Info
Place to archive and snapshot the incredible command or pipe command with Linux OS platform such as Debian, Ubuntu, CentOS, …
In-house Commands
echo command
Decode string with specify unicode-escaped with -e flag, read more at: StackOverFlow - How to convert \uXXXX unicode to UTF-8 using console tools in *nix
Note
You can use
uni2asciifor instead if you want to integrate with 3rd party
echo -e "unicode-string"journalctl command
Documentation: How To Use Journalctl to View and Manipulate Systemd Logs
Capture and logged full events of service
journalctl -u service-name.serviceTo see only log messages for the current boot
journalctl -u service-name.service -bFind your boots in list
journalctl --list-bootsSee the error log with command
journalctl -p err -b Info
You can exchange -p option with pram
- 0: emerg
- 1: alert
- 2: crit
- 3: err
- 4: warning
- 5: notice
- 6: info
- 7: debug
grep command
Use grep with exclude by -v flag
grep -v "dotnet" .To grep include multiple word
Info
Use
-iflag to execute that. Especially add with\|symbol between two words. Read more at: How to Grep for Multiple Strings, Patterns or Words, extending with multiple situations (HELPFUL)
grep -i "Hostname\|Port"awk command
Skip first line Usually header when you use awk to print column variables
awk 'NR>1 {print $3}'Get the last param when seperate by / or any symbol, you can use F and $NF to get the result
awk -F/ '{print $NF}'tree command
Print the sub-directory of folder with configuration level
tree -d -L 2 .Print the sub file and folder with filter not include smt with -I option. Explore at StackOverFlow - tree command for multiple includes and excludes
# With only
tree -a -L 1 -I .git

# With multiple
tree -a -L 1 -I '.git|.terraform.lock.hcl'
Print tree with combine full path, include and exclude pattern
tree -f -I "bin|unitTest" -P "*.[ch]|*.[ch]pp." your_dir/find command
Find the folder with find base on the regex format
find . -maxdepth 1 -type d -regex '.*/azp/_work/\d+$'Find directory in current location but expose that in format ls
find . -type d -lsFind the file or directory to provide you last in path of file and directory
find . -maxdepth 2 -type d | awk -F/ '{print $NF}'iptables command
Learn more about iptables commands from links down below
- Github - iptables cheatsheet
- Prompt generate Iptables
- Hacktricks - Suricata & Iptables cheatsheet
- How to list all iptables rules with line numbers on Linux
- How can I remove specific rules from iptables?
Allow only traffic from external IP to host via port
sudo iptables -A INPUT -s <source> -p <tcp/udp> --dport <destination-port> -j ACCEPTBlock all traffic to specify port in host
sudo iptables -A INPUT -p <tcp/udp> --dport <destination-port> -j DROPList all rule and table rule
# List all rules
sudo iptables -S

# list all tables rules
sudo iptables -L -v -n | more

# list all rules for INPUT tables
sudo iptables -L INPUT -v -n
Delete rule in iptables
# Basic command to delete
sudo iptables -F

# To specify you want
# Find your rule base on number
iptables -L INPUT --line-numbers
# Remove that base on number of line
iptables -D INPUT <specific-line-number>

# IYKYN, use `-D` flag for same command `-A` to remove that rule
tr command
Use tr to delete with -d flag
tr -d "HostName:Port" # If find 2 word, seperate with space
tr -d "HostNamePort" # If find 2 word, no space add-on
Use tr to change space to colon, ⇒ :
tr -s "[:blank:]" ":"ssh command
Use tunneling mode of ssh to reverse shell from remote to your local host
Info
Command below to port-forward from port
127.0.0.1:8080from remote host and send the traffic to port:8080inside your host
ssh -N -L 8080:127.0.0.1:8080 -i /path/to/your/private_key <user>@<remote-host> -p <port-ssh> # Default ssh via port 22, use -p if you need to specificjq command
List of articles relate jq with helpful solution
You can use jq to select multiple variable
cat app.json | jq -r '.expo | .name, .version' You can use jq to select multiple variable and concat that to one string
cat app.json | jq -r '(.expo.name + "." + .expo.version)'You can use jq with variable to pass through from command or define to your jq
curl -H "PRIVATE-TOKEN: $PRIVATE_GLAB_TOKEN" "https://gitlab.com/api/v4/users/$GLAB_USER_ID/contributed_projects" | jq --arg REPO_CHECKED_NAME "$REPO_CHECKED_NAME" '.[] | select(.name == $REPO_CHECKED_NAME) | .id'jq support for another arg like json, you can try to concat object this one with your existence object. Explore more at Add an object to existing JSON using jq and Append JSON Objects using jq
cat ~/config-bk.json | jq -r --argjson addon "$(cat ~/.docker/config.json | jq -r ".auths")" '.auths+=$addon'Convert json to string for multiple purpose
cat file.json | jq -c | jq -RGet first keys in list object with jq
cat config-bk.json | jq 'keys[]'Select the keys if value of a field is “auto”. Explore at Select the keys if value of a field is “auto”
# Get the object with value = auto
jq 'map_values(select(.value == "auto"))' file
# Get key with same situation
jq -r 'map_values(select(.value == "auto"))|keys[]' file
du command
You can use du command for list all size inside your directory
# List folder only
du -csh xeusnguyen.xyz

# List file inside
du -csh xeusnguyen.xyz/*
lsblk command
If you want to take the look with your storage device like HDD or SSD, you can use lsblk to see what format of those devices
# View information about your disk
lsblk -o NAME,HCTL,SIZE,MOUNTPOINT

# View output info about filesystems
lsblk -f| File System | Supported File Size | Compatibility | Ideal Usage |
| FAT32 | up to 4 GB | Windows, Mac, Linux | For maximum compatibility |
| NTFS | 16 EiB – 1 KB | Windows, Mac (read-only), most Linux distributions | For internal drives and Windows system file |
| Ext4 | 16 GiB – 16 TiB | Windows, Mac, Linux (requires extra drivers to access) | For files larger than 4 GB |
mkfs command
You can use mkfs command to formatting your device. Read more at How to Use the mkfs Command on Linux
mkfs [options] [-t type fs-options] device [size]fdisk command
Documentation: What is FDISK and how does it work?
Use fdisk when you want to hangout with your hard dkkkkkkkkkkkkkisk drive, like integrate multiple way for formatting or partitioning a hard disk drive, or to delete different portions of it. FDISK is an external utility. It is most commonly used to prepare and partition a hard drive
# to view details of available disk partitions.
sudo fdisk -l
# to view the partitions on a specific disk.
sudo fdisk -l /dev/sda
# to create a hard disk partition.
sudo fdisk /dev/sda
# to view the partition size.
sudo fdisk -s /dev/sda
And when you want to hit to interaction mode you can try with
sudo fdisk /dev/sdaAnd when you hit keyboard with m, you can see the helper
Command (m for help): m

Help:

  GPT
   M   enter protective/hybrid MBR

  Generic
   d   delete a partition
   F   list free unpartitioned space
   l   list known partition types
   n   add a new partition
   p   print the partition table
   t   change a partition type
   v   verify the partition table
   i   print information about a partition

  Misc
   m   print this menu
   x   extra functionality (experts only)

  Script
   I   load disk layout from sfdisk script file
   O   dump disk layout to sfdisk script file

  Save & Exit
   w   write table to disk and exit
   q   quit without saving changes

  Create a new label
   g   create a new empty GPT partition table
   G   create a new empty SGI (IRIX) partition table
   o   create a new empty DOS partition table
   s   create a new empty Sun partition table
scp command
Documentation: SCP Command in Linux {13 Examples}
scp is protocol which permit use copy and transfer file from remote and local machine with bi-direction, or cp from remote to remote
# From local to remote
scp /path/file/local user@ip:/path/file/remote

# From remote to local
scp user@ip:/path/file/remote /path/file/local

# From remote to remote
scp user1@ip1:/path/file/remote1 user2@ip2:/path/file/remote2

# From remote to remote (but your machine is mediate)
scp -3 user1@ip1:/path/file/remote1 user2@ip2:/path/file/remote2
In some special case, you can integrate with option with your scp command to specific
Different Port: Usually scp use SSH (Port 22) to mediate help you secure transfer data through that port, but in other situation SSH not work in Port 22, you can use -p to specific
scp -p 2222 /path/file/local user@ip:/path/file/remoteRecursive: To copy whole folder, usually we use recursive mode and scp does have with -r
scp -r /path/folder/ user@ip:/path/file/remotesed command
Documentation: Sed cheatsheet and How to Use Sed to Find and Replace a String in a File
To replace a string in file with sed, you can use command with format
#Replace in file (Global)
sed -i 's/OLD/NEW/g' path/file #Replace string inside a file
To replace in the string, you can control action with
echo "[MASKED]" | sed -e "s/\[MASKED\]/123456789/g"Cheatsheet
Re run the previous command
You can use previous command with !! on your shell, for example
# First if you use clear screen
clear

# You can call clear screen again with !!
!!
Also you can reuse the previous command arguments, for example
$ commad <args>
$ 2nd command !$
Use environment variables from .env file
Info
Read more about topic in
Stackoverflow: Set environment variables from file of key/value pairs
Use export with except # line in .env file
export $(grep -v '^#' .env | xargs)When you want to work with script, you can use -o allexport
# Multiple line
set -o allexport
source dot/env/file
set +o allexport

# One line
set -o allexport && source dot/env/file && set +o allexport
Update Ubuntu new version
You can use integration tool inside ubuntu to update new version, that will pull and update packages inside host, do that easily with command
# Check the linux version
lsb_release -a

# Use command to update new version ubuntu
do-release-upgrade
Warning
In this situation you update
ubuntu, it will update your kernel so please remember make a big-changes can gain different harden to control, so do know before you doing
Follow some methodology to upgrade new version of kernel, such as
- How to Update Linux Kernel In Ubuntu
- Cập nhật Linux Kernel trên Ubuntu 20.04 (Vietnamese)
- How to Update/Upgrade Linux Kernel in Ubuntu
- Ubuntu Linux Upgrade Linux Kernel Command
Depend on those articles, you can update kernel of Ubuntu via
- Update OS version (e.g. 20.04 ⇒ 22.04)
- Update package of OS dependencies
- Manually Update
When you choose manually update, you can use some following tools
- Mainline
- ubuntu-mainline-kernel.sh
- Directly download use
curlorwgetand installing from pkgs.org
If you see this one from via kubewekend series, I prefer to use update Ubuntu version or use secondly optional via apt like
# check your kernel version, via uname
uname -r

# find the supportive from apt repositories, via apt search
sudo apt search linux-image

# figure out the compatible version, if you come from kubewekend you can use version 5.15.0-116-generic, so we install via
sudo apt install linux-virtual-hwe-20.04 -y

# Reboot to receive the new update
sudo reboot # OR use sudo shutdown -r now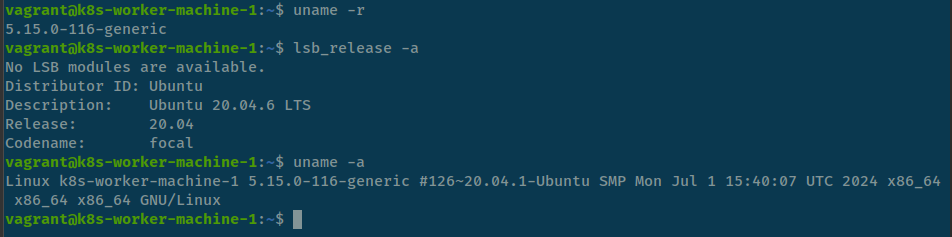
Update alternative version
Quote
When you have multiple version of tools, package or moreover, like
pythonjava jdkshell, you need to switch between of them that why you need the topic
For change and update the configuration between different of tools, debian core offer us the command call update-alternatives. Let digest to its
You can find the manual of the command with --help flag
$ update-alternatives --help
Usage: update-alternatives [<option> ...] <command>

Commands:
  --install <link> <name> <path> <priority>
    [--slave <link> <name> <path>] ...
                           add a group of alternatives to the system.
  --remove <name> <path>   remove <path> from the <name> group alternative.
  --remove-all <name>      remove <name> group from the alternatives system.
  --auto <name>            switch the master link <name> to automatic mode.
  --display <name>         display information about the <name> group.
  --query <name>           machine parseable version of --display <name>.
  --list <name>            display all targets of the <name> group.
  --get-selections         list master alternative names and their status.
  --set-selections         read alternative status from standard input.
  --config <name>          show alternatives for the <name> group and ask the
                           user to select which one to use.
  --set <name> <path>      set <path> as alternative for <name>.
  --all                    call --config on all alternatives.

<link> is the symlink pointing to /etc/alternatives/<name>.
  (e.g. /usr/bin/pager)
<name> is the master name for this link group.
  (e.g. pager)
<path> is the location of one of the alternative target files.
  (e.g. /usr/bin/less)
<priority> is an integer; options with higher numbers have higher priority in
  automatic mode.

Options:
  --altdir <directory>     change the alternatives directory
                             (default is /etc/alternatives).
  --admindir <directory>   change the administrative directory
                             (default is /var/lib/dpkg/alternatives).
  --instdir <directory>    change the installation directory.
  --root <directory>       change the filesystem root directory.
  --log <file>             change the log file.
  --force                  allow replacing files with alternative links.
  --skip-auto              skip prompt for alternatives correctly configured
                           in automatic mode (relevant for --config only)
  --quiet                  quiet operation, minimal output.
  --verbose                verbose operation, more output.
  --debug                  debug output, way more output.
  --help                   show this help message.
  --version                show the version.
When you want to take a look how the version we have, such as java you can call with --list flag and name, example
$ update-alternatives --list java
/usr/lib/jvm/java-11-openjdk-amd64/bin/java
/usr/lib/jvm/java-18-openjdk-amd64/bin/java
And when you have decision, on my situation java on my machine on 11 but I want to switch to 18, you can perform this command
# Check version java
$ java --version
openjdk 11.0.22 2024-01-16
OpenJDK Runtime Environment (build 11.0.22+7-post-Ubuntu-0ubuntu222.04.1)
OpenJDK 64-Bit Server VM (build 11.0.22+7-post-Ubuntu-0ubuntu222.04.1, mixed mode, sharing)

# Change version to 18
$ sudo update-alternatives --config java
There are 2 choices for the alternative java (providing /usr/bin/java).

  Selection    Path                                         Priority   Status
------------------------------------------------------------
  0            /usr/lib/jvm/java-18-openjdk-amd64/bin/java   1811      auto mode
* 1            /usr/lib/jvm/java-11-openjdk-amd64/bin/java   1111      manual mode
  2            /usr/lib/jvm/java-18-openjdk-amd64/bin/java   1811      manual mode

Press <enter> to keep the current choice[*], or type selection number: 0
update-alternatives: using /usr/lib/jvm/java-18-openjdk-amd64/bin/java to provide /usr/bin/java (java) in auto mode

# Check the version java again
$ java --version
openjdk 18.0.2-ea 2022-07-19
OpenJDK Runtime Environment (build 18.0.2-ea+9-Ubuntu-222.04)
OpenJDK 64-Bit Server VM (build 18.0.2-ea+9-Ubuntu-222.04, mixed mode, sharing)
Relate documentation
- Switch between multiple java versions
- What exactly does
update-alternativesdo? - The update-alternatives Command in Linux
Comment note in Shell Bash
Info
2 ways for writing the comment to shell bash.
Example and troubleshooting via Link to details
Using the # character for comment
Info
In Bash, a comment starts with the hash symbol (#). Anything after # on that line is considered a comment and is ignored by the Bash interpreter
# This is a comment in Bash

# Output:
# (No output, as comments are not executed)
Using the doctype Here Document for comment multiple line
Info
Bash doesn’t have a specific syntax for multi-line comments like some other languages, but you can use a trick with the : command and a ‘here document’ to achieve the same effect.
: << 'END_COMMENT'
This is a
multi-line comment
in Bash
END_COMMENT

# Output:
# (No output, as comments are not executed)
Reconfiguration for curl template output
Note
Reference: Timing Page Responses With Curl
Templates format to output via curl command
time_namelookup:  %{time_namelookup}s\n
time_connect:  %{time_connect}s\n
time_appconnect:  %{time_appconnect}s\n
time_pretransfer:  %{time_pretransfer}s\n
time_redirect:  %{time_redirect}s\n
time_starttransfer:  %{time_starttransfer}s\n
				 ----------\n
	  time_total:  %{time_total}s\n
To reference the documentation for the time based variables is as follows.
- time_appconnect - The time, in seconds, it took from the start until the SSL/SSH/etc connect/handshake to the remote host was completed.
- time_connect - The time, in seconds, it took from the start until the TCP connect to the remote host (or proxy) was completed.
- time_namelookup - The time, in seconds, it took from the start until the name resolving was completed.
- time_pretransfer - The time, in seconds, it took from the start until the file transfer was just about to begin. This includes all pre-transfer commands and negotiations that are specific to the particular protocol(s) involved.
- time_redirect - The time, in seconds, it took for all redirection steps including name lookup, connect, pretransfer and transfer before the final transaction was started. time_redirect shows the complete execution time for multiple redirections.
- time_starttransfer - The time, in seconds, it took from the start until the first byte was just about to be transferred. This includes time_pretransfer and also the time the server needed to calculate the result.
- time_total - The total time, in seconds, that the full operation lasted.
How to use
Find the PATH which including the curl-formatter.txt file with cd or pwd, Use this with curl command
curl -w "@<file-formatter-above>" -o /dev/null -sL <url>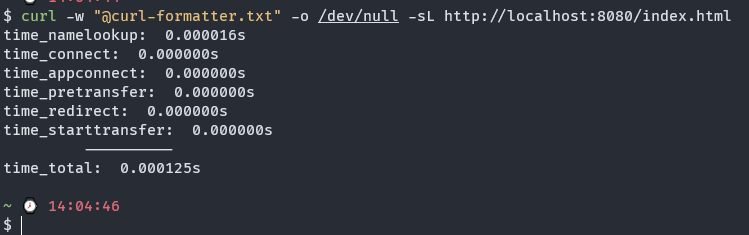
Redirect Output and Error
Note
Reference ▶️ ▶️ ▶️ How to Redirect Output and Error to /dev/null in Linux
Some thing about the output of linux
- In the linux machine,
/dev/nullthat will location where you can return null for your shell likecommand 2>&1 /dev/null - There will have 3 three type of output which linux has
- Standard input (stdin) is designated with 0
- Standard output (stdout) is designated with 1
- Standard error (stderr) is designated with 2
Redirect output to /dev/null in Linux
For example: You run apt install curl but you want your shell not return anything you can redirect output into /dev/null. It will be like
sudo apt install curl 1>/dev/null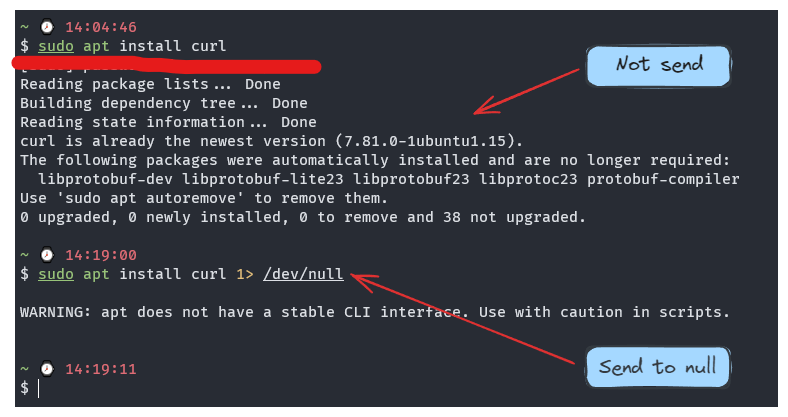
Usage: Used it when you don’t want stdout go to your shell, just removing the odd things and keep the important output
Redirect error to /dev/null in Linux
For example: You run find / but you run with non root, so somecase you will have some permission error output to your shell. You can use /dev/null for removing this messing stuff
find / 2> /dev/null
Combine stdout and stderror into one with this character &
1. Long version
find / 2> /dev/null 1>/dev/null

2. Short version
find / 2>&1 /dev/null (Send error to output and send them to /dev/null)

3. Some other case
find / > /dev/null 2>&1
Sometime you can use version
2of combiningThe
2>&1part means “redirect the error stream into the output stream”, so when you redirect the output stream, error stream gets redirected as well. Even if your program writes tostderrnow, that output would be discarded as well. (Sergey Kalinichenko)
Find this problem ▶️ ▶️ What is /dev/null 2>&1?
User Management in Linux
Info
With User and Group configuration in Linux become potential to managing, and enhance your security, user connection and moreover. Following some situation to keep some command that be useful for us when manipulate this stuff inside Linux
Some articles can be good for us when practicing with those stuff around
- Ubuntu Doc - User management
- User Management in Linux
- How to Manage Users in Linux
- Introduction to usermod command
Change Password
If you want to change password of current user, you can use command
# For Current User
passwd

# For Root User
sudo passwd

# For another user
passwd <username>
Add and Delete user
In this situation, you have multiple command to handle it, such as adduser, useradd, deluser and userdel. With the graduation introduce by Ubuntu Doc, I will choose adduser and deluser to handle this case
# Add user with no need handle much
sudo adduser username

# Del user with no need erase through multiple steps
sudo deluser username
Add and Delete user out of group
There is many way to handle this work, but I prefer to use it with usermod command
# Add user to group
sudo usermod -aG group username

# Remove user out group
sudo usermod -rG group username
Helpful usermod command
Change your user with new name, but you need do it on another user with kill that shell, because if you access to your old account, I will be attached by process
sudo usermod -l old_name new_nameChange the shell of user, you can switch to user to use chsh but this can be done remotely
sudo usermod --shell /path/to/shell usernameMove the content of user’s home directory using usermod command
sudo usermod -d new_dir_path -m user_nameExternal Commands
Caddy server
Use the documentation to get valid command to handling Caddy Server
To reload configuration use reload command. Doc: caddy reload
caddy reload --config /location/caddy/fileTo check and validate configuration from caddyfile use validate command. Doc: caddy validate
caddy validate --config /location/caddy/fileNote
With
Caddy V2, mostlywebsocketautomatically serve and do not need to configuration likev1. Check about that in Caddy Proxy
Vagrant
If you have problems when vagrant can’t authentication for ssh. You will need concern to add this setting. Read more at: Vagrant ssh authentication failure
config.ssh.forward_agent = trueSwap mode in Ubuntu
You can swap mode in Ubuntu from desktop mode to server mode, by use key combining
- Ctrl + Alt + F1 : To use desktop mode
- Ctrl + Alt + F3: To use shell or server mode
Pip command of Python3
With Python3 from version 3.12, there isn’t gonna easy for us to install package, so if you want to force install with python3-pip, you can add the optional --break-system-packages after the pip command
pip3 install numpy --break-system-packagesWith read from file, we can do same way
pip3 install -r requirements.txt --break-system-packages