Quote
Hi @all, How are you going, great huh 👐. Graceful and especially to announcing about
kubewekend- new series of mine, which one to give me and you opportunities to learn about new technologies, the way to bring you nearkubernetesand more a lot of things pick a up arounddevops,networking,devsecops,pipelinesand moreover. And today, the first session, let dive deeper into way for setup the VM on your host, I mean how can we automate provisioning to create your machine withvagrant, that is factor to doing a lot of stuff when you want to operate something in your host, especiallykubernetes. Not wait to long, let’s digest 😄
List of topics in series
What is vagrant ? Why I use it ?
Like usual, before start a lab, we will figure out what things we do interact, and how we can handle and understand about useful that tools can bring up for us. And vagrant is special target, much powerful and easily to hang out when you want to work in vm with virtualbox, hyper-v and vmware

If this is first time you hear about vagrant, then vagrant is
Introduce Vagrant
Info
Vagrant is a tool for building complete development environments. With an easy-to-use workflow and focus on automation, Vagrant lowers development environment setup time, increases development/production parity, and makes the “it works on my machine” excuse a relic of the past.
Vagrant is one in tools of Hashicorp, which community provide us about powerful solution in Managing Infrastructure by code, such as
- Terraform
- Nomad
- Packer
- Consul
- And yeah, Vagrant
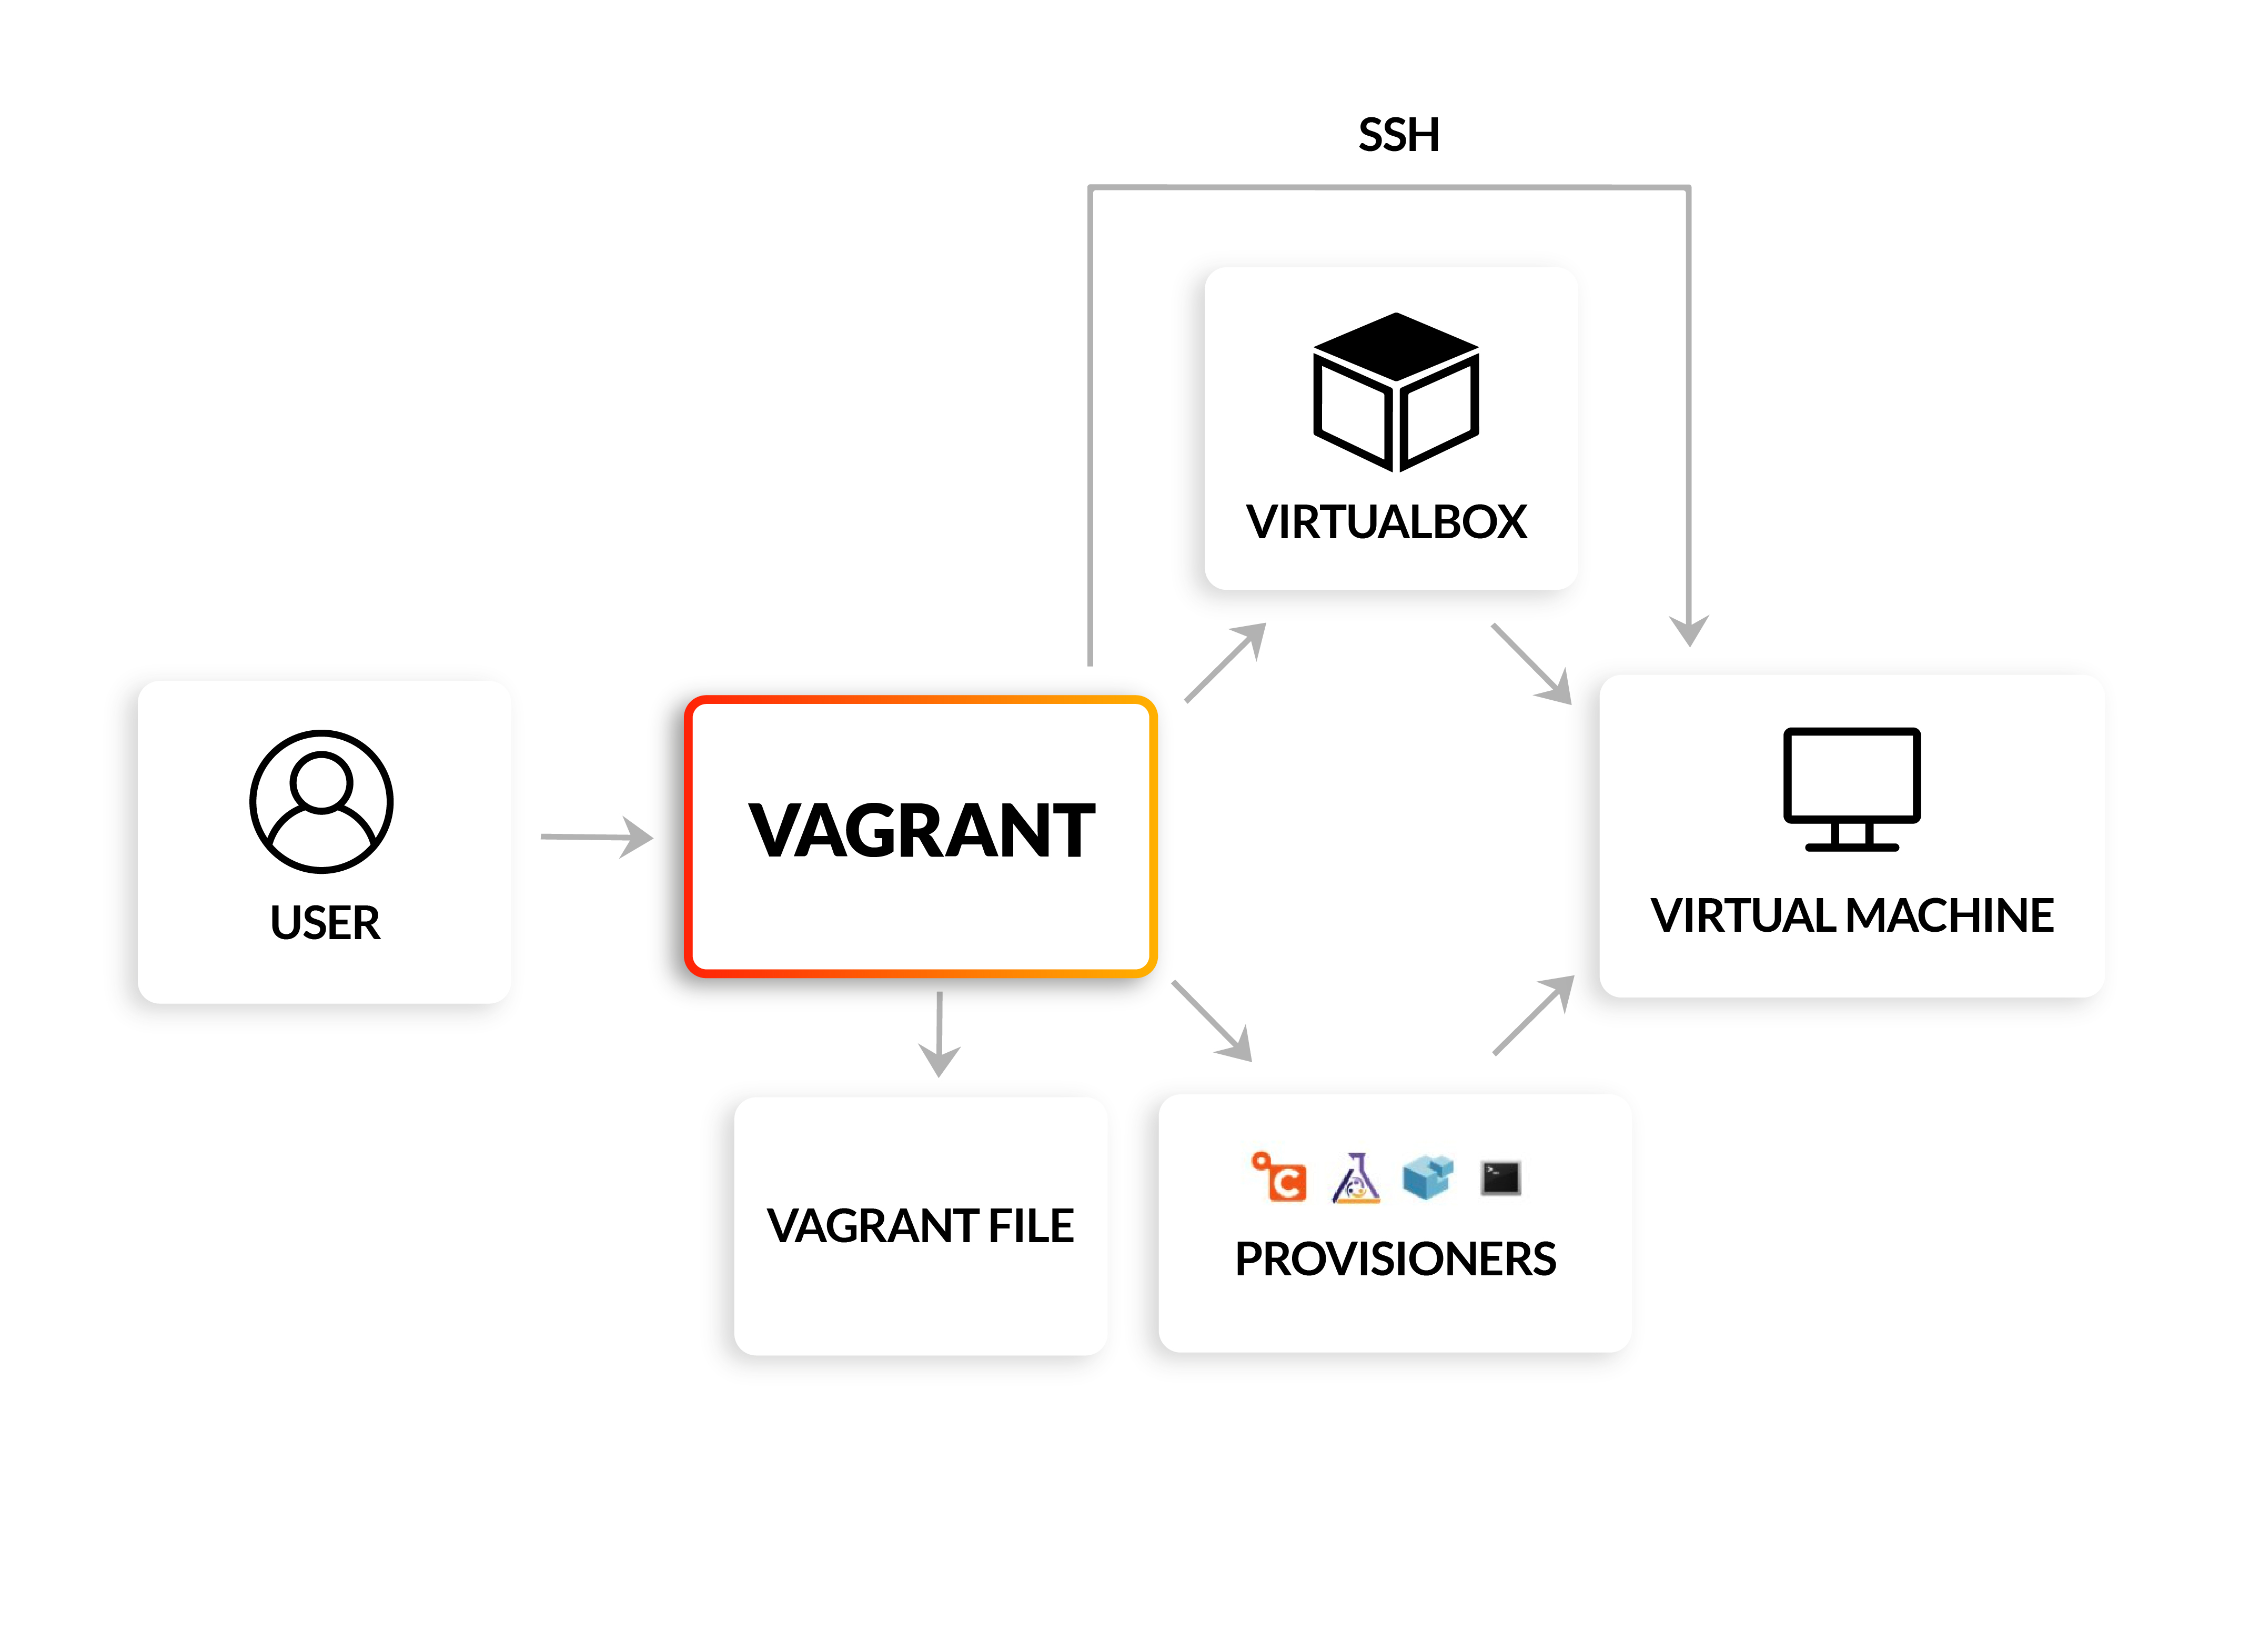
Back to Vagrant, this tool can help you handle the work when you want to build virtual machine environments in a single workflow, you will except mistake when you setup hand by hand for virtual machine and cut off effort to setup your projects, help maximize the productivity and flexibility of you and your team.
Fact
To achieve its magic, Vagrant stands on the shoulders of giants. Machines are provisioned on top of VirtualBox, VMware, AWS, or any other provider. Then, industry-standard provisioning tools such as shell scripts, Chef, or Puppet can automatically install and configure software on the virtual machine.
Vagrant is designed to use for multiple purpose and personal reason
- For Developer,
Vagrantwill isolate dependencies and their configuration within a single disposable, consistent environment, without sacrificing any of the tools you are used to working with (editors, browsers, debuggers, etc.) - For Operators,
Vagrantgives you a disposable environment and consistent workflow for developing and testing infrastructure management scripts. - For Designers,
Vargantwill automatically set everything up that is required for that web app in order for you to focus on doing what you do best: design.
Note
Vagrant is designed for everyone as the easiest and fastest way to create a virtualized environment! 🤭
Read more about Vagrant versus with others software, at : Vagrant vs. Other Software
Vagrant Fundamentals

The special of Vagrant comes up with multiple features, and active community to help you doing great things, let me tell you
- Boxes - The package format for Vagrant environments, that will factor like light weight image which package and provide to reuse that for bring up virtual environment
- Vagrantfile - Describe your virtual machine’s configuration and how to provision it
- Provisioning - Workflow help you automatically install software, alter configuration, and do lot of things with machine
- Vagrant Cloud - Huge providers to give you boxes which can interact with
vagrant - And a lot of things, CLI Synced Folders Networking
Explore more about Vagrant and features at Documentations
Installation
Vagrant is CLI, as binary and work for multiple platforms from Mac, Win and Linux. You can install from install page and follow instruction to installing
So simple if you work with Linux, especially Ubuntu or Debian, you can follow my guide to install Vagrant
# Install require tools for installation
sudo apt update
sudo apt install -y wget curl git unzip build-essential libfuse2

# Get the binary from installation page
wget -q https://releases.hashicorp.com/vagrant/2.4.1/vagrant_2.4.1_linux_amd64.zip

# Unzip the compress
unzip -q vagrant_2.4.1_linux_amd64.zip

# mv to execution profile
sudo mv vagrant /usr/local/bin
Done after move to directories, you can check vagrant on your shell
~ ⌚ 16:18:47
$ vagrant --version
Vagrant 2.4.1
Vagrant workflow
Base on my experience, when work with vagrant, you will make sure some stuff already exist and make sure your step can occur smooth and no problems
- Prepare environment variables if need
- Validate
Vagrantfileconfiguration withvalidatecommand - Check providers actually install and work on your machine
- Use
upcommand when you validate all above, and others will handle viaVagrant - After provisioning progress, Use
sshcommand to connect machine
Conclusion

Quote
Hope you find well information about
vagrant, figure out the technology which you work with. Don’t worry to ton of information because on the next part, when you do the lab, I think you will actually lovevagrant, for sure 100% 😄
Do magical with Vagrant

Introduce Lab
Todo
On session 1, we will use
vagrantto provisioning the machine inVirtualBox, and preparedockerenvironment inside to next session, you will deploykubernetescluster withdockerinside that machine
Source Lab: Use Vargrant to configuration the VM with provider
That is my source code about kubewekend series, you can follow and take new update from progress of series, what lab does we have in table of contents
Before you can do the lab, make sure you do
- Install virtualbox
- Install vagrant
With Virtualbox, if you meet the problem to install or unable to start virtualbox service, you can reach out to virtualbox troubleshoot which can help use to resolve problem (NOTICE: Ubuntu 24.04 can be meet)
If you check all work, VBoxManage and Vagrant like this
~ ⌚ 16:20:05
$ VBoxManage --version
7.0.18r162988

~ ⌚ 16:44:49
$ vagrant --version
Vagrant 2.4.1
You is already to do provisioning VM with Vagrantfile, but before review file, you can perform box add command to cut off the time to waiting download box from Vagrant Cloud. To be stable and not increase the trouble, we will use Ubuntu 20.04 - focal64
vagrant box add https://app.vagrantup.com/ubuntu/boxes/focal64It will start download box and you can check result on the last of progress, with box list command
vagrant box list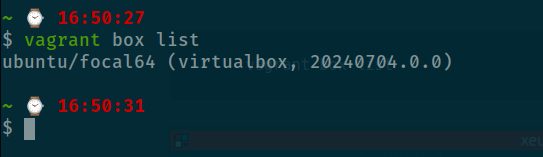
Vagrantfile
Now, we overview Vagrantfile, I try to setup multiple case for you meet when work with vagrant, such as
- Iteration loop (Use for in
ruby) - Set up
priorityfor your step in provisioning machine - Overwrite
sshdefault port to customize of your - Disable password and use
private_keyto authentication - Use
envinVagrantfilewith.envfile - Write
provisionwithshellblock to installingdocker - Configuration
triggerwhen you doupandprovisionwith machine - Use regex to handle
provisionmultiple machine
Vagrant.configure("2") do |config|
  # # Handle multiple machine in one block of Vagrantfile
  # # https://developer.hashicorp.com/vagrant/docs/multi-machine
  config.vm.define "k8s-master-machine", primary: true do |config|
    config.vm.box = "ubuntu/focal64"
    config.vm.hostname = "k8s-master-machine"
    config.vm.communicator = "ssh"
    # Default enable 2222 for ssh communication (Add id: "ssh" to disable default)
    # https://realguess.net/2015/10/06/overriding-the-default-forwarded-ssh-port-in-vagrant/
    config.vm.network "forwarded_port", guest: 22, host: 6996, protocol: "tcp", id: "ssh", host_ip: "127.0.0.1"
    config.vm.box_check_update = false
    config.ssh.username = ENV["SSH_USER"]
    config.ssh.private_key_path = ENV["SSH_PRIV_KEY_PATH"]
    config.ssh.port = 6996
    config.ssh.guest_port = 22

    # # Disable to generate a key pair inside .vargrant directory, use insecure_private_keys
    # # instead of using private_key
    # config.ssh.insert_key = false

    config.ssh.forward_agent = true

    config.vm.provider "virtualbox" do |config|
      config.name = "k8s-master-machine"
      config.memory = 2048
      config.cpus = 2
    end
  end

  # Use to loo[] over VM defination
  # Documentation: https://developer.hashicorp.com/vagrant/docs/vagrantfile/tips#loop-over-vm-definitions
  # Use can use `up` with regex to numberic the machines what you want to provisioning
  # Example: vagrant up "/k8s-worker-machine-[1-2]/" --provider=virtualbox
  (1..3).each do |i|
    config.vm.define "k8s-worker-machine-#{i}" do |config|
      config.vm.box = "ubuntu/focal64"
      config.vm.hostname = "k8s-worker-machine-#{i}"
      config.vm.communicator = "ssh"
      # Default enable 2222 for ssh communication (Add id: "ssh" to disable default)
      # https://realguess.net/2015/10/06/overriding-the-default-forwarded-ssh-port-in-vagrant/
      # For prevent collisions, use `auto_correct` and `unsable_port_parameter` to guide the port to new one
      config.vm.network "forwarded_port", guest: 22, host: 9669, protocol: "tcp", id: "ssh", host_ip: "127.0.0.1", auto_correct: true
      config.vm.usable_port_range = 9669..9671
      config.vm.box_check_update = false
      config.ssh.username = ENV["SSH_USER"]
      config.ssh.private_key_path = ENV["SSH_PRIV_KEY_PATH"]
      config.ssh.guest_port = 22

      # # Disable to generate a key pair inside .vargrant directory, use insecure_private_keys
      # # instead of using private_key
      # config.ssh.insert_key = false

      config.ssh.forward_agent = true

      config.vm.provider "virtualbox" do |config|
        config.name = "k8s-worker-machine-#{i}"
        config.memory = 1024
        config.cpus = 1
      end
    end
  end

  # Initialize the shell command to configuration
  $configScript = <<-'SHELL'
  sudo -i
  sudo apt update && sudo apt install curl git -y
  sudo apt install docker.io docker-compose -y
  sudo usermod -aG docker vagrant
  SHELL

  # Reload profile of current user on machine
  $reloadProfile = <<-'SHELL'
  sudo -i
  shutdown -r now
  SHELL

  # Execution the shell script provide
  config.vm.provision "shell", inline: $configScript

  # Configuration auto trigger reload profile in machine after shell
  config.trigger.after :up, :provision do |trigger|
    trigger.info = "Running a after trigger!"
    trigger.run_remote = { inline: $reloadProfile }
    trigger.ignore = [:destroy, :halt]
  end
end
So Vagrant is use ruby major language to write this file, so syntax will like a ruby a lot. Inside this Vagrantfile, I will do three task when you use up command
- Tell
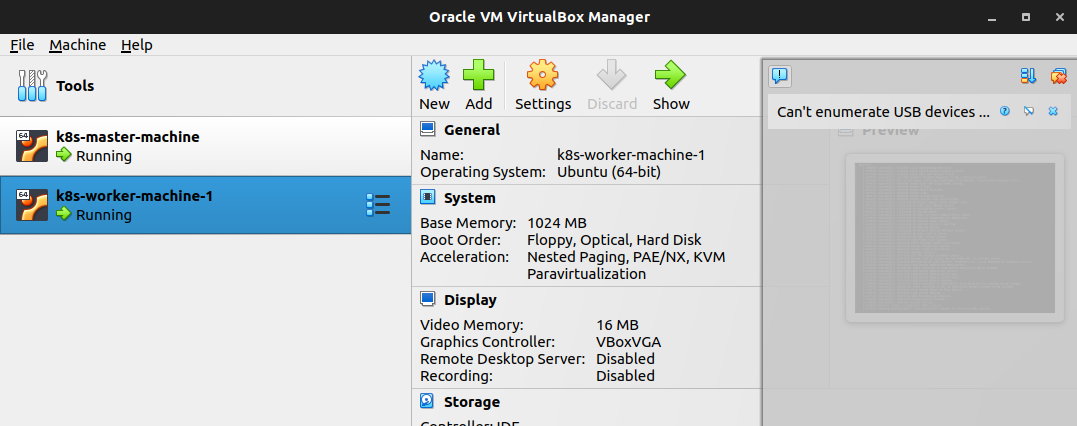
Virtualbox, build and define the machine base on name we will pass into, e.g:k8s-master-machine,k8s-worker-machine-1. Especially, I define dynamic worker machine to help you learn about high availability (HA) on this series, so you can useregexwhich I refer on description aboutdescriptionto parallel build multiple machines, e.g use"/k8s-worker-machine-[1-2]/"to up machine 1 and 2 - When you trigger
upyou can performsshand do provision shell script to install docker engine inside that machine. You can update script what ever you want and re-trigger withprovisioncommand - Lastly, when you use
upandprovisioncommand, your machine will restart base on trigger event which I setup on the last, to apply and use new profile whichrebootoptions
You can learn more about Vagrantfile at Vagrantfile that will include multiple topics and configuration about vm ssh winrm winssh vagrant
After you make sure learn and feel pleasure with your Vagrantfile. You can save that do next step
Make a magic
When you choose the Vagrantfile of mine, you can do step by step to get the goal
-
First, locate to the root of project
-
Secondly, you need to make sure set environment variables for your shell before execute Vagrant, you can do manually or use
.env# Manually export SSH_USER="vargrant-user" export SSH_PRIV_KEY_PATH="~/.ssh/vmbox" # Use .env file cp -r .env.examples .env set -o allexport && source .env && set +o allexport -
Third, use
upcommand with provider=virtualbox# Use can use another provider: https://developer.hashicorp.com/vagrant/docs/providers # Provision 1 master and 1 worker vagrant up k8s-master-machine k8s-worker-machine-1 --provider=virtualbox # You can provision more worker with regex pattern vagrant up "/k8s-worker-machine-[2-3]/" --provider=virtualbox
Result when you provisioning successfully
Vagrant note
Note
In this part, I will brief the popular command, that use for control and handle task with
vagrant
Destroy
When you want to destroy, use destroy command with option to destroy vm
# Shutdown and destroy VM for all machines
vagrant destroy --graceful --force

# Specify the target with name
# (Use can regex to manipulate multiple machines)
vagrant destroy k8s-worker-machine-1 --graceful --force
Provision
When you want to execute a shell script, you can use provision command
# Execute a shell script for all machines
vagrant provision

# Execute a shell script for specific machines
# (Use can regex to manipulate multiple machines)
vagrant provision k8s-worker-machine-1
Halt
When you want to turn off the machine provisioning, use halt command
# Turn off all machines provision
vagrant halt

# Turn off the specific machine provision
# (Use can regex to manipulate multiple machines)
vagrant halt k8s-worker-machine-1
Reload
When you want to reload the machine provisioning when update Vargrantfile, use reload command. (NOTE: Use can use that to turn up your machine, but it will regenerate private key, make sure you understand that)
# Reload all machines provision
vagrant reload

# Reload the specific machine provision
# (Use can regex to manipulate multiple machines)
vagrant reload k8s-worker-machine-1
Box
When you want to add a new box to the machine, or cut off time for downloads machine. Use can use box command
# Check actually box we have in host
vagrant box list

# Install box to host
vagrant box add https://location/of/vagrant/box # (Can be local, Vagrant Registry or private storage)

# Example: vagrant box add https://app.vagrantup.com/ubuntu/boxes/focal64
SSH
When you want to connect to the machine, you have two ways to connect
- Via
vargrant,sshcommand
# Connect to machine with specified machine name
vagrant ssh k8s-worker-machine-1

# When you want to pass command via ssh
vagrant ssh k8s-worker-machine-1 --command "echo "Hello World" > foo.txt"
That situation will use private_key base on your ssh-config when you define and generate machine, you will not need concert about your key is outdate or whatever, just simple put the responsibility for vagrant to take care connection
# You can check with `vagrant ssh-config` to understand your `ssh` work on port
vagrant ssh-config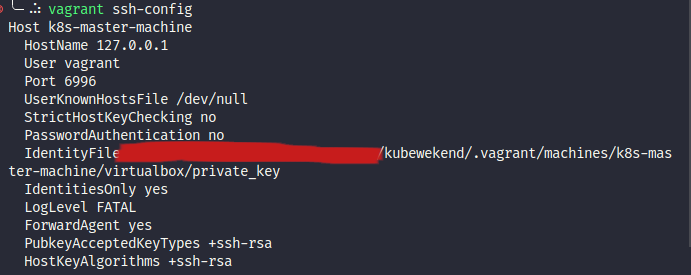
And you access ssh succeed with vagrant ssh command
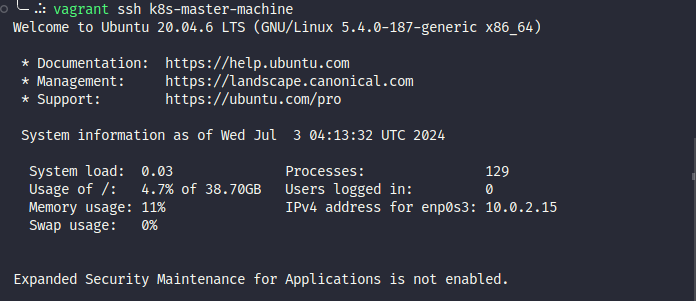
- Via actions with manually configured
ssh-key
# With this action you need to location where .vagrant in your project, usually in root directory
ls .vagrant/

# After that you need run `ssh-agent` to create new session for agent ssh
eval $(ssh-agent -s) # Set the new session agent

# Add the key to your host, and make a authentication
ssh-add ./vagrant/machines/k8s-master-machine/private_key

# And lastone make a connection to machine on custom port
# Befor that you can check again with `vagrant ssh-config` to understand your `ssh` work on port
vagrant ssh-config

# Make a ssh connection
ssh vagrant@127.0.0.1 -p 6996
Status
You can use status command to check your state of machine
vagrant status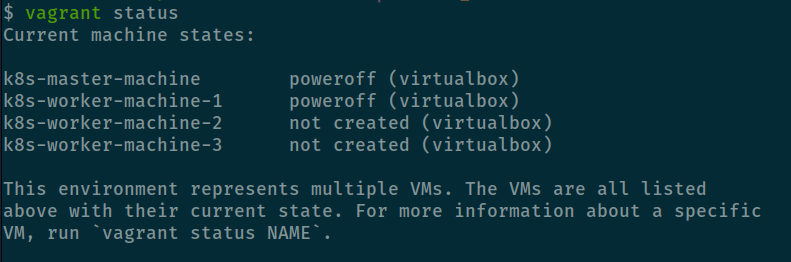
Conclusion
Success
Yeah that all for today, just few situation around
vagrant, hope you can learn a lot about them and define your ownVagrantfileto handle your requirements. As least, I can deliver you some situations you can refer for future update. And lastly of this lab, you have machine withdockerinside, and be ready for bring upKubernetescluster on next session
Quote
Lastly, This is end on the session 1, please wait and join with me in the next issues, you can find suitable topic at Setup Self Kubernetes Cluster in locally ✍. On the session 2, I will guide you about
ansibleand how we can useansibleto provide for you ownkubernetescluster withkind. And now, I hope you have a good weekend, happy with your family, stay safe and I will see you soon, bye bye 😄