Quote
Hi @all, this week is not having special, and I have lot of idea to releasing about multiple topics, but really cool to contributing anything else. Therefore, I try to learn more about mobile, and now we have another way to continue build and distribute mobile application with Expo. Let’s digest about that
What is Expo ?
![]()
Follow the documentation, you can explore more about expo, behavior, practicing and moreover with this tool
Let reach to introduce about Expo, extremely superb
Info
Expo
Expo is a framework that makes developing Android and iOS apps easier. Our framework provides file-based routing, a standard library of native modules, and much more.
As you can imagine, your experience will surprise with cool stuff when I first came up with this one, not act like react native with fastlane with need you integrated more library, but expo help developer go far with easily to build and deliver your mobile application. In my perspective, Expo is so good and help me cut off lots of time to handle build and release progress, honestly to said about that
If you say it, you have to say it again, you will meet more problems when try to build with expo more than bare react native. I am not developer, but I hear about that, and you need to consider when give decision to choose one of them, and these articles can really help
Some my co-worker relate about some stuff about the difference between bare react native and expo, including
- ”Not have many options when you select library to handle your project with expo"
- "Should be learn from bare to understand more about react native because expo is advantage version to build your project”
But with me - DevOps engineer - I understand about situations when you need to do for help and suggest the good way when start project, and the big difference between bare react native and expo, it come up about build environment
- With bare, if you follow up about my stuff around Build mobile with fastlane (Part 1), you can imagine that you need to handle more technically job to help you can build, and serve your project with android SDK. This will really tough things if you don’t familiar with your operation system
- But with expo, this story will move with different way, expo serve us the command line tool call Expo Application Services (EAS), It means you can use that to cut off lots of your effort to try set up and build your application environment, and it means you just need this command line to starting coding your application, and extremely convenience.
Let talk more about how eas can when you try to build your application for first start
EAS and story behind

When you try to hand on with expo, that platform can provide you
- Expo SDK: A library of pre-built components and APIs that simplify common tasks.
- Expo Go: An app to preview projects in real-time.
- Expo CLI: Command-line tools to manage and build projects.
- Managed and Advanced Workflows: Managed workflow abstracts complex configurations and native code, while advanced workflow offers extensive customization options.
Info
Why I told you about expo is rapidly help you build and delivery project because expo serves us platform
expo.dev(Cloud Platform) where provides multiple device with integrating and being ready for build your project both platform Android and IOS with 0 setup environment, and that huge supportive from expo
In this platform, you can see the progress build, store your environment, secrets and distribution information for help you sign and delivery your application to Google Play and App Store in near futures, and what else you need LOL
You can get eas to your local machine with npm
npm install --global eas-cliAnd now you have eas with such powerful tools. With EAS, you can do some useful thing, such as
- EAS Build: Compile and sign Android/iOS apps with custom native code in the cloud.
- EAS Submit: Upload your app to the Play Store or App Store from the cloud with a single command.
- EAS Update: Seamlessly deliver live app updates, critical bug fixes, content changes, beta features, and more to give your users the best experience possible.
Following these features, no one can say EAS is weakness tools with such incredible thing with control moreover steps about DevOps handling with bare react native
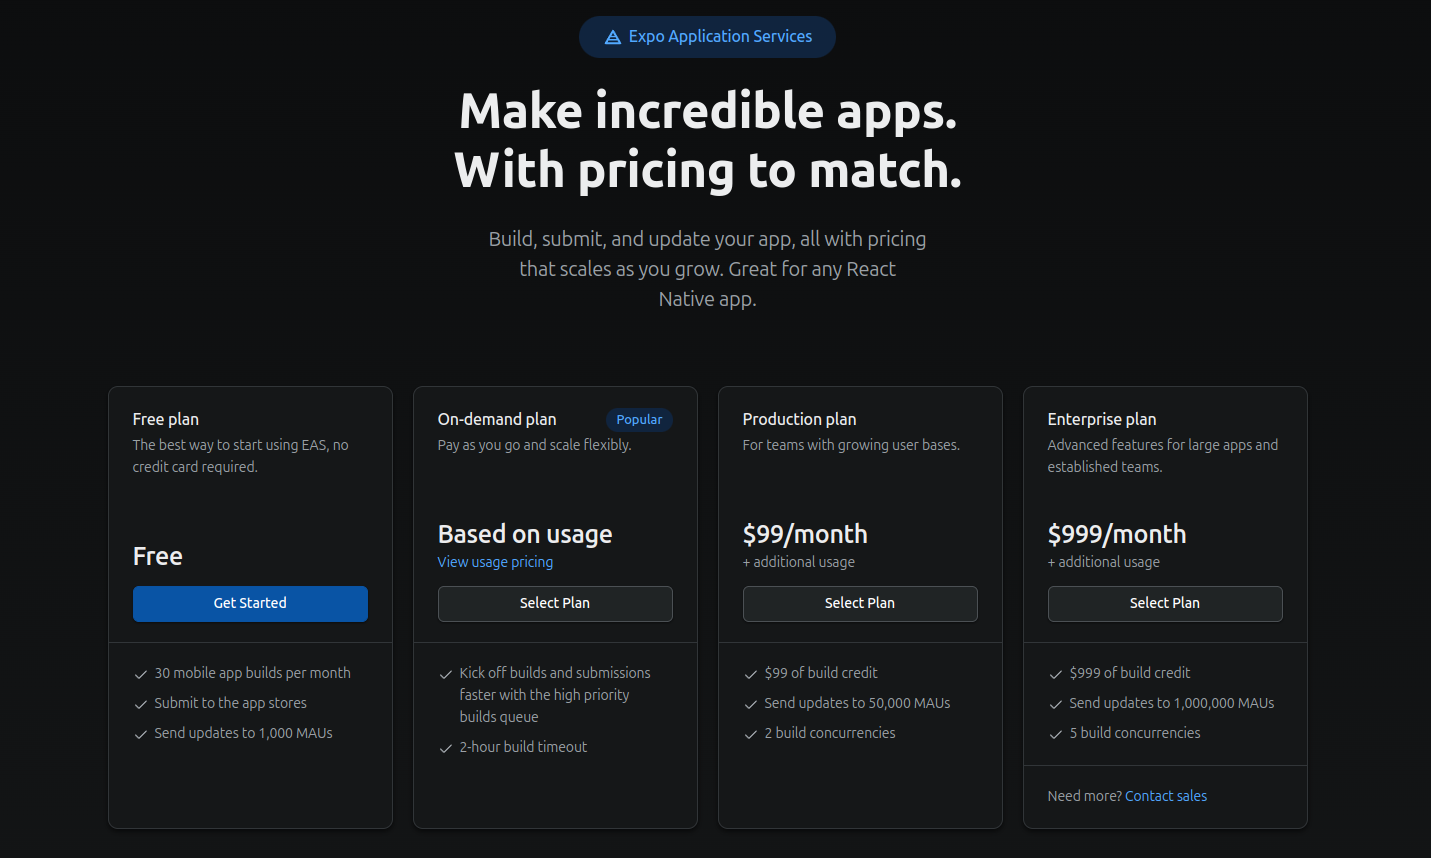
To help you build your project with expo and connect your local machine with cloud service, you need to know about pricing plan of expo, not anything powerful is free. Expo Application Services (EAS) offers free access to a limited quantity of low-priority builds on EAS Build and free updates with EAS Update. These limits reset monthly.
With Pricing plan, you can choose one of plans for yourself but if you just practice, and play with expo free optional great for you
Info
The big difference is speed when you require expo’s host for your build because with free plan, your build progress will set on low-priority, that means you need to wait at least in queue not have build with high priority, and you will force build progress with limit time in one month, but I think these factors which are not big deals 😄
If you clear with your optional, let make your EAS connect with cloud of expo
-
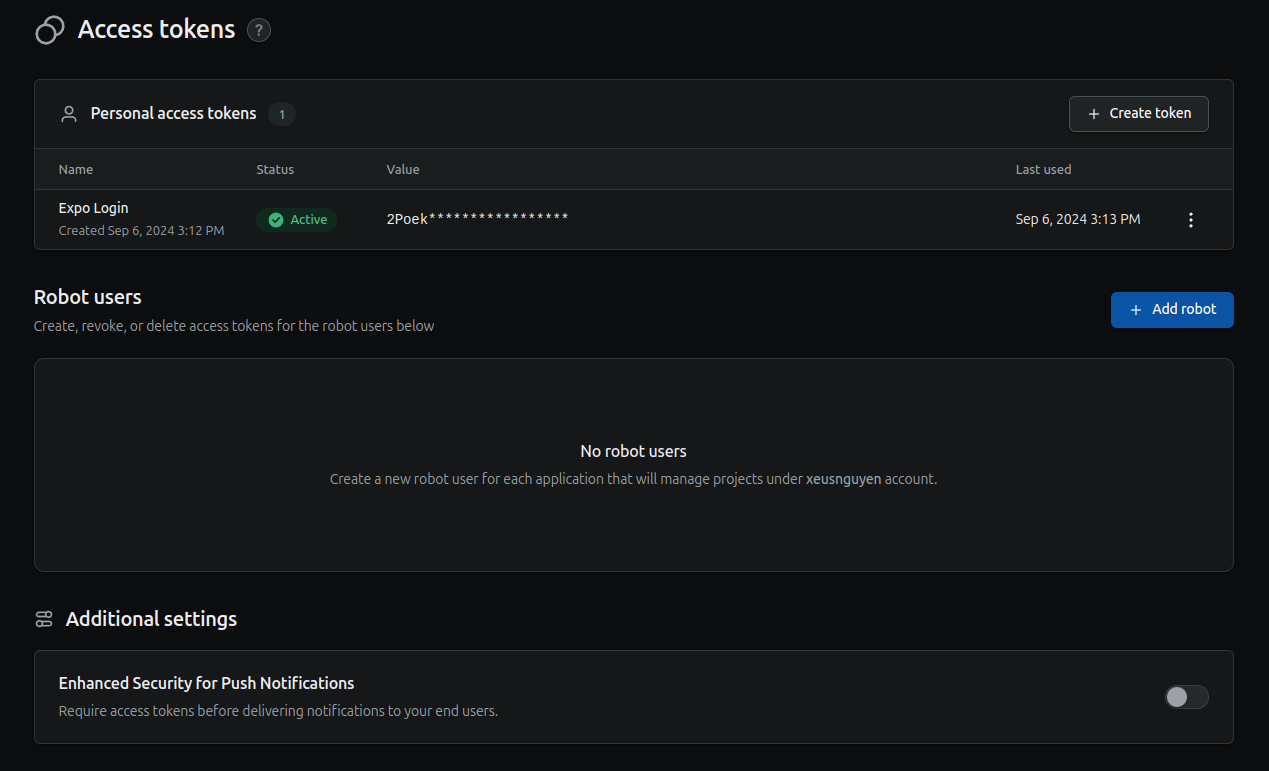
First of all, you need to create Personal Access Token (PAT) in Account Settings ⇒ Access tokens
-
Next, you will have connect your host with expo through that token by exporting this token to your environment of machine
# With Linux or Mac export EXPO_TOKEN=<pat-token> # With Windows CMD set EXPO_TOKEN=<pat-token> # With Powershell $env:EXPO_TOKEN = "<pat-token>" -
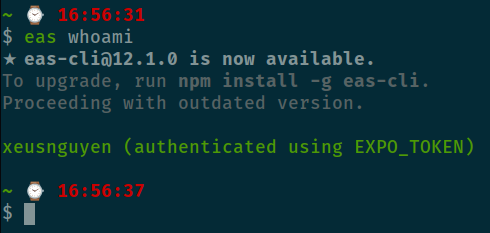
Now, you need to validate your eas with
whoamito ensure connectioneas whoami
First interact with EAS
In this part, I will provide you first step when you want to hand on with eas, and I think build come first
To simple build your platform, you can use
eas build -p <ios/android>This command will create trigger to deliver your source code to cloud platform of expo, and borrow machine and build your application to artifact (e.g apk and ipa).
Initialize example project
But before you can do that, let create example project
npx create-expo-app@latestAnd now you will have project with structure like this
.
├── app
├── app.json
├── assets
├── babel.config.js
├── components
├── constants
├── .expo
├── expo-env.d.ts
├── .git
├── .gitignore
├── hooks
├── node_modules
├── package.json
├── package-lock.json
├── README.md
├── scripts
└── tsconfig.json
As you can see, you have whole project with only one command, and now try to start with no need to setup anything else because expo provide Expo Go to help you run your application in your real machine. But you need to install something
-
adb: Debug your application in your machine, no SDK require
-
In usage, your metro will create in the host work inside only your machine, and that make your phone can’t connect, therefore you need to set that your same network between your phone and your expo machine
# Get host machine with ifconfig, ipconfig or ip addr export REACT_NATIVE_PACKAGER_HOSTNAME=<your-host-machine> -
You need put your
adbinside yourANDROID_HOMEwith path$ANDROID_HOME/platform-tools. Read more about setup $ANDROID_HOME at Setup Environment for build android
Now you can run with npm start to execute your application in your mobile
npm start # = expo startScan QR code with Expo Go and your app will on your android
Build your application
With build, you can trigger both of platform in your source code, it means you are not need to have machine with android SDK or xcode to build your application, just need to use expo
First of all, reach to dashboard cloud of expo.dev, and create your project
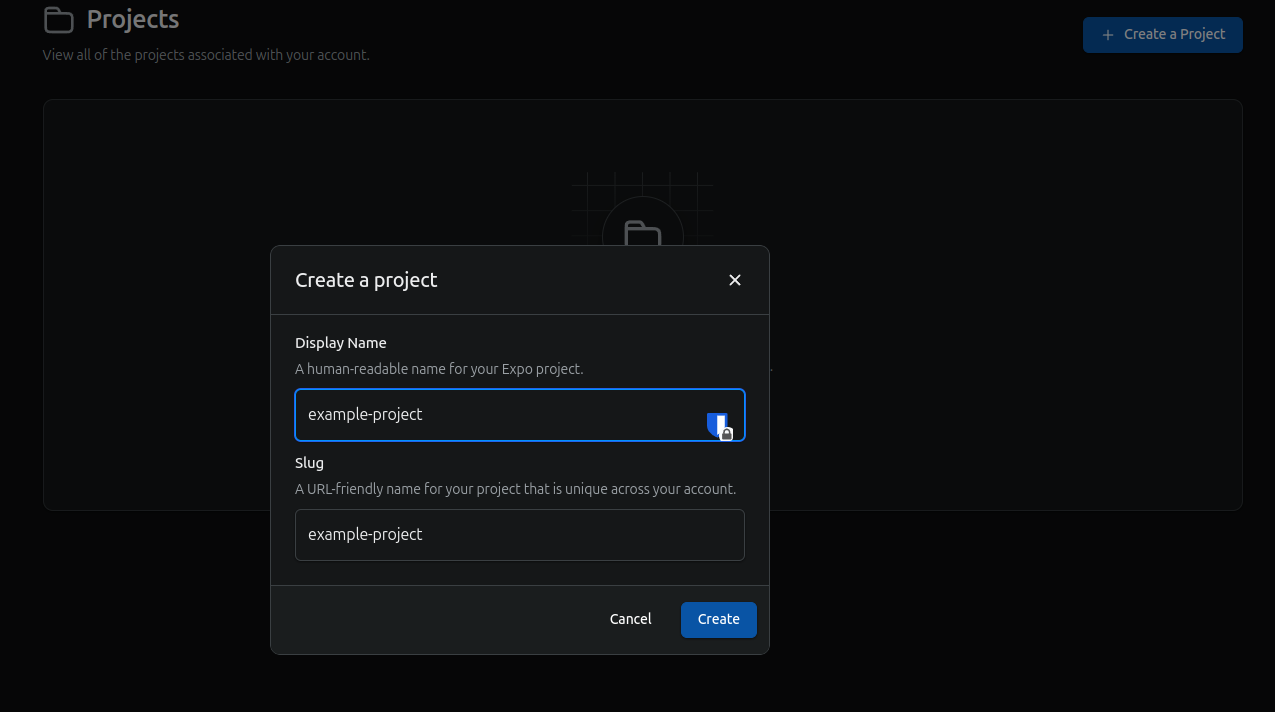
Next, you need to run init to set up your eas and information of application for connecting with Expo Cloud
eas init --id <project-id>Current if you take a look, your app.json file where define your application will change to new one with your project-id, name and slug of application in expo
{
  "expo": {
    "name": "expo-build",
    "slug": "example-project",
    "version": "1.0.0",
    "orientation": "portrait",
    "icon": "./assets/images/icon.png",
    "scheme": "myapp",
    "userInterfaceStyle": "automatic",
    "splash": {
      "image": "./assets/images/splash.png",
      "resizeMode": "contain",
      "backgroundColor": "#ffffff"
    },
    "ios": {
      "supportsTablet": true
    },
    "android": {
      "adaptiveIcon": {
        "foregroundImage": "./assets/images/adaptive-icon.png",
        "backgroundColor": "#ffffff"
      }
    },
    "web": {
      "bundler": "metro",
      "output": "static",
      "favicon": "./assets/images/favicon.png"
    },
    "plugins": [
      "expo-router"
    ],
    "experiments": {
      "typedRoutes": true
    },
    "extra": {
      "router": {
        "origin": false
      },
      "eas": {
        "projectId": "xxxxxxxxxxxxxxxx"
      }
    },
    "owner": "xeusnguyen"
  }
}
Next, EAS has file called profile where you define your information for your build, read and explore more about this stuff through Configure EAS Build with eas.json and eas.json. You will create this one for your build
{
  "build": {
    "development": {
      "developmentClient": true,
      "distribution": "internal"
    },
    "preview": {
      "distribution": "internal"
    },
    "production": {}
  }
}
As you can see, in this file, we will define three profile with applying for three situation, development, preview and production. (NOTE: If you see the key distribute with value internal, It means you can easy to distribute your app directly to physical Android and iOS devices) And with eas.json is supply important role to help you make your build configured as your expectation
On your pleasure, now you can trigger build with preview profile for build android application, for example with command
eas build -p android --profile previewNow expo will prompt and ask you some question to specific to your application
- Android application id (Enter ⇒ Choose the current info in your
app.json) - Android Keystore (Yes/No) ⇒ You need select yes to create one of them if you don’t want to create manually, read more at Create Keystroke and Sign for your application
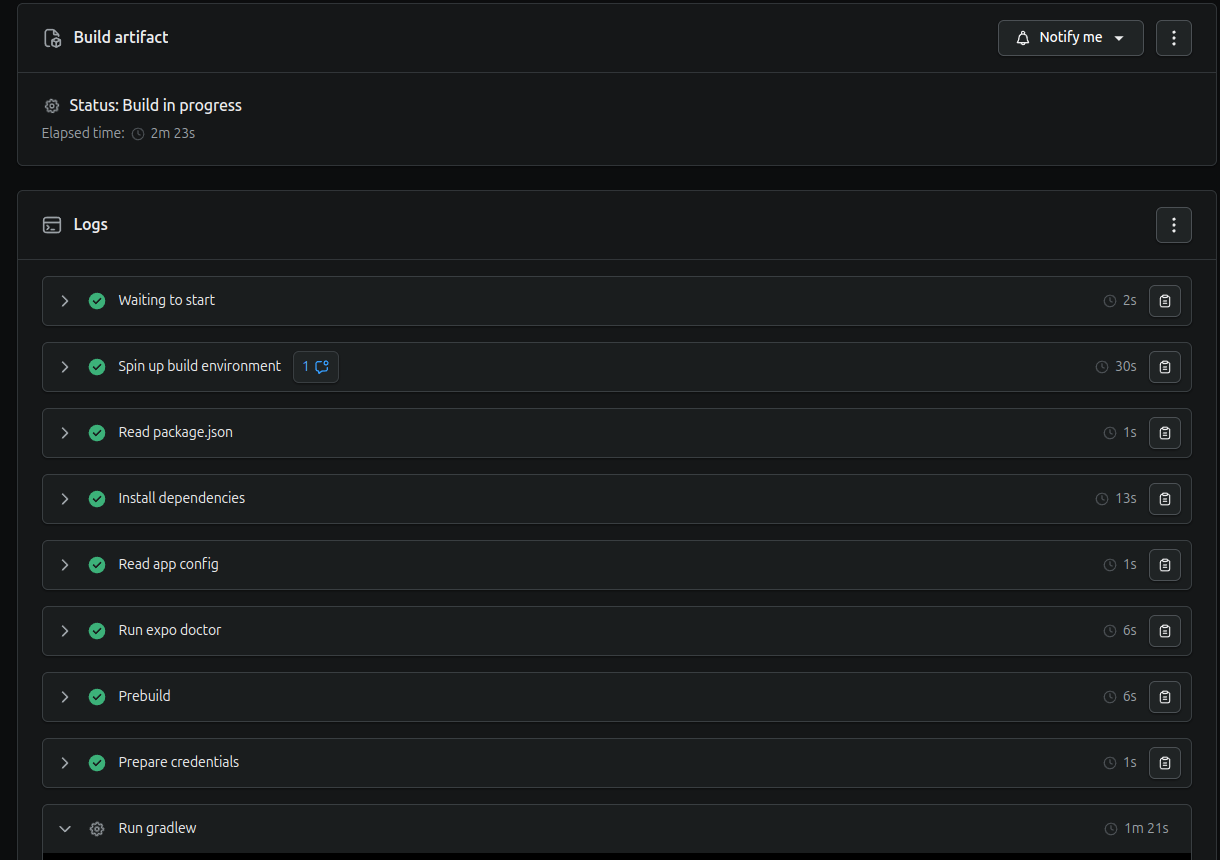
And now your expo will receive the trigger for build application, if you lucky, your application will build immediately, unless there are builds with high-priority in queue

Retrieve with URL, to see your build progress inside your Expo Account
And when your application will complete, your artifact of build will response with
- QR Code - You can scan to download app
- APK URL - Directly URL to downloading your application in
APK
Bring up to CI
If you want to automation your build progress, you can do same workflow in local
- Expose your
EXPO_TOKENto host variables - Install
eas-cli, andnode-modulesto build application - Trigger
eas buildcommand - Download and upload artifact after building successfully
For example, I will define this workflow in Github Actions, you can get one for yourself and doing stuff to create a host for build your application in actions. But before, you need to learn about
And now just copy, and enjoy
# Define name of Actions
name: Build and Release Android Applications
# Trigger of Actions by manually
# Read on: https://docs.github.com/en/actions/writing-workflows/choosing-when-your-workflow-runs/events-that-trigger-workflows#workflow_dispatch
on: workflow_dispatch

# Define job in a workflow
# Read on: https://docs.github.com/en/actions/using-jobs/using-jobs-in-a-workflow
jobs:
  build_android:
    runs-on: ubuntu-latest
    env:
      EXPO_TOKEN: ${{ secrets.EXPO_TOKEN }}
    steps:
      - uses: actions/checkout@v3
        with:
          fetch-depth: 0 # Fetch all history for git info

      - uses: actions/setup-node@v3
        with:
          node-version: 18.20.2

      - name: Install Dependencies
        run: |
          npm install
          npm install -g eas-cli
          npx eas --version
          npx eas whoami

      - name: Build Android Application
        run: npx eas build -p android --profile previewAndroid --non-interactive

      - name: Download Artifact from Expo
        run: |
          artifactURL=$(npx eas build:view --json | jq -r ".artifacts.buildUrl")
          mkdir -p ./android
          wget -q $artifactURL -O ./android/$(cat app.json | jq -r '(.expo.name + "." + .expo.version)').apk

      - name: Upload artifact
        uses: actions/upload-artifact@v4
        with:
          path: android
          retention-days: 30
Conclusion

Success
This is all for today, just introduce with you about
expoand kind stuff of this technology, but more thing you can explore with expo in next session. Hope you find well information to control, build and enjoy your application. Expo is really cool for starting if you want to figure out to build both platform mobile application, with 0 effort 😄
Quote
Learn something new is excited, if you want to hand on, It’s a change for you to practicing with new one, really convenient and fun. Therefore, don’t give up believe yourself, try more, learn whatever you want, stay safe and see you on next week. Bye dude 🙌