Quote
Hi @all, Hope you have nice weekend. On this week, I will talk about little bit a new things what I try and applied for my wiki-site for analytics, tracking the activity on my site with
umami. Moreover, I want to try another web-server iscaddyinstead ofnginx- kind of similar with me, because I want to try new things 😄😄😄. Let’s digest about it !!
Umami - Opensource analytics platform
It has been a while since this wiki was published but IDK who are interacting with my site, what is popular topic with most attention. Therefore, I decide find and applied a new analytics to knowing about the behavior people on my website and improving the topic which have most attentions
With platform when I release this wiki is Quartz - Jacky Zhao - one more time I appreciate about your contribute to delivery this template to me and community 🤝🤝. On the documentation, Quartz relate about configuration to tracking, analytics this site via some platform like Google Analytics Plausible Umami Goatcounter. I mean It has a lot but choosing quick and easy is important. Therefore, I have take a look and have comparison between of them, here is result
Google Analytics
![]()
Abstract
Google Analytics is a web analytics service that provides statistics and basic analytical tools for search engine optimization (SEO) and marketing purposes. The service is part of the Google Marketing Platform and is available for free to anyone with a Google account. Google Analytics - Wesley Chai | TechTarget Contributor
I don’t have experience with GA, So I have read some about article to find out more about it, like
- English - Google Analytics 4 Pros and Cons
- Vietnamese - Google Analytics là gì? Cách sử dụng Google Analytics hiệu quả
Info
GA is great for basic tracking and to gain a general sense of your site’s traffic. Google Analytics may fit the bill if your main focus is on what browser types, operating systems, and device types are visiting your site. In addition, they offer a free plan that has up to 20 custom non-Personally Identifiable Information (PII) properties.
Adding the code to your site is relatively straightforward as well. Like many trackers, you’ll add the JavaScript snippet to your site to start tracking.
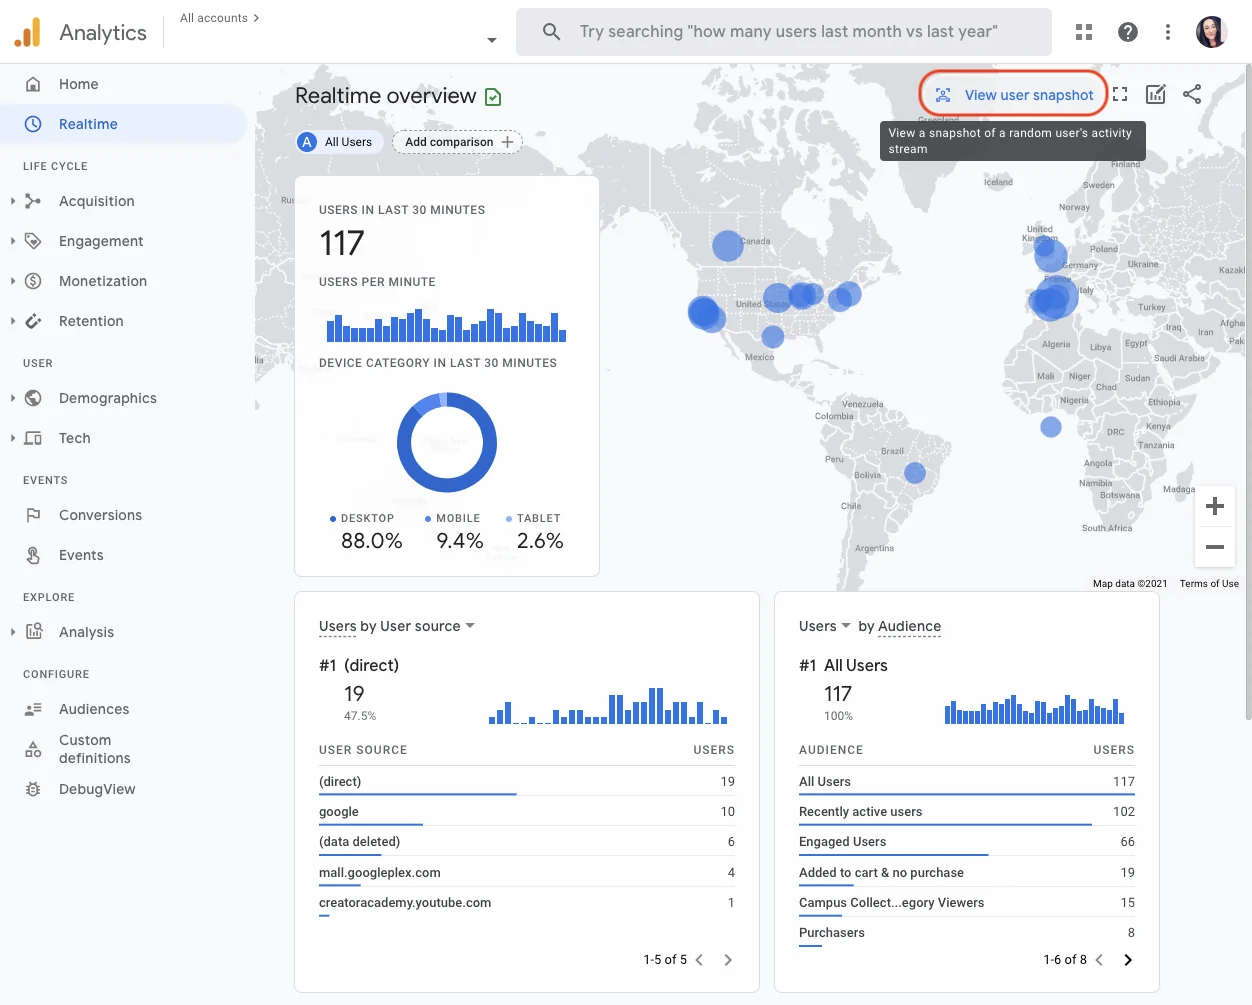 But like I said, I want to try with new self-hosted and opensource, so maybe GA is not expectation for me. So I am not choosing the platform for analytics site, some feature I will not use and GA look like a kind of complicated
Plausible
![]()
Abstract
Plausible is intuitive, lightweight and open source web analytics. No cookies and fully compliant with GDPR, CCPA and PECR. Made and hosted in the EU, powered by European-owned cloud infrastructure 🇪🇺
New update 2024: Plausible have updated their pricing model and added a new Business plan that includes Custom Properties, Funnels (removed from Growth), Ecommerce revenue attribution
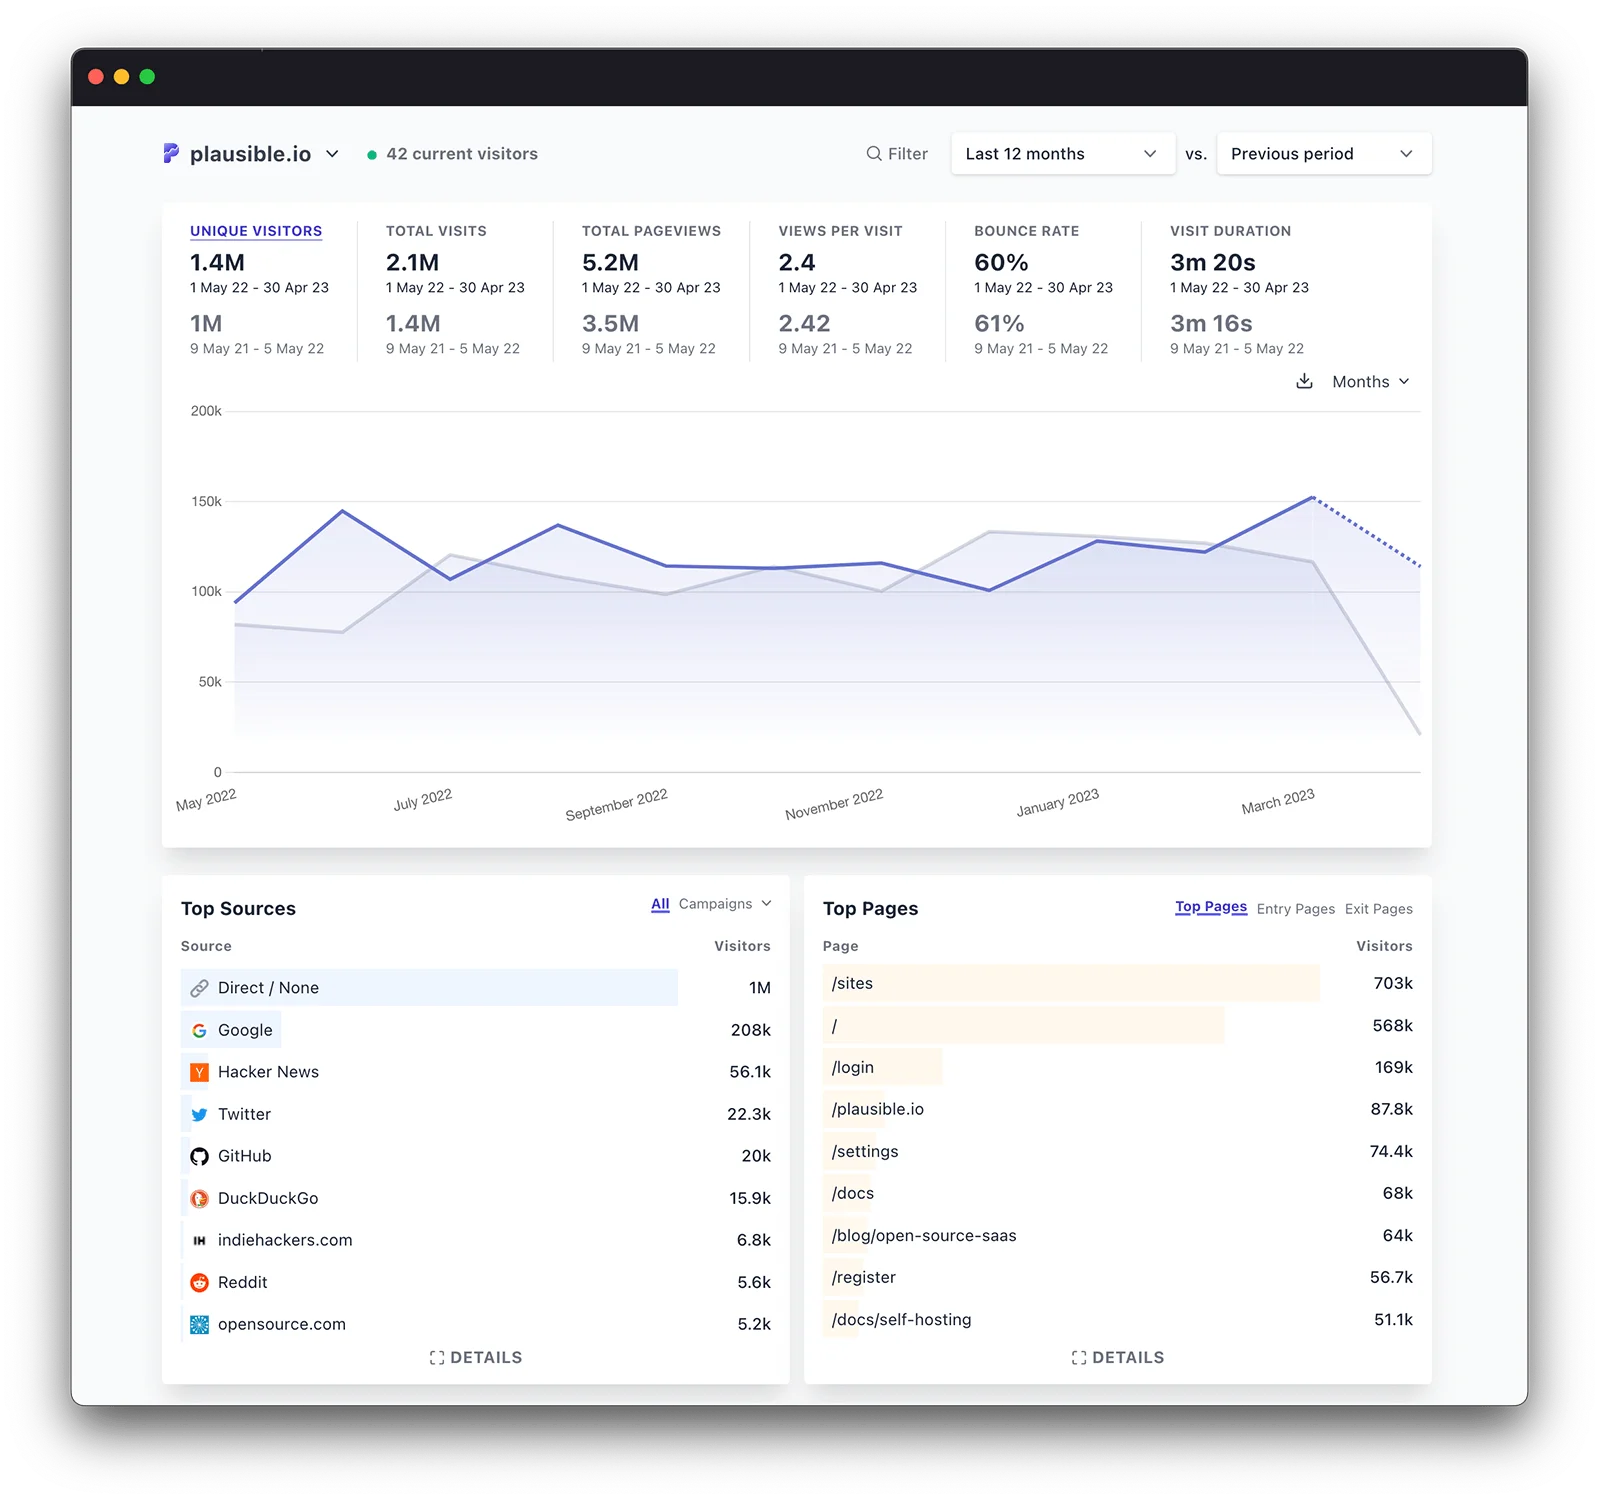 First sight, It look like similar site and beautiful. So I hope it will work with expectation, when I try to digest about this platform I have some conclusion
Pros:
- Open-source and privacy-friendly
- Lightweight and easy-to-use
- Real-time data
- GDPR, CCPA compliant
- Can be self-hosted
Cons:
- Contract necessary for the hosting
- Not a free tool (Growth plan starts at $9 per month for 10k monthly pageviews)
- Limited integrations
So with Plausible , you can self-hosted and try some cool things via this platform. One thing, I find out via Plausible - CE is Caddy Server which can be alternative Nginx - web-server with ZeroSSL and Let's Encrypt for automatic serve SSL for your host.
You can find to Plausible - Github for know about more. With some reasonable, I do not choose this one because of Plausible documentation about It not good enough for me to understanding what I am doing to completely self-hosting.
From Plausible: Self-Hosted Google Analytics alternative, It encourage smt like
Info
The easiest way to get started with Plausible is with our official managed service in the cloud but if you’re happy to manage your own infrastructure, you can also self-host Plausible Community Edition (CE) on your server. Plausible CE is our “free as in beer”, self-hosted and AGPL-licensed release.
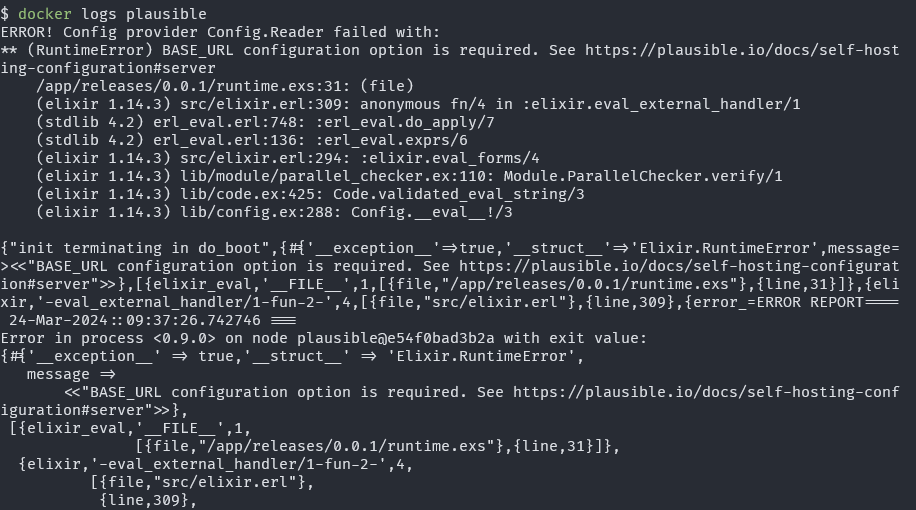
I meet a failure on the first step and It makes me not satisfied, so I will not waste my time. If you want to make challenge on the self-hosted Plausible, you will need these article for doing smt
- https://plausible.io/docs/
- https://plausible.io/docs/self-hosting-configuration
- https://github.com/plausible/community-edition/
Umami - Last one but like the beast
![]()
Info
Umami is a simple, easy-to-use, open-source web analytics solution. It provides website owners with essential insights about their website traffic in a clean and straightforward way. It can be self-hosted and is a great alternative for those looking for privacy-friendly options.
Pros:
- Simple and clean design
- Open-source and customizable
- Privacy-focused, no cookies used
- Can be self-hosted
- Free to use
Cons:
- May require technical knowledge to set up self-hosting
- No option for event tracking
- Limited features compared to full-fledged analytics tools
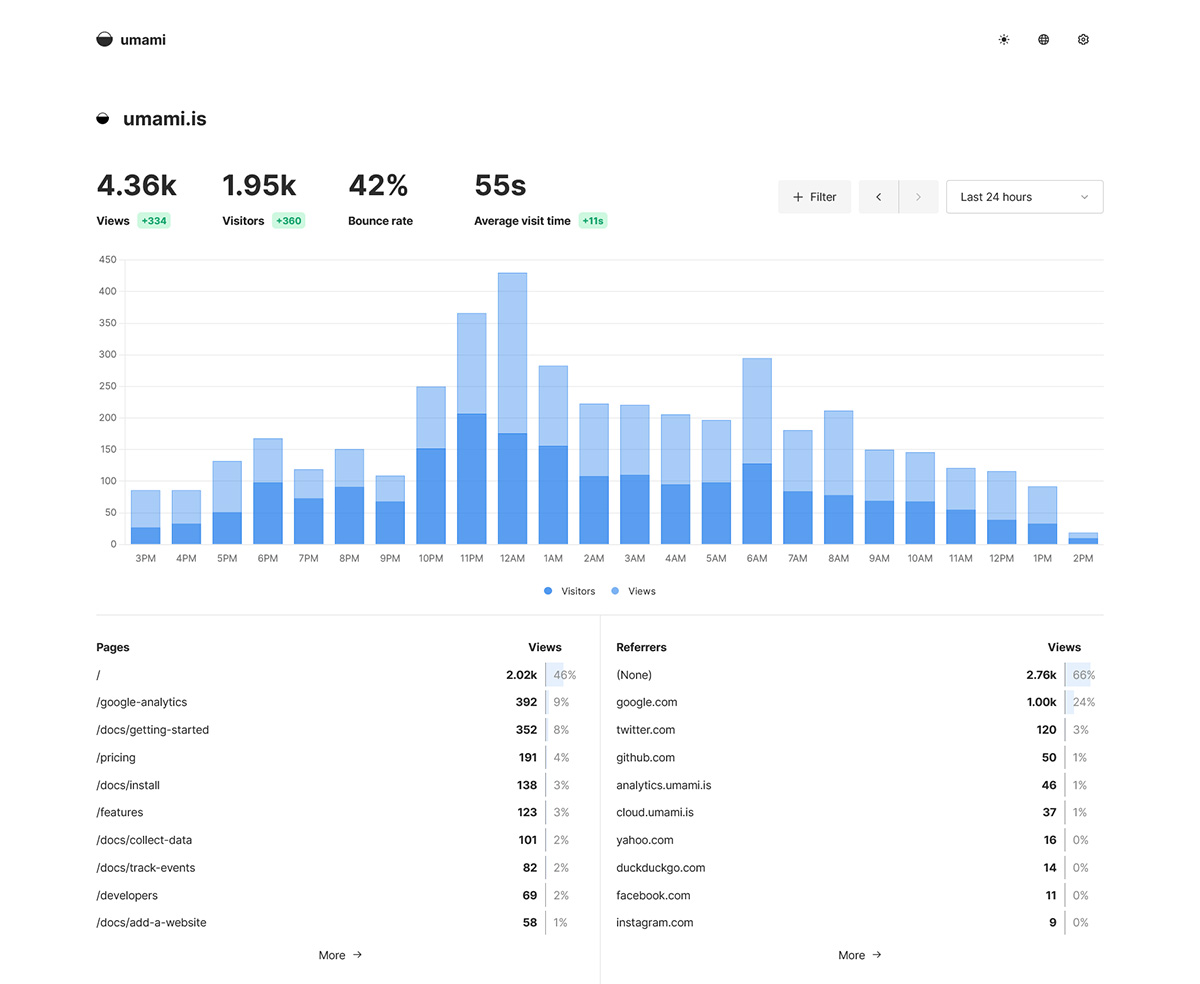
On the first sight, I look similar like Plausible, color, information is easily to understanding and for sure, Umami is best self-hosted solution for your first analytics site. Some reasonable, I can list like
Umamiis kindly simple and do not need multiple technical integration likePlausibleorGoogle Analytics- It’s have
Docker-composewith easily to self-hosted with Instant image, just clone and put the connection with any database supported Umamidocumentation is for sure to using like open-source, not make you confusing to choose and find out.
Question
Hardest when self-hosted
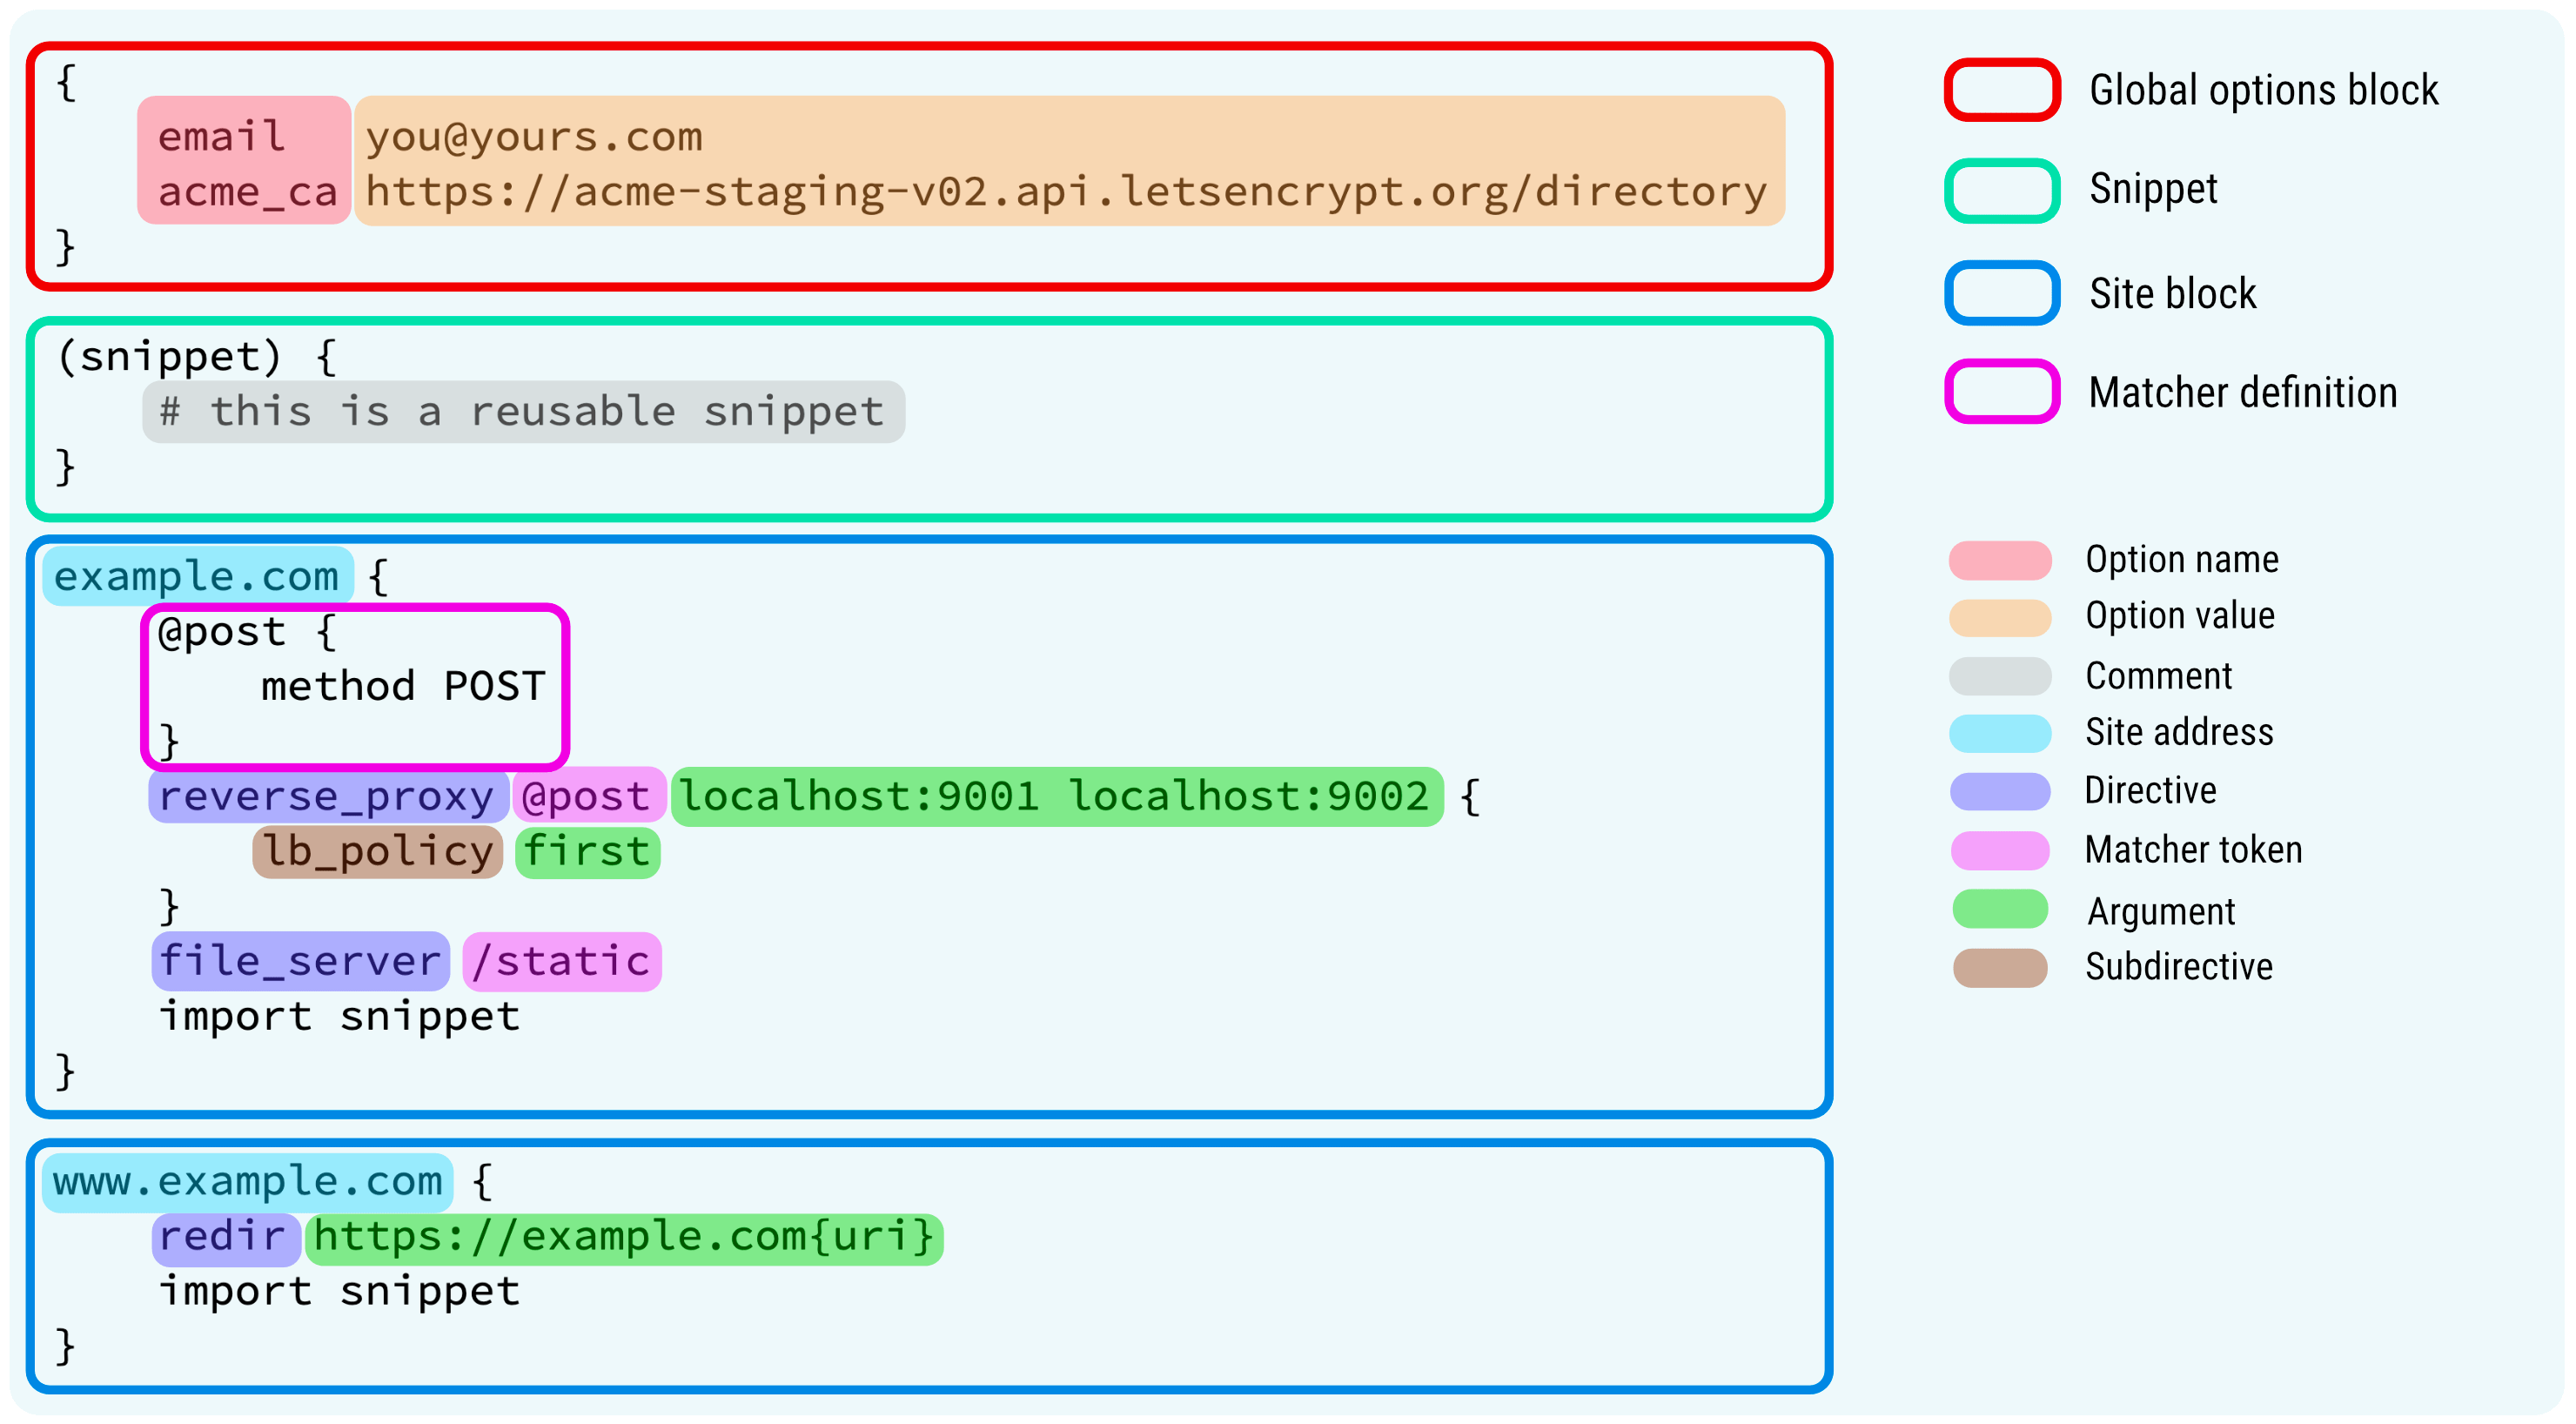
umamiis the skill to working withDocker,Docker-compose,hostingandserver. So I will describe basic step to reaching about the goal, but hold on let’s me introduce the new web-serverCaddywhich can be easily use for multiple case instead ofNginx,ApacheorIIS
Caddy Server - new target web-server which can choose for alternative
About the Caddy Server

Info
Caddy is an extensible, cross-platform, open-source web server written in Go.
The name “Caddy” refers both to a helper for tedious tasks, and a way to organize multiple parts into a simplified system. At its core, Caddy is an extensible platform for deploying long-running services (“apps”) using a single, unified configuration that can be updated on-line with a REST API. Official Caddy distributions ship with a set of standard modules which include HTTP server, TLS automation, and PKI apps. It is best known for its automatic HTTPS features.
I am really surprise when have a first look with Caddy, although I have seen Caddy on multiple blogs and articles on Medium like
- Roll Your Own Static Site Host on VPS with Caddy Server
- How to Use Caddy Server 2
- Securing ShinyProxy with Caddy Server
And now, when first time to work with Caddy, I am really impress which helpful of one bring back, some huge things which you can try like
- By default, Caddy automatically obtains and renews TLS certificates for all your sites
- A forward-thinking reverse proxy
- Production-grade static file server
- Flexible configuration compatible with any workflow
- Unparalleled extensibility
- 4x faster PHP apps
However, With me Nginx is best choice but Caddy can be others choose for make another suggestion, solution and whatever. Thinks about Caddy can read Nginx config like adapter, I mean It’s kind crazy interesting.
Some about interesting article, documentation and blog about web-server technologies which you can find and deliver, Caddy is on the way become the huge thing
- Caddy feature
- Download for Caddy
- Documentation for Caddy
- Comparing the best web servers: Caddy, Apache, and Nginx
- Web And Application Servers
Run the first Caddy Server
With Caddy, you can try multiple way to configuration via adapter, API but Caddyfile is most of thing can me and you impressed. It’s JSON format, you simply put your domain and free SSL can serve for your service 🥶🥶🥶
For easily use Caddy, you can try Caddyfile for the first optional with feel step, you will have a static website with SSL like what you want
- Caddy is work on
DockerorBinary, use can try one on solution butDockeris kind simple and easily usage. With docker, you can find Caddy on the Dockerhub
docker run -d --name caddy --rm -p 80:80 -p 443:443 -p 2019:2019 caddy - With some optional and warning which I want to prefer. Remember, when you want to
SSLwork make sure port443can reach from domain to hit with yourCaddy
Warning
Example: If you set up on
homelab, maybe some routers or ISP modems can’t enable port443, The problem will raise in here when you run server caddy). On this situation, You must changehttps_portandhttp_portto another if meet some mistake. IDK why It occurs 🤔 or maybe I am wrong. Just for sure
If you run the command above, hit your browser with localhost to see what Caddy response

Info
That is list of things about what you need to do for serve your site over HTTPS with Caddy Server. Give an applause for super friendly from this one !! 😃😃😃
Combine Caddy with Umami for serve your analytics platform with SSL
Question
This part, I will show you how we can connect
UmamiandCaddyto each othes for making the secure analytics platforms. Probably, you just pleasure when put thepasswordorcredentialsinSSLsite instead not secure site 😅
Prepare server or VPS
Like I talk about, you may need VPS for working in situation or maybe your 443 can work in homelab and you not need. Whatever, so try best VPS or hosting some where can use both 80 and 443
On my situation, I will use Azure VM with Ubuntu OS . For make sure anything work, you need at least VM stats like
1 - 2vCPU1 ~ 2 GBMemory>= 5 GBStorage
Next, you need configure the firewall of cloud like Security Group with AWS or Network Security Group with Azure for port open, including
- 80 (HTTP)
- 443 (HTTPS)
- 22 (SSH)
- 6996 (Wild Port) - This purpose if you want your domain that set on this port
After book your VPS, next step you need run this script for setting up environment for run compose
sudo apt update && sudo apt install docker.io docker-compose -y
sudo usermod -aG docker $USER
sudo systemctl enable docker
sudo chmod 666 /var/run/docker.sock
When you run all of command above, make sure your Docker daemon work with command
~ ⌚ 21:42:08
$ docker ps
CONTAINER ID   IMAGE     COMMAND        CREATED          STATUS          PORTS
Prepare your host and point it to public ip
When you book your VPS, most of cloud will return your Public IP with IPv4 or IPv6. You need to find them and copy that for pointing to your DNS server like
- With
IPv4, you need match that domain typeA - With
IPv6, you need match that domain typeAAAA - With
VPS - DNSlikeAWScloud, You need match that domain typeCNAME
For example, If I have a Public IPv4 69.96.69.96 and subdomain havefun.fun4fun.io, just choose type A domain and point that for IPv4. You can read them in Basic things about internet and networking
Run the compose and get the result
On this step, you need to work with docker-compose. For sure, you need to check docker-compose on your host with docker-compose --version
~ ⌚ 21:42:10
$ docker-compose --version
docker-compose version 1.29.2, build unknown
You can reach to my repository, take a look docker-compose.yaml file and copy them to your VPS shell
---
version: '3'
services:
  umami:
    image: ghcr.io/umami-software/umami:postgresql-latest
    env_file:
      - ./.env.umami.examples
    depends_on:
      db:
        condition: service_healthy
    restart: always
    healthcheck:
      test: ["CMD-SHELL", "curl http://localhost:3000/api/heartbeat"]
      interval: 5s
      timeout: 5s
      retries: 5
  db:
    image: postgres:14-alpine
    env_file:
      - ./.env.db.examples
    volumes:
      - umami-db-data:/var/lib/postgresql/data
    restart: always
    healthcheck:
      test: ["CMD-SHELL", "pg_isready -U $${POSTGRES_USER} -d $${POSTGRES_DB}"]
      interval: 5s
      timeout: 5s
      retries: 5
  proxy:
    image: caddy:latest
    ports:
      - 80:80
      - 443:443
    volumes:
      - caddy-data:/data
      - ./Caddyfile:/etc/caddy/Caddyfile
    depends_on:
      umami:
        condition: service_healthy
    restart: always
volumes:
  umami-db-data:
caddy-data:NOTICEL: For running this file, you need provide them two .env file including .env.db.examples and .env.umami.examples
DATABASE_URL=postgresql://<db-user>:<db-pass>@<db-host>:5432/umami
DATABASE_TYPE=postgresql # Choose the database type (# Default: Postgres)
APP_SECRET=RANDOM_STRINGPOSTGRES_DB=umami
POSTGRES_USER=<db-user>
POSTGRES_PASSWORD=<db-password>After change what the identity of umami and db, prepare the Caddyfile which doing for your next step, change $DOMAIN to your self domain which point your VPS like havefun.fun4fun.io
https://havefun.fun4fun.io {
        reverse_proxy umami:3000
}
Run the docker-compose and get the result
docker-compose -f docker-compose.yaml -p analytics up -dAccess your browser with domain https://havefun.fun4fun.io and your umami come up
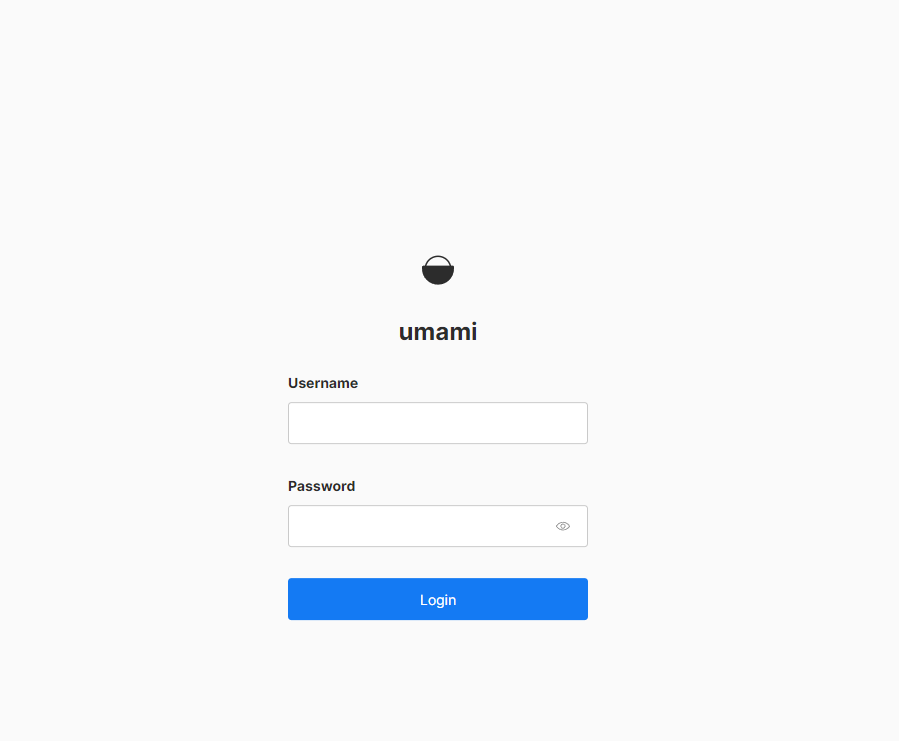
Your first start, default account is admin and password isumami
Setup your site traffic reach to umami
I am not actually programing my site, I just reuse a template and It offer umami like plugin for traffic analysis. But usually, If you want set your analytics on your site, just need include the <script> for running specify things to analytics platform. Like umami, you can find /script.js on umami. To digest about that, take a look helpful video to understanding more
- How to set up your own website analytics with Umami? | Open Source | Self Hosted
- Adding self-hosted analytics to your website for free with Umami
Conclusion

Abstract
That’s all for today, I hope you can figure out what things you need to do on making own analytics platform for you project. That project is quite fun and cost minimum time to set up, just couple minutes and you have basic analytics with
SSLOn this blog,
Caddy serveris factor which I want to prefer which multiple time with powerful, one-line setup, auto SSL. How cool thing is it 😏😏😏
Info
Appreciate to know
umamiandcaddy, that is making this game to easily and more effective. Thanks for all contributing from umami and caddy. Stay safe, research, humble and I will see you on next things. Bye Bye 🏳️🏳️🏳️