Quote
Hi @all, I have excited to bring
kubewekendback to this weekend, more stuff need to tackle but not for this weekend. In this weekend, we will learn and figure more about storage inside kubernetes cluster, how you can provide one of these, ceph - opensource with really cool stuff and background for us digest. Not long for wait, back tokubewekend
Storage inside Kubewekend
Start with networking inside Kubernetes, as you remember about cilium, this one belong the component inside cluster, and community call that CNI (Container Network Interface). And with Storage inside Kubernetes, you have same concept and that require you install kind stuff as driver calling CSI (Container Storage Interface).
You can go and check the article below to understand more about reason why kubernetes give this concept for our community
Info
The Container Storage Interface (CSI) is a standard for exposing arbitrary block and file storage systems to containerized workloads on Container Orchestration Systems (COs) like Kubernetes. Using CSI third-party storage providers can write and deploy plugins exposing new storage systems in Kubernetes without ever having to touch the core Kubernetes code.
Note
Inside the summary, you can see the real problem inside
kubernetesthat before CSI release. Technically, there is existence mechanism for plugin or volume solution insidekubernetesbut meet the challenge because this one methodology is put insidekubernetescore - It means when upgrade, bug or issue, community must wait to control problems when next release ofkubernetescome up
And that does why integrate 3rd party inside kubernetes core, It is really challenge, if you know about cloud services, you will have multiple solutions and techniques for storage and it doesn’t really simple for you put a lot of things inside kubernetes that will make cluster explosion. Therefore, really surprise about how they create alternative mechanism to reduce the problem. And Now we are having CSI

About CSI Concept
Really inspiration, this one is tough thing and contain a lots of stuff you will never care about, but I want to make some sorts of difficult things, such as overview about CSI and you will surprise about this one
You can explore with me through community and github repository
As you can see, CSI is built-in gRPC of Google, actually kubernetes is open-source program of Google when start that why gRPC is integrating in this stuff, just guess from mine 😄
If I spread out of architecture of CSI, this will really stressful for us 😅. And as my knowledge in this moment, I will not understand as much about them to transfer that one for you, honestly. But following the Specification, this concept will provide protobuf - one of things belong of gRPC protocol, you can find more information about protocol inside my Compile gRPC for 1st time blog, CSI use gRPC protocol and protobuf to make conversation between CO (Container Orchestraion - Kubernetes is one of them) with Plugin (Controller - Node)
And It make sense for connection and responsibility to make CSI work as stable. We are a end use of them, so if you concern about how we can developer own CSI stuff, I think that can be long story LOL, but we will learn about that one.
Following the article about CSI, you actually can create own CSI, and you need to ensure about create function or interface, if I don’t wrong to provide the method which can help kubernetes or what ever orchestration can interact with your storage. Read information below
Info
The kubernetes-csi site details how to develop, deploy, and test a CSI driver on Kubernetes. In general, CSI Drivers should be deployed on Kubernetes along with the following sidecar (helper) containers
- external-attacher
- Watches Kubernetes
VolumeAttachmentobjects and triggersControllerPublishandControllerUnpublishoperations against a CSI endpoint.- external-provisioner
- Watches Kubernetes
PersistentVolumeClaimobjects and triggersCreateVolumeandDeleteVolumeoperations against a CSI endpoint.- node-driver-registrar
- Registers the CSI driver with kubelet using the Kubelet device plugin mechanism.
- cluster-driver-registrar (Alpha)
- Registers a CSI Driver with the Kubernetes cluster by creating a
CSIDriverobject which enables the driver to customize how Kubernetes interacts with it.- external-snapshotter (Alpha)
- Watches Kubernetes
VolumeSnapshotCRD objects and triggersCreateSnapshotandDeleteSnapshotoperations against a CSI endpoint.- livenessprobe
- May be included in a CSI plugin pod to enable the Kubernetes Liveness Probe mechanism.
Storage vendors can build
Kubernetesdeployments for their plugins using these components, while leaving theirCSIdriver completely unaware ofKubernetes.
Quote
I think that kind stuff will become more difficult, but when you want you can do for yourself, but it not conclude in this series and session. We will stop about
CSIin here and back later when we actually learn more stuff about theses one
Now we head to mechanism of CSI inside kubewekend Cluster
Development and Deployment CSI
Info
Kubernetes users interested in how to deploy or manage an existing CSI driver on Kubernetes should look at the documentation provided by the author of the CSI driver.
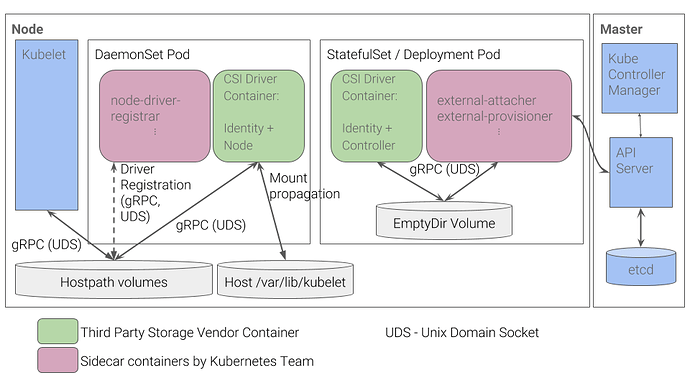
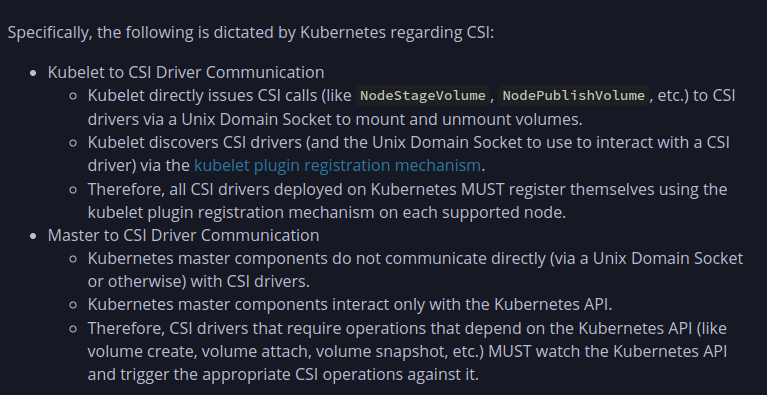
In currently situation, the minimize requirements are around how kubernetes components find and communicate with a CSI Driver
Following the documentation, they give us perspective to see how communicate from
Note
Because these requirements are minimally prescriptive, CSI driver developers are free to implement and deploy their drivers as they see fit.
And you can do that with some recommended mechanism, like
- Kubernetes CSI Sidecar Containers
- Kubernetes CSI objects
- CSI Driver Testing tools
How we can use CSI inside kubewekend
Quote
Actually, this question is the main meaning when you hit button to my blog, because the mechanism isn’t really simple and ease to hand on, this is best of part when you want to contribute your own solution inside
kuberentes
In my opinion, I just figure out what exist solution can help us inject or implement CSI from Cloud services, from storage object and with techniques really provide us.
You can find one of them inside list of List of Kubernetes CSI Driver, and you need ensure install exactly what requirement from driver providers to permit your Kubernetes Cluster can interact with storage through this driver
Assuming a CSI storage plugin is already deployed on a Kubernetes cluster, users can use CSI volumes through the familiar Kubernetes storage API objects: PersistentVolumeClaims, PersistentVolumes, and StorageClasses. Documented here.
Source: OVH Cloud
Info
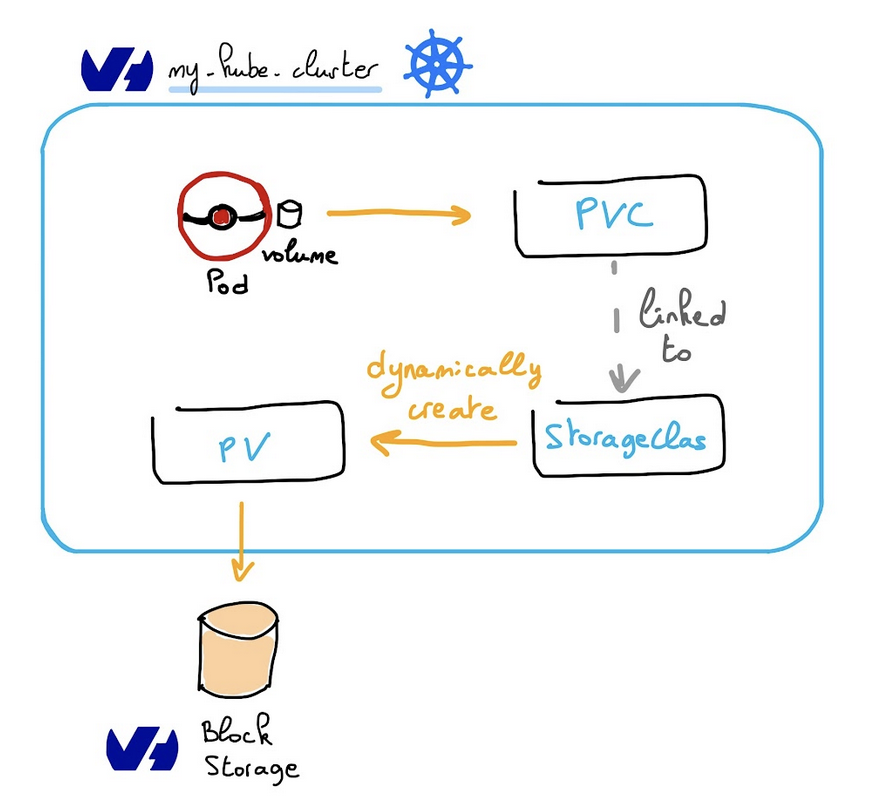
Following concept, you can image the connection between of these ones via image. Start from Pod (unit of
kubernetes) use PVC (Persistent volume claim) to connect and claim data from PV (Persistent volume) which represent to connect with storage (file, object or moreover). Andkubernetesrelease SC (StorageClass) to help us dynamically create PV when you don’t want to implement all process and that whykubernetesattach and mount volume to the pod
You can explore more detail about with storage in Kubernetes and method you can hand on with them
Dynamic Provisioning
Info
Enable automatic creation/deletion of volumes for CSI Storage plugins that support dynamic provisioning by creating a
StorageClasspointing to the CSI plugin.
kind: StorageClass
apiVersion: storage.k8s.io/v1
metadata:
  name: fast-storage
provisioner: csi-driver.example.com
parameters:
  type: pd-ssd
  csi.storage.k8s.io/provisioner-secret-name: mysecret
  csi.storage.k8s.io/provisioner-secret-namespace: mynamespace
Warning
When you work with storage like Azure Blob or Azure file, you can meet the problem about stuck when provide or talk with your cloud services, that why you need to provide parameter keys (
csiProvisionerSecretName,csiProvisionerSecretNamespace, etc.) to help you connect storageclass to your cloud providers
Dynamic provisioning is triggered by the creation of a PersistentVolumeClaim object. The following PersistentVolumeClaim, for example, triggers dynamic provisioning using the StorageClass above.
apiVersion: v1
kind: PersistentVolumeClaim
metadata:
  name: my-request-for-storage
spec:
  accessModes:
  - ReadWriteOnce
  resources:
    requests:
      storage: 5Gi
  storageClassName: fast-storage
And it will automatically create new volume and map that with PV and now you just need to bind the PV to PVC, and it will exchange to ready state. You can marked as default tags for one of them, that will help you create default volume type when call PVC
Pre-Provisioned Volumes
Info
You can always expose a pre-existing volume in Kubernetes by manually creating a PersistentVolume object to represent the existing volume
apiVersion: v1
kind: PersistentVolume
metadata:
  name: my-manually-created-pv
spec:
  capacity:
    storage: 5Gi
  accessModes:
    - ReadWriteOnce
  persistentVolumeReclaimPolicy: Retain
  csi:
    driver: csi-driver.example.com
    volumeHandle: existingVolumeName
    readOnly: false
    fsType: ext4
    volumeAttributes:
      foo: bar
    controllerPublishSecretRef:
      name: mysecret1
      namespace: mynamespace
    nodeStageSecretRef:
      name: mysecret2
      namespace: mynamespace
    nodePublishSecretRef
      name: mysecret3
      namespace: mynamespace
We will deeply encounter with this one on next part, I just mention about method to help you figure out how we can provision and implement volume in Kubernetes
Attaching and Mounting
You can use volume inside your pod via call PVC value inside yaml definition. This one will become help you attach and mount your PV to path inside pod
kind: Pod
apiVersion: v1
metadata:
  name: my-pod
spec:
  containers:
    - name: my-frontend
      image: nginx
      volumeMounts:
      - mountPath: "/var/www/html"
        name: my-csi-volume
  volumes:
    - name: my-csi-volume
      persistentVolumeClaim:
        claimName: my-request-for-storage
Info
And when your pod call PVC, Kubernetes will trigger the appropriate operations against the external CSI plugin (
ControllerPublishVolume,NodeStageVolume,NodePublishVolume, etc.) to ensure the specified volume is attached, mounted, and ready to use by the containers in the pod.
Conclusion
Quote
Really tough thing, I think so when first meet the concept, anyone work around Kubernetes will stuck in few day and don’t figure out what problem. But if you understand and image what next step in provisioning and implement volumes in Kubernetes, this experience will become cool stuff and that can help you hand-on with lots of Kubernetes concept which one provide us
Check it out when you want to learn more about PVC, PV and Storage Class, I think those ones can help you
- Setup MySQL with Wordpress in k8s - Easy migrate or not !!
- Kubernetes Volumes explained
- Official Kubernetes about Storage
- Azure Blob Storage CSI driver for Kubernetes
- Create and use a volume with Azure Blob storage in Azure Kubernetes Service (AKS)
Practice with Volume in kubewekend
Question
Target of practice in this session about we supply to
kubewekendcluster one of biggest platform when you think about object storage and huge techniques stay behind, Ceph. We will check it out and see how we need to do for provide this one for cluster
About the Ceph ?
![]()
Info
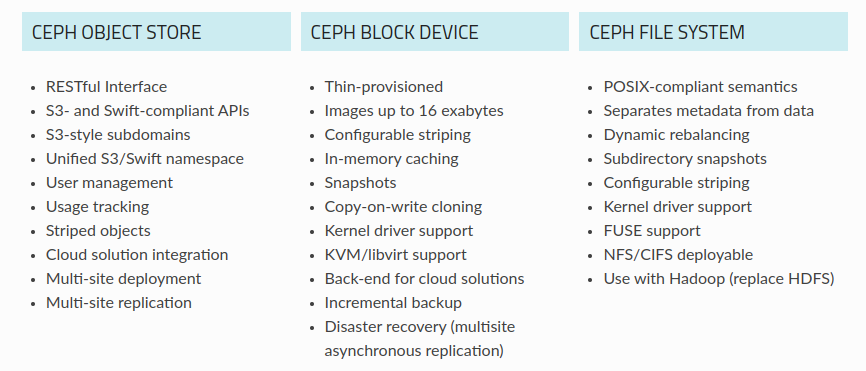
Ceph delivers object, block, and file storage in one unified system. Ceph is highly reliable, easy to manage, and free. The power of Ceph can transform your company’s IT infrastructure and your ability to manage vast amounts of data
You can explore about Ceph with me through Intro to Ceph article, as you can see, Ceph provide us three type of storage and you can manage all of them with only Ceph
Follow these link to figure out what you want about Ceph, and figure out method Ceph can beat it for you
We will deeply discover about Ceph in particular blog, but in this session I just want to help you to use Ceph or whatever CSI to example for imaginary how can you set up one of them for your Kubernetes Cluster
Methodology install Ceph in Kubewekend
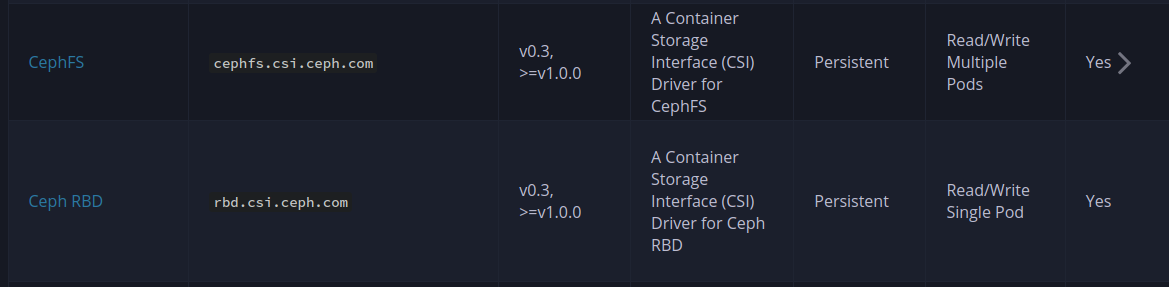
You can check out on the List of Kubernetes CSI Driver and with Ceph you will have two type driver to install inside your cluster
Warning
Upset to tell you about,
cephfswill remove out of cluster whenkubernetesreach to version 1.31 and this one is really deprecate on version 1.28. Read more at cephfs. Buttttt, It just recommend you change from volume plugin to CSI Driver, and that is what exactly we want to do in this session 😄.

And now, the first thing you need to do is installing ceph-cli which one work as daemon in your host and help you provide CSI Driver for your cluster (Same as cilium)
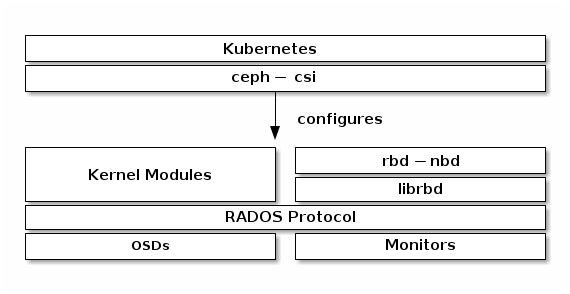
When you create ceph inside cluster, It not simple install only one daemonset things inside but that install bunch of things include things for cluster, including
- Monitors: A Ceph Monitor (
ceph-mon) maintains maps of the cluster state, including the monitor map, manager map, the OSD map, the MDS map, and the CRUSH map. - Managers: A Ceph Manager daemon (
ceph-mgr) is responsible for keeping track of runtime metrics and the current state of the Ceph cluster, including storage utilization, current performance metrics, and system load. - Ceph OSDs: An Object Storage Daemon (Ceph OSD,
ceph-osd) stores data, handles data replication, recovery, rebalancing, and provides some monitoring information to Ceph Monitors and Managers by checking other Ceph OSD Daemons for a heartbeat. - MDSs: A Ceph Metadata Server (MDS,
ceph-mds) stores metadata for the Ceph File System.
Info
Ceph stores data as objects within logical storage pools. Using the CRUSH algorithm, Ceph calculates which placement group (PG) should contain the object, and which OSD should store the placement group. The CRUSH algorithm enables the Ceph Storage Cluster to scale, rebalance, and recover dynamically.
And one question, how we can install ceph for our cluster, that will really interesting question. We have multiple ways for handle
- Using helm
- Using rook
- Using rdb-manifest and fs-manifest. Example Medium - Deploy Ceph, integrate with Kubernetes
Technically, from ceph-installing documentation, using rook is recommending way to run Ceph in Kubernetes or to connect an existing Ceph storage cluster to Kubernetes. And I really like that you will except more problems when you miss steps
![]()
With Rook, an open source cloud-native storage orchestrator, providing the platform, framework, and support for Ceph storage to natively integrate with cloud-native environments.
Info
Rook automates deployment and management of Ceph to provide self-managing, self-scaling, and self-healing storage services. The Rook operator does this by building on Kubernetes resources to deploy, configure, provision, scale, upgrade, and monitor Ceph.
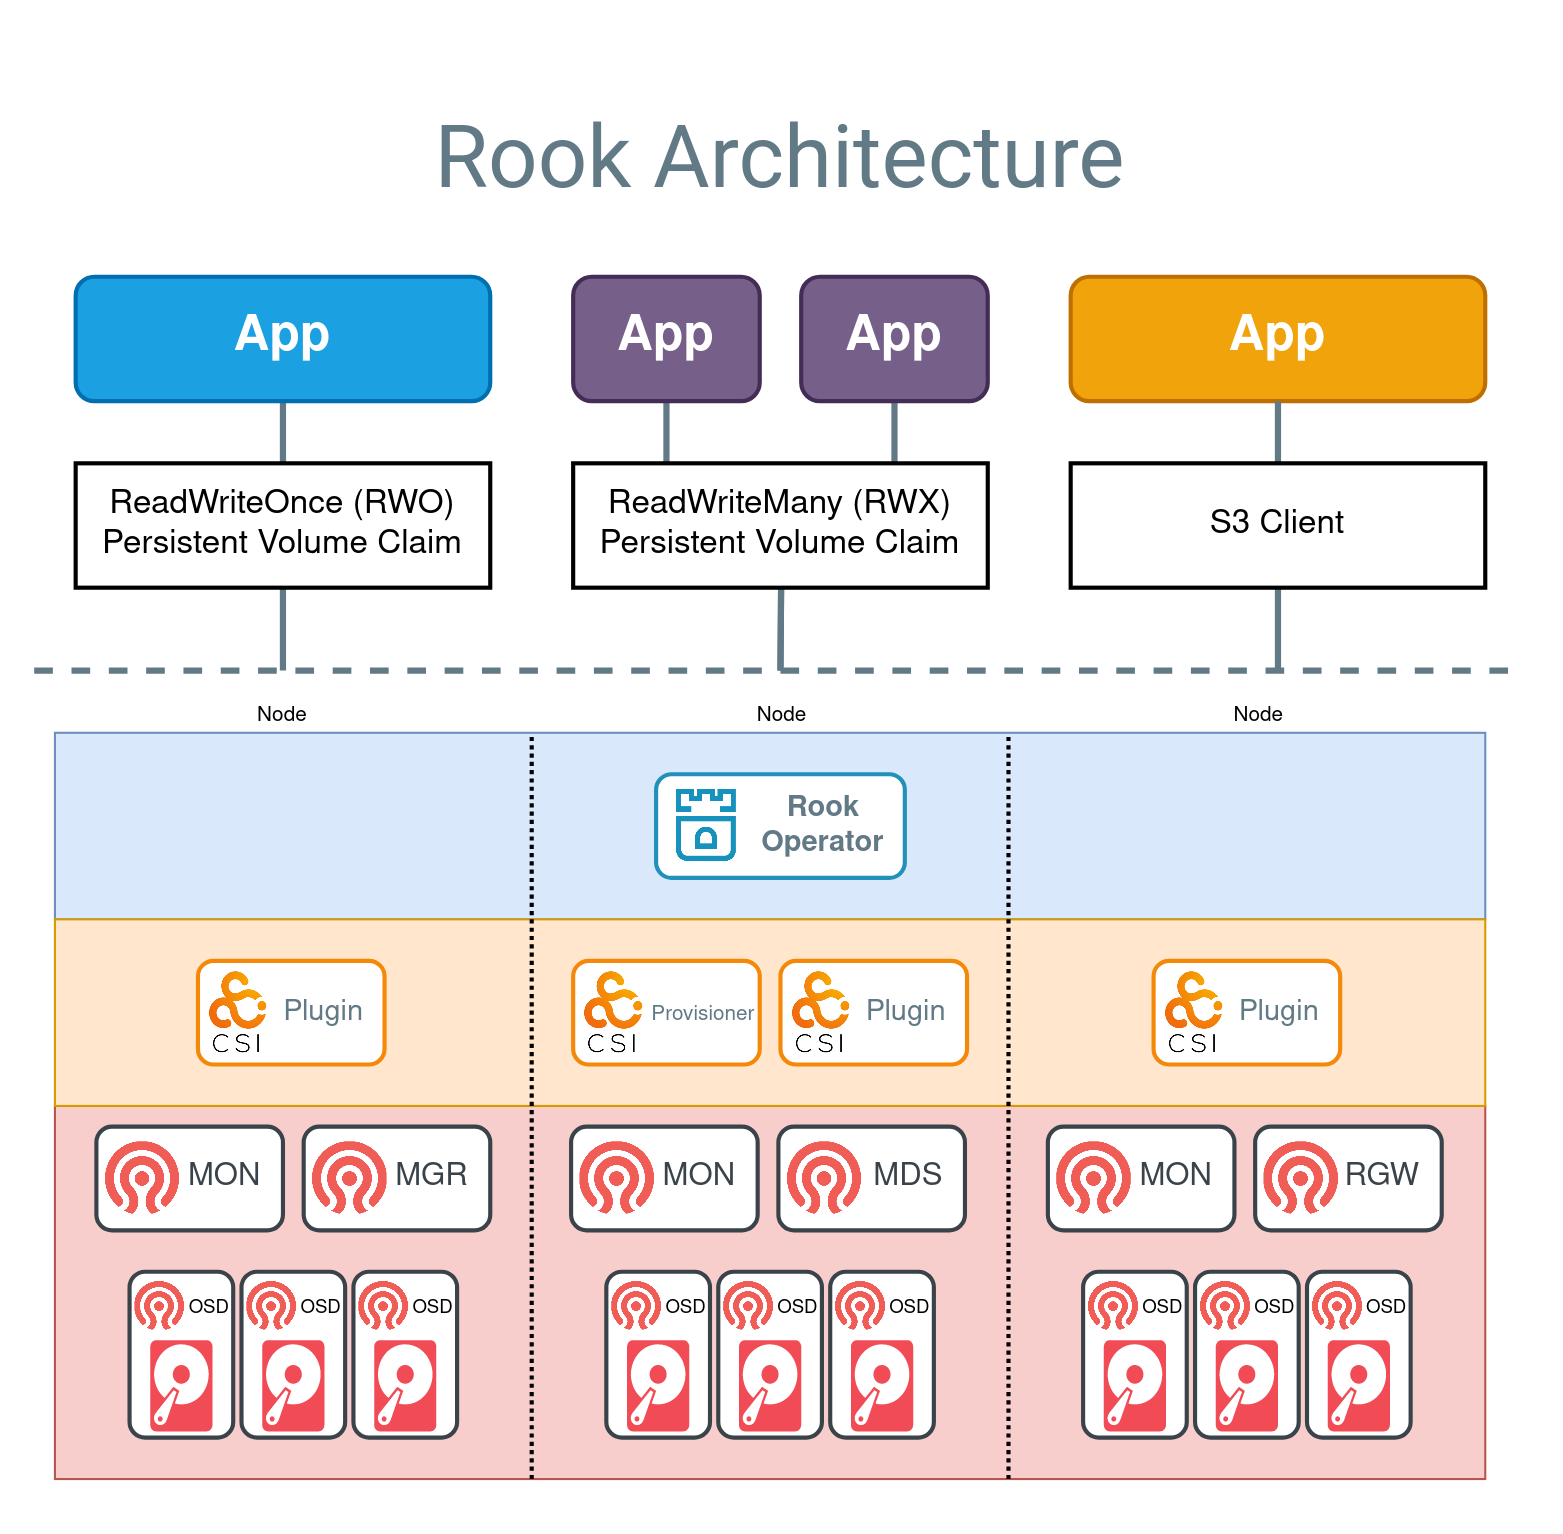
Following Rook, this platform will provide us bunch of CRD (Custom resource definition) in Kubernetes (Relate you on other session) to help us create interface or API for ease to implement and interact with Ceph with Rook. But just excited to tell you about that, you can learn more about rook and ceph through
Prerequisites
With Quickstart, I will follow this one to hand-on with ceph and rook
First of all, they require me check the configuration about kubernetes, we will hand-on to that enough
Kubernetes version ✅
Info
Kubernetes versions v1.26 through v1.31 are supported.
You can check version of kubernetes with kubectl get node
k get nodes
Currently, kubewekend of us work on v1.28.9 and this one enough for doing stuff with rook and ceph
CPU Architecture ✅
Info
Architectures supported are amd64 / x86_64 and arm64.
You can validate that with uname command in linux to check your host is adapt condition
uname -a
Ceph Prerequisites ✅
To configure the Ceph storage cluster, at least one of these local storage types is required:
- Raw devices (no partitions or formatted filesystems)
- Raw partitions (no formatted filesystem)
- LVM Logical Volumes (no formatted filesystem)
- Persistent Volumes available from a storage class in
blockmode
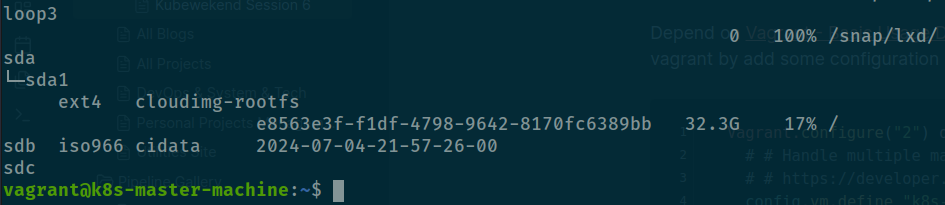
Currently, if you have look about raw devices that will not exist any for your ceph and that will make this deployment become false
lsblk -f
Not exist any raw devices, poor for me 😢. But I will do some stuff to provide it, therefore, you need head to Vagrantfile to implement additionally information for your host
Depend on Vagrant - Basic Usage Documentation, you can hand-on some stuff with vagrant by add some configuration
Vagrant.configure("2") do |config|
  # # Handle multiple machine in one block of Vagrantfile
  # # https://developer.hashicorp.com/vagrant/docs/multi-machine
  config.vm.define "k8s-master-machine", primary: true do |config|

	...

	# Add one more disk 10GB for master node
    config.vm.disk :disk, size: "10GB", name: "extra_storage"

	...
And run reload command with Vagrant
vagrant reload k8s-master-machineAfter ssh again to machine run lsblk -f and you will see raw device is addition to
Check again with lsblk but for ensure your volume capacity right expectation
lsblk -o NAME,HCTL,SIZE,MOUNTPOINT | grep -i "sd"
And now your are ready to continue
Kernel ✅
I think with upgrade kernel on last session, our cluster will be alright, for ensure not problem you can run some specific command following documentation to check about rbd
sudo modprobe rbdAnd not error is return, you should be okay 😎
One more thing, CephFS require minimum kernel version is 4.17 but we over that for newest version can be in Ubuntu 20.04 is 5.15.0-117-generic
Now you can reach to implement install Ceph, let’s see any problem occur when install that one 😅
Install Ceph with Rook
Following quickstart, A simple Rook cluster is created for Kubernetes with the following kubectl commands and example manifests.
git clone --single-branch --branch v1.15.0 https://github.com/rook/rook.git
cd rook/deploy/examples
kubectl create -f crds.yaml -f common.yaml -f operator.yaml
kubectl create -f cluster.yaml
Warning
Concern and following step by step
Remember you need to make sure have at least 2 or 3 node for doing configuration with ceph (prevention some thing not understand), so you need to modify for apply the next session practice to add more node inside your cluster. In my situation, you just need modify kind-config.yaml to get that work
kind: Cluster
apiVersion: kind.x-k8s.io/v1alpha4
name: kubewekend
networking:
  apiServerAddress: "0.0.0.0"
  apiServerPort: 6996
  podSubnet: 10.244.0.0/16
  serviceSubnet: 10.96.0.0/16
  disableDefaultCNI: true
  kubeProxyMode: "iptables"

nodes:
- role: control-plane
  image: "kindest/node:v1.28.9"
- role: worker
  image: "kindest/node:v1.28.9"
- role: worker
  image: "kindest/node:v1.28.9"
And run create again with command
kind create cluster --config kind-config.yaml --name kubewekendRe run command with rook to install again ceph, you will need some tool from ceph repository to handle ceph cluster
# Install cephadm
sudo apt search cephadm
sudo apt install cephadm -y

# Install ceph-commons
sudo cephadm install ceph-common
But hold up, it actually problem or some thing different between cluster.yaml and cluster-test.yaml. Therefore, you just need to use test for alternative because something you need deeper inside to use cluster version, that why is run ceph status command and it return error. Read more in version Medium - Implementing ROOK Ceph Storage solution on Virtual kubernetes clusters
 You can simply use
 kind-config.yaml with only control plane
kind: Cluster
apiVersion: kind.x-k8s.io/v1alpha4
name: kubewekend
networking:
  apiServerAddress: "0.0.0.0"
  apiServerPort: 6996
  podSubnet: 10.244.0.0/16
  serviceSubnet: 10.96.0.0/16
  disableDefaultCNI: true
  kubeProxyMode: "iptables"

nodes:
- role: control-plane
  image: "kindest/node:v1.28.9"
Info
Actually,
cluster-test.yamlis smaller version and you can use that for testing on small cluster, the error is not proven anything because you runcephinside cluster andcephcommand is not talk with cluster, and give you status
I think about situation, we need to modify the ceph command for understand that use for what cluster before we can use that command for check status inside kubewekend cluster. So again, apply with cluster-test.yaml instead of cluster.yaml
cd rook/deploy/examples

# Clean old version
kubectl delete -f cluster.yaml

# Install new one
kubectl create -f cluster-test.yaml
And wait at least 5 minute, can be long or short but afterward you will receive that value inside rook-ceph namespace
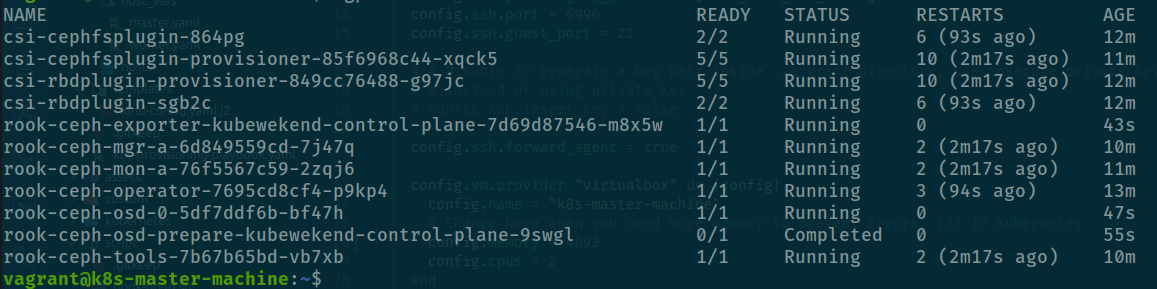
kubectl get pods -n rook-ceph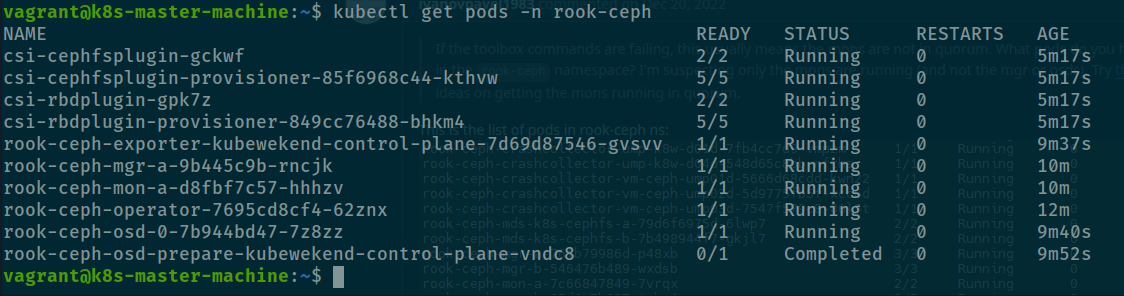
And done, now you will have interface inside kubernetes for ceph cluster, you can retrieve that one with
# Get the services of cluster
kubectl get svc -n rook-ceph
Now we create storageclass for ceph to being in-use with ceph cluster for both rbd and fs
# Create storage class for block storage(rbd) # ISSUE REALLY COME
kubectl apply -f ./rook/deploy/examples/csi/rbd/storageclass.yaml

# Create storage class for filesystem storage
kubectl apply -f ./rook/deploy/examples/csi/cephfs/storageclass.yaml
kubectl get sc -n rook-ceph
In the lastly, we will change default configuration of storage class for ceph-block can handle that
# promote for rook-ceph-block to default
kubectl patch storageclass rook-ceph-block -p '{"metadata": {"annotations":{"storageclass.kubernetes.io/is-default-class":"true"}}}'

# downgrade for standard storageclass (Kubewekend supply)
kubectl patch storageclass standard -p '{"metadata": {"annotations":{"storageclass.kubernetes.io/is-default-class":"false"}}}'
You will need to install ceph tools to help you monitor ceph cluster status
kubectl create -f ./rook/deploy/examples/toolbox.yamlAll available tools in the toolbox are ready for your troubleshooting needs.
Example:
ceph statusceph osd statusceph dfrados df
Actually insane, when you exec into the pod container with toolbox inside, you will meet some kind stuff and that will make causing for mount on next part
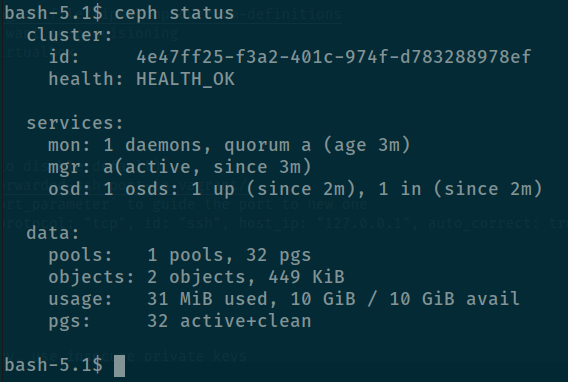
k exec --tty --stdin pod/rook-ceph-tools-xxxxxx-xxxx -- /bin/bashAnd use ceph command for check status
# Check status of cluster
ceph status

# Check detail health of cluster
ceph health detail
If you apply storageclass like above, It will create replicapool with make your ceph cluster become unhealthy with refer empty pool with push your cluster can become dataloss. It will really struggle, but I figure out about that so I will try modify
First of all, we reformat disk to raw because your disk is using by previous ceph cluster
# use fdisk to exchange
sudo fdisk /dev/sdc

# work with fdisk

Welcome to fdisk (util-linux 2.34).
Changes will remain in memory only, until you decide to write them.
Be careful before using the write command.

# Use for create parition (NOT NEED)
Command (m for help): n
Partition number (1-128, default 1): <enter>
First sector (34-20971486, default 2048): <enter>
Last sector, +/-sectors or +/-size{K,M,G,T,P} (2048-20971486, default 20971486): <enter>

Created a new partition 1 of type 'Linux filesystem' and of size 10 GiB.

# Check disk
Command (m for help): p
Disk /dev/sdc: 10 GiB, 10737418240 bytes, 20971520 sectors
Disk model: HARDDISK
Units: sectors of 1 * 512 = 512 bytes
Sector size (logical/physical): 512 bytes / 512 bytes
I/O size (minimum/optimal): 512 bytes / 512 bytes
Disklabel type: gpt
Disk identifier: 98815868-002F-4928-A620-37375EF0CDD4

# Save state
Command (m for help): w
The partition table has been altered.
Calling ioctl() to re-read partition table.
Syncing disks.
Now reboot your machine
sudo shutdown -r nowAfter that, try to connect to machine again but remember you need create again cluster for except difficult to control
# delete old cluster (Should be delete first, but now it can)
kind delete cluster --name kubewekend

# create new cluster
kind create cluster --config /path/config --name kubewekend
And now try to create again
cd rook/deploy/examples
kubectl create -f crds.yaml -f common.yaml -f operator.yaml
kubectl create -f cluster-test.yaml
Wait at least 5min with check status of ceph cluster is work or not
kubectl get cephcluster -wAnd if problem continue expose HEALTH_WARN, you can exec inside tool command

  cluster:
    id:     4e47ff25-f3a2-401c-974f-d783288978ef
    health: HEALTH_WARN
            Reduced data availability: 1 pg inactive
            OSD count 0 < osd_pool_default_size 1

  services:
    mon: 1 daemons, quorum a (age 2m)
    mgr: a(active, since 77s)
    osd: 0 osds: 0 up, 0 in

  data:
    pools:   1 pools, 1 pgs
    objects: 0 objects, 0 B
    usage:   0 B used, 0 B / 0 B avail
    pgs:     100.000% pgs unknown
             1 unknown
It mean you cluster is not work with raw disk (not exist OSD), therefore you must back to configuration of Vagrantfile, you need to command the extra_disk for UNATTACHED with disk, and uncommand to reload again

vagrant reload k8s-master-machine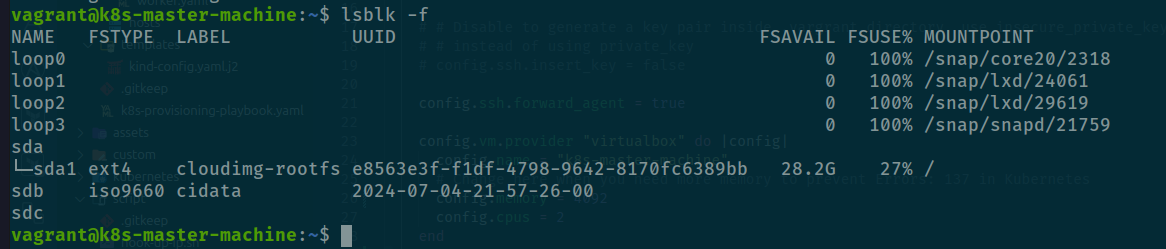
And now rook-ceph-osd-0-xxxxx-xxx will provision for your, that really tough but efficiency
Validate again health status of ceph cluster with toolkit
Great, now you need to modify or delete inside RBD Storage class for except create replicapool with 3
apiVersion: ceph.rook.io/v1
kind: CephBlockPool
metadata:
  name: replicapool
  namespace: rook-ceph # namespace:cluster
spec:
  failureDomain: host
  replicated:
    size: 2
#    # Disallow setting pool with replica 1, this could lead to data loss without recovery.
#    # Make sure you're *ABSOLUTELY CERTAIN* that is what you want
    requireSafeReplicaSize: true
#    # gives a hint (%) to Ceph in terms of expected consumption of the total cluster capacity of a given pool
#    # for more info: https://docs.ceph.com/docs/master/rados/operations/placement-groups/#specifying-expected-pool-size
#    #targetSizeRatio: .5
---
apiVersion: storage.k8s.io/v1
kind: StorageClass
metadata:
  name: rook-ceph-block
provisioner: rook-ceph.rbd.csi.ceph.com # csi-provisioner-name
parameters:
  # clusterID is the namespace where the rook cluster is running
  # If you change this namespace, also change the namespace below where the secret namespaces are defined
  clusterID: rook-ceph # namespace:cluster

  # If you want to use erasure coded pool with RBD, you need to create
  # two pools. one erasure coded and one replicated.
  # You need to specify the replicated pool here in the `pool` parameter, it is
  # used for the metadata of the images.
  # The erasure coded pool must be set as the `dataPool` parameter below.
  #dataPool: ec-data-pool
  pool: replicapool

  # (optional) mapOptions is a comma-separated list of map options.
  # For krbd options refer
  # https://docs.ceph.com/docs/master/man/8/rbd/#kernel-rbd-krbd-options
  # For nbd options refer
  # https://docs.ceph.com/docs/master/man/8/rbd-nbd/#options
  # mapOptions: lock_on_read,queue_depth=1024

  # (optional) unmapOptions is a comma-separated list of unmap options.
  # For krbd options refer
  # https://docs.ceph.com/docs/master/man/8/rbd/#kernel-rbd-krbd-options
  # For nbd options refer
  # https://docs.ceph.com/docs/master/man/8/rbd-nbd/#options
  # unmapOptions: force

  # (optional) Set it to true to encrypt each volume with encryption keys
  # from a key management system (KMS)
  # encrypted: "true"

  # (optional) Use external key management system (KMS) for encryption key by
  # specifying a unique ID matching a KMS ConfigMap. The ID is only used for
  # correlation to configmap entry.
  # encryptionKMSID: <kms-config-id>

  # RBD image format. Defaults to "2".
  imageFormat: "2"

  # RBD image features
  # Available for imageFormat: "2". Older releases of CSI RBD
  # support only the `layering` feature. The Linux kernel (KRBD) supports the
  # full complement of features as of 5.4
  # `layering` alone corresponds to Ceph's bitfield value of "2" ;
  # `layering` + `fast-diff` + `object-map` + `deep-flatten` + `exclusive-lock` together
  # correspond to Ceph's OR'd bitfield value of "63". Here we use
  # a symbolic, comma-separated format:
  # For 5.4 or later kernels:
  #imageFeatures: layering,fast-diff,object-map,deep-flatten,exclusive-lock
  # For 5.3 or earlier kernels:
  imageFeatures: layering

  # The secrets contain Ceph admin credentials. These are generated automatically by the operator
  # in the same namespace as the cluster.
  csi.storage.k8s.io/provisioner-secret-name: rook-csi-rbd-provisioner
  csi.storage.k8s.io/provisioner-secret-namespace: rook-ceph # namespace:cluster
  csi.storage.k8s.io/controller-expand-secret-name: rook-csi-rbd-provisioner
  csi.storage.k8s.io/controller-expand-secret-namespace: rook-ceph # namespace:cluster
  csi.storage.k8s.io/node-stage-secret-name: rook-csi-rbd-node
  csi.storage.k8s.io/node-stage-secret-namespace: rook-ceph # namespace:cluster
  # Specify the filesystem type of the volume. If not specified, csi-provisioner
  # will set default as `ext4`. Note that `xfs` is not recommended due to potential deadlock
  # in hyperconverged settings where the volume is mounted on the same node as the osds.
  csi.storage.k8s.io/fstype: ext4
# uncomment the following to use rbd-nbd as mounter on supported nodes
# **IMPORTANT**: CephCSI v3.4.0 onwards a volume healer functionality is added to reattach
# the PVC to application pod if nodeplugin pod restart.
# Its still in Alpha support. Therefore, this option is not recommended for production use.
#mounter: rbd-nbd
allowVolumeExpansion: true
reclaimPolicy: Delete
And now apply rbd and cephfs again
# rbd
kubectl apply -f ./csi/rbd/storageclass.yaml

# cephfs
kubectl apply -f ./csi/cephfs/storageclass.yaml
Success
Like above your have twice storageclass for
rbdandcephfs
Try to mount and attach the volume with RBD
I just collect example from Rook about create the wordpress and mysql with PVC, so let try to create one of them and see what result
apiVersion: v1
kind: Service
metadata:
  name: wordpress-mysql
  labels:
    app: wordpress
spec:
  ports:
    - port: 3306
  selector:
    app: wordpress
    tier: mysql
  clusterIP: None
---
apiVersion: v1
kind: PersistentVolumeClaim
metadata:
  name: mysql-pv-claim
  labels:
    app: wordpress
spec:
  storageClassName: rook-ceph-block
  accessModes:
    - ReadWriteOnce
  resources:
    requests:
      storage: 5Gi
---
apiVersion: apps/v1
kind: Deployment
metadata:
  name: wordpress-mysql
  labels:
    app: wordpress
    tier: mysql
spec:
  selector:
    matchLabels:
      app: wordpress
      tier: mysql
  strategy:
    type: Recreate
  template:
    metadata:
      labels:
        app: wordpress
        tier: mysql
    spec:
      containers:
        - image: mysql:5.6
          name: mysql
          env:
            - name: MYSQL_ROOT_PASSWORD
              value: changeme
          ports:
            - containerPort: 3306
              name: mysql
          volumeMounts:
            - name: mysql-persistent-storage
              mountPath: /var/lib/mysql
      volumes:
        - name: mysql-persistent-storage
          persistentVolumeClaim:
            claimName: mysql-pv-claim
Through of this manifest, you can see that will provide something with inside namespace include
- MySQL Deployment with use PVC
- PVC Use
rook-ceph-blockwith request 5GB - Service to expose port 3306 of MySQL
And now we apply it with apply -f command
# Use remote
kubectl apply -f https://github.com/rook/rook/blob/release-1.15/deploy/examples/mysql.yaml

# Use inside your host
kubectl apply -f ./rook/deploy/examples/mysql.yaml
And now you create PVC for mysql, and your result is creating successfully

Conclusion

Success
Really tough week, I stand with you in late night for complete this session, more thing I learn from this one and try to hand on with volume is new experience for me. CSI is one of things make Kubernetes become pleasant, delivery more solution for community and create opportunities for development and deployment can reach to next level with this techniques. And Ceph and Rook, I can say that really hard to control, learn and hand on with huge architecture stand behind, but like i said
kubewekendis a change for myself and for my community to learn some thing new, hope you find well with content
Quote
A couple is passing, and I try to balance my workload, so have kept you waiting for a long time. But this week is really cool, and I can back with you, learn and do something greate inside Kubewekend. Therefore, I appreciate with my followers, our community is part which tell myself need to improve everyday and bring you interesting content, so stay safe, learn something new and I will see you on next week maybe with Kubewekend. Bye Bye 🙌