Quote
Hello @all, It me again probably 😄. Today I want to continue contribute the way to bundle and build completely application mobile which can ready to delivery to another platform, such as Google Play (Android) or App Store (IOS)
You can follow and take a look other blog of me about Setup Environment for build android, that steps will require and provide your environment to becoming ready integrate with build-tools which we approach today, Fastlane
What is fastlane ?
Introduce
![]()
Info
fastlane is the easiest way to automate beta deployments and releases for your iOS and Android apps. 🚀 It handles all tedious tasks, like generating screenshots, dealing with code signing, and releasing your application.
Yeah, in my opinion, fastlane is simple way to automatically your progress when meet or need build pattern for multiple mobile platform. Well, maybe you can work React Native and I think fastlane is a great choice when you think about building CI/CD for your mobile applications
Reason why fastlane ?
- 100% opensource
- Integration with all extension which need build and release your mobile applications
- In house building, you can run this on your machine, no expose anything
- Support multiple platform,
Mac,IOSandAndroid - Simple your task with
fastlanealias, and build-tool will take other responsibility
And many more reason and benefit when you can choose this tool for instead of multiple extensions

Install fastlane
So basically, your host will not exist fastlane, you need to install and export PATH to binary file to in use.
Before install fastlane, you need to make sure your host have require tools and package, which use to setup that one, such as
- Ruby (Recommend for Linux)
- Bundler : You can use
sudo gem install bundler(Recommend MacOS). Read more: Documentation
After already these tools on your host, go to install fastlane with command
# Use sudo because gem is inside /usr/local when you install via apt, and it need root permission
# Documentation: https://docs.fastlane.tools/#:~:text=System%20Ruby%20%2B%20RubyGems%20(macOS/Linux/Windows)
sudo gem install fastlane
That all you need, you can check fastlane in your host with --version flag
fastlane --version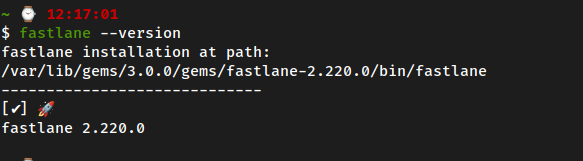
Reach to important part when you make the automation progress, fastlane usually define like ruby, because of the module belong ruby 😄, It simple and do not make you confusing when work for, but at lease you need to understand Appfile and Fastfile, do they mean
Appfile
Info
The
Appfilestores useful information that are used across all fastlane tools like your Apple ID or the application Bundle Identifier, to deploy your lanes faster and tailored on your project needs.From fastlane-docs
Appfile of Android, really simple when generate with only json_key_file and package_name
json_key_file("") # Path to the json secret file - Follow https://docs.fastlane.tools/actions/supply/#setup to get one
package_name("") # e.g. com.krausefx.app
With the IOS, it will have more things, because IOS application really mess up and hard to define or generate
app_identifier "net.sunapps.1" # The bundle identifier of your app
apple_id "felix@krausefx.com"  # Your Apple email address

# You can uncomment the lines below and add your own
# team selection in case you're in multiple teams
# team_name "Felix Krause"
# team_id "Q2CBPJ58CA"

# To select a team for App Store Connect use
# itc_team_name "Company Name"
# itc_team_id "18742801"
You can use multiple bundle identifiers per environment with defining for_platform or for_lane block declaration
app_identifier "net.sunapps.1"
apple_id "felix@krausefx.com"
team_id "Q2CBPJ58CC"

for_platform :ios do
  team_id '123' # for all iOS related things
  for_lane :test do
    app_identifier 'com.app.test'
  end
end
When you call lane test, the default values will be overwritten by for_lane block
If you want to access Appfile with Fastfile, you can use try_fetch_value
...

identifier = CredentialsManager::AppfileConfig.try_fetch_value(:app_identifier)
team_id = CredentialsManager::AppfileConfig.try_fetch_value(:team_id)

...
Fastfile
Info
The
Fastfilestores the automation configuration that can be run withfastlane. TheFastfileis used to configurefastlane. Open it in your favorite text editor, usingRubysyntax highlighting.From fastlane-docs
Basic lane define can be
lane :build do
	gradle(
		task: "assembleRelease"
	)
end
You can create multiple lane, and run it by specify case or all base on your decision and expectation
With Fastfile, you will have some special block, extensions which can be helpful to operating automation, such as
-
Blocks
before_allandafter_all, It organizes the simple operations you need to perform before or after the request lane and actions similar to the lane. Those blocks are really useful when you want to repeat any process, such astestFastfile before_all do |lane| cocoapods end # after_block need the lane become successful, if not it won't called after_all do |lane| say("Successfully finished deployment (#{lane})!") slack( message: "Successfully submitted new App Update" ) sh("./send_screenshots_to_team.sh") # Example end -
errorblock, which get executed when an error occurs, in any of the blocks (before_all, the lane itself or after_all). Usually to announce notification abouterror_infotoslackFastfile error do |lane, exception| slack( message: "Something went wrong with the deployment.", success: false, payload: { "Error Info" => exception.error_info.to_s } ) end -
You can use
fastlane new_actionto define the new extension withruby, for performing specify job or anything else. Usually put in on locationfastlane/actions/[action_name].rbYou can call extension on
Fastfilewithother_actionfunctionalFastfile other_action.deliver(text: "Please input your password:", key: 123)So i do not familiar with these configuration, but you can take a look and read more about this one. Documetation
-
You also import the other fastlane file from another repositories or template with
importandimport_from_gitFastfile import "../GeneralFastfile" override_lane :from_general do # ... end import_from_git(url: 'https://github.com/fastlane/fastlane') # or import_from_git(url: 'git@github.com:MyAwesomeRepo/MyAwesomeFastlaneStandardSetup.git', path: 'fastlane/Fastfile') lane :new_main_lane do # ... end
Note
You should import the other Fastfile on the top above your lane declarations. When defining a new lane fastlane will make sure to not run into any name conflicts. If you want to overwrite an existing lane (from the imported one), use the override_lane keyword.
-
requirecan be used if you need to integration another 3rd party from gemFastfile fastlane_require 'hike' lane :release do # Do stuff with hike end
fastlane cli
The last thing you need to concern when define and choose fastlane for automation progress is fastlane command line. You will need it to perform jobs which define in fastfile
Take a look with -h flag with fastlane command
  fastlane

  CLI for 'fastlane' - The easiest way to automate beta deployments and releases for your iOS and Android apps

        Run using `fastlane [platform] [lane_name]`
        To pass values to the lanes use `fastlane [platform] [lane_name] key:value key2:value2`

  Commands: (* default)
    action                 Shows more information for a specific command
    actions                Lists all available fastlane actions
    add_plugin             Add a new plugin to your fastlane setup
    console                Opens an interactive developer console
    docs                   Generate a markdown based documentation based on the Fastfile
    enable_auto_complete   Enable tab auto completion
    env                    Print your fastlane environment, use this when you submit an issue on GitHub
    help                   Display global or [command] help documentation
    init                   Helps you with your initial fastlane setup
    install_plugins        Install all plugins for this project
    lanes                  Lists all available lanes and shows their description
    list                   Lists all available lanes without description
    new_action             Create a new custom action for fastlane.
    new_plugin             Create a new plugin that can be used with fastlane
    run                    Run a fastlane one-off action without a full lane
    search_plugins         Search for plugins, search query is optional
    socket_server          Starts local socket server and enables only a single local connection
    trigger              * Run a specific lane. Pass the lane name and optionally the platform first.
    update_fastlane        Update fastlane to the latest release
    update_plugins         Update all plugin dependencies

  Aliases:
    swift init init swift

  Global Options:
    --verbose
    --capture_output     Captures the output of the current run, and generates a markdown issue template
    --troubleshoot       Enables extended verbose mode. Use with caution, as this even includes ALL sensitive data. Cannot be used on CI.
    --env STRING[,STRING2] Add environment(s) to use with `dotenv`
    -h, --help           Display help documentation
    -v, --version        Display version information


  Options for trigger:
    --disable_runner_upgrades Prevents fastlane from attempting to update FastlaneRunner swift project
    --swift_server_port INT Set specific port to communicate between fastlane and FastlaneRunner

  Author:
    Felix Krause <fastlane@krausefx.com>

  Website:
    https://fastlane.tools

  GitHub:
    https://github.com/fastlane/fastlane
It has a lots of stuff, but if you just want to execution fastfile, so simple move to location where fastlane directories exist, trigger command
fastlane [platform] [lane_name]fastlane advanced
With fastlane, it has’t to stop that, fastlane can interact with multiple configuration, actions and environments. You can take a time and look for in Fastlane Advanced Docs. Some topics which can interest you, such ah
Setup project with fastlane
To setup fastlane for android or ios, you need to navigate to ./android or ./ios, run the command init for create and generate configuration base on the platform
# Android
cd ./android

fastlane init

# IOS
cd ./ios

fastlane init
It will ask you couple question, for supply the generate you can make decision for question, like
- Provide the package name for your application when asked (e.g. io.fabric.yourapp)
- Press enter when asked for the path to your json secret file
- Answer ‘n’ when asked if you plan on uploading info to Google Play via fastlane (we can set this up later)
After that, you can ./fastlane directory and gemfile is create, and inside fastlane you can see it include two file Appfile and Fastfile

I do not familiar with upload application to Google Play, but maybe on next time, I will guide you about that. Before that, you can read and do step by step like instruction, key.json is result of last progress (Include: secret-key, name for authentication to Google Play Console). Read more at Documentaion: Setting up supply
When you applied all kind of things, you will have folder android, like
.
├── app
│   ├── build.gradle
│   ├── debug.keystore
│   ├── google-services.json
│   ├── proguard-rules.pro
│   └── src
├── build.gradle
├── fastlane
│   ├── Appfile
│   ├── Fastfile
│   ├── README.md
│   └── report.xml
├── Gemfile
├── gradle
│   └── wrapper
├── gradle.properties
├── gradlew
├── gradlew.bat
└── settings.gradle
Gradle Configuration (Android)

When you build android, you need to setup the environments for build and release applications, you can read and check about requirements at Requirements things for build android
Next, let take a look about gradle to understand what things usually config for android project. Always, when create project with Android Studio, environments will generate gradle configuration files. Read more: Medium - What is Gradle and why do we use it as Android developers?. So i can help you brief information about configuration file, like
Settings.gradle
rootProject.name = 'example'
apply from: file("../node_modules/@react-native-community/cli-platform-android/native_modules.gradle"); applyNativeModulesSettingsGradle(settings)
include ':app'
includeBuild('../node_modules/@react-native/gradle-plugin')
Info
You can read more about
settingsin official documentation, with this file you can understand about
rootProject.nameassigns a name to the build, which overrides the default behavior of naming the build after the directory it’s in. It’s recommended to set a fixed name as the folder might change if the project is shared - e.g. as root of a Git repository.apply from, represent the way how script plugins are applied. This is how it’s described in the official docs. (Resource: StackOverFlow - what is mean of ‘apply from’ in gradle?)include(projectPaths)Adds the given projects to the build. Each path in the supplied list is treated as the path of a project to add to the build. Note that these path are not file paths, but instead specify the location of the new project in the project hierarchy. As such, the supplied paths must use the ’:’ character as separator (and NOT ’/’).includeBuild(rootProject)includes a build at the specified path to the composite build.
Note
So it mean, the file will define settings what gradle will target for, that usually
react-nativeproject usenode_modulesto add and manage package,gradleneeds to understandnative-pluginand others for project, sosettings.gradleborn for this responsibility
build.gradle (root project)
buildscript {
    ext {
        buildToolsVersion = "34.0.0"
        minSdkVersion = 21
        compileSdkVersion = 34
        targetSdkVersion = 34
        ndkVersion = "25.1.8937393"
        kotlinVersion = "1.8.0"

        googlePlayServicesVersion = "+" // default: "+"
        firebaseMessagingVersion = "21.1.0" // default: "21.1.0"

        // Other settings
        supportLibVersion = "23.1.1" // default: 23.1.1
    }
    repositories {
        google()
        mavenCentral()
    }
    dependencies {
        classpath("com.android.tools.build:gradle")
        classpath("com.facebook.react:react-native-gradle-plugin")
        classpath("org.jetbrains.kotlin:kotlin-gradle-plugin")
        classpath 'com.google.gms:google-services:4.4.1'
    }
}

apply plugin: "com.facebook.react.rootproject"
Info
The project-level build.gradle file is used to define global configuration and settings for the entire project. It is also used to implement dependencies and plugins on top level. By default, all configurations and settings inside our project-level
build.gradleshould be inherited by all the modules in the project, andbuild.gradlefiles inside modules are able to override them.
The most common things that are set inside project-level build.gradle are the plugins that are necessary for building the Android app, such as:
- Android Gradle,
- Kotlin,
- Hilt.
Sometimes you also have a need to add libraries that you would like to use across your modules, like:
- Android Support Library,
- Google Play Services Library.
When you talk a look the build.gradle, that include some module with some reason
repositories{}Configures the repositories for this project.dependencies {}Configures the dependencies for this project.buildscript {}Configures the build script classpath for this project.ext {}Configuration libraries for build progress for this project
build.gradle (app module)
apply plugin: "com.android.application"
apply plugin: "org.jetbrains.kotlin.android"
apply plugin: "com.facebook.react"
apply plugin: 'com.android.application'
apply plugin: 'com.google.gms.google-services'
apply from: file("../../node_modules/react-native-vector-icons/fonts.gradle")


/**
 * This is the configuration block to customize your React Native Android app.
 * By default you don't need to apply any configuration, just uncomment the lines you need.
 */
react {
    /* Folders */
    //   The root of your project, i.e. where "package.json" lives. Default is '..'
    // root = file("../")
    //   The folder where the react-native NPM package is. Default is ../node_modules/react-native
    // reactNativeDir = file("../node_modules/react-native")
    //   The folder where the react-native Codegen package is. Default is ../node_modules/@react-native/codegen
    // codegenDir = file("../node_modules/@react-native/codegen")
    //   The cli.js file which is the React Native CLI entrypoint. Default is ../node_modules/react-native/cli.js
    // cliFile = file("../node_modules/react-native/cli.js")

    /* Variants */
    //   The list of variants to that are debuggable. For those we're going to
    //   skip the bundling of the JS bundle and the assets. By default is just 'debug'.
    //   If you add flavors like lite, prod, etc. you'll have to list your debuggableVariants.
    // debuggableVariants = ["liteDebug", "prodDebug"]

    /* Bundling */
    //   A list containing the node command and its flags. Default is just 'node'.
    // nodeExecutableAndArgs = ["node"]
    //
    //   The command to run when bundling. By default is 'bundle'
    // bundleCommand = "ram-bundle"
    //
    //   The path to the CLI configuration file. Default is empty.
    // bundleConfig = file(../rn-cli.config.js)
    //
    //   The name of the generated asset file containing your JS bundle
    // bundleAssetName = "MyApplication.android.bundle"
    //
    //   The entry file for bundle generation. Default is 'index.android.js' or 'index.js'
    // entryFile = file("../js/MyApplication.android.js")
    //
    //   A list of extra flags to pass to the 'bundle' commands.
    //   See https://github.com/react-native-community/cli/blob/main/docs/commands.md#bundle
    // extraPackagerArgs = []

    /* Hermes Commands */
    //   The hermes compiler command to run. By default it is 'hermesc'
    // hermesCommand = "$rootDir/my-custom-hermesc/bin/hermesc"
    //
    //   The list of flags to pass to the Hermes compiler. By default is "-O", "-output-source-map"
    // hermesFlags = ["-O", "-output-source-map"]
}

/**
 * Set this to true to Run Proguard on Release builds to minify the Java bytecode.
 */
def enableProguardInReleaseBuilds = false

/**
 * The preferred build flavor of JavaScriptCore (JSC)
 *
 * For example, to use the international variant, you can use:
 * `def jscFlavor = 'org.webkit:android-jsc-intl:+'`
 *
 * The international variant includes ICU i18n library and necessary data
 * allowing to use e.g. `Date.toLocaleString` and `String.localeCompare` that
 * give correct results when using with locales other than en-US. Note that
 * this variant is about 6MiB larger per architecture than default.
 */
def jscFlavor = 'org.webkit:android-jsc:+'

android {
    ndkVersion rootProject.ext.ndkVersion
    buildToolsVersion rootProject.ext.buildToolsVersion
    compileSdk rootProject.ext.compileSdkVersion

    namespace "com.example"
    defaultConfig {
        applicationId "com.example.fun"
        // minSdkVersion rootProject.ext.minSdkVersion
        minSdkVersion 23
        targetSdkVersion rootProject.ext.targetSdkVersion
        versionCode 1
        versionName "1.0"
		// Change name of output apk file
        archivesBaseName = "example"
    }
    signingConfigs {
        debug {
            storeFile file('debug.keystore')
            storePassword 'android'
            keyAlias 'androiddebugkey'
            keyPassword 'android'
        }
    }
    buildTypes {
        debug {
            signingConfig signingConfigs.debug
        }
        release {
            // Caution! In production, you need to generate your own keystore file.
            // see https://reactnative.dev/docs/signed-apk-android.
            signingConfig signingConfigs.debug
            minifyEnabled enableProguardInReleaseBuilds
            proguardFiles getDefaultProguardFile("proguard-android.txt"), "proguard-rules.pro"
        }
    }
}

dependencies {
    // The version of react-native is set by the React Native Gradle Plugin
    implementation("com.facebook.react:react-android")
    implementation("com.facebook.react:flipper-integration")
    implementation 'com.facebook.android:facebook-android-sdk:latest.release'

    if (hermesEnabled.toBoolean()) {
        implementation("com.facebook.react:hermes-android")
    } else {
        implementation jscFlavor
    }
}

apply from: file("../../node_modules/@react-native-community/cli-platform-android/native_modules.gradle"); applyNativeModulesAppBuildGradle(project)
apply plugin: 'com.android.application'
apply plugin: 'com.google.gms.google-services'
Info
The last and probably the most used one is
build.gradleinside our app module. It is used for defining the configurations and settings used for this particular module. Functionality-wise, it has similar options as project-levelbuild.gradle, but it brings a separation of concerns. So all the libraries and frameworks, that we want to use in our Kotlin code that is placed inside our app module, should be defined in dependencies block from this gradle file. All the plugins that are required for these libraries to work should also be defined in the same gradle file.
Inside our app module build.gradle, we can find three main sections:
- Plugins,
- Android,
- Dependencies.
- React: Usually configuration when
react-nativeproject
This is a place where we can do a lot of configuration changes to our app. The most common things developers set here are:
- The versions of minSdk, targetSdk and compileSdk.
- Version code and name of the app.
- Product flavors and build types.
You can consult StackOverFlow - How to change apk name by using gradle like this format? article for understand more way to configuration name of release application when bundle. If not, it will set to app default
defaultConfig {
    ...
    archivesBaseName = "$applicationId-v$versionCode($versionName)"
}
gradle.properties
# Project-wide Gradle settings.

# IDE (e.g. Android Studio) users:
# Gradle settings configured through the IDE *will override*
# any settings specified in this file.

# For more details on how to configure your build environment visit
# http://www.gradle.org/docs/current/userguide/build_environment.html

# Specifies the JVM arguments used for the daemon process.
# The setting is particularly useful for tweaking memory settings.
# Default value: -Xmx512m -XX:MaxMetaspaceSize=256m
org.gradle.jvmargs=-Xmx2048m -XX:MaxMetaspaceSize=512m

# When configured, Gradle will run in incubating parallel mode.
# This option should only be used with decoupled projects. More details, visit
# http://www.gradle.org/docs/current/userguide/multi_project_builds.html#sec:decoupled_projects
# org.gradle.parallel=true

# AndroidX package structure to make it clearer which packages are bundled with the
# Android operating system, and which are packaged with your app's APK
# https://developer.android.com/topic/libraries/support-library/androidx-rn
android.useAndroidX=true
# Automatically convert third-party libraries to use AndroidX
android.enableJetifier=true

# Use this property to specify which architecture you want to build.
# You can also override it from the CLI using
# ./gradlew <task> -PreactNativeArchitectures=x86_64
reactNativeArchitectures=armeabi-v7a,arm64-v8a,x86,x86_64

# Use this property to enable support to the new architecture.
# This will allow you to use TurboModules and the Fabric render in
# your application. You should enable this flag either if you want
# to write custom TurboModules/Fabric components OR use libraries that
# are providing them.
newArchEnabled=false

# Use this property to enable or disable the Hermes JS engine.
# If set to false, you will be using JSC instead.
hermesEnabled=true
Info
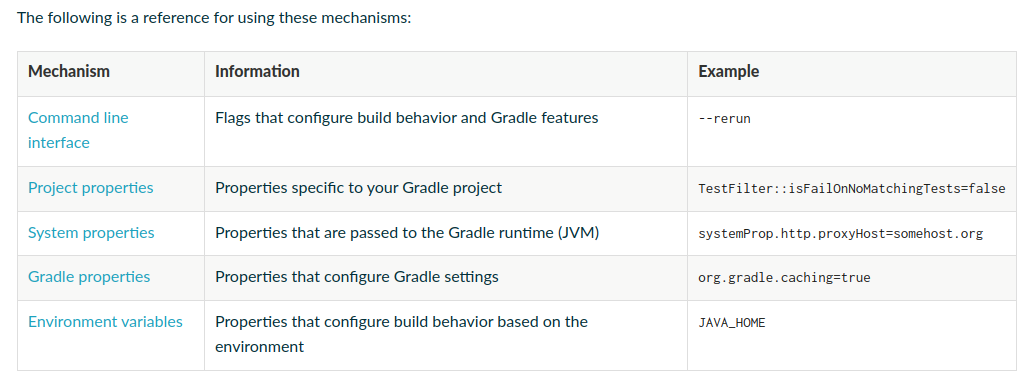
Gradle provides multiple mechanisms for configuring the behavior of Gradle itself and specific projects.
This way will help you more intervention to gradle when you applied gradle assemble or gradlew assemble with more configuration for react-native
Define fastlane android project configuration
So target on this part, I will focus how the fastlane work, and how can use fastlane with gradle to build completely .apk. This steps will prepare for next release production when you want to force your application to Google Play
First of all, you can use the script to setup environment, just couple things requirements when i refer on Setup Environment for build android article
#!/bin/bash
# Install common things
sudo apt update
sudo apt install -y curl build-essential cmake unzip


# Install Java (Requires Java >= 17)
# Java version: 17
sudo apt update
sudo apt install -y openjdk-17-jre openjdk-17-jdk
java --version

# Install Android command-line tools
wget https://dl.google.com/android/repository/commandlinetools-linux-11076708_latest.zip && unzip *.zip
mkdir -p ~/.android-sdk/cmdline-tools/latest
cp -r cmdline-tools/* ~/.android-sdk/cmdline-tools/latest
ls -la ~/.android-sdk/cmdline-tools/latest/bin

# Setup ANDROID_HOME
echo "export ANDROID_HOME=\"\$HOME/.android-sdk\"" >> ~/.bashrc
echo "export PATH=\"\$PATH:\$ANDROID_HOME/cmdline-tools/latest/bin\"" >> ~/.bashrc

####### Optional installing ######
# # Install small build packages, base on native-chart on android
# sudo apt-get install ninja-build -y
# ninja --version
##################################

# Install fastlane
sudo apt-get install -y ruby-full
ruby -v
sudo gem install fastlane
fastlane --version
Copy and create setup-android-env.sh script, you change mode of file and execute the script by some command
# Give the execution permit to file
chmod +x setup-android-env.sh

# Execution
./setup-android-env.sh

# Or if you not want give permission
cat setup-android-env.sh | bash -
Requirement about the environment when build android, at least
- 2 CPU vCore
- 4 GB Ram
>=30 GB Disk (Recommend : SSD Disk)
When you install fastlane, java and common essential things. You need to reload profile of Linux machine for get new environment.
# Reload profile
source "$HOME/.bashrc" # same as .zshrc
Warning
Just base on my knowledge, when you want to perform build Android on host machine, you need to specify the better way to applied to your
ci/cdprogress
- If you use
Azure Pipelines, and you have to self-hosted agents, you need to make sure setANDROID_HOMEandPATHinsiderunsvc.sh, which can help the agents understand variables which use for android build. Read more: StackOverFlow - ANDROID_HOME not set (VSTS agent running as service on OS X)- If you use
Gitlab-CI, you can easily usedockermode which usually run and build anything inside the docker, just need to use mobiledevops/android-sdk-image or softartdev/android-fastlane Docker image to build and upload android project to GGPlay
After that, if your project requirement about ndk package in android, you can perform this command to install and verify license for your SDK build tools (NOTE: Need to give approving for license of SDK, for except any problems)
# Verify your host include `sdkmanager`
sdkmanager --version

# Install and approve licenses for bunch of sdk build-tools
yes | sdkmanager "ndk;25.1.8937393"
yes | sdkmanager --licenses
So your environment for already, navigate to android directory, and go fastlane init to create and setup project
cd ./android || exit 1

fastlane init
That will create your fastlane directory inside the project, and you can change and make the build lane for progress the build and export to .apk file, currently you don’t need to take care Appfile, just focus on Fastfile
default_platform(:android)

platform :android do
  desc "Build application to apk file"
  lane :build do
    gradle(
      task: "clean assembleRelease",
    )
  end
end
This lane you create will include two step, clean and assembleRelease
clean: Help you on deletion thebuilddirectory if it existsassembleRelease: This task will perform build with integration multiple things, call extension and module, and bundle anything to.apk
Fact
You need to wait the long time on the first build to integration
gradle,javapackage andnode_moduleif you usereact-native
If you have Fastfile, all things already and you just need to use fastlane command line to perform build lane. Location on ./android
fastlane buildIf you want setup to the pipeline, you can use Azure Pipelines, for example
trigger: none

# Recommendation on your self-hosted with run and setup script above
pool:
	name: self-hosted-pool

stages:
  - stage: build_android
    displayName: Build Android Applications
    jobs:
      - job: build_android
        displayName: Build Android Jobs
        steps:
          - task: UseNode@1
            displayName: Setup Node Environment
            inputs:
              version: "18.20"

          - script: |
              npm i -g yarn
              yarn install
            displayName: Install node package for project

          - script: |
              cd ./android || exit 1
              fastlane build
            displayName: Build the APK for Android Project

          - task: PublishBuildArtifacts@1
            displayName: Publish APK file to Repository
            inputs:
              ArtifactName: APK Package
              PathtoPublish: ./android/app/build/outputs/apk/release
So on the last of progress, you can find the .apk file on route ./android/app/build/outputs/apk/release/app-release.apk
Warning
Maybe, with
androidbuild not easily like i said, it will include multiple problems from not enough package, version is too old or not compatible with your applications, … The best solutions are googling and install, and switch couple version to find target version for you project 😄😄😄😄
Update - Install Platform Tools
If you want to test and run application with your real device through adb, I think you can try to absorb that with the script down below
#!/bin/bash

# Download Platform tool and unzip
wget https://dl.google.com/android/repository/platform-tools-latest-linux.zip && unzip platform-tools-latest-linux.zip

# Copy and spawn the tool into the folder android-sdk
# NOTE: You need to install sdk-manager, which step you create the ANDROID_HOME
mv platform-tools $ANDROID_HOME

# Export PATH to use platform-tools
echo "export PATH=\"\$PATH:\$ANDROID_HOME/platform-tools\"" >> ~/.bashrc

# Remove the zip file
rm -rf platform-tools-latest-linux.zip
After you complete that one you can try reload profile .bashrc or .zshrc to receive new update
# Use for zsh profile
source ~/.zshrc

# Use for bash profile
source ~/.bashrc
Conclusion

Abstract
That all for today, I hope this articles can help you and more others people which struggling on setup android project, introduce
fastlanewhich such powerful for automation building mobile application. On the next part, I will deliver you a way to deployment and upload application to google play for beta test 🚀🚀🚀
Info
There are more traps in build android progress, please careful and google to find best part for your choice, don’t afraid about that, anything are already putting on Internet, just find and find. So enjoy, stay safe and see yah on the next release 👍👍👍