Quote
Hi @all, again we meet on the Kubewekend, how does your week, buddy? This week will be really excited because I have useful experience to inspecting and practicing with some problems take around
Kind, thekernelto operateCNIas cilium, run the add-on worker nodes with create HA cluster after that joining worker to one control plane where we can do some cool things with them. And this week will long week same as previous, but if you want to have adventure, join with me and let’s digest
Dive deeper into Kubelet

Quote
Honestly,
kubeletis one of parts with most complicated and excited inside kubernetes, that make your worker node can be connected with control plane and assume or operate workload and resources inside your worker node, It’s really insane ! How can they work ?
When you and me talk about kubelet, this one will have many stories to discussion, you can find more useful information about kubelet in Kubelet in Session 3. Because in any cluster and Kubewekend not exceptional, kubelet usually run as service in system not run as workload in kubernetes, therefore if you want to see how kubelet service status, you can see via systemd inside machine
# Access vagrant host in control-plane
vagrant ssh k8s-master-machine

# After that access into docker where run `kind` engine inside
docker exec -it k8s-master-machine-control-plane /bin/bash

# Use can use journalctl, service or systemctl to make conversation to get information about kubelet
# With systemctl
systemctl status kubelet

# With service
service kubelet status

# With journalctl
journalctl -u kubelet | more # super detail
Info
If you can see you can see anything about
kubelet, likeIDMemoryCommandCGroupand many things will help you debug the problems, when you want to understand and hardcore usejournalctlto figure out all of thread inside 🥶
When you dive into kubelet as command this one run, you can see where configuration to perform kubelet because kubelet is binary for execution
/usr/bin/kubelet --bootstrap-kubeconfig=/etc/kubernetes/bootstrap-kubelet.conf --kubeconfig=/etc/kubernetes/kubelet.conf --config=/var/lib/kubelet/config.yaml --container-runtime-endpoint=unix:///run/containerd/containerd.sock --node-ip=172.18.0.3 --node-labels= --pod-infra-container-image=registry.k8s.io/pause:3.9 --provider-id=kind://docker/k8s-master-machine/k8s-master-machine-control-plane --runtime-cgroups=/system.slice/containerd.serviceInfo
If you want to figure out why we can create service, please give time take the look another blog of mine at Setup Cadvisor
Back to kubelet, this one have some characteristic to concern about
-
As least one worker node will run inside control plane if you not define another one, that why we have
kubeletinsidecontrol-planeimage -
Use bootstrap
kubeconfigat/etc/kubernetes/bootstrap-kubelet.conf- Will be empty because we don’t use any bootstrap to build up -
Use
kubeconfigat/etc/kubernetes/kubelet.conf- Define about context of cluster like certificate and address of cluster to connect -
Check about config at
/var/lib/kubelet/config.yaml- Same as configuration if you have look on session via API -
Container runtime inside
imageuse viacontainerd.sock- socket container likedockerdbut lightweight, usually use both of them, it better together. Read more at: containerd vs. Docker: Understanding Their Relationship and How They Work Together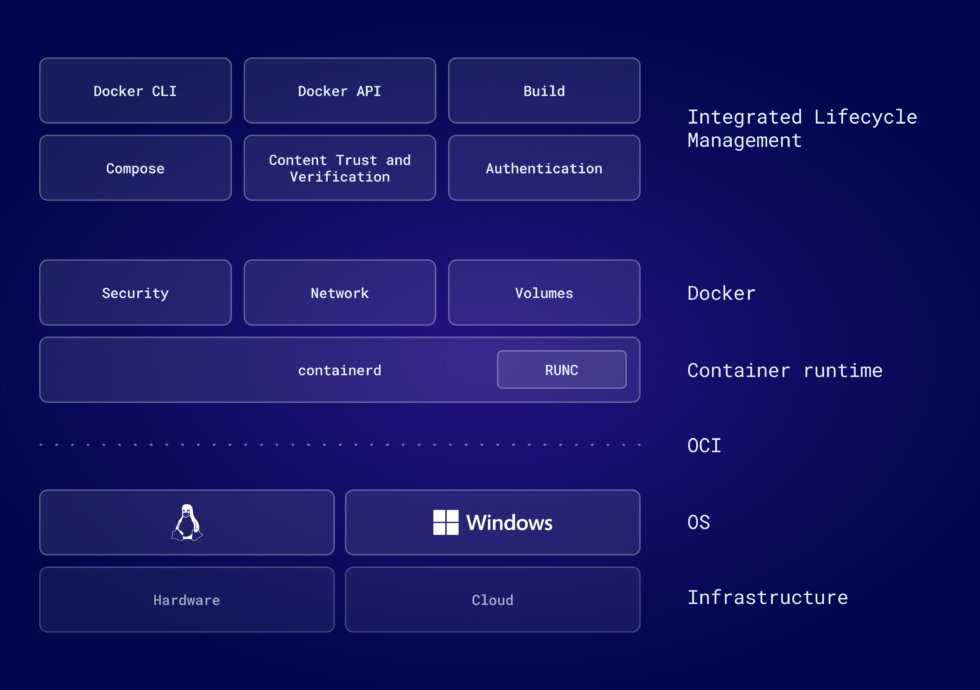
Question
If you want to understand
Container Runtimewithcontainerd, it plays role as interface stand between for helping your container interact with operation system, anddockerdis the higher level which provide more feature for developer. That’s it 😄, usually inside container just havecontainerdfor optimize resources and reduce the complexity
- Next we see that provide
node-ip, really same as the network which provide forkindcontainer - Use pod-infra-container-image as
pause:3.9- a container which holds the network namespace for the pod. Kubernetes creates pause containers to acquire the respective pod’s IP address and set up the network namespace for all other containers that join that pod. Read more at: What is the use of a pause image in Kubernetes? - Obviously use
kindcontrol-plane because that worker will associate viakind - And lastly, runtime-cgroups to help
kubeletcan know about how much resource provide and permit to use viacontainerd
Quote
Those characteristics are a lots, I know about that but you need to understand to see what happen on next part, tough job but sound cool.
If you have understand kubelet and know about what is kubelet process run inside kubewekend, that is enough to moving next part, and problems will come up
Dynamic add nodes to kind cluster
Question
The purpose of created HA is help us on split the workload inside Kubernetes, and run in multiple machine or VM. With that idea, this will not cause any damage when worker node have problems, such as upgrade
kubernetesand keep no downtime for your services, and add-on we can have more things to practical, actually about write customize scheduler 😄
Before start this part, we will research about HA or High Availability concept, one of best practice in Infrastructure
Info
High Availability (HA)?
The ability of a system to operate continuously for a designated period of time even if components within the system fail.
The highest mission of HA is keep your system always alive, and it’s all. Therefore, to prevention downtime, you add more cluster into your control plane and when any workload become failure that will have target to exchange traffic and not cause any downtime, enough reason to create kind cluster with feature and more efficiency for my community, for my reader 🙌🙌🙌
When think about create HA with kind, I think that impossible and now I understand more about how to create that and be brave to contribute for our community, thankful and appreciate him - Steve Sklar to help me know what actually need to do and have way to continue diving to it 😅. Read more about that at How to dynamically add nodes to a kind cluster
Not mount kernel to worker node
Now, we are starting, and first of all is create worker via using Docker command to create node with kind as container, but in the first time, you will stand between two situation down below
- Succeed run
kubelet
docker run --restart on-failure -v /lib/modules:/lib/modules:ro --privileged -h k8s-worker -d --network kind --network-alias k8s-worker --tmpfs /run --tmpfs /tmp --security-opt seccomp=unconfined --security-opt apparmor=unconfined --security-opt label=disable -v /var --name k8s-worker --label io.x-k8s.kind.cluster=kind --label io.x-k8s.kind.role=worker --env KIND_EXPERIMENTAL_CONTAINERD_SNAPSHOTTER kindest/node:v1.28.9- Failure run
kubelet
docker run --restart on-failure --privileged -h k8s-worker -d --network kind --network-alias k8s-worker --tmpfs /run --tmpfs /tmp --security-opt seccomp=unconfined --security-opt apparmor=unconfined --security-opt label=disable -v /var --name k8s-worker --label io.x-k8s.kind.cluster=kind --label io.x-k8s.kind.role=worker --env KIND_EXPERIMENTAL_CONTAINERD_SNAPSHOTTER kindest/node:v1.28.9Question
What is different between of them ? Answer: Not mount the volume where define your
hostkernel
You need to mount your kernel configuration to be ensure kubelet can connect with your machine to running the node and operation pod inside via -v /lib/modules:/lib/modules:ro
Actually if you want to know about kubelet techniques stand behind, check out
- driver of container runtime in
cgroupandsystemdpart that components to control all process, resources inside the machine - Explaining what is
systemdandcgroupin Linux via article Medium - Systemd and cgroup
Quote
Take a notes for this reason, we will discuss more about problems about
cgroupon the next part
Now when you run docker container in successful, and now we have worker node but that stand loneliness, so you need join that container to control plane. Currently, Kubewekend cluster is using kind to operate control plane via kubeadm, Read more principle and concept of kind at kind Principles.
Info
If you know you know,
kubeadmis first concept to help you create control plane and bootstrapkubernetes, you can check via Creating a cluster with kubeadm
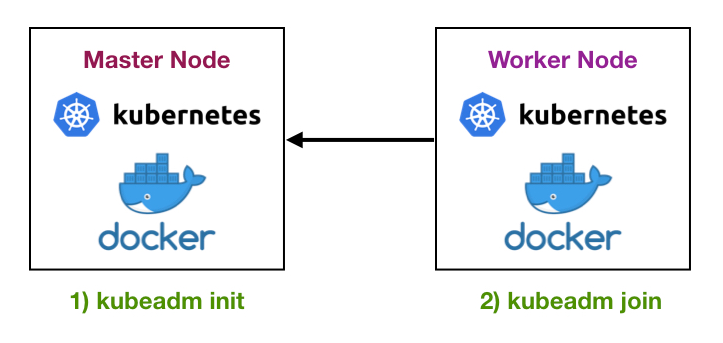
Following the step to create and join node in documentation, you can reproduce them inside kind via some steps
- Create token
Info
Create a token which managed via control plane, and provide suitable command with token to help you in joining worker or another control plane to clusters
docker exec --privileged k8s-master-machine-control-plane kubeadm token create --print-join-command- Join to control plane
# Exec into worker container
docker exec -it k8s-worker /bin/bash

# Join with command kubeadm
kubeadm join k8s-master-machine-control-plane:6443 --token xxxxxx --discovery-token-ca-cert-hash sha256:xxxxx --skip-phases=preflight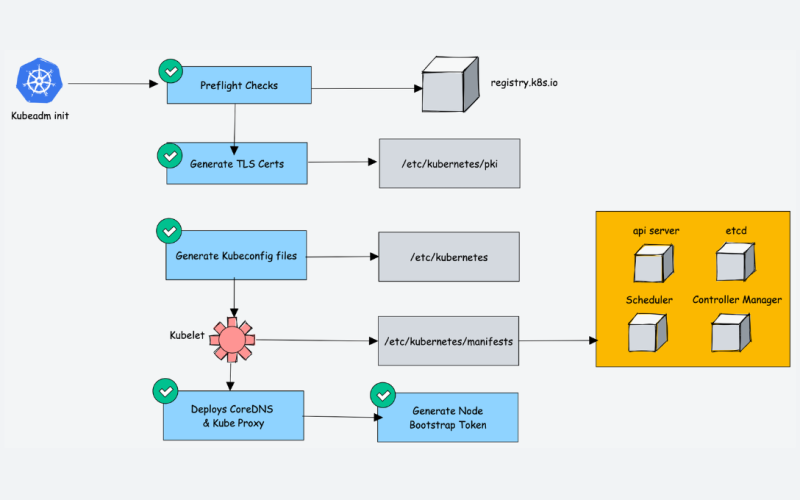
Bug
When you don’t use param
--skip-phases=preflight, your command join will fail for 100%, becausekubeadmwill run and yourkernelin machine not existconfigsfile to load full information about yourkernel, see down below
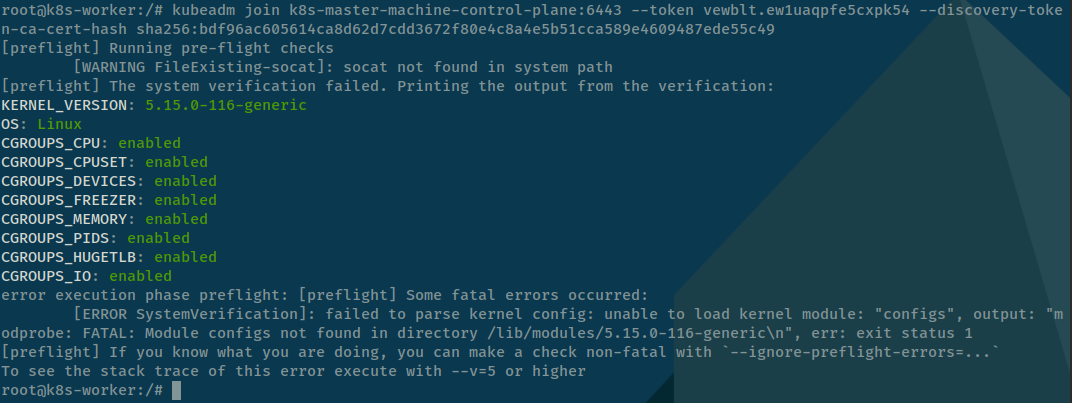
Info
Parameter
--skip-phases=preflight, this step will help you bypasspreflightofkubeadmstep, reach you init and others stories will work great
After you perform two step above, you actually join your worker node into clusters, retrieve that via command
kubectl get nodesStory will become complex and pleasant on next part, another problems come up and you need actually to control your kernel and understand why it can’t start your CNI and connect that with CNI and make your worker node become Not Ready state.
Can’t not install cilium CNI inside worker node
Now we have problem not run CNI on worker node, you know kubernetes used auto discovery when have new node join to cluster, control plane will schedule to provide daemonset workload to inside worker node via kubelet and kube-apiserver, including
- kube-proxy ✅
- CSI - not have this feature currently ❌
- CNI - Cilium and actually problems in currently ❌
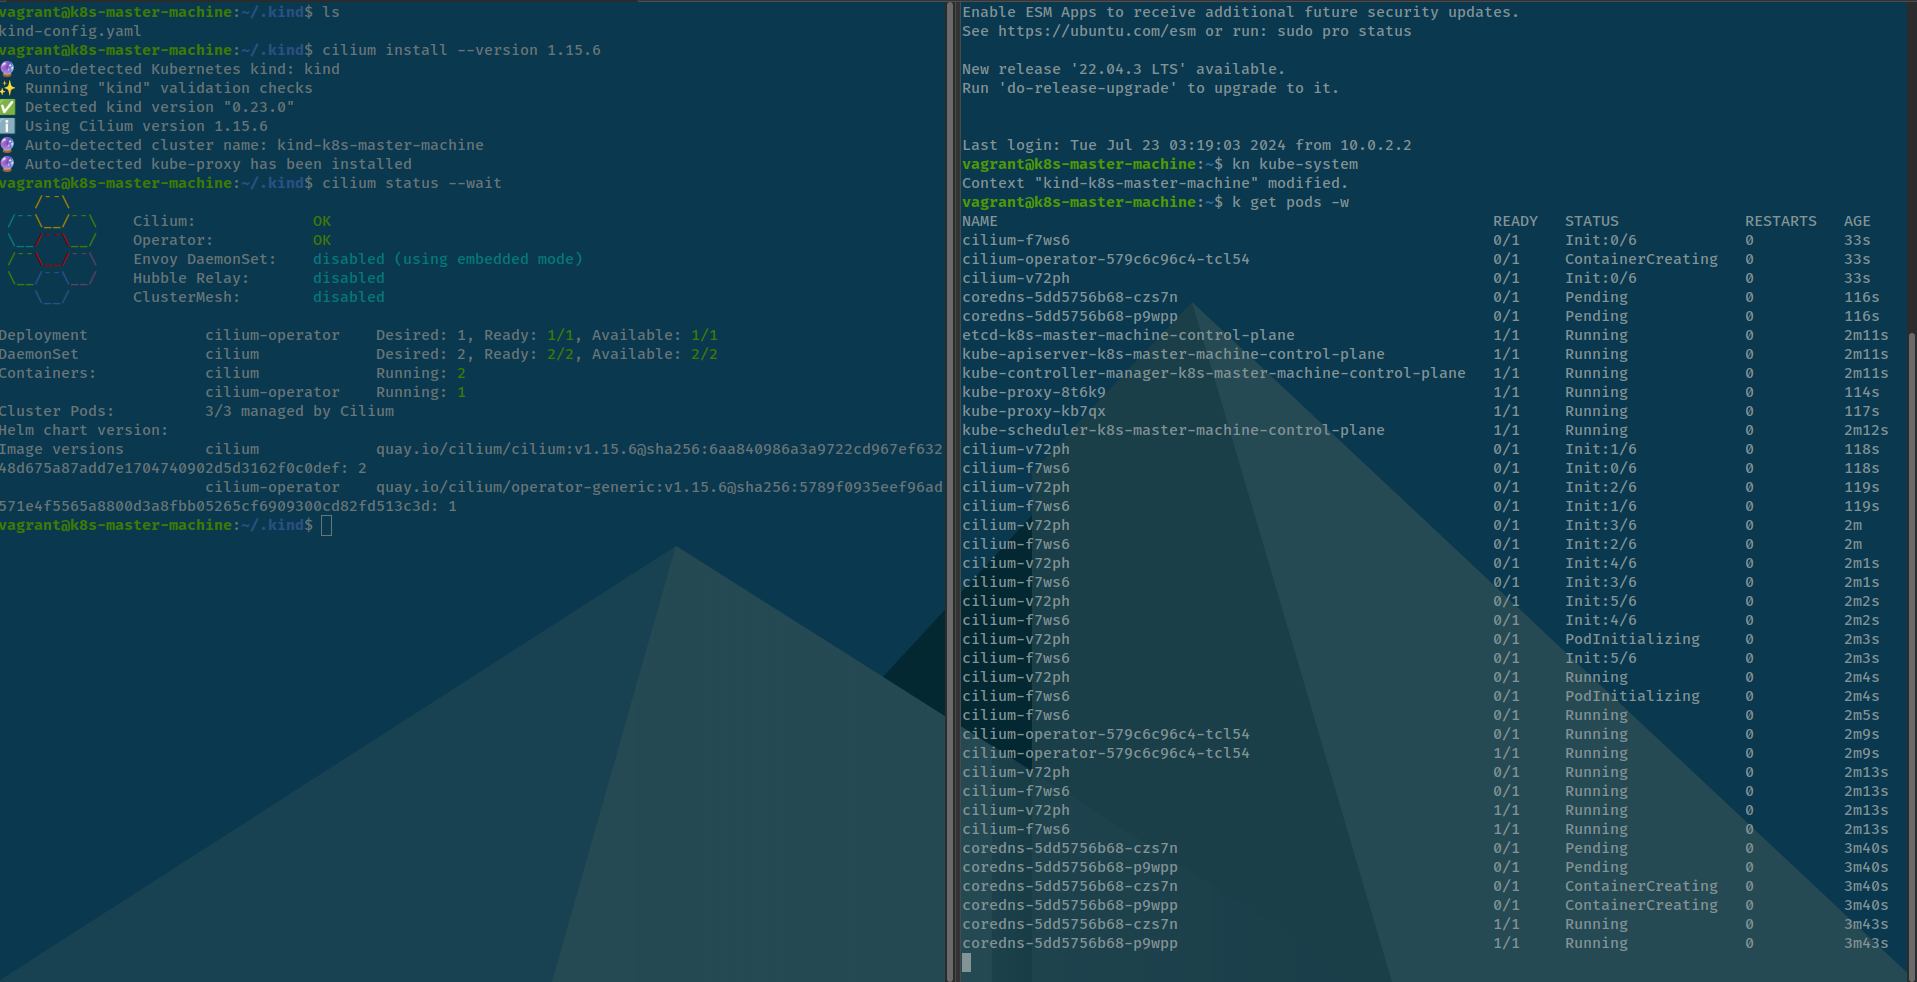
In the step to initialization the cilium and kube-proxy, kube-proxy work perfectly but CNI not run at all with multiple error number, sometime announce 2 or 137
# Check status and state of pod
kubectl get pods -n kube-system -w

# Use to deeper inspected
kubectl describe pods/cilium-xxxx -n kube-system # CrashLoopBack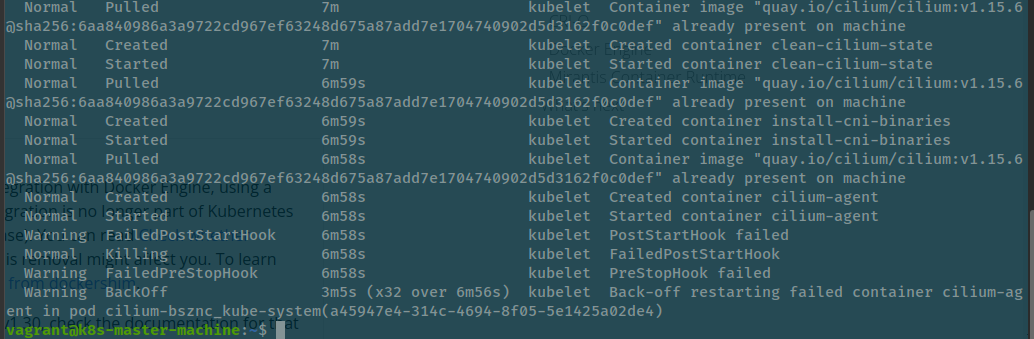
Check status of kubelet service inside new worker node
# Exec with docker inside new node
docker exec -it k8s-worker /bin/bash

# Try to log the status of kubelet service via journalctl and systemctl
systemctl status kubelet

journalctl -xeu kubelet
When check it that announce about cilium - our CNI was be killed by PostStartHook event and cause FailedPostStartHook inside Kubewekend cluster, we need to figure out why was that
First I try to stop kubelet service by systemd of k8s-worker, use
systemctl stop kubeletNext, try to run kubelet with command inside kubelet service with in refer in Dive deeper into Kubelet in previous part and force add node-ip because i think that cause problems
/usr/bin/kubelet --bootstrap-kubeconfig=/etc/kubernetes/bootstrap-kubelet.conf --kubeconfig=/etc/kubernetes/kubelet.conf --config=/var/lib/kubelet/config.yaml --container-runtime-endpoint=unix:///var/run/containerd/containerd.sock --node-ip=172.18.0.2 --pod-infra-container-image=registry.k8s.io/pause:3.9 --runtime-cgroups=/system.slice/containerd.serviceBut not the actually issue is really come up when I try to overview the error with huge information through what we got in running kubelet command.
And yup I detect about error make container crash in step run cilium-agent, see down-below
2710 kuberuntime_container.go:287] "Failed to execute PostStartHook" err="rpc error: code = Unknown desc = failed to exec in container: failed to start exec \"c3107b15e85a5b213e28a811b7341c153ec727ebf3c1a58b6c1d51bcd4f4e06b\": OCI runtime exec failed: exec failed: unable to start container process: error adding pid 3095 to cgroups: failed to write 3095: open /sys/fs/cgroup/unified/kubelet.slice/kubelet-kubepods.slice/kubelet-kubepods-burstable.slice/kubelet-kubepods-burstable-poda45947e4_314c_4694_8f05_5e1425a02de4.slice/cri-containerd-abb37780fc913b3720641a4039186adb06f5d1de0229de0e8707f12e2fde5a21.scope/cgroup.procs: no such file or directory: unknown" pod="kube-system/cilium-bsznc" podUID="a45947e4-314c-4694-8f05-5e1425a02de4" containerName="cilium-agent" containerID="containerd://abb37780fc913b3720641a4039186adb06f5d1de0229de0e8707f12e2fde5a21"Something wrong inside the cgroups and cannot to giving pods cilium to create process and add them to group management. Try to search and access some issue in github - more information but useful 100%, and find out something can help as
- (arm64) OCI runtime exec failed: exec failed: unable to start container process: error adding pid 791507 to cgroups
- Kubernetes postStart lifecycle hook blocks CNI
From the idea of BenTheElder in the first issue link - whose maintain kind so he talk about Older version of kernel machine when you kind version. So let’s think
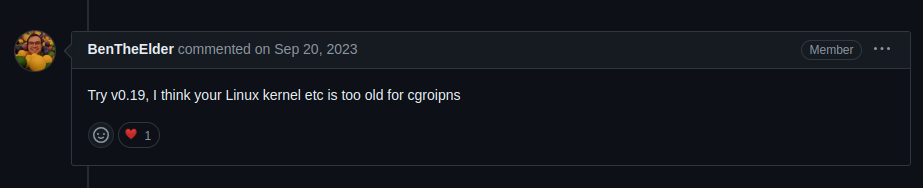
- We have newest
kindversion - 0.23.0 ❌

- We install the cluster in node version 1.28.9, still update and not deprecated, so it not come up from cluster image ❌
Question
Can I perform install
kindin currently Ubuntu version ? Does it have any different ?
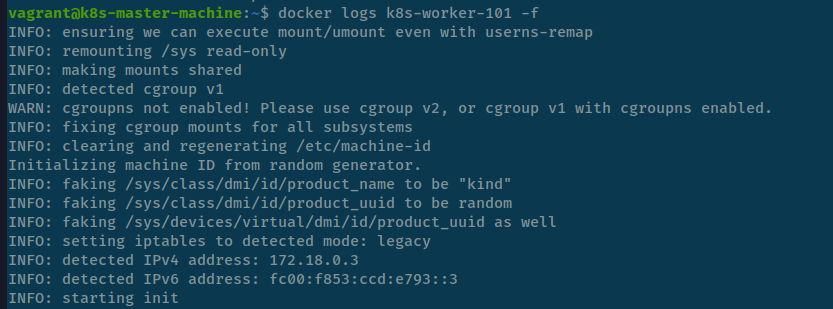
And yup it does, when i try figure out, there are different between my host and my vagrant machine on the kernel version, I dunno but in some warning they mark me about cgroupns not enabled! Please use cgroup v2, or cgroup v1 with cgroupns enabled.
Therefore, I try self-hosted kind on my machine in Ubuntu 22.04, with kernel version 6.5.0-44-generic and in vagrant machine with Ubuntu 20.04, with kernel version 5.4.0-189-generic. And It work when try to install cilium inside my Ubuntu with kernel version 6.5.0-44-generic and not work with vagrant. Really suspicious, LOL 😄
Question
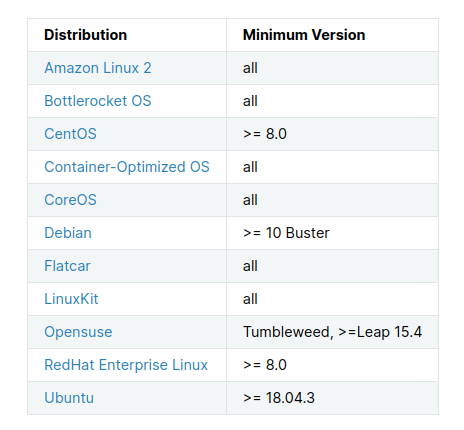
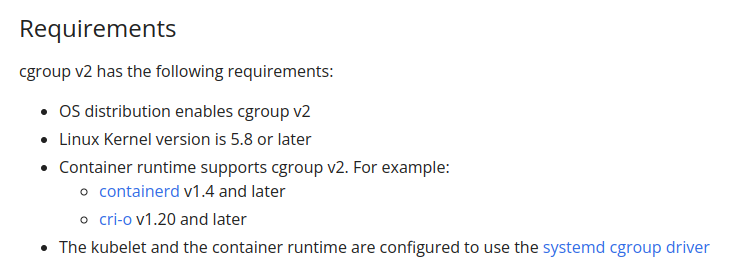
Another question, does cilium have any requirements in latest version ?
And yup it really have 😅, therefore try to figure out problem and check about requirement cilium
Cilium need me install Linux kernel >= 4.19.57 or equivalent (e.g., 4.18 on RHEL8) and luckily vagrant get to used it and one more, Ubuntu 20.04 is good enough with requirement on higher version 18.04.3
Don’t no why so, try back to kind configuration and try to setup add-on worker into control plane when start, and try to self-hosted customize CNI with cilium against, let’s try
And yup we actually run cilium succeed, don’t know why dude, LOL 😃. It means that problems can be via cilium be installed via auto-discovery and dunno why it execution the error like that LOL.
If you can see, cgroup v1 in-use with node pre-provisioning via kind-config and rasise any warning about cgroupns not enabled! Please use cgroup v2, or cgroup v1 with cgroupns enabled
BTW we can validate that not come from kernel version, or at least I don’t know in this time and we know that have enough condition to run cilium inside worker node
Warning
Actually, Error log make me confuse because another error level 137
One time again, I try to add more node and the error actually occur in step run cilium-agent, dunno why but i have see error: 137
Bug
Error 137 means this pods cannot run because do not have enough memory to consume for pods and
systemdkilled, and in another waykubeletwill keep reserve memory to make your node became stableI don’t know about different between
aksandkindbecause when I useaksthat problems come up andkindmaybe same because when i run on host not in VM, cilium actually can start
Question
This reason further strengthens the work to be considering upgrade more resource in host, we actually need to do
First of all, back to Vagrantfile inside Kubewekend Session 1 to change some configuration in master-machine
config.vm.provider "virtualbox" do |config|
  config.name = "k8s-master-machine"
  config.memory = 2048 -> 3072
  config.cpus = 2
end
And done of change, to keep your machine not destroy just need to reload feature to applied new change
vagrant reload k8s-master-machineTry one more again about add worker node, and not yet expand resources doesn’t help currently, actually problems occur on cgroups and FailedPreStopHook, anything make sense they have connection, you need to provide
-
Enough resource around 100-200 cilium-client, need to be little bit well off to prevent the resources are occupied by
kubelet -
Problem don’t occur any when we use default
CNIofkindiskind-net
Todo
Yup back to issue we will concern about update
kerneland you have two optional
- Risk: Install new kernel inside your
vagranthost, need to make sure you know are you doing- Safe: Update a new version Ubuntu for
vagranthost to receive a compatible version ofkernel
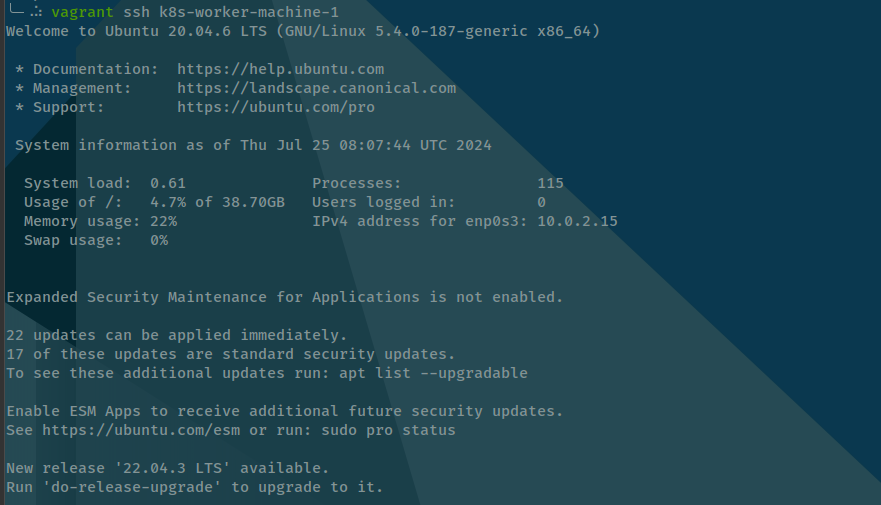
So following the safe option, I choose upgrade Ubuntu to new version 20.04 ⇒ 22.04 and received new version kernel from 5.4.0-189-generic to 5.15.0-116-generic. Read more at Update Ubuntu new version

Success
And actually that resolve any problem you meet, so i think if you want to operate
ciliumat version1.5with old kernel you need downgrade your version ofcilium, and do not use latest because of congestion inside the kernel
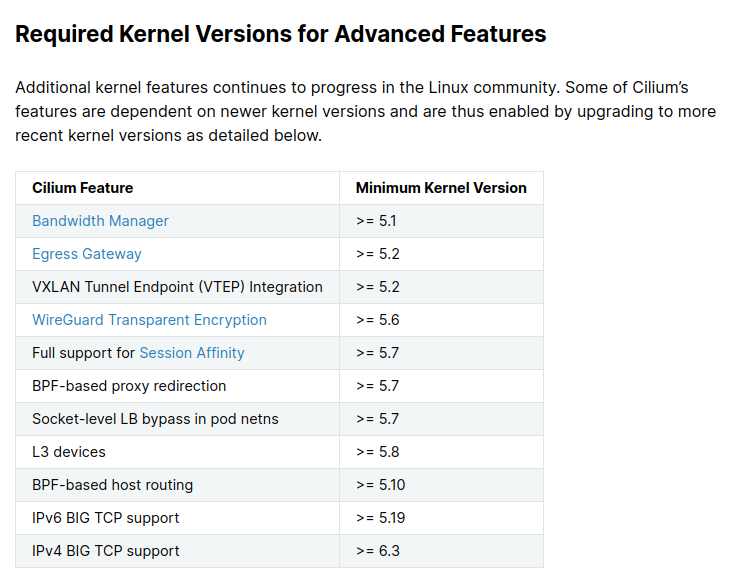
As you can see, you need to use kernel over 5.10 version to valid run the cilium maybe on latest version, so that why we need upgrade kernel
Info
Follow the Update Ubuntu new version, to understand technique to upgrade your kernel version and
kubewekendcluster on Ubuntu 20.04
Quote
It can be upgrade to kernel
5.15.0-116-genericwith not need to update the version to Ubuntu 22.04, but for sure you can test both of methodologies.In my perspective, update version of Ubuntu to new version and get the kernel support is better than force update your old version to new kernel version because that can cause some damage and hard to resolve if you meet, but well done we resolve anything else and now we can understand how can make HA for our cluster you multiple machine
Let’s practice to handle create that on multiple machine because i just do this stuff on the same machine to testing it actually work, and meet any problems LOL 😄
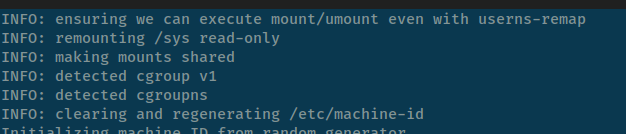
When redeploy and check log of worker node, as you can see it move on to using cgroup v2
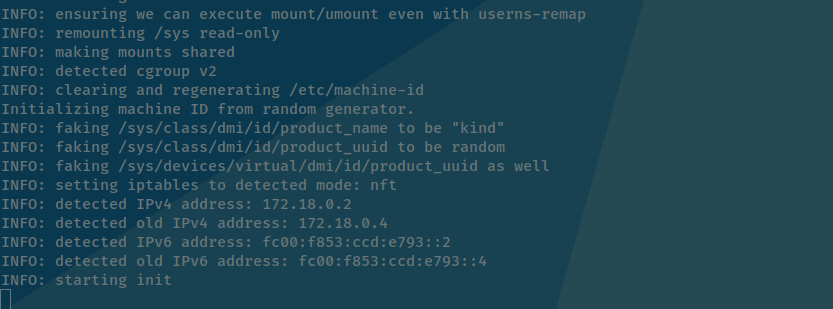
You can relate this feature on cluster architecture on cgroup v2 at Kubernetes Documentation - About cgroup v2
If you want explore more feature cgroup v2 better than cgroup v1, please relate to CNCF Blog - Embracing Cgroup V2: Best Practices for Migrating Kubernetes Clusters to AlmaLinux to see what it got, super cool
Use vmbox to join worker node into master node
I know about there are more alternative out there which cut off the effort when self-hosted and join worker via kubeadm like
- kubespray - Deploy a Production Ready Kubernetes Cluster
- K3s - Lightweight Kubernetes. Easy to install, half the memory, all in a binary of less than 100 MB
But hand on with kubewekend can be harder than use template like above, actually kind is good enough to create and practice local kubernetes, hangover I want to create little bit challenge for myself, but don’t worry in this part will explain at all
Use vagrant again to create add one worker machine like we doing on session 1, if you are done with this step, reach to next 😄
After done bring up worker machine, we need make master and worker can interact with each others via same network
Attach your machine with Nat Network
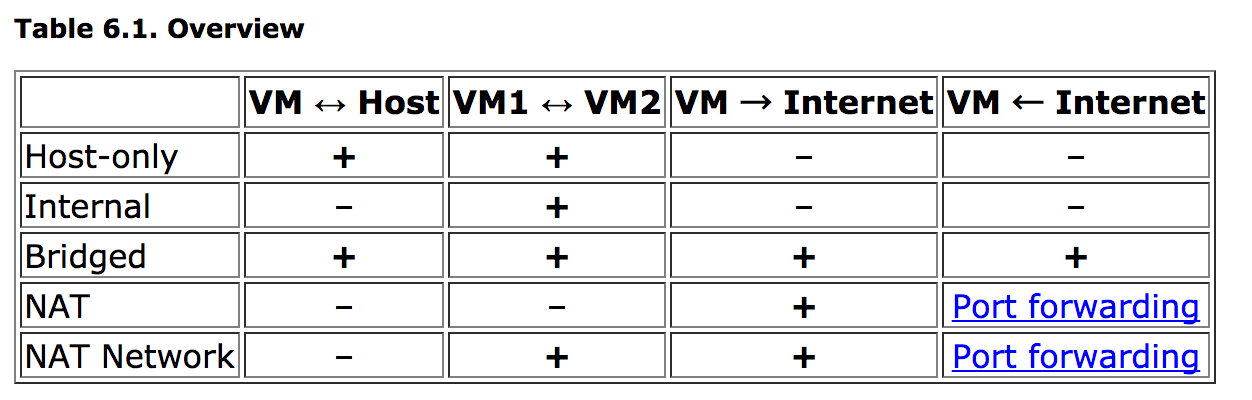
And if you can see currently, our machines is using NAT and it will not connect with others, so we need use alternative plan for networking, such as Bridged and NAT Network but recommend you use NAT Network with purpose learning and flexible than Bridged
First, I have practice with scripting for help you automation all step when hand on creating network and give machine interact, but many issue let me not image why 😿
Vagrantmake me so annoy when change new network configuration for adapter, worker node will lost all information SSH of host 😅- When applied network, It causes your host stuck in boot state when you try shutdown and update new interface. Not actually methodology to check machine boot succeed or not
You can approach that via script down below, but you can meet the trouble for sure, not easily BTW 🤭
#!/bin/bash

# Purpose: Use vboxmanage to control and add new network, consume network rules
# Documentation: https://www.techbeatly.com/how-to-create-and-use-natnetwork-in-virtualbox/
# Doc Virtualbox: https://www.virtualbox.org/manual/ch08.html#vboxmanage-natnetwork

# Initialize variables to config network interface
# Use default variables - ISSUE
# https://stackoverflow.com/questions/2013547/assigning-default-values-to-shell-variables-with-a-single-command-in-bash
netName="${1:-"KubewekendNet"}"
netRange="${2:-"10.0.69.0/24"}"

# Clean rule or check existing network to make sure non overlapping
# Use: list and natnetwork
# list: https://www.virtualbox.org/manual/ch08.html#vboxmanage-list
# natnetwork: https://www.virtualbox.org/manual/ch08.html#vboxmanage-natnetwork

if [ "$(vboxmanage list natnetworks | grep -e "$netName")" == "" ]; then
    # Create a network interface
    VBoxManage natnetwork add --netname "$netName" --network "$netRange" --enable
    # Turn on DHCP
    VBoxManage natnetwork modify --netname "$netName" --dhcp on

    echo "💣 Successfully created the interface 💣"
fi

# Check machine name which running and be ready to add cluster
listRunningMachine=$(vagrant status | grep -e "running" | awk '{print $1}')
listPowerOffMachine=$(vagrant status | grep -e "poweroff" | awk '{print $1}')

printf "🚀 Hook-up new ip for kubewekend 🚀\n\n"

if [ "$listPowerOffMachine" != "" ]; then
    for vm in $listPowerOffMachine; do

        # Attach your machine with network interface
        VBoxManage modifyvm "$vm" --nic1 natnetwork --nat-network1 "$netName"
        VBoxManage startvm "$vm" --type headless

        # Loop to validate your machine alive or not
        while true
        do
            if [ "$(VBoxManage showvminfo "$vm" | grep -c "running (since")" == "1" ];then
                printf "☕ Wait a sec to machine alive and providing IP ☕\n"
                sleep 20
                break
            else
                printf "☕ Take a sip coffee and wait to machine alive ☕\n"
                sleep 2
            fi
        done

        # Retrieve the ssh configuration via Vagrant
        machineSSH=$(vagrant ssh-config "$vm")
        portSSH=$(echo "$machineSSH" | grep Port | awk '{print $2}')


        # Retrieve the ip of the machine
        # Issue: https://superuser.com/questions/634195/how-to-get-ip-address-assigned-to-vm-running-in-background
        machineIP=$(VBoxManage guestproperty get "$vm" "/VirtualBox/GuestInfo/Net/0/V4/IP" | cut -d ":" -f2 | xargs)

        ## TODO: Validate exist or not, if exist delete and add new, if not exist add new
        if [ "$(VBoxManage natnetwork list | grep -e "Rule $vm")" != "" ]; then
            VBoxManage natnetwork modify --netname "$netName" --port-forward-4 delete "Rule $vm"
            VBoxManage natnetwork modify --netname "$netName" --port-forward-4 "Rule $vm:tcp:[127.0.0.1]:$portSSH:[$machineIP]:22"
        else
            VBoxManage natnetwork modify --netname "$netName" --port-forward-4 "Rule $vm:tcp:[127.0.0.1]:$portSSH:[$machineIP]:22"
        fi
        echo "$vm is hook-up successfully with $netName"
    done
fi

if [ "$listRunningMachine" != "" ]; then
    for vm in $listRunningMachine; do

        # Retrieve the ssh configuration
        machineSSH=$(vagrant ssh-config "$vm")
        portSSH=$(echo "$machineSSH" | grep Port | awk '{print $2}')

        # Attach your machine with network interface
        VBoxManage startvm "$vm" --type emergencystop
        VBoxManage modifyvm "$vm" --nic1 natnetwork --nat-network1 "$netName"
        VBoxManage startvm "$vm" --type headless

        # Loop to validate your machine alive or not
        while true
        do
            if [ "$(VBoxManage showvminfo "$vm" | grep -c "running (since")" == "1" ];then
                printf "☕ Wait 30 sec to at least machine alive and providing IP ☕\n"
                sleep 30
                break
            else
                printf "☕ Take a sip coffee and wait to machine alive ☕\n"
                sleep 2
            fi
        done

        # Retrieve the ip of the machine
        # Issue: https://superuser.com/questions/634195/how-to-get-ip-address-assigned-to-vm-running-in-background
        machineIP=$(VBoxManage guestproperty get "$vm" "/VirtualBox/GuestInfo/Net/0/V4/IP" | cut -d ":" -f2 | xargs)

        ## TODO: Validate exist or not, if exist delete and add new, if not exist add new
        if [ "$(VBoxManage natnetwork list | grep -e "Rule $vm")" != "" ]; then
            VBoxManage natnetwork modify --netname "$netName" --port-forward-4 delete "Rule $vm"
            VBoxManage natnetwork modify --netname "$netName" --port-forward-4 "Rule $vm:tcp:[127.0.0.1]:$portSSH:[$machineIP]:22"
        else
            VBoxManage natnetwork modify --netname "$netName" --port-forward-4 "Rule $vm:tcp:[127.0.0.1]:$portSSH:[$machineIP]:22"
        fi
        echo "$vm is hook-up successfully with $netName"
    done
fi
Therefore, to not waste your time, you can use UI for instead, not cover much but we can use both UI and CLI during progress
-
First of all create networks for whole VM in cluster follow step Choose
Tools→Network⇒ ChooseNAT NetworksTab → Click Create Button ⇒ Change information in General Options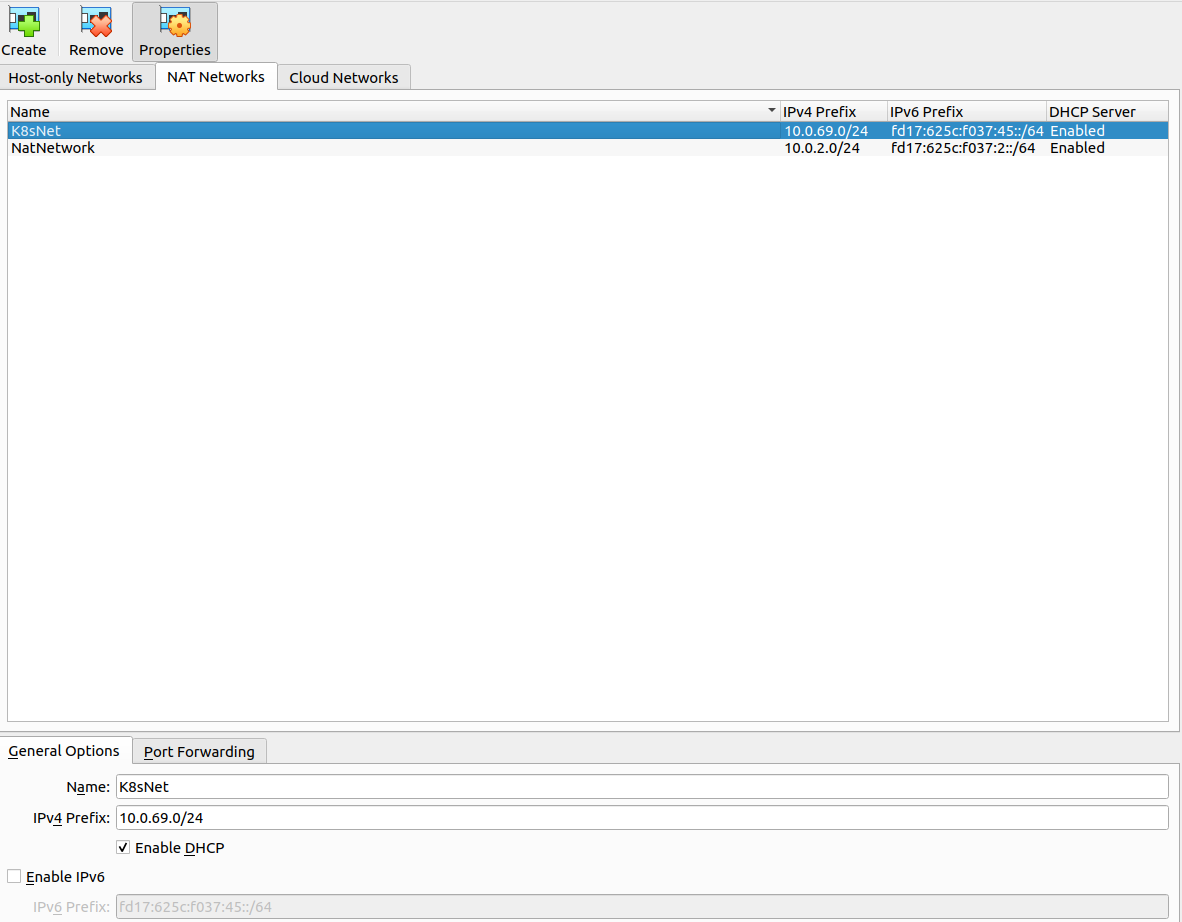
-
Choose
networkin configuration of VM, such ask8s-master-machine![[Pasted image 20240725151934.png]] -
On the network, in part
attached tochange fromNAT⇒NAT Networkand select your network which you create![[Pasted image 20240726092754.png]] -
Approve and recheck inside the machine with provide new IP Address via DHCP, but at currently you can access host via
vagrant, useVMBoxManageto retrieve info of machine. DocumentationVBoxManage guestproperty get <vm-name> "/VirtualBox/GuestInfo/Net/0/V4/IP";
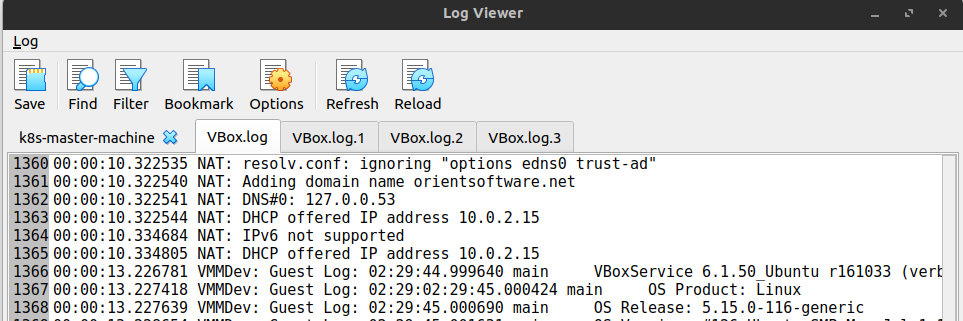
Or you can use Log Viewer (Ctrl + L) of virtualbox to access and view log your target machine
-
But before recheck, use need to port forward again for port to ssh inside that machine as
Tools⇒NAT Networks⇒ Choose name of NAT network ⇒ ChoosePort Forwardingin the bottom ⇒ Click add rule ⇒ Provide information for rule ⇒ Apply
-
Access again with
vagrant sshand now you are connecting tok8s-master-machineviaNAT Networking, but withk8s-worker-machine-xhave some different to connect, you need usesshinstead because yourssh-configwith vagrant is changing via host configuration
ssh -i .vagrant/machines/k8s-worker-machine-1/virtualbox/private_key -o IdentitiesOnly=yes vagrant@127.0.0.1 -p 9669![[Pasted image 20240725154459.png]]
![[Pasted image 20240728004200.png]]
Validate your connect between master and worker with ping command
# Exam: Master: 10.96.69.4, Worker: 10.96.69.5
ping -4 10.96.69.4 # From worker node
ping -4 10.96.69.5 # From master node
Now our host is connected, moving on to update kernel on two host to 5.15.0-116-generic and reaching self-hosted kubewekend cluster
# Update kernel
sudo apt install linux-virtual-hwe-20.04 -y

# Reboot and wait
sudo shutdown -r now 
Do some step with configuration cgroup
And now we will try run kind and worker node with docker in the second part of session Dynamic add nodes to kind cluster and poorly we need to update your cluster to new one version because of 20.04 will change your kernel but cgroup v1 is still alive and do not use cgroup v2 and it makes our host can’t be run cilium cni if not actually configuration
Master Machine
In the individual in upgrading kernel, It will not actually upgrade your cgroup to new version but your machine can be use cgroup v2 but need to configuration, therefore you have two optional
- Upgrade to new version, It means you can re-provisioning your machine with
Ubuntu jammy 22.04or use command to update. Vagrant Ubuntu 22.04 - Change daemon to enable
cgroupns, and help your docker daemon can execute and understand what state of it
Quote
I know that will tough option which you need to choose, follow me if you don’t want to cause any trouble you should choose option 1, but if you want to explore more about
cgroupandsystemdmaybe options 2 can be best choiceAs I can say, I will try hard path in this session, if you want to make option 1, please follow Part 2 of session to figure out how to upgrade OS 🙌
If you choose optional 2, you are brave men buddy. We will have two option in optional 2 and I can guide you at all and can be applied one of them if you want
- Continuous use
cgroupv1but enablecgroupns, and it can make sure your can be better to - Applied
cgroup v2to try upgrade some configuration ofsystemd
With continuing use cgroupv1 and enable cgroupns, you can explore at: Systemd fails to run in a docker container when using cgroupv2 (—cgroupns=private), It will require you add more flag inside command to give your docker-daemon can enable cgroupns feature with flag
--cgroup-parent=docker.slice: Specify custom cgroups, It means you can choose what cgroup running insidedocker--cgroupns:cgroupnamespace to use (host|private), and you need to change toprivateif you run own privatecgroupnamespace
docker run --restart on-failure -v /lib/modules:/lib/modules:ro --privileged \
-h k8s-worker -d --network kind --network-alias k8s-worker --tmpfs /run --tmpfs /tmp \
--security-opt seccomp=unconfined --security-opt apparmor=unconfined --security-opt label=disable -v /var \
--name k8s-worker --label io.x-k8s.kind.cluster=kind --label io.x-k8s.kind.role=worker --env KIND_EXPERIMENTAL_CONTAINERD_SNAPSHOTTER \
--cgroup-parent=docker.slice --cgroupns private \
kindest/node:v1.28.9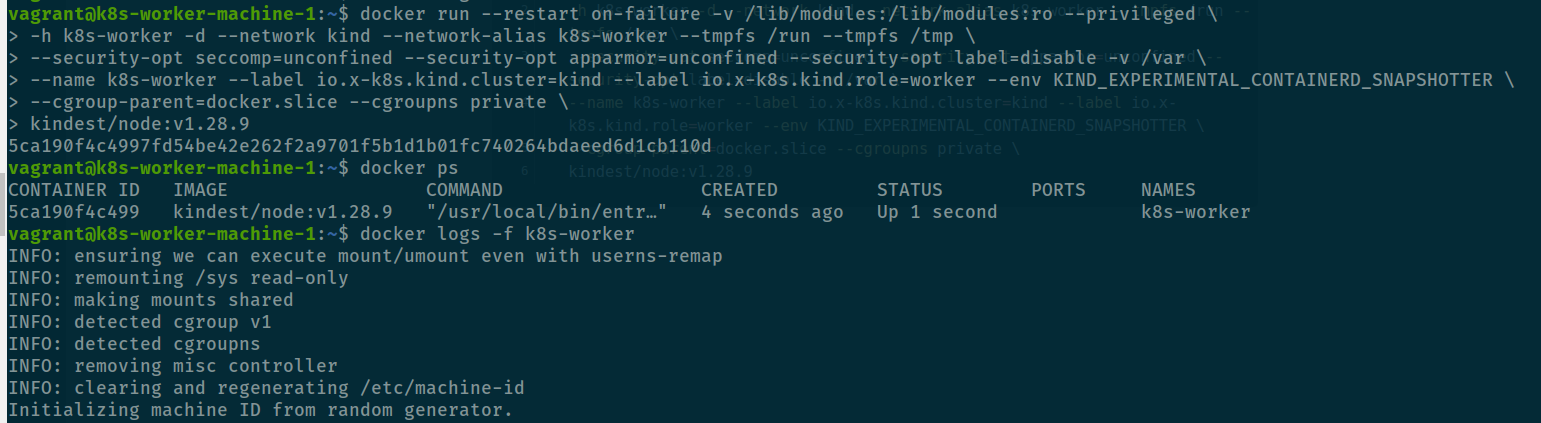
Now your container is running both cgroup v1 and cgroupns inside worker container, so how about cgroupv2 is actually work, answer is yes when you update new kernel for your machine you have cgroupv2 in the system but currently your host is not to use cgroupv2 as default, we will learn how to do that via update-grub and try to set worker node use cgroupv2
When you validate your host support cgroupv2, use grep and find at /proc/mounts
grep cgroup /proc/mounts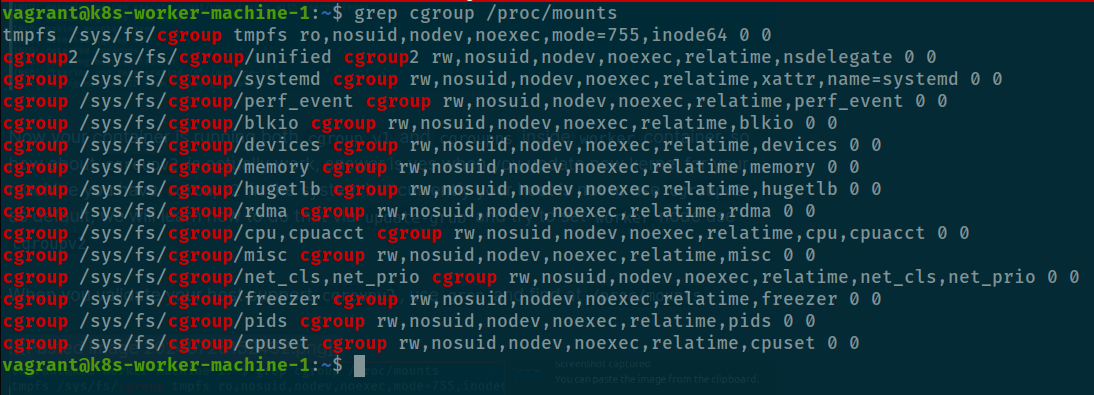
Or you can use grep with /proc/filesystems, explore at How do I check cgroup v2 is installed on my machine?
grep cgroup /proc/filesystems
If machine only support cgroupv1 you will not see any line cgroup2 and how you can adapt your machine into cgroupv2, you can modify grub and boot your host with level 2, It means disable cgroupv1 as default and only use cgroupv2
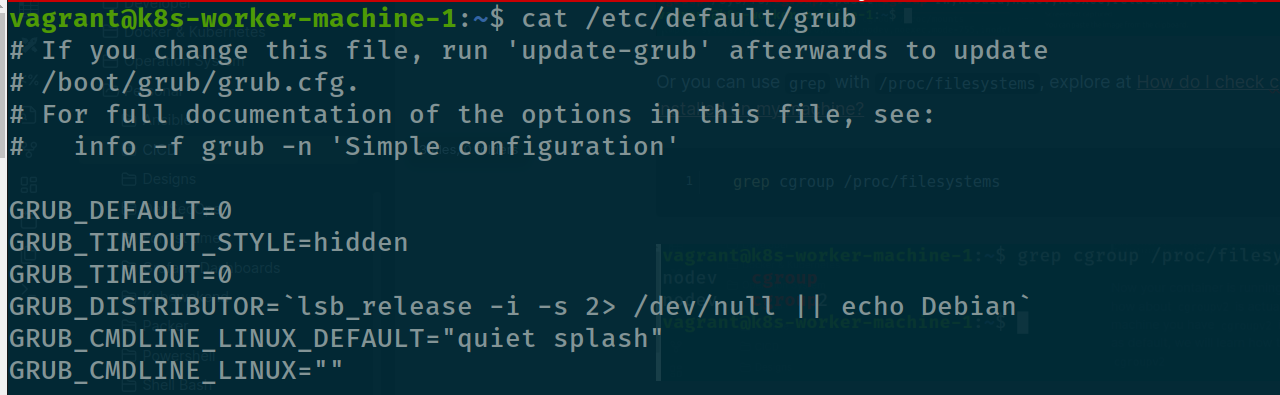
Following discussion Error: The image used by this instance requires a CGroupV1 host system when using clustering, in the line GRUB_CMDLINE_LINUX, try to add systemd.unified_cgroup_hierarchy=1 and try update grub again
# Open you host with grub
sudo nano /etc/default/grub

# Try to modify the line and update with
sudo update-grub

# Reboot to ensure again, not probably but good to you
sudo shutdown -r now
And now try to run worker node and see what is going on
docker run --restart on-failure -v /lib/modules:/lib/modules:ro --privileged -h k8s-worker -d --network kind --network-alias k8s-worker --tmpfs /run --tmpfs /tmp --security-opt seccomp=unconfined --security-opt apparmor=unconfined --security-opt label=disable -v /var --name k8s-worker --label io.x-k8s.kind.cluster=kind --label io.x-k8s.kind.role=worker --env KIND_EXPERIMENTAL_CONTAINERD_SNAPSHOTTER kindest/node:v1.28.9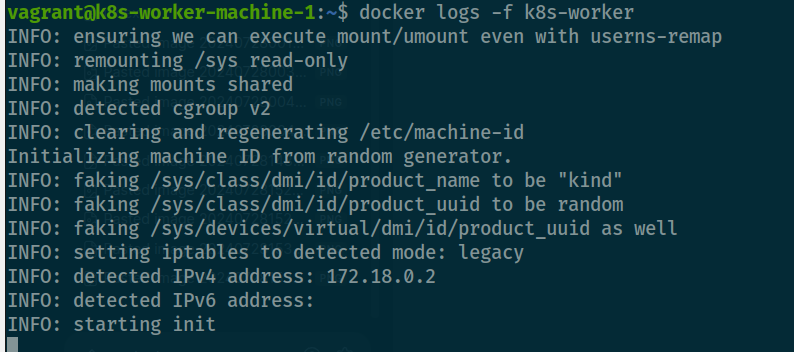
Your host is currently use cgroupv2 and awesome 😄, follow this article to know more buddy cgroup v2
Connect your worker to master via kubeadm
If you catch up workflow, the part will last perform in this session, and we need to make sure your connection between master and worker machine
Warning
Because
kindis not create to purpose when you can use between machine, we enforcekindto do it so that cause annoy when you failure, I know about that tough andvagranthost is not easily when change toNAT⇒NAT Network
Therefore, just practice in this session because HA is not good with kind, maybe you use alternative tools can be better but kind is target and our competition in this series that why we need to pleasure with that one.
You need alternative Vagrantfile to prevent much annoy when you can’t connect to VM when change new network


As you can see about cannot connect 😿, not do anything, we must be upgrade Vagrantfile like this
Vagrant.configure("2") do |config|
  # # Handle multiple machine in one block of Vagrantfile
  # # https://developer.hashicorp.com/vagrant/docs/multi-machine
  config.vm.define "k8s-master-machine", primary: true do |config|
    config.vm.box = "ubuntu/focal64"
    config.vm.hostname = "k8s-master-machine"
    config.vm.communicator = "ssh"
    # Default enable 2222 for ssh communication (Add id: "ssh" to disable default)
    # https://realguess.net/2015/10/06/overriding-the-default-forwarded-ssh-port-in-vagrant/
    config.vm.network "forwarded_port", guest: 22, host: 6996, protocol: "tcp", id: "ssh", host_ip: "127.0.0.1"
    config.vm.box_check_update = false
    config.ssh.username = ENV["SSH_USER"]
    config.ssh.private_key_path = ENV["SSH_PRIV_KEY_PATH"]
    config.ssh.port = 6996
    config.ssh.guest_port = 22

    # # Disable to generate a key pair inside .vargrant directory, use insecure_private_keys
    # # instead of using private_key
    # config.ssh.insert_key = false

    config.ssh.forward_agent = true

    config.vm.provider "virtualbox" do |config|
      config.name = "k8s-master-machine"
      # Change here when you need more memory to prevent Errors: 137 in Kubernetes
      config.memory = 2048
      config.cpus = 2
    end
  end

  config.vm.define "k8s-worker-machine-1" do |config|
  config.vm.box = "ubuntu/focal64"
  config.vm.hostname = "k8s-worker-machine-1"
  config.vm.communicator = "ssh"
  # Default enable 2222 for ssh communication (Add id: "ssh" to disable default)
  # https://realguess.net/2015/10/06/overriding-the-default-forwarded-ssh-port-in-vagrant/
  # For prevent collisions, use `auto_correct` and `unsable_port_parameter` to guide the port to new one
  config.vm.network "forwarded_port", guest: 22, host: 9669, protocol: "tcp", id: "ssh", host_ip: "127.0.0.1"
  config.vm.box_check_update = false
  config.ssh.username = ENV["SSH_USER"]
  config.ssh.private_key_path = ENV["SSH_PRIV_KEY_PATH"]
  config.ssh.guest_port = 22
  config.ssh.port = 9669

  # # Disable to generate a key pair inside .vargrant directory, use insecure_private_keys
  # # instead of using private_key
  # config.ssh.insert_key = false

  config.ssh.forward_agent = true

  config.vm.provider "virtualbox" do |config|
    config.name = "k8s-worker-machine-1"
    config.memory = 1024
    config.cpus = 1
  end
end


  # Initialize the shell command to configuration
  $configScript = <<-'SHELL'
  sudo -i
  sudo apt update && sudo apt install curl git -y
  sudo apt install docker.io docker-compose -y
  sudo usermod -aG docker vagrant
  SHELL

  # Reload profile of current user on machine
  $reloadProfile = <<-'SHELL'
  sudo -i
  shutdown -r now
  SHELL

  # Execution the shell script provide
  config.vm.provision "shell", inline: $configScript

  # Configuration auto trigger reload profile in machine after shell
  config.trigger.after :up, :provision do |trigger|
    trigger.info = "Running a after trigger!"
    trigger.run_remote = { inline: $reloadProfile }
    trigger.ignore = [:destroy, :halt]
  end
end
Change your network adapter of worker node to NAT and run vagrant reload to reconfiguration again
vagrant reload k8s-worker-machine-1After running reload, you change again to natnetworks and check ssh-config, the surprise your ssh is keep not like as when you build your worker node in the loop and turn on autocorrect: true network
# Retrieve the ip and change that for portforwading rule
VBoxManage guestproperty get "k8s-worker-machine-1" "/VirtualBox/GuestInfo/Net/0/V4/IP" | cut -d ":" -f2 | xargs
Try ssh command
If you have problem, please destroy ⇒ up your machine again to applied new network adapter. When you run ssh succeed into your host, run worker node but you need add more host to worker container because we need that can interact with machine because that give network can interact and connect via host at /etc/hosts. Read more at Add entries to container hosts file (—add-host)
docker run --restart on-failure -v /lib/modules:/lib/modules:ro --privileged \
-h k8s-worker -d --network kind --network-alias k8s-worker --tmpfs /run --tmpfs /tmp \
--security-opt seccomp=unconfined --security-opt apparmor=unconfined --security-opt label=disable -v /var \
--name k8s-worker --label io.x-k8s.kind.cluster=kind --label io.x-k8s.kind.role=worker --env KIND_EXPERIMENTAL_CONTAINERD_SNAPSHOTTER \
--add-host "host.docker.internal:host-gateway" \
kindest/node:v1.28.9
Now you run succeed container and you need to exec some command inside to check your host can interact with master node
docker exec -it k8s-worker /bin/bashIn you master machine, host simple webserver with python to see they can interact with others inside worker container
# In master node
python3 -m http.server 9999

# In container worker node run command to hit webserver in port 9999. For example, IP of master will 10.0.69.15, you can
curl 10.0.69.15:9999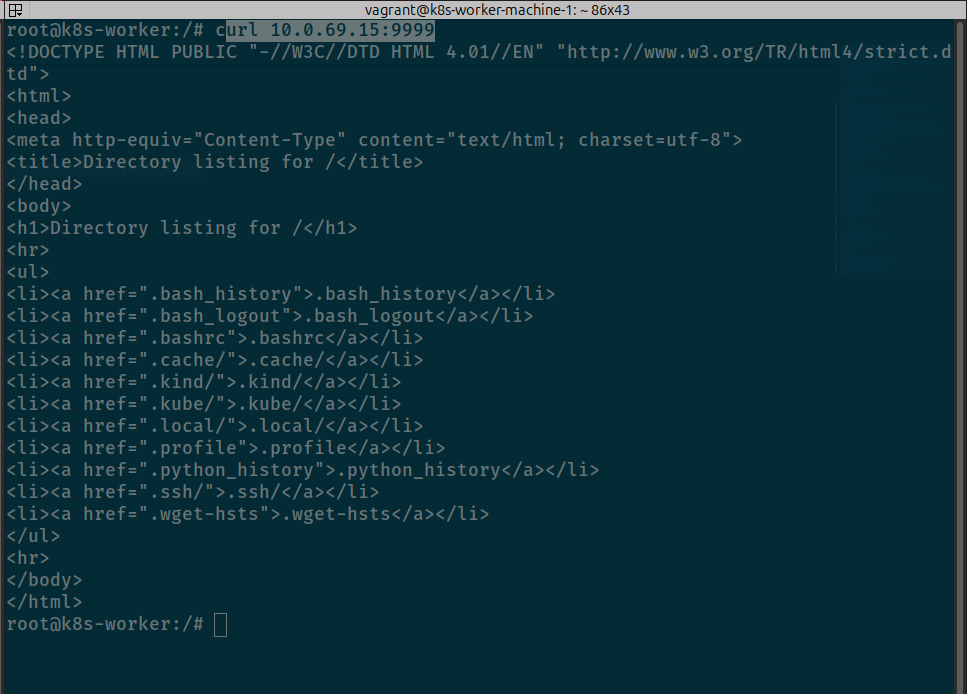
Your worker can interact with master node via container to host, and now you need to validate it can be interact between container and container. Try step in Part 2 of this session
# Generate
docker exec --privileged k8s-master-machine-control-plane kubeadm token create --print-join-command
And applied command inside worker container but change ip address and port because we forward port inside apiserver to 6996 ⇒ 6443 like this
kubeadm join 10.0.69.15:6996 --token xxxxxx --discovery-token-ca-cert-hash sha256:xxxx --skip-phases=preflightAnd yup nothing execute 😃

So I try to add -v=5 to debug my command
kubeadm join 10.0.69.15:6996 --token xxxxxx --discovery-token-ca-cert-hash sha256:xxxx --skip-phases=preflight -v=5And now problem will show for us

The evident proves your cert trust only 0.0.0.0 and localhost network, and it mean you need to configuration kubeadm in master node to make that actually generate cert for eth ip.
Therefore, I do research and find the solution at How can I add an additional IP / hostname to my Kubernetes certificate? which guide me to add on new IP in kubeadm and let’s that generate valid token and cert, for apiserver can approve IP of host
First of all, try connect to your master container
docker exec -it k8s-master-machine-control-plane /bin/bashNow find your kubeadm configuration and try to add your host to make your node can interact with master IP
kubectl -n kube-system get configmap kubeadm-config -o jsonpath='{.data.ClusterConfiguration}' > kubeadm.yamlapiServer:
certSANs:
- localhost
- 0.0.0.0
extraArgs:
authorization-mode: Node,RBAC
runtime-config: ""
timeoutForControlPlane: 4m0s
apiVersion: kubeadm.k8s.io/v1beta3
certificatesDir: /etc/kubernetes/pki
clusterName: kubewekend
controlPlaneEndpoint: kubewekend-control-plane:6443
controllerManager:
extraArgs:
enable-hostpath-provisioner: "true"
dns: {}
etcd:
local:
dataDir: /var/lib/etcd
imageRepository: registry.k8s.io
kind: ClusterConfiguration
kubernetesVersion: v1.28.9
networking:
dnsDomain: cluster.local
podSubnet: 10.244.0.0/16
serviceSubnet: 10.96.0.0/16
scheduler: {}As you can see only 0.0.0.0 and localhost as we discussion, so you nano try add your host IP below list in certSANs
apiServer:
  certSANs:
  - localhost
  - 0.0.0.0
  - 10.0.69.15
  extraArgs:
    authorization-mode: Node,RBAC
    runtime-config: ""
  timeoutForControlPlane: 4m0s
apiVersion: kubeadm.k8s.io/v1beta3
certificatesDir: /etc/kubernetes/pki
clusterName: kubewekend
controlPlaneEndpoint: kubewekend-control-plane:6443
controllerManager:
  extraArgs:
    enable-hostpath-provisioner: "true"
dns: {}
etcd:
  local:
    dataDir: /var/lib/etcd
imageRepository: registry.k8s.io
kind: ClusterConfiguration
kubernetesVersion: v1.28.9
networking:
  dnsDomain: cluster.local
  podSubnet: 10.244.0.0/16
  serviceSubnet: 10.96.0.0/16
scheduler: {}
Now move the old certificates to another folder, otherwise kubeadm will not recreate new ones
mv /etc/kubernetes/pki/apiserver.{crt,key} ~Use kubeadm to generate new apiserver certificates
kubeadm init phase certs apiserver --config kubeadm.yaml
After that you kubernetes will apply change after you update your new certificate for cluster, now you can check status of kube-apiserver
It restart like I expectation, and now try to generate token to see your worker node can connect to your master node
kubeadm token create --print-join-commandAnd boom
Continue error 😄, not easily now we need to continuous modify because I see this warning
Get "https://kubewekend-control-plane:6443/api/v1/namespaces/kube-system/configmaps/kubeadm-config?timeout=10s": dial tcp: lookup kubewekend-control-plane on 172.17.0.1:53: server misbehaving
failed to get config map
k8s.io/kubernetes/cmd/kubeadm/app/util/config.getInitConfigurationFromCluster
	k8s.io/kubernetes/cmd/kubeadm/app/util/config/cluster.go:74
k8s.io/kubernetes/cmd/kubeadm/app/util/config.FetchInitConfigurationFromCluster
	k8s.io/kubernetes/cmd/kubeadm/app/util/config/cluster.go:56
k8s.io/kubernetes/cmd/kubeadm/app/cmd.fetchInitConfiguration
	k8s.io/kubernetes/cmd/kubeadm/app/cmd/join.go:620
k8s.io/kubernetes/cmd/kubeadm/app/cmd.fetchInitConfigurationFromJoinConfiguration
	k8s.io/kubernetes/cmd/kubeadm/app/cmd/join.go:590
k8s.io/kubernetes/cmd/kubeadm/app/cmd.(*joinData).InitCfg
	k8s.io/kubernetes/cmd/kubeadm/app/cmd/join.go:544
k8s.io/kubernetes/cmd/kubeadm/app/cmd/phases/join.getKubeletStartJoinData
	k8s.io/kubernetes/cmd/kubeadm/app/cmd/phases/join/kubelet.go:91
k8s.io/kubernetes/cmd/kubeadm/app/cmd/phases/join.runKubeletStartJoinPhase
	k8s.io/kubernetes/cmd/kubeadm/app/cmd/phases/join/kubelet.go:106
k8s.io/kubernetes/cmd/kubeadm/app/cmd/phases/workflow.(*Runner).Run.func1
	k8s.io/kubernetes/cmd/kubeadm/app/cmd/phases/workflow/runner.go:259
k8s.io/kubernetes/cmd/kubeadm/app/cmd/phases/workflow.(*Runner).visitAll
	k8s.io/kubernetes/cmd/kubeadm/app/cmd/phases/workflow/runner.go:446
k8s.io/kubernetes/cmd/kubeadm/app/cmd/phases/workflow.(*Runner).Run
	k8s.io/kubernetes/cmd/kubeadm/app/cmd/phases/workflow/runner.go:232
k8s.io/kubernetes/cmd/kubeadm/app/cmd.newCmdJoin.func1
	k8s.io/kubernetes/cmd/kubeadm/app/cmd/join.go:179
github.com/spf13/cobra.(*Command).execute
	github.com/spf13/cobra@v1.7.0/command.go:940
github.com/spf13/cobra.(*Command).ExecuteC
	github.com/spf13/cobra@v1.7.0/command.go:1068
github.com/spf13/cobra.(*Command).Execute
	github.com/spf13/cobra@v1.7.0/command.go:992
k8s.io/kubernetes/cmd/kubeadm/app.Run
	k8s.io/kubernetes/cmd/kubeadm/app/kubeadm.go:50
main.main
	k8s.io/kubernetes/cmd/kubeadm/kubeadm.go:25
runtime.main
	runtime/proc.go:267
runtime.goexit
	runtime/asm_amd64.s:1650
unable to fetch the kubeadm-config ConfigMap
k8s.io/kubernetes/cmd/kubeadm/app/cmd.fetchInitConfiguration
	k8s.io/kubernetes/cmd/kubeadm/app/cmd/join.go:622
k8s.io/kubernetes/cmd/kubeadm/app/cmd.fetchInitConfigurationFromJoinConfiguration
	k8s.io/kubernetes/cmd/kubeadm/app/cmd/join.go:590
k8s.io/kubernetes/cmd/kubeadm/app/cmd.(*joinData).InitCfg
	k8s.io/kubernetes/cmd/kubeadm/app/cmd/join.go:544
k8s.io/kubernetes/cmd/kubeadm/app/cmd/phases/join.getKubeletStartJoinData
	k8s.io/kubernetes/cmd/kubeadm/app/cmd/phases/join/kubelet.go:91
k8s.io/kubernetes/cmd/kubeadm/app/cmd/phases/join.runKubeletStartJoinPhase
	k8s.io/kubernetes/cmd/kubeadm/app/cmd/phases/join/kubelet.go:106
k8s.io/kubernetes/cmd/kubeadm/app/cmd/phases/workflow.(*Runner).Run.func1
	k8s.io/kubernetes/cmd/kubeadm/app/cmd/phases/workflow/runner.go:259
k8s.io/kubernetes/cmd/kubeadm/app/cmd/phases/workflow.(*Runner).visitAll
	k8s.io/kubernetes/cmd/kubeadm/app/cmd/phases/workflow/runner.go:446
k8s.io/kubernetes/cmd/kubeadm/app/cmd/phases/workflow.(*Runner).Run
	k8s.io/kubernetes/cmd/kubeadm/app/cmd/phases/workflow/runner.go:232
k8s.io/kubernetes/cmd/kubeadm/app/cmd.newCmdJoin.func1
	k8s.io/kubernetes/cmd/kubeadm/app/cmd/join.go:179
github.com/spf13/cobra.(*Command).execute
	github.com/spf13/cobra@v1.7.0/command.go:940
github.com/spf13/cobra.(*Command).ExecuteC
	github.com/spf13/cobra@v1.7.0/command.go:1068
github.com/spf13/cobra.(*Command).Execute
	github.com/spf13/cobra@v1.7.0/command.go:992
k8s.io/kubernetes/cmd/kubeadm/app.Run
	k8s.io/kubernetes/cmd/kubeadm/app/kubeadm.go:50
main.main
	k8s.io/kubernetes/cmd/kubeadm/kubeadm.go:25
runtime.main
	runtime/proc.go:267
runtime.goexit
	runtime/asm_amd64.s:1650
error execution phase kubelet-start
k8s.io/kubernetes/cmd/kubeadm/app/cmd/phases/workflow.(*Runner).Run.func1
	k8s.io/kubernetes/cmd/kubeadm/app/cmd/phases/workflow/runner.go:260
k8s.io/kubernetes/cmd/kubeadm/app/cmd/phases/workflow.(*Runner).visitAll
	k8s.io/kubernetes/cmd/kubeadm/app/cmd/phases/workflow/runner.go:446
k8s.io/kubernetes/cmd/kubeadm/app/cmd/phases/workflow.(*Runner).Run
	k8s.io/kubernetes/cmd/kubeadm/app/cmd/phases/workflow/runner.go:232
k8s.io/kubernetes/cmd/kubeadm/app/cmd.newCmdJoin.func1
	k8s.io/kubernetes/cmd/kubeadm/app/cmd/join.go:179
github.com/spf13/cobra.(*Command).execute
	github.com/spf13/cobra@v1.7.0/command.go:940
github.com/spf13/cobra.(*Command).ExecuteC
	github.com/spf13/cobra@v1.7.0/command.go:1068
github.com/spf13/cobra.(*Command).Execute
	github.com/spf13/cobra@v1.7.0/command.go:992
k8s.io/kubernetes/cmd/kubeadm/app.Run
	k8s.io/kubernetes/cmd/kubeadm/app/kubeadm.go:50
main.main
	k8s.io/kubernetes/cmd/kubeadm/kubeadm.go:25
runtime.main
	runtime/proc.go:267
runtime.goexit
	runtime/asm_amd64.s:1650
Again your kube-apiserver cannot interact you need to configuration how to permit and help your worker node connect kube-apiserver, try again in kubeadm.yaml
apiServer:
  certSANs:
  - localhost
  - 0.0.0.0
  - 10.0.69.15
  extraArgs:
    authorization-mode: Node,RBAC
    runtime-config: ""
  timeoutForControlPlane: 4m0s
apiVersion: kubeadm.k8s.io/v1beta3
certificatesDir: /etc/kubernetes/pki
clusterName: kubewekend
controlPlaneEndpoint: 10.0.69.15:6996
controllerManager:
  extraArgs:
    enable-hostpath-provisioner: "true"
dns: {}
etcd:
  local:
    dataDir: /var/lib/etcd
imageRepository: registry.k8s.io
kind: ClusterConfiguration
kubernetesVersion: v1.28.9
networking:
  dnsDomain: cluster.local
  podSubnet: 10.244.0.0/16
  serviceSubnet: 10.96.0.0/16
scheduler: {}
Change the control plane address to host because worker node can interact with kube-apiserver via host IP address, that reason why I config like this and now trying again, don’t forget delete pod kube-apiserver or use can use kill -9 to delete process
# Some time be in stuck and not know reason :)
kubectl delete pods -n kube-system kube-apiserver-k8s-master-machine-control-plane

# Try with ps
ps aux | grep -e "kube-apiserver"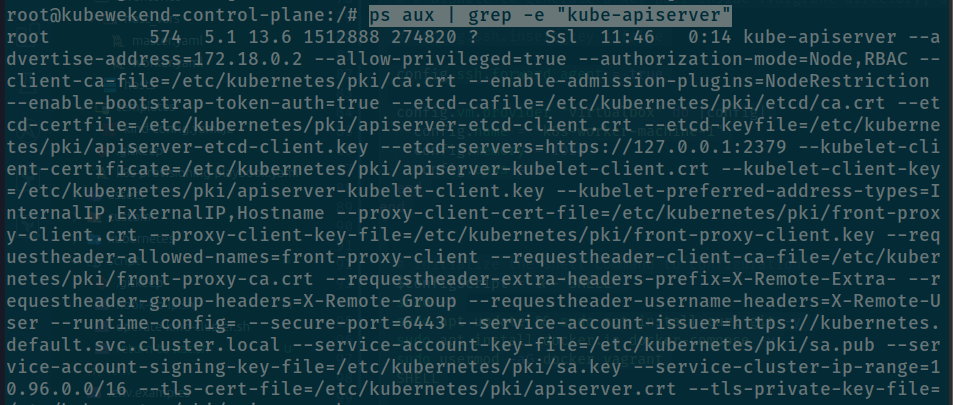
# Kill your process with attach for kube-apiserver
kill -9 <pid>
After try update new configuration to configmap
kubeadm init phase upload-config kubeadm --config kubeadm.yamlAnd the result is continue failure 😄
I think about we don’t have Coredns to resolve and reason why it not bring up because not install CNI for currently master node 😄
 It can be accept all route and try connect to endpoint
 10.0.96.15:6996 in mode global, not ensure but make a test but before we will install cilium use Installl Cilium to your host
Quote
And I realize i make big mistake, misconfiguration between
10.0.96.15:6996and10.0.69.15:6996and that really stupid 😄 to make me waste time to debug
And so try again and continue error again, but retrieve cluster-info is pass and that proven we are right path to configuration
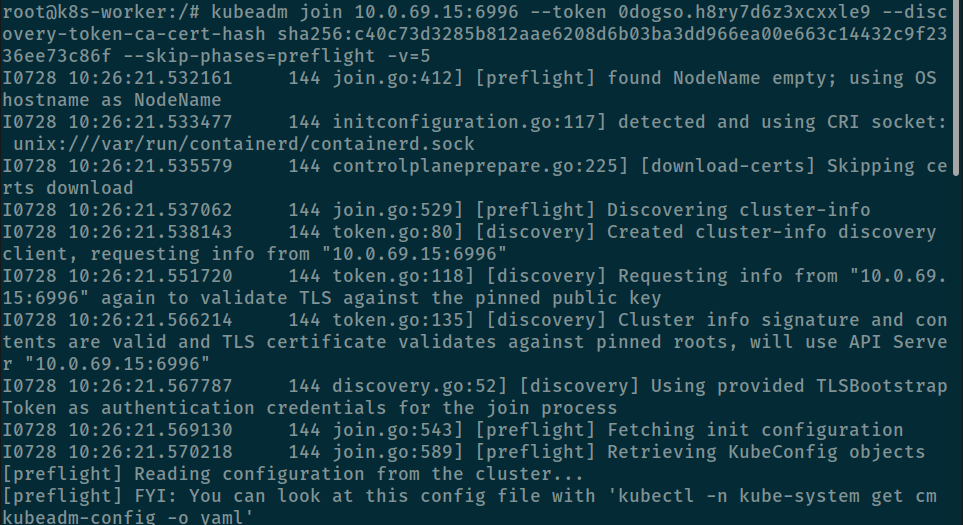
kubeadm join 10.0.69.15:6996 --token h6b5vo.u1x063vo5xu4bj27 \
--discovery-token-ca-cert-hash sha256:4194bb0d3eb3cbca344e4b50df8347356bdb487aa39deb7f83839a543ce819d4 \
--skip-phases=preflight -v=5
I0728 14:44:51.849874 332 join.go:412] [preflight] found NodeName empty; using OS hostname as NodeName
I0728 14:44:51.852058 332 initconfiguration.go:117] detected and using CRI socket: unix:///var/run/containerd/containerd.sock
I0728 14:44:51.853734 332 controlplaneprepare.go:225] [download-certs] Skipping certs download
I0728 14:44:51.855364 332 join.go:529] [preflight] Discovering cluster-info
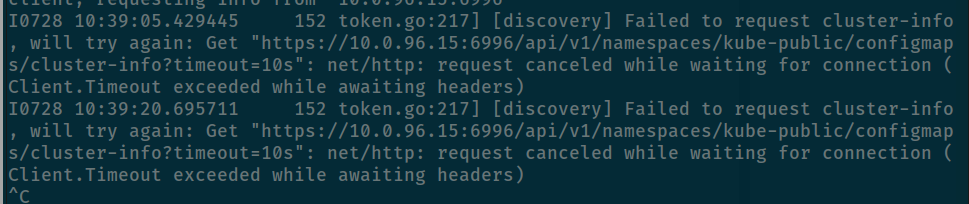
I0728 14:44:51.856153 332 token.go:80] [discovery] Created cluster-info discovery client, requesting info from "10.0.69.15:6996"
I0728 14:44:51.869441 332 token.go:118] [discovery] Requesting info from "10.0.69.15:6996" again to validate TLS against the pinned public key
I0728 14:44:51.884549 332 token.go:135] [discovery] Cluster info signature and contents are valid and TLS certificate validates against pinned roots, will use API Server "10.0.69.15:6996"
I0728 14:44:51.886189 332 discovery.go:52] [discovery] Using provided TLSBootstrapToken as authentication credentials for the join process
I0728 14:44:51.887542 332 join.go:543] [preflight] Fetching init configuration
I0728 14:44:51.889003 332 join.go:589] [preflight] Retrieving KubeConfig objects
[preflight] Reading configuration from the cluster...
[preflight] FYI: You can look at this config file with 'kubectl -n kube-system get cm kubeadm-config -o yaml'
Get "https://kubewekend-control-plane:6443/api/v1/namespaces/kube-system/configmaps/kubeadm-config?timeout=10s": dial tcp: lookup kubewekend-control-plane on 172.17.0.1:53: server misbehaving
Now the we met on the configuration for kubeadm-config, and actually that have issue can be resolve via article kubeadm join failed: unable to fetch the kubeadm-config ConfigMap
Issue ask me about to reconfiguration both kubeadm.yaml (Done) but configmap of cluster-info is not upgrade, so we need to update that, but first retrieve that with command
kubectl get cm cluster-info -o yaml -n kube-public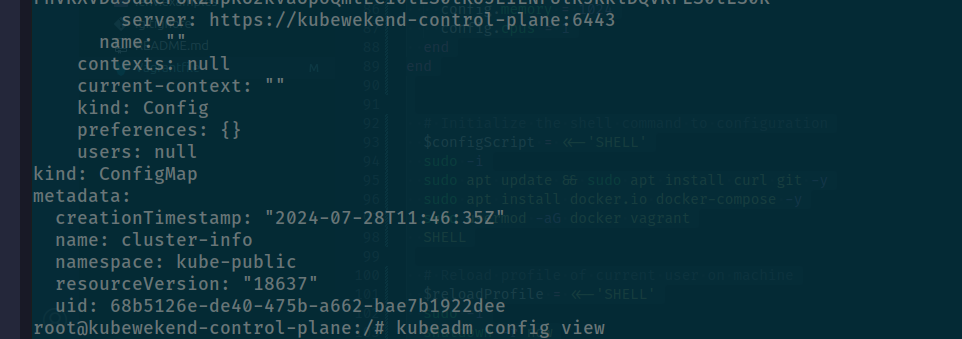
Currently server is not configuration to IP so we need to edit that we can use kubectl edit to update configmap
# Change default editor to nano
export KUBE_EDITOR=nano

# Edit config map
kubectl edit cm cluster-info -n kube-public
After save and update, we reload kube-apiserver and kubelet of master node if needed but first try with kube-apiserver as kill container
kubectl delete pods/kube-apiserver-kubewekend-control-plane -n kube-system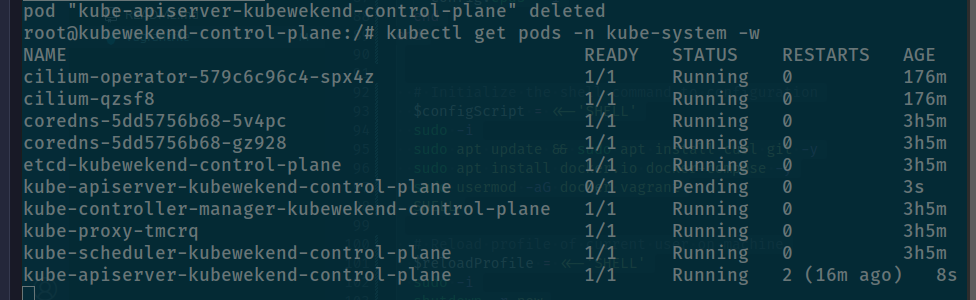
Check again inside worker node before reload kubelet because that can cause some damage and your cluster can be interrupted and I don’t want this situation 😄
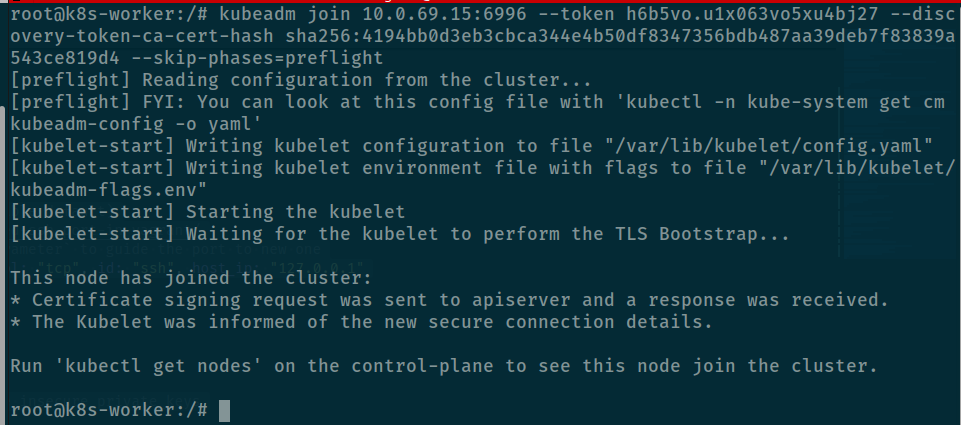
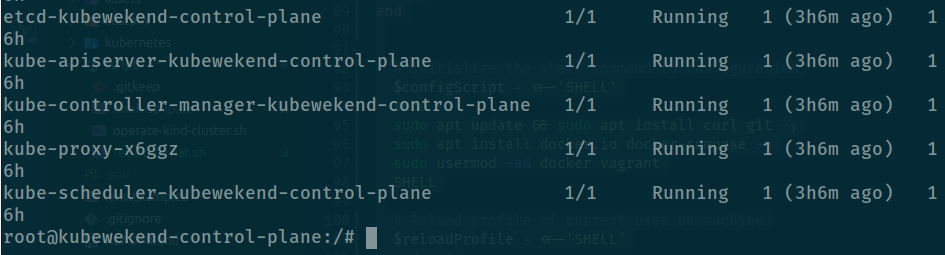
And finally we can connect addition worker host into master, that is huge progress to get this result, cry for that 🙌🙌🙌
And when use get nodes, you have some problems take around CNI again
kubectl get nodes
And It comes up with error about not found apiserver because it configuration cluster network and our kubewekend cluster you use MachineIP + Port
time="2024-07-28T15:07:03Z" level=info msg=Invoked duration=1.530641ms function="github.com/cilium/cilium/cilium-dbg/cmd.glob..func39 (cmd/build-config.go:32)" subsys=hive
time="2024-07-28T15:07:03Z" level=info msg=Starting subsys=hive
time="2024-07-28T15:07:03Z" level=info msg="Establishing connection to apiserver" host="https://10.96.0.1:443" subsys=k8s-client
time="2024-07-28T15:07:38Z" level=info msg="Establishing connection to apiserver" host="https://10.96.0.1:443" subsys=k8s-client
time="2024-07-28T15:08:08Z" level=error msg="Unable to contact k8s api-server" error="Get \"https://10.96.0.1:443/api/v1/namespaces/kube-system\": dial tcp 10.96.0.1:443: i/o timeout" ipAddr="https://10.96.0.1:443" subsys=k8s-client
time="2024-07-28T15:08:08Z" level=error msg="Start hook failed" error="Get \"https://10.96.0.1:443/api/v1/namespaces/kube-system\": dial tcp 10.96.0.1:443: i/o timeout" function="client.(*compositeClientset).onStart" subsys=hive
time="2024-07-28T15:08:08Z" level=info msg=Stopping subsys=hive
Error: Build config failed: failed to start: Get "https://10.96.0.1:443/api/v1/namespaces/kube-system": dial tcp 10.96.0.1:443: i/o timeout
And issue be resolved via some issue and documentation, help us reconfiguration CNI with Cilium

So we will uninstall CNI and try to install again with right configuration
# Uninstall Cilium out of cluster
cilium uninstall --wait

# Install again with configuration
# E.g: Kubeapi-server IP: 10.0.69.15 and Port: 6996
cilium install --version 1.15.6 --set k8sServiceHost=10.0.69.15 --set k8sServicePort=6996
And after applied we have ready node as we expected

Conclusion
Success
Sorry to take you much to join with adventure with me, but hope you find well information during the session, figure out what thing need to control and management when create new host, networking, security, container runtime, kernel and moreover like
cgroupandsystemdkubelet. Therefore, I love muchkubernetesbecause we need to learn and keep update when try to self-hosted and managekubernetesproblems, really tough but supper fun and cool
Quote
Thanks all support from community to help me create
kubewekendas expected, I know it hard to hand-on in automation, I will try but not this week. Happy to practice and learn a lots of things inside kubernetes, help me upgrade skill when try with linux and I thinks that I cool stuff I do from writing series. Therefore, thankful for my reader who read to end, appreciate your patience, and one time again stay safe, learning and I will see you on the next weekend. Bye bye 🤝🤝🤝