Introduce Azure Pipelines
Abstract
The Gallery of Azure DevOps pipelines, where I share experience about some approaching automation in this platform.
Documentation
- Azure - What is Azure Pipelines?
- Azure - Azure Pipelines documentation
- Azure - YAML schema reference for Azure Pipelines
Feature
- Azure - Predefine variables
- Azure - Azure Pipelines task reference
- Azure - Specify conditions - (NOTE : Vice versa
eq, you can usenebut reference little bit on documentation) - Azure - Expressions
- Azure - Create and target an environment
- Azure - Template usage reference
- Azure - Publish and download pipeline artifacts
Deploy React application to Azure SWA
Abstract
Pipelines will help you deploy and release react application to
swaof Azure CloudPlugins:
Tools:
First of all, you need to provide this json file for purpose set up swa-cli what use to provide configuration and deploy your application
{
    "$schema": "https://aka.ms/azure/static-web-apps-cli/schema",
    "configurations": {
      "wiki": {
        "appLocation": ".",
        "outputLocation": "public",
        "appBuildCommand": "npm run build",
        "run": "npm run start",
        "appDevserverUrl": "http://localhost:8080",
        "env": "production"
      }
    }
}trigger: none
pool: $(PoolName)
stages:
- stage: build_publish_artifacts
displayName: Build and publish
jobs:
- job: setup_environment_and_publish_artifacts
displayName: Setup environemnts, build and publish artifacts
steps:
- task: UseNode@1
displayName: Setup Node
inputs:
version: '18.14'
- script: |
npm ci
npx quartz build
workingDirectory: "./src"
displayName: Install dependencies and build
- task: PublishBuildArtifacts@1
inputs:
ArtifactName: public
PathtoPublish: "./src/public"
- stage: deploy_to_swa
displayName: Deploy Page
jobs:
- job: pull_and_deploy_web
displayName: Deploy the web page
steps:
- task: DownloadBuildArtifacts@0
inputs:
artifactName: public
downloadPath: "./src/"
displayName: Download build artifacts
- task: UseNode@1
displayName: Setup Node
inputs:
version: '18.14'
- script: |
npm install -g @azure/static-web-apps-cli
swa --version
swa deploy --deployment-token=$(token_release)
workingDirectory: $(System.DefaultWorkingDirectory)/src
displayName: Install swa and deploy application
Just create a pipeline on Azure DevOps and trigger the pipeline by manually, and provide some require environment variables for pipeline, like token_release (Token of Azure SWA) and PoolName (Name of agent to perform pipeline)

Click Run to trigger pipeline, last state will announce your deployment completely with your web application domain
Setup CI/CD for React Native
Read more about React Native build with fastlane on CI/CD at Build mobile with fastlane
Status: Does not completely, continuous integrate next step build android 😢 😢 😢
Info
Setup CI for setup environment, build tools for test and build
APKandIPAfile for bothAndroidandIOS. Let digest !!!Plugins:
Tools:
trigger: none

stages:
  - stage: setup_and_test
    displayName: Setup environment and test
    pool:
      vmImage: 'ubuntu-latest'
    jobs:
      - job: setup_and_test
        displayName: Setup environment
        steps:
          - task: UseNode@1
            displayName: Setup Node
            inputs:
              version: '18.20'

          - script: |
              npm i -g yarn
              yarn install
            displayName: Install Package
            workingDirectory: "./app"

          - script: |
              yarn lint
            displayName: Syntax Check ESlint
            workingDirectory: "./app"

          - script: |
              yarn add -D jest-junit
              yarn test --ci --reporters=jest-junit --reporters=default
            displayName: Unit test jest
            workingDirectory: "./app"

          - task: PublishTestResults@2
            displayName: Publish Test Result
            inputs:
              testResultsFormat: 'JUnit'
              testResultsFiles: '**/junit.xml'
              searchFolder: "./app"

  - stage: build_android
    displayName: Build Android Applications
    jobs:
      - job: build_android
        displayName: Build Android Jobs
        steps:
          - task: UseNode@1
            displayName: Setup Node Environment
            inputs:
              version: "18.20"

          - script: |
              npm i -g yarn
              yarn install
            displayName: Install node package for project

          - script: |
              cd ./android || exit 1
              fastlane build
            displayName: Build the APK for Android Project

          - task: PublishBuildArtifacts@1
            displayName: Publish APK file to Repository
            inputs:
              ArtifactName: APK Package
              PathtoPublish: ./android/app/build/outputs/apk/release
Troubleshoot
Warning
When you set up the azure-agent for running job, remember set
.envvariables for specify agent because it will not read Linux$PROFILE, just read only environment inrunsvc.sh. Read more at: StackOverFlow - ANDROID_HOME not set (VSTS agent running as service on OS X)
Setup CICD for build Container Applications
Abstract
You can use this pipeline for deploy application Azure Container Application with self-hosted VM via
systemassignidentityPlugins:
- UseDotNet@2 (NOTE: For .NET Core application, change for whatever you want)
- DotNetCoreCLI@2
- PublishBuildArtifacts@1
- Docker@2
Tools (Require install to VM)
# Non trigger automation trigger, but base on policy
trigger: none

# Trigger when open PR to main
pr:
  branches:
    include:
      - main

pool:
  vmImage: 'ubuntu-latest'

stages:
  - stage: test_and_build
    displayName: Test and Build Applications
    condition: ne(variables['Build.SourceBranchName'], 'main')
    variables:
      buildConfiguration: 'Release'
    jobs:
      - job: test_and_build
        displayName: Test and Build Applications
        steps:
          - task: UseDotNet@2
            displayName: 'Install .NET Core SDK'
            inputs:
              version: 8.0.300

          - task: DotNetCoreCLI@2
            displayName: 'Restore Dependencies'
            inputs:
              command: 'restore'
			  projects: '**/*.csproj'

          - task: DotNetCoreCLI@2
            displayName: "Build Project"
            inputs:
              command: 'build'
              arguments: '-c $buildConfiguration -o ./build'
              modifyOutputPath: true
              workingDirectory: './src'

          - task: DotNetCoreCLI@2
            displayName: "Published Project"
            inputs:
              command: 'publish'
              arguments: '-c $buildConfiguration -o ./publish'
              zipAfterPublish: false
              workingDirectory: './src'

          - task: PublishBuildArtifacts@1
            displayName: 'Published Artifact'
            inputs:
              PathtoPublish: './src/publish'
              ArtifactName: public-artifact  - stage: build_image

  - stage: build_image
    displayName: Build Docker Image
    # Run when merge code into main
    condition: eq(variables['build.sourceBranch'], 'refs/heads/main')
    jobs:
      - job: build_image
        displayName: Build Docker Image and Push to registry
        steps:
          - task: Docker@2
            displayName: Login to ACR
            inputs:
              command: login
              # Manage service connections
              # Documentation: https://learn.microsoft.com/en-us/azure/devops/pipelines/library/service-endpoints?view=azure-devops&tabs=yaml
              containerRegistry: "Dockerserviceconnection"

          - task: Docker@2
            displayName: Build and Push Image
            inputs:
              command: buildAndPush
              Dockerfile: ./src/Dockerfile
              repository: app-dev
              buildContext: ./src/
              tags: |
                latest
                $(Build.SourceVersion)

  - stage: deploy
    displayName: Deploy Applications
    dependsOn: build_image
    condition: and(succeeded('build_image'), eq(variables['build.sourceBranch'], 'refs/heads/main'))
    jobs:
      - deployment: deploy
	    # Set rule to permit running this job or pending
	    # Documentation: https://learn.microsoft.com/en-us/azure/devops/pipelines/process/environments?view=azure-devops
        environment: $(environmentDeployment)
        strategy:
          runOnce:
            deploy:
              steps:
              - script: |
                  az login --identity
                  az containerapp update --name mindfull-app-$(environmentDeployment) \
                    --resource-group rg-$(environmentDeployment) \
                    --image example.azurecr.io/app-$(environmentDeployment):$(Build.SourceVersion) \
                    --set-env-vars "ASPNETCORE_ENVIRONMENT=$(environmentApplication)" \
                    "ConnectionStrings__Default=secretref:ConnectionStrings"
                displayName: Deploy Applications to Container App
Note
Policy on auto trigger, just work with
mainbranch. So if you work with another branch, likeproduction,develop, … Thus we need, changetriggervalue to your specify branch. Issue: StackOverFlow - Using CI triggers and PR build validation together: Prevent that build runs twice
# Just work with main, if you push the pr
trigger: none

# If you want to use both pr and trigger (For another branch)
trigger:
  branches:
    include:
      - develop

pr:
  branches:
    include:
      - develop
Optional
To help PR event occur trigger CI automation, you need to configure Policy for branch, for example

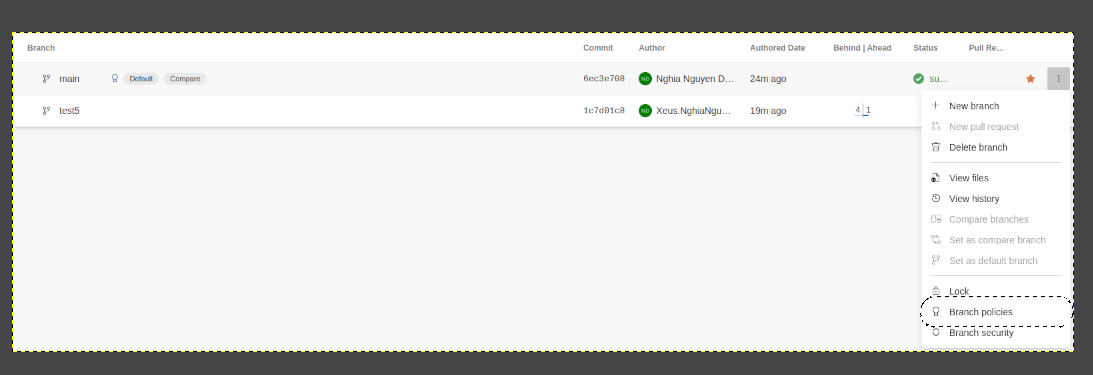
You want trigger for main branch, so you need choose Branch polices option, It will bring you to another page for setup policy

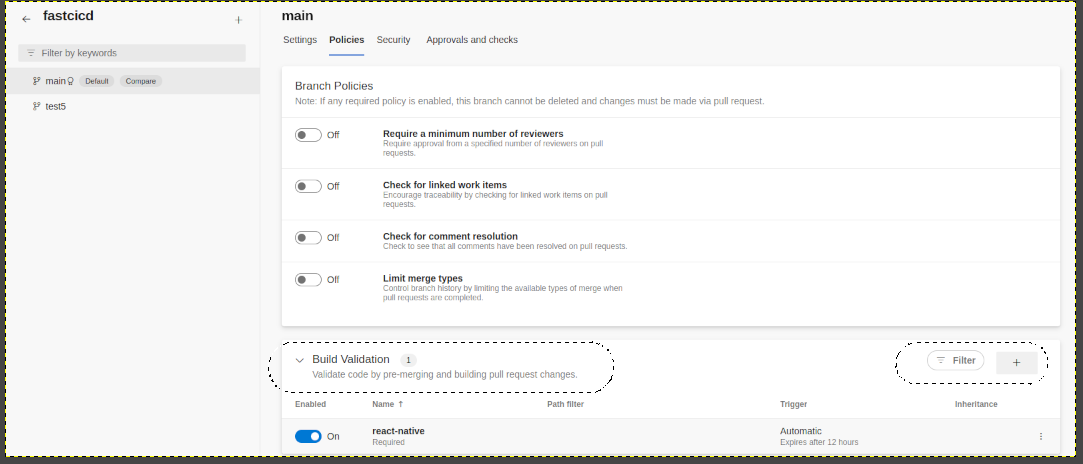
On the Build Validation, you can choose + button for adding build validation with trigger automation your pipeline

For example, I have react-native pipeline, It will automation trigger this one when I create PR.
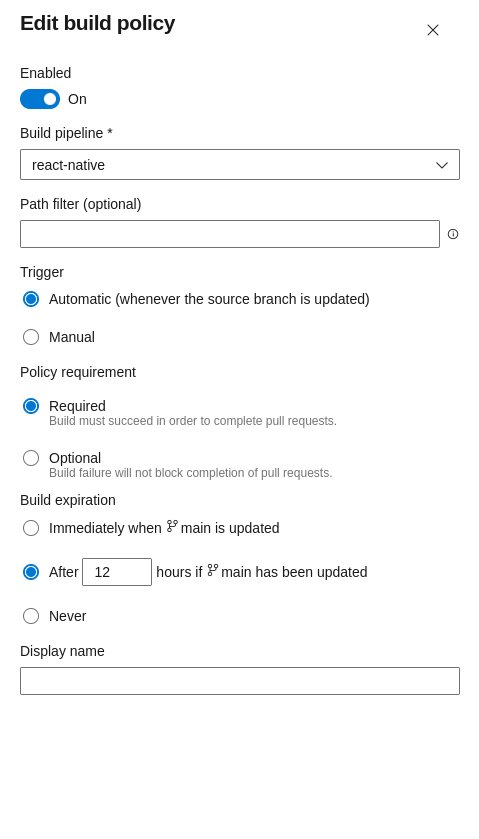
- You can choose Manual for instead but if you want,
- Others optional, you can clarify Required or Optional to accept build
failedpipeline, that cause block - Choose the Build expiration to set time line of Build events to validate

When trigger, your pipeline will set PR automated for instead of Individual CI
Troubleshoot
Warning
When you use
succeeded()expression, remember import name branch you need to check on on the single quote bracket likesucceeded('build'), it mean this task will read-only the status state ofbuildstage, if not it will read all values of stage or job in pipeline, and make a decision
Retrieve the artifact cross pipelines
Abstract
When you wanna apply the methodology to retrieve the artifact cross pipelines in same project, It will help you doing multiple things kinda like up-down pipeline, depend on, more
Plugins:
You can use publish plugin to upload your file into artifact of Azure Pipeline
pool:
  vmImage: 'ubuntu-latest'

stages:
  - stage: build_publish_artifacts
    displayName: Build and publish
    jobs:
      - job: publish_artifacts
        displayName: publish artifacts
        steps:
	      # Write text into the file
          - script: |
              echo "artifact-123" > artifact.txt
            displayName: Publish artifact

		  # Upload that file into artifact in azure pipelines
          - task: PublishBuildArtifacts@1
            inputs:
              ArtifactName: public
              PathtoPublish: "artifact.txt"
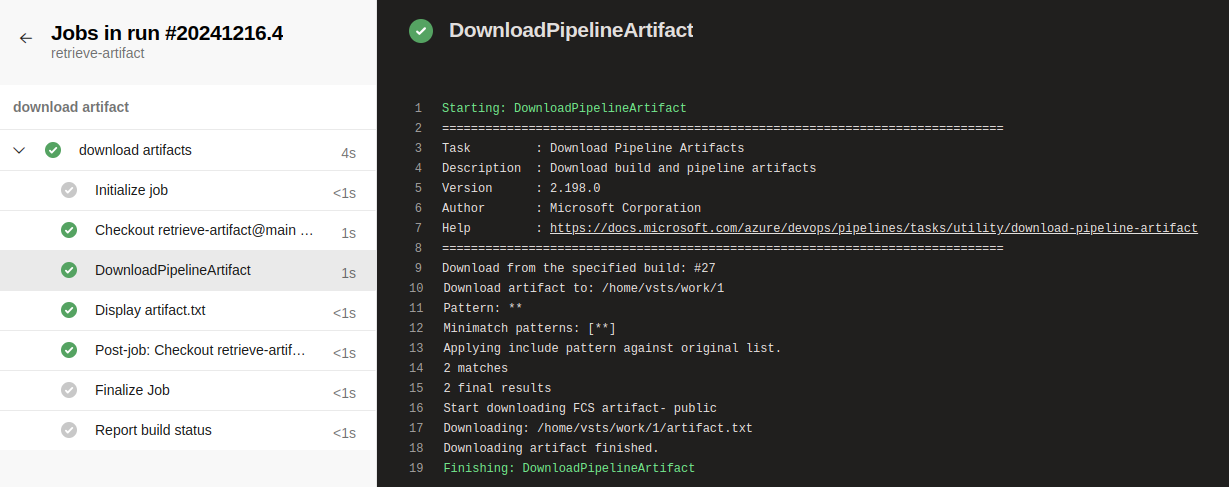
After that in other repository inside project, you can easily retrieve that artifact from your pipeline
pool:
  vmImage: "ubuntu-latest"

stages:
  - stage: download_publish_artifacts
    displayName: download artifact
    jobs:
      - job: download_artifact
        displayName: download artifacts
        steps:
	      # Download artifact from another repo inside same project
          - task: DownloadPipelineArtifact@2
            inputs:
              # Set build type
              buildType: "specific"
              # Project name
              project: "artifact-hub"
              # Pipeline id where run publish
              definition: "3"
              # Download from main artifact
              buildVersionToDownload: "latest"
              # Specific artifact name published
              artifactName: "public"
              # Output Path
              targetPath: "$(Pipeline.Workspace)"

		  # Get the content inside the artifact
          - script: |
              cat $(Pipeline.Workspace)/artifact.txt
            displayName: Display artifact.txt
Info
This implement already work with multiple repositories inside one project. If you wanna apply with cross project, you should be considered before applying
Related articles and implementation, Explore more at
- Azure - Publish and download pipeline artifacts
- Azure - Publish and download build artifacts
- Youtube - Azure Pipelines Download Latest Successful Artifact From Another Pipeline Automatically
- StackOverFlow - Azure Artifacts - Sharing project-scoped feeds with other projects
Error and Troubleshoot
The SSL connection could not be established, and No usable version of libssl was found
With the sentence No usable version of libssl was found, usually meet on Ubuntu 22.04, you can fix by install openssl
Ubuntu: Ubuntu Package Issue: Github
wget -c http://security.ubuntu.com/ubuntu/pool/main/o/openssl/libssl1.1_1.1.0g-2ubuntu4_amd64.deb

sudo dpkg -i libssl1.1_1.1.0g-2ubuntu4_amd64.deb
After that, you can run ./config.sh, but next sentence will problems The SSL connection could not be established. You can resolve that one with ENV AZP variables
First export to environment variable AZP_AGENT_USE_LEGACY_HTTP and run ./config.sh
export AZP_AGENT_USE_LEGACY_HTTP=true

./config.sh
After that, you need set to environment to agent to bypass the SSL issue in runsvc.sh file
#!/bin/bash

# convert SIGTERM signal to SIGINT
# for more info on how to propagate SIGTERM to a child process see: http://veithen.github.io/2014/11/16/sigterm-propagation.html
trap 'kill -INT $PID' TERM INT

if [ -f ".path" ]; then
    # configure
    export PATH=`cat .path`
    echo ".path=${PATH}"
fi

# insert anything to setup env when running as a service
export AZP_AGENT_USE_LEGACY_HTTP=true

# run the host process which keep the listener alive
./externals/node10/bin/node ./bin/AgentService.js &
PID=$!
wait $PID
trap - TERM INT
wait $PID
And that all, trigger svc.sh file to setup and connect the agent to pool
sudo ./svc.sh install
sudo ./svc.sh start