Abstract
This is about some configuration to make your effective when work with powershell. This will collection from multiple source, check it out and let’s create your favorite shell
When you need to setup those things, you need to be consider for install some thing, like
Install and setup powershell profile
For install Chocolatey, you can use one-line command with Administrator of your powershell
Set-ExecutionPolicy Bypass -Scope Process -Force; [System.Net.ServicePointManager]::SecurityProtocol = [System.Net.ServicePointManager]::SecurityProtocol -bor 3072; iex ((New-Object System.Net.WebClient).DownloadString('https://community.chocolatey.org/install.ps1'))Install some common module for your powershell terminal
# Install git
choco install git

# Install vscode
choco install vscode

# Install Oh-my-posh
# Documentation: https://ohmyposh.dev/docs/installation/windows
choco install oh-my-posh

# Install powertoys
# Documentation: https://learn.microsoft.com/en-us/windows/powertoys/install
winget install Microsoft.PowerToys --source winget

# Optional: You can install winget 3.0.0 beta UI for easily managed
# Documentation: https://github.com/marticliment/WingetUI
choco install wingetui
You need to configure profile for apply the plugin for your powershell by run
notepad $PROFILEClick or enter for yes optional when your terminal not exist these one
## To running this script - need to bypass restricted
## RUN THIS COMMAND VIA ADMINSTRATOR PWSH: Set-ExecutionPolicy RemoteSigned -Scope CurrentUser

# Set the autosuggestion and autocomplete in pwsh
# Install before running (Administrator running)
# Install-Module PSReadLine -RequiredVersion 2.1.0

Import-Module PSReadLine
Set-PSReadLineOption -PredictionSource History

# Shows navigable menu of all options when hitting Tab
# Default not need to downloading
Set-PSReadlineKeyHandler -Key Tab -Function MenuComplete

# Set the autosuggestion git in pwsh
# Install before used for preventing error
# PowerShellGet\Install-Module posh-git -Scope CurrentUser -Force

Add-PoshGitToProfile -AllHosts -Force

## Set oh-my-posh theme for powershell
# Install this oh-my-posh from website: https://ohmyposh.dev/ or windows store
oh-my-posh init pwsh | Invoke-Expression

# Import the Chocolatey Profile that contains the necessary code to enable
# tab-completions to function for `choco`.
# Be aware that if you are missing these lines from your profile, tab completion
# for `choco` will not function.
# See https://ch0.co/tab-completion for details.
$ChocolateyProfile = "$env:ChocolateyInstall\helpers\chocolateyProfile.psm1"
if (Test-Path($ChocolateyProfile)) {
  Import-Module "$ChocolateyProfile"
}

# Change theme of ohmyposh
# Selection one of these: https://ohmyposh.dev/docs/themes
oh-my-posh init pwsh --config "https://raw.githubusercontent.com/JanDeDobbeleer/oh-my-posh/main/themes/amro.omp.json" | Invoke-Expression

# Install terminal-icon with admin trust before import-module
# Install-Module -Name Terminal-Icons -Repository PSGallery
Import-Module -Name Terminal-Icons
To understand more about powershell, come and take a look on
Install VMware Workstation
Usually, In windows I use vmware_workstation instead of vmbox. If you prefer any version, link down below
With version 16, use need license key to providing to use unlimited for your vmware, so get use it via
ZF3R0-FHED2-M80TY-8QYGC-NPKYF
YF390-0HF8P-M81RQ-2DXQE-M2UT6 # Check-mate
ZF71R-DMX85-08DQY-8YMNC-PPHV8
FC11K-00DE0-0800Z-04Z5E-MC8T6
Why we relate vmware, because if you want to provide the machine by automation via Vagrant in this platform, use can perform this powershell command, and helpful article can useful
- How to Install and Uninstall MSI Packages using Powershell
- msiexec - docs
- How to uninstall the MSI package using PowerShell?
# Download vagrant from hashicorp repo
Invoke-WebRequest -Uri "https://releases.hashicorp.com/vagrant/2.4.1/vagrant_2.4.1_windows_amd64.msi" -Outfile ~\Downloads\vagrant_2.4.1_windows_amd64.msi

# Install MSI but we can't bypass approve, you will be interact in this step
cd ~\Downloads; Start-Process 'msiexec.exe' -ArgumentList '/I vagrant_2.4.1_windows_amd64.msi' -Wait

# Install vagrant utility for vmware
Invoke-WebRequest -Uri "https://releases.hashicorp.com/vagrant-vmware-utility/1.0.22/vagrant-vmware-utility_1.0.22_windows_amd64.msi" -Outfile ~\Downloads\vagrant-vmware-utility_1.0.22_windows_amd64.msi

# Step will same as install vagrant, need to approve
cd ~\Downloads; Start-Process 'msiexec.exe' -ArgumentList '/I vagrant-vmware-utility_1.0.22_windows_amd64.msi' -Wait

# Check all vagrant app name via win32
Get-WmiObject -Class Win32_Product | Where-Object { $_.Name -match "vagrant" }

# Restart your windows to applied changed
Restart-Computer
After you succeed on installing vagrant, we need to install plugin for vagrant to use provider vmware_workstation
# Install plugin for vmware workstation
vagrant plugin install vagrant-vmware-desktop

# Check about plugin actually install
vagrant plugin list
Done, you can use vagrant inside your machine and connect directly vmware_workstation, create Vagranfile and enjoy !!
Enable SSH-Agent
Documentation: StackOverFlow - Starting ssh-agent on Windows 10 fails
In usual, ssh-agent feature will become disable in Windows 10 and 11, so you need to make a change in configuration of service tag or use powershell command to handle it
You can check this by running in Windows PowerShell
Get-Service ssh-agentStatus Name DisplayName
------ ---- -----------
Stopped ssh-agent OpenSSH Authentication AgentResult return stop, It means your ssh-agent is not work in your machine, but let filter with StartType is knowing what state of OpenSSH
Get-Service ssh-agent | Select StartTypeStartType
---------
DisabledTo enable, you can use powershell or UI to handle
Get-Service -Name ssh-agent | Set-Service -StartupType Manual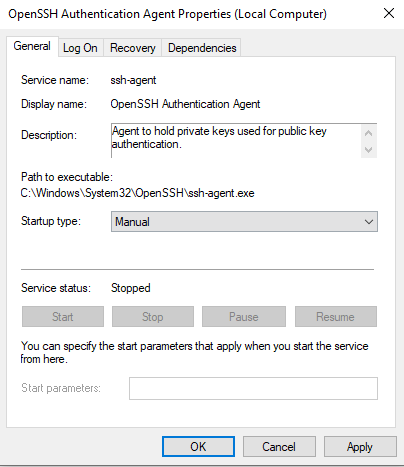
And now you can use OpenSSH Agent to add your key inside your windows machine