Resource reservations
Documentation: 🔗Click to the link
Info
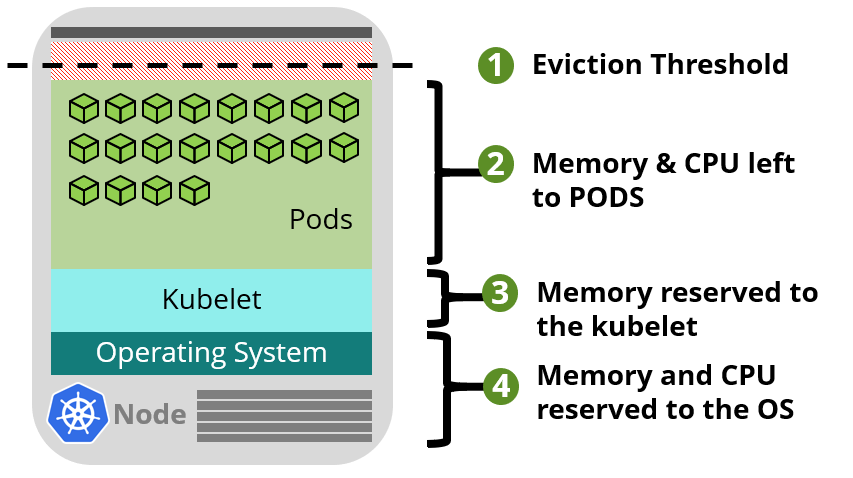
AKS uses node resources to help the node function as part of your cluster. This usage can create a discrepancy between your node’s total resources and the allocatable resources in AKS. Remember this information when setting requests and limits for user deployed pods.
You can use command for check the node resource allocated
kubectl describe node [NODE_NAME]

# Example:
Capacity:
  cpu:                2
  ephemeral-storage:  50620216Ki
  hugepages-1Gi:      0
  hugepages-2Mi:      0
  memory:             8129880Ki
  pods:               110
Allocatable:
  cpu:                1900m
  ephemeral-storage:  46651590989
  hugepages-1Gi:      0
  hugepages-2Mi:      0
  memory:             5474648Ki
  pods:               110
Two types of resources are reserved:
CPU
Info
Reserved CPU is dependent on node type and cluster configuration, which may cause less allocatable CPU due to running additional features.
| CPU cores on host | 1 | 2 | 4 | 8 | 16 | 32 | 64 |
|---|---|---|---|---|---|---|---|
| Kube-reserved (millicores) | 60 | 100 | 140 | 180 | 260 | 420 | 740 |
| Example: |
- If your node has 2 CPU core, the reservation will take
100mand your real quotas is2000m - 100m = 1900m - If your node has 4 CPU core, the reservation will take
140mand your real quotas is4000m - 140m = 3860m
Memory
With version 1.27.7 - stable K8s version with applied old utilized by AKS includes the sum of two values., but when you use from 1.29 or later, kubelet is have big change in concept, read more at: Memory reservations
-
kubeletdaemon is installed on all Kubernetes agent nodes to manage container creation and termination. By default on AKS,kubeletdaemon has the memory.available<750Mi eviction rule, ensuring a node must always have at least 750Mi allocatable at all times. When a host is below that available memory threshold, thekubeletwill trigger to terminate one of the running pods and free up memory on the host machine. -
A regressive rate of memory reservations for the kubelet daemon to properly function (kube-reserved).
- 25% of the first 4GB of memory
- 20% of the next 4GB of memory (up to 8GB)
- 10% of the next 8GB of memory (up to 16GB)
- 6% of the next 112GB of memory (up to 128GB)
- 2% of any memory above 128GB
Info
Memory and CPU allocation rules are designed to do the following:
Keep agent nodes healthy, including some hosting system pods critical to cluster health.
Cause the node to report less allocatable memory and CPU than it would report if it weren’t part of a Kubernetes cluster.
Memory resource reservations can’t be changed.
Example:
If your node has 8GB Memory, your actually memory quotas reporting is
Threadhold eviction (Not change): 750Mi (0.75)
For first 4GB: 25% (0.25 * 4 = 1 = 1000Mi)
For next 4GB: 20% (0.20 * 4 = 0.8 = 800Mi)

Real Memory Quotas

8Gi - (750 + 1000 + 800) = 8000Mi - 2550Mi = 5450Mi
Conclusion
- CPU hasn’t eviction range but it has limitation,
Insufficient CPUcan occur if it over1900mfor sum of request - Memory has eviction range
(750Mi), If you work with customize cluster, you can change the value but Azure can’t. Make sure your resource always down and not over others750Mifor stabling and preventing,evictionandterminationbyKubelet - Memory also has allocated range, if sum of request your resource over allocated value like over
5450Mi,Insufficient Memorycan occur
Node pools & Node selectors
Documentation: Node pools - Node selectors
Info
What is Node Pools ?
Nodes of the same configuration are grouped together into node pools. A Kubernetes cluster contains at least one node pool. The initial number of nodes and size are defined when you create an AKS cluster, which creates a default node pool. This default node pool in AKS contains the underlying VMs that run your agent nodes.
You scale or upgrade an AKS cluster against the default node pool. You can choose to scale or upgrade a specific node pool. For upgrade operations, running containers are scheduled on other nodes in the node pool until all the nodes are successfully upgraded.
In an AKS cluster with multiple node pools, you may need to tell the Kubernetes Scheduler which node pool to use for a given resource. This is suitable situation for choosing nodeSelector
The following basic example schedules an NGINX instance on a Linux node using the node selector pool: infrapool:
kind: Pod
apiVersion: v1
metadata:
  name: nginx
spec:
  containers:
    - name: myfrontend
      image: mcr.microsoft.com/oss/nginx/nginx:1.15.12-alpine
  nodeSelector:
    pool: infrapool
Workload and Schedule
Pods
Documentation: 🔗Click to the link
Info
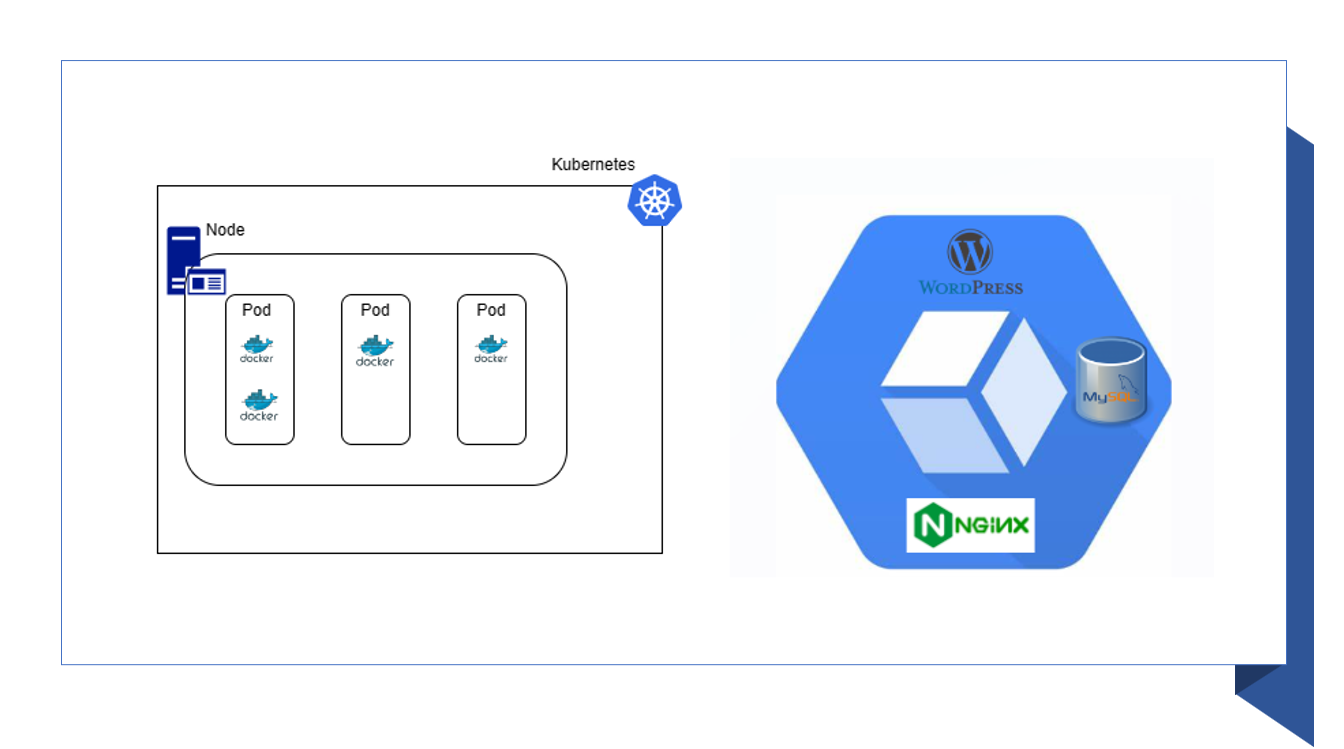
Kubernetes uses pods to run an instance of your application. A pod represents a single instance of your application.
You can use command to get the pod (application pod)
# -n : namespace (= default)

kubectl get -n default pods <your-pod>
If you want to detecting what container is used in Pod, find it with deployments via command
# -o wide: output with more information (image container)

kubectl get -n default deployments <your-deployment> -o wide
Note
NOTICE: But Pod can contain multiple containers, scheduled together on the same node, and allow containers to share related resources.
Todo
Best practice is to include resource limits for all pods to help the Kubernetes Scheduler identify necessary, permitted resources.
Abstract
A pod is a logical resource, but application workloads run on the containers. Pods are typically ephemeral, disposable resources. Individually scheduled pods miss some of the high availability and redundancy Kubernetes features. Instead, pods are deployed and managed by Kubernetes Controllers, such as the Deployment Controller.
Deployments and YAML manifests
Documentation: 🔗Click to the link
Info
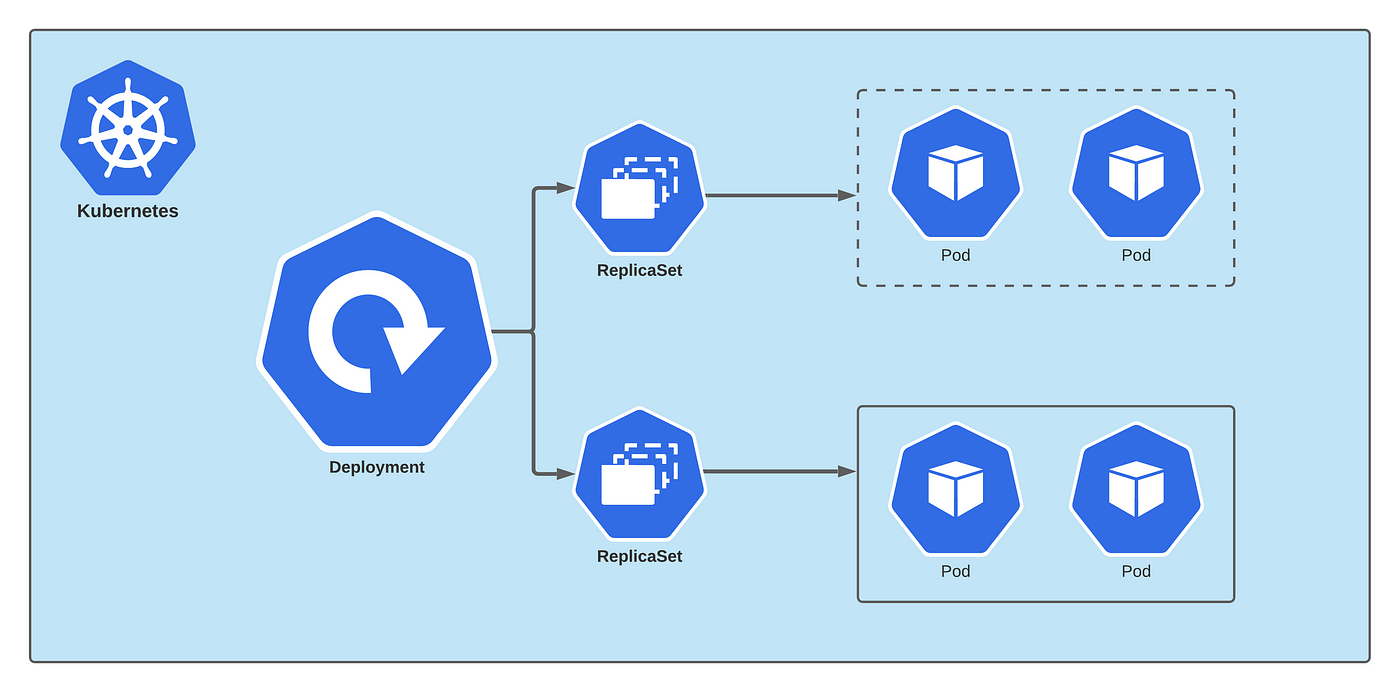
A deployment represents identical pods managed by the Kubernetes Deployment Controller. A deployment defines the number of pod replicas to create. The Kubernetes Scheduler ensures that additional pods are scheduled on healthy nodes if pods or nodes encounter problems.
You can update deployments to change the configuration of pods, container image used, or attached storage. The Deployment Controller:
- Drains and terminates a given number of replicas.
- Creates replicas from the new deployment definition.
- Continues the process until all replicas in the deployment are updated.
You can image yaml manifest of deployment when apply helm like
apiVersion: apps/v1
kind: Deployment
metadata:
  name: nginx
spec:
  replicas: 3
  selector:
    matchLabels:
      app: nginx
  template:
    metadata:
      labels:
        app: nginx
    spec:
      containers:
      - name: nginx
        image: mcr.microsoft.com/oss/nginx/nginx:1.15.2-alpine
        ports:
        - containerPort: 80
        resources:
          requests:
            cpu: 250m
            memory: 64Mi
          limits:
            cpu: 500m
            memory: 256Mi
StatefulSets and DaemonSets
Documentation: 🔗Click to the link
Info
Using the Kubernetes Scheduler, the Deployment Controller runs replicas on any available node with available resources. While this approach may be sufficient for stateless applications, the Deployment Controller isn’t ideal for applications that require:
- A persistent naming convention or storage.
- A replica to exist on each select node within a cluster.
Two Kubernetes resources, however, let you manage these types of applications:
- StatefulSets maintain the state of applications beyond an individual pod lifecycle.
- DaemonSets ensure a running instance on each node, early in the Kubernetes bootstrap process.
StatefulSets
Documentation: 🔗Click to the link
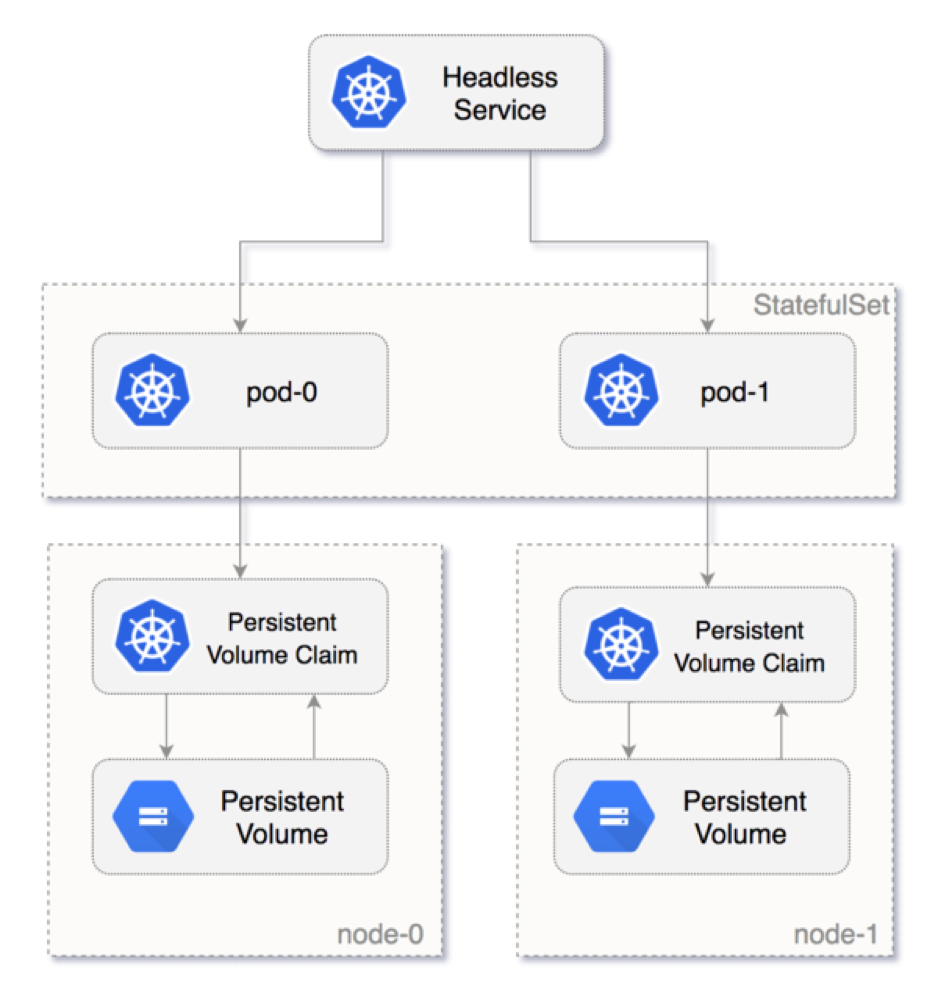
Info
With StatefulSet, you can consider when create
- Database components
- Application work with high-performance and not removing data from server
Define the application in YAML format using
kind: StatefulSet.The StatefulSet Controller handles the deployment and management of the required replicas. Data is written to persistent storage, provided by Azure Managed Disks or Azure Files.
With StatefulSets, the underlying persistent storage remains, even when the StatefulSet is deleted.
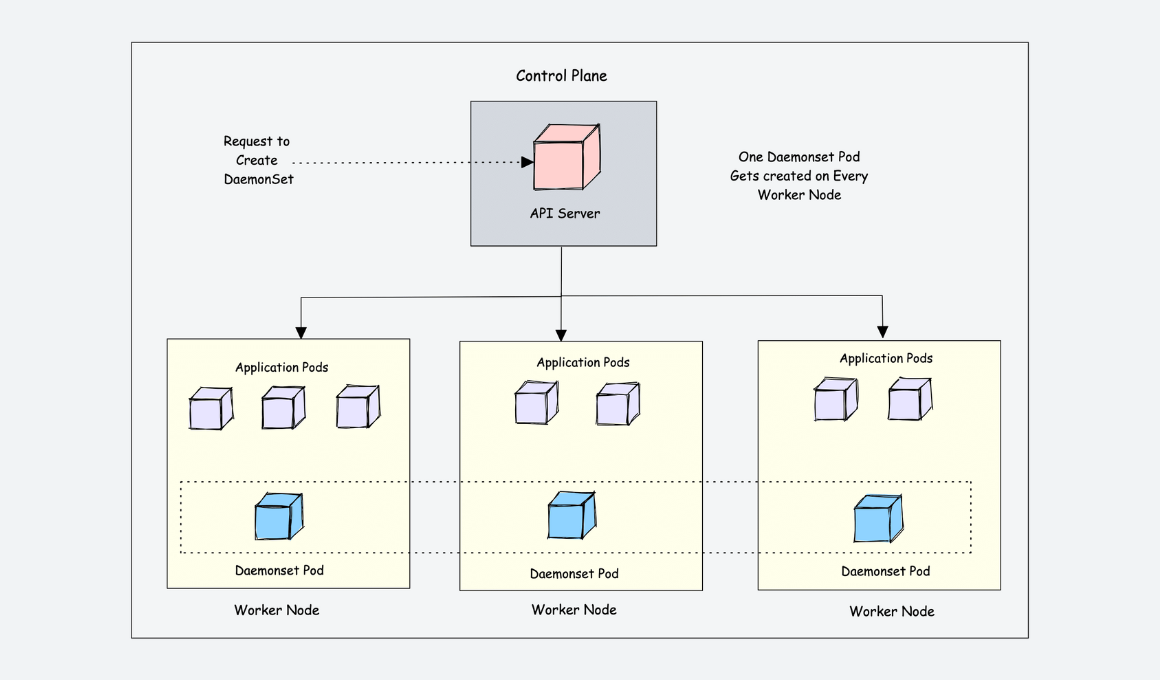
DaemonSets
Documentation: doc
Info
For specific log collection or monitoring, you may need to run a pod on all nodes or a select set of nodes. You can use DaemonSets to deploy to one or more identical pods. The DaemonSet Controller ensures that each node specified runs an instance of the pod.
The DaemonSet Controller can schedule pods on nodes early in the cluster boot process, before the default Kubernetes scheduler has started. This ability ensures that the pods in a DaemonSet are started before traditional pods in a Deployment or StatefulSet are scheduled.
Like StatefulSets, a DaemonSet is defined as part of a YAML definition using
kind: DaemonSet.
CronJob & Jobs
Documentation: 🔗Click to the link
Definition
Abstract
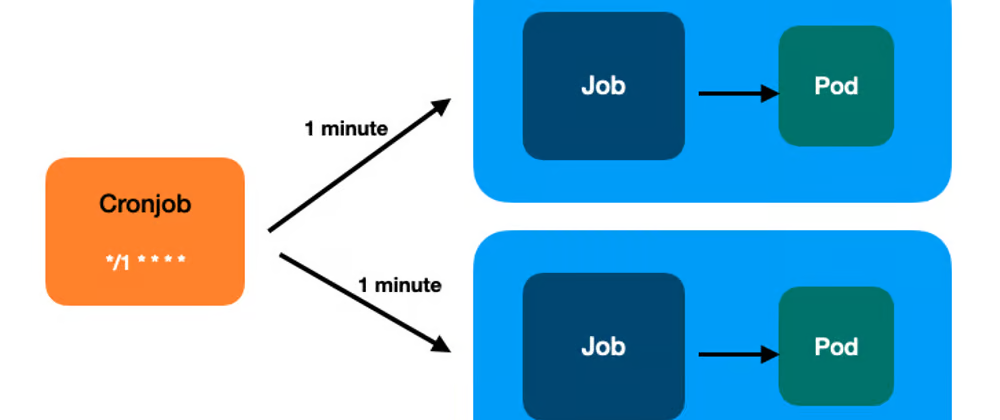
What is cronjobs ?
A CronJob creates Jobs on a repeating schedule.
CronJob is meant for performing regular scheduled actions such as backups, report generation, and so on. One CronJob object is like one line of a crontab (cron table) file on a Unix system. It runs a Job periodically on a given schedule, written in Cron format.
What is jobs ?
A Job creates one or more Pods and will continue to retry execution of the Pods until a specified number of them successfully terminate. As pods successfully complete, the Job tracks the successful completions. When a specified number of successful completions is reached, the task (ie, Job) is complete. Deleting a Job will clean up the Pods it created. Suspending a Job will delete its active Pods until the Job is resumed again.A simple case is to create one Job object in order to reliably run one Pod to completion. The Job object will start a new Pod if the first Pod fails or is deleted (for example due to a node hardware failure or a node reboot).
You can also use a Job to run multiple Pods in parallel.
Schedule syntax
The .spec.schedule field is required. The value of that field follows the Cron syntax:
┌───────────── minute (0 - 59)
│ ┌───────────── hour (0 - 23)
│ │ ┌───────────── day of the month (1 - 31)
│ │ │ ┌───────────── month (1 - 12)
│ │ │ │ ┌───────────── day of the week (0 - 6) (Sunday to Saturday)
│ │ │ │ │                             OR sun, mon, tue, wed, thu, fri, sat
│ │ │ │ │
│ │ │ │ │
* * * * *
Other than the standard syntax, some macros like @monthly can also be used:
| Entry | Description | Equivalent to |
|---|---|---|
| @yearly (or @annually) | Run once a year at midnight of 1 January | 0 0 1 1 * |
| @monthly | Run once a month at midnight of the first day of the month | 0 0 1 * * |
| @weekly | Run once a week at midnight on Sunday morning | 0 0 * * 0 |
| @daily (or @midnight) | Run once a day at midnight | 0 0 * * * |
| @hourly | Run once an hour at the beginning of the hour | 0 * * * * |
Storage

With Kubernetes work on Azure Cloud. Therefore, we need consider what type of storage, cluster can associate
- Azure File
- Azure Disk
- Azure Blob
With Storage on AKS, you need to enable CSI drive for using extension storage class above by command or IaC
az aks update -n myAKSCluster -g myResourceGroup --enable-disk-driver --enable-file-driver --enable-blob-driveror enable it when provision with terraform
resource "azurerm_kubernetes_cluster" "this" {
  ...
  ...
  storage_profile {
    blob_driver_enabled         = true
    disk_driver_enabled         = true
    file_driver_enabled         = true
    snapshot_controller_enabled = false
  }
  ...
  ...
}
Related articles
- Container Storage Interface (CSI) drivers on Azure Kubernetes Service (AKS)
- Kubernetes - Storage Classes
- Kubernetes - Persistent Volumes
Networking
Documentation
- Kubernetes concept - Cluster Networking
- Kubernetes concept - Services, Load Balancing, and Networking
- Ingress-Nginx Controller
- Networking concepts for applications in Azure Kubernetes Service (AKS)
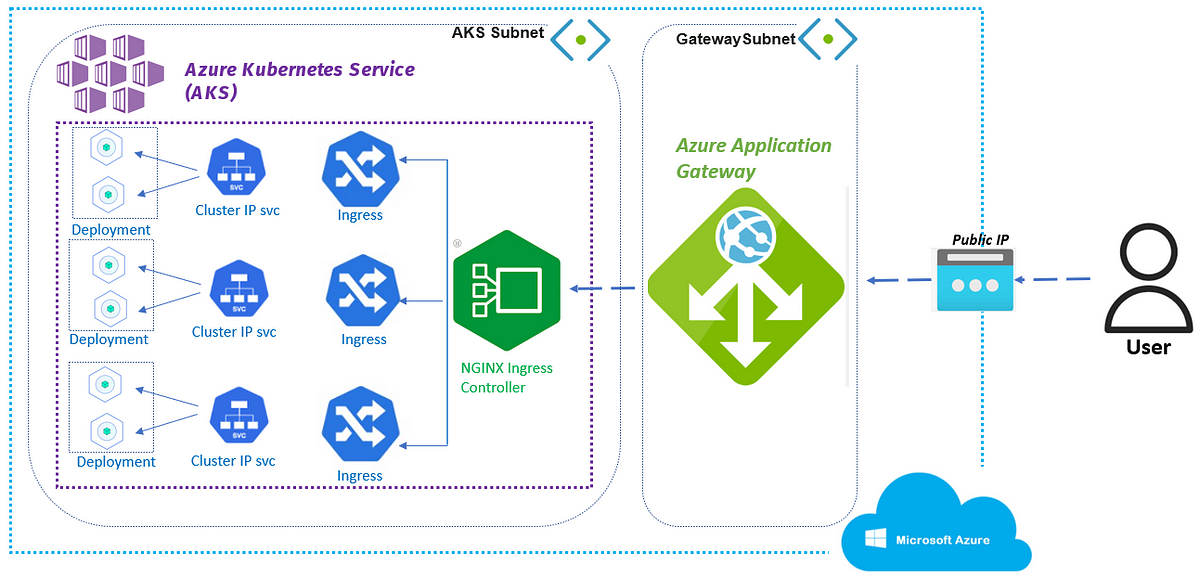
More information about networking in AKS
- Ingress type which use via Nginx-Ingress, It works like the concept of nginx but complicate and integration more things.
- Not
sticky sessionis set oningress, so not concern about that - The route handle, rule, restrict are setting on
Nginx, so you need to understand thenginxfor changing that Nginx-Ingressdeploy viahelm
Danger
Please, do not delete the
deploymentofnginx-ingressbecause of triggering the new load balancer create and our IP will update and cause DOWNTIME for system
AKS price and configuration
Price
| Free tier | Standard tier | Premium tier | |
|---|---|---|---|
| When to use | • You want to experiment with AKS at no extra cost • You’re new to AKS and Kubernetes | • You’re running production or mission-critical workloads and need high availability and reliability • You need a financially backed SLA | • You’re running production or mission-critical workloads and need high availability and reliability • You need a financially backed SLA. • All mission critical, at scale or production workloads requiring 2 years of support |
| Supported cluster types | • Development clusters or small scale testing environments • Clusters with fewer than 10 nodes | • Enterprise-grade or production workloads • Clusters with up to 5,000 nodes | • Enterprise-grade or production workloads • Clusters with up to 5,000 nodes |
| Pricing | • Free cluster management • Pay-as-you-go for resources you consume | • Pay-as-you-go for resources you consume • Standard tier Cluster Management Pricing | • Pay-as-you-go for resources you consume • Premium tier Cluster Management Pricing |
| Feature comparison | • Recommended for clusters with fewer than 10 nodes, but can support up to 1,000 nodes • Includes all current AKS features | • Uptime SLA is enabled by default • Greater cluster reliability and resources • Can support up to 5,000 nodes in a cluster • Includes all current AKS features | • Includes all current AKS features from standard tier • Microsoft maintenance past community support |
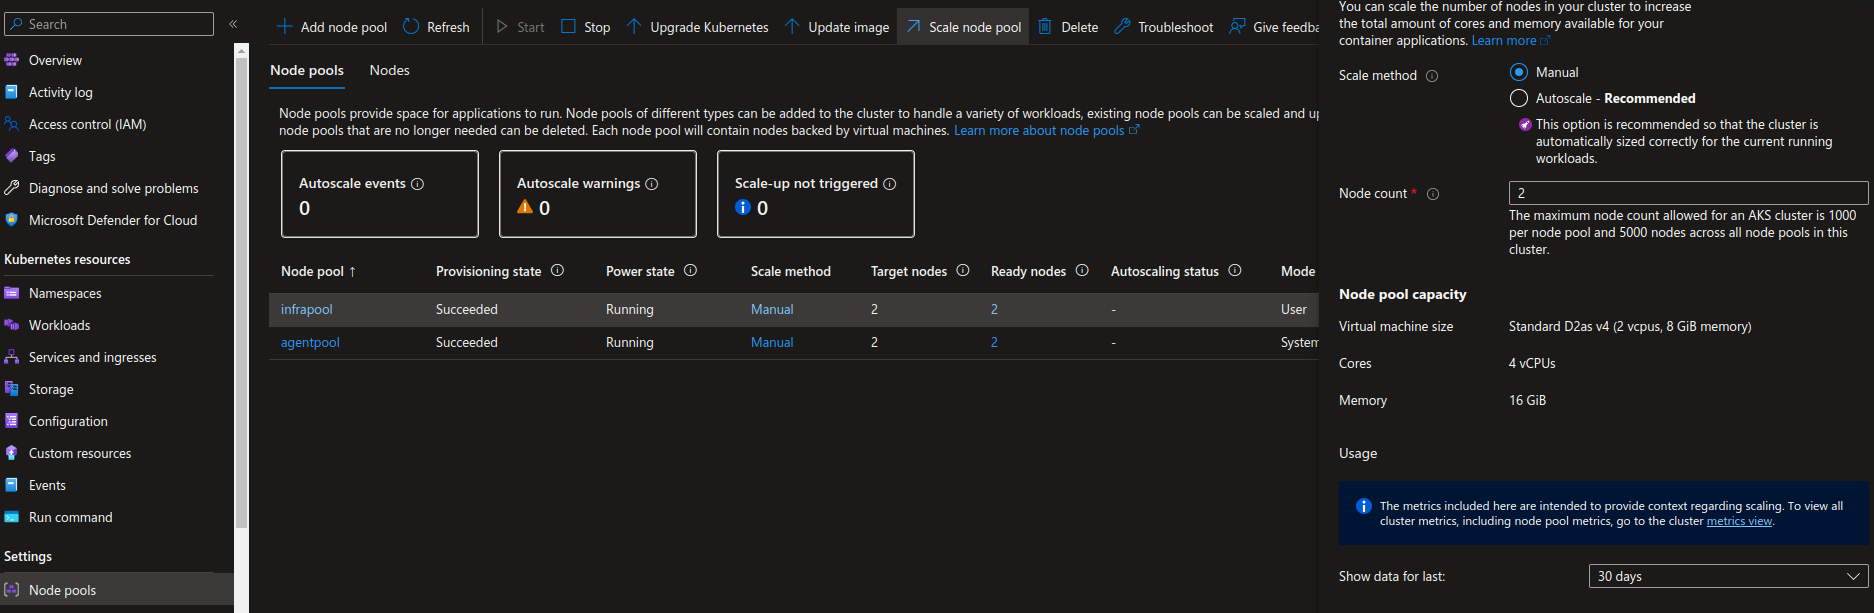
Auto Scaling
For purpose stably infrastructure, AKS can be able to apply
- Apply scale with kind
cluster autoscalerin Azure Kubernetes Service (AKS). Find more, Use the cluster autoscaler in Azure Kubernetes Service (AKS) - Set another scaling range for your node through couple ways
We can apply that via command
az aks update --resource-group myResourceGroup --name myAKSCluster --enable-cluster-autoscaler --min-count 1 --max-count 3You can also use Azure portal with choose on Nodes pool ⇒ Select node pool want update ⇒ choose Scale Node Pool
Security Patch for OS
For purpose prevent vulnerable, attack for AKS, Security Patch is suggested by Azure. Therefore, All environment is applying this one via command
-
Check the
nodeOsUpgradeChannelby commandaz aks show --resource-group <rg-name> --name <aks-name> --query autoUpgradeProfile It contains two optional:
 nodeOsUpgradeChannel(Have purpose to update the security and bugfixes for Node Container Image) andupgradeChannel(Have purpose to update the aks cluster - that not recommendation) -
If null in first option, go through enable feature flag and add the configuration for this stuff. More detail in this link https://learn.microsoft.com/en-us/azure/aks/auto-upgrade-node-image#register-the-nodeosupgradechannelpreview-feature-flag:~:text=Register%20the%20NodeOsUpgradeChannelPreviewAfter run the command
az feature register --namespace "Microsoft.ContainerService" --name "NodeOsUpgradeChannelPreview"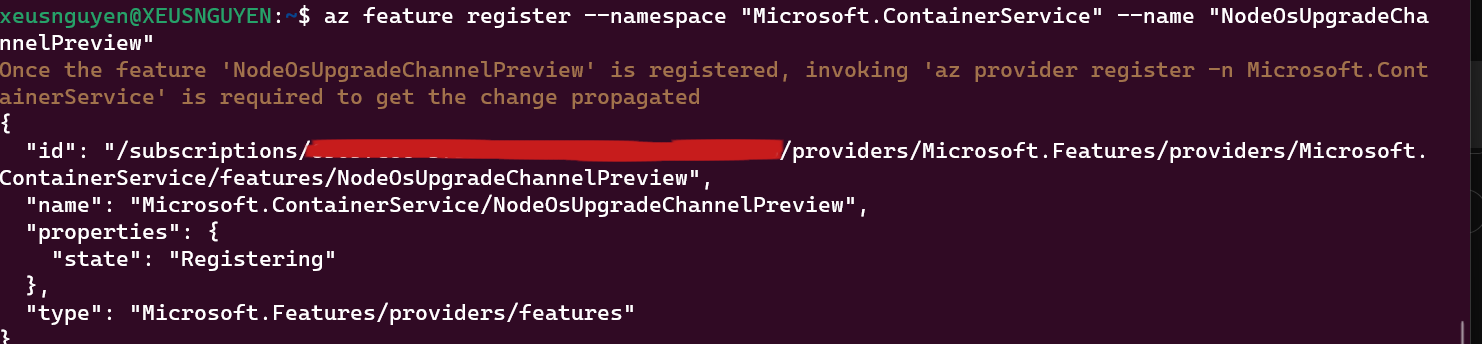 The feature flag is registering. And after that run the command for confirm the feature
 az provider register --namespace Microsoft.ContainerService -
After that use this command to create security patch it will create VHD but the cost is footling
az aks update --resource-group <rg-name> --name <aks-name> --node-os-upgrade-channel SecurityPatch. So for checking go step 1 to print the result of applies.
-
All thing is done in this lastly, because the update can make the maintance system so it will do on the weekend every 2 week on 11pm saturday. The command for doing that kind is
az aks maintenanceconfiguration add -g <rg-name> --cluster-name <aks-name> --name aksManagedNodeOSUpgradeSchedule --interval-weeks 2 --day-of-week Saturday --start-time 16:00 --duration 6 --schedule-type Weekly. For more detail go this link https://learn.microsoft.com/en-us/azure/aks/planned-maintenance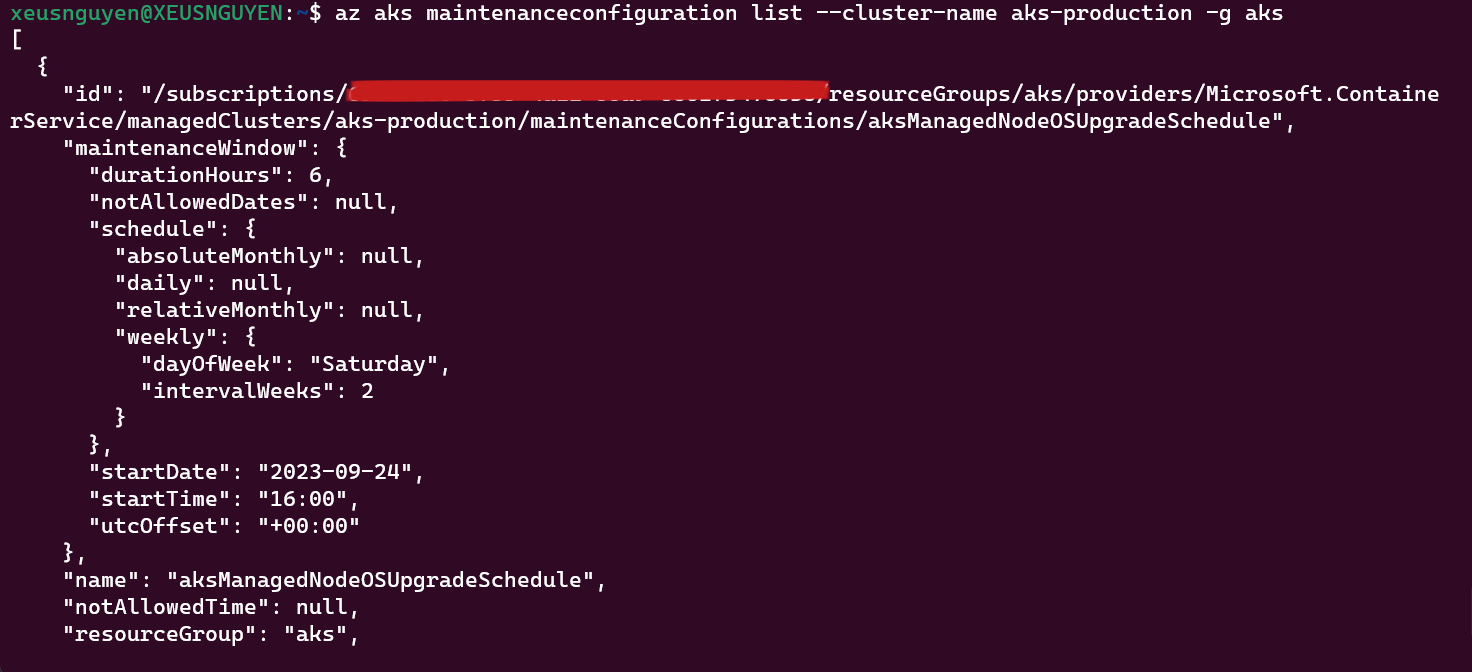 That all step to setup mechanism for OS security update. The affect can show on activity log on K8s - Check it for more detail progress update.
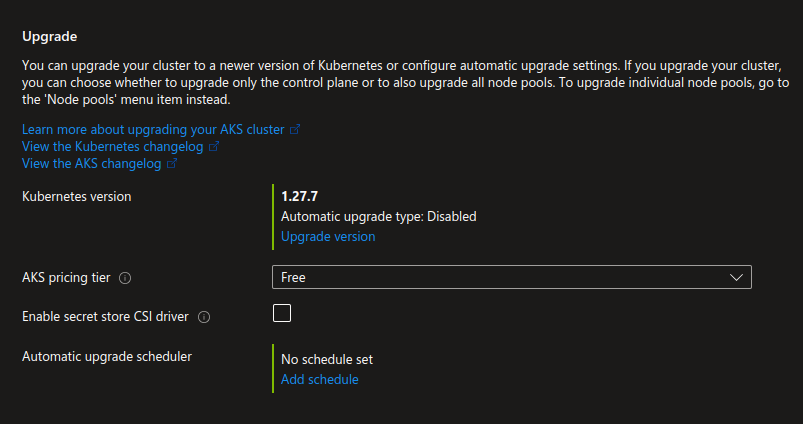
Versioning of AKS
Warning
If you want to updating version, you can use multiple way from
Azure Portal, Commandbut for general, please use Infrastructure as Code for upgrading version. More about will relate at Update the version AKS with Terraform
Danger
- Please consider when update the big version, some features can deprecate or remove. If you want update, please take your time to understanding what happen on next version.
- On Azure, you can’t leap upgrade over two version, for example from 1.27.x to 1.29.x. You must perform all upgrades sequentially by major version number
Related articles
- Upgrade an Azure Kubernetes Service (AKS) cluster
- Upgrade options for Azure Kubernetes Service (AKS) clusters
- Azure Kubernetes Service patch and upgrade guidance
- Supported Kubernetes versions in Azure Kubernetes Service (AKS)
Conclusion
Success
On this session, we discover AKS and Kubernetes technologies like
- Tool for manage Kubernetes Cluster
- Resource reservation in AKS
- Node and Node Selector
- Workload and schedule for each type
- Networking, Storage of AKS
- AKS price and configuration
Quote
Kubernetes is huge technologies stack, It is not a finished project but in development date by date. Feel free, research and work more with this one for improving your knowledge