Error when package code needs to be installed, but I can’t find an archive for it
Link for resolve: Reddit
If you package problem, for example (Code). You need to perform these command
# Location the error or missing package
sudo apt policy code

# Reinstall or purge your package cause error
sudo dpkg --remove --force-remove-reinstreq code
sudo apt purge code --autoremove
sudo apt install --fix-broken
sudo apt update
libssl error in Ubuntu 22.04
Info
Ubuntu 22.04 has upgraded libssl to 3 and does not propose libssl1.1, so when you install packages that meet the problems, with me when setup
Azure agent, read at The SSL connection could not be established, and No usable version of libssl was found. But when you need to revert some other version problem will mess up, you can follow this one and reboot your machine to applied compatible version oflibssl
Link issue: StackOverFlow - MongoDB Install Fails on Ubuntu 22.04 - Depends on libssl1.1 but it is not installable
Package: libssl1.1_1.1.1f-1ubuntu2_amd64.deb
- Install via source-list when you import the key
# Write a source of package into apt, to retrieve the version of package
echo "deb http://security.ubuntu.com/ubuntu focal-security main" | sudo tee /etc/apt/sources.list.d/focal-security.list

sudo apt-get update
sudo apt-get install libssl1.1

# Delete the focal-security list file you just created
sudo rm /etc/apt/sources.list.d/focal-security.list- Manually installed
# Retrive the package from ubuntu repositories
wget http://archive.ubuntu.com/ubuntu/pool/main/o/openssl/libssl1.1_1.1.1f-1ubuntu2_amd64.deb

# Install the lib debian file which you download
sudo dpkg -i libssl1.1_1.1.1f-1ubuntu2_amd64.deb
Problem with ssh
When you see the situation about your key for authentication a destination host have changing because your action or hacker, from your side you can resolve when exection ssh by flushing the old key like
ssh-keygen -f "/home/user/.ssh/known_hosts" -R "[127.0.0.1]:6996"Success
It will help you update your known_hosts, and give you permission to authentication remote host with new cred
If you meet situation about, cannot auth ssh via password. It means, usually your host will protect your VM with no enable PasswordAuthentication in /etc/ssh/sshd_conf. If you want to enable, you need to perform
# Change content sshd_config
sudo sed -i 's/#PasswordAuthentication no/PasswordAuthentication yes/' /etc/ssh/sshd_config

# Restart ssh vervice
sudo systemctl restart sshd

# OR
sudo /etc/init.d/ssh force-reload
sudo /etc/init.d/ssh restart
Could not load ‘vboxdrv’ after upgrade to Ubuntu 16.04 (and I want to keep secure boot)
Info
That issue come from when you install the
virtualboxin OS with enable secure boot in theBIOS, usually come from individual machine, I thinks. Mostly you installvirtualboxfromapt, it will not applied when your machine meet that problem. Can explain more 😅
You can find the solution for secure boot at
- I can’t execute command modprobe vboxdrv
- Could not load ‘vboxdrv’ after upgrade to Ubuntu 16.04 (and I want to keep secure boot)
Quote
That is tough think for new start, I know but you have 2 way to resolve the problem, i dunno make sure you follow what but, this is the same between them but one side is manually generate and other use
debwith include that step. Follow if you solve the problem
First method
Note
Manually generate, and submit
mokfor authentication secure boot, that new for me and cost me time to understand 😄 but that gradually valuable
# Install the mkutil package to be able to do signed
# Often, your host will include this tool, if not download it
sudo apt update
sudo apt install mokutil -y

# Generate the signature file
openssl req -new -x509 -newkey rsa:2048 -keyout MOK.priv -outform DER -out MOK.der -nodes -days 36500 -subj "/CN=VirtualBox/"

# Add it to the kernal
sudo /usr/src/linux-headers-$(uname -r)/scripts/sign-file sha256 ./MOK.priv ./MOK.der $(modinfo -n vboxdrv)

# Register it for the Secure Boot
# In this step, it will ask you provide the password
# provide it what you want, remember and retype when reboot MOK again
sudo mokutil --import MOK.der

# Do the reboot machine now, with reboot or shutdown command
sudo shutdown -r now # sudo reboot (same actions)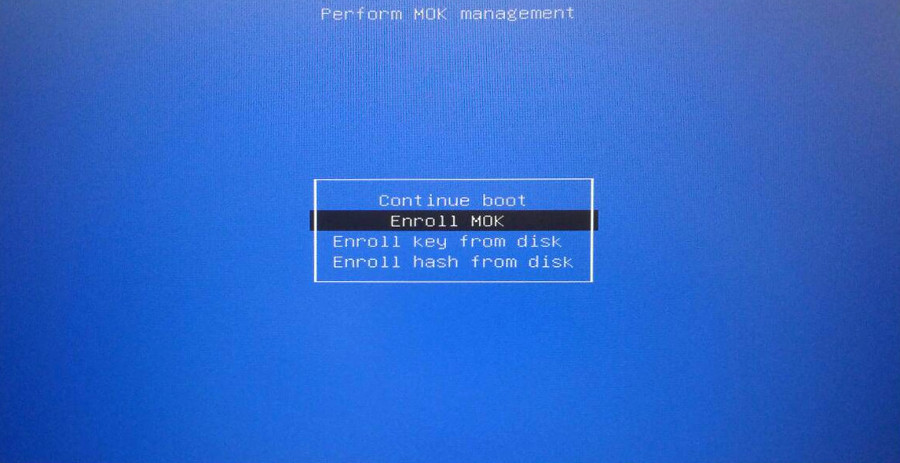
When reboot you will see the screen, choose Enroll MOK to continue. Answer the step in blue screen Enroll MOK > Continue > Yes > and it will ask you for the password > reboot. That will boot you to ubuntu. After that to validate it work or not, you can do
# Check version and problems of virtualbox, if not
# Use are completely resolving the problem
VBoxManage --version

# (Optional) To check MOK key, sign and status, use
sudo mokutil --list-enrolled
If not work at all, you need to delete the MOK key and will do the another optional
# Delete the key (On the situation, you continue keep key)\
# basically, you just need delete with key selected
sudo mokutil --delete /your/key/enrolled

# Check the key will add to queue to delete
sudo mokutil --list-delete # exist, it will be okay

# Reboot, and do enroll MOK boot like above
sudo reboot
Your work will have different, you can follow Enroll MOK > Delete > Yes > and it will ask you for the password > reboot . That all you remove the old key, if you delete or forgot where you put the key, follow this step
# You will export the key you enrolled
mokutil --export

# Usually, that will have name with syntax, e.g: MOK-xxxx.der
# take a look list-enrolled, map that with the key, for example
# If your key which want delete on location, you will choose
# MOK-0002.der with same command above
sudo mokutil --delete MOK-0002.der
Second method
Note
That will simple, but make sure you do same thing above but the
virtualboxwill give you all step and just need prompt your password, remember for re-typing again in MOK
This method will require you install virtualbox from official documentation, you can use wget , curl or you can directly click and install that, here the link
After that, you need install that with --fix-broken to help you install dependencies packages with your deb
# For example, I use Ubuntu 24.04. It can be done like this
# You will ask to prompt password in the last step
sudo apt --fix-broken install ./virtualbox-7.0_7.0.18-162988~Ubuntu~noble_amd64.deb -y

# Reboot and do MOK step like above
sudo shutdown -r now
Success
That will help you resolve this case, maybe when you have new version of Ubuntu that can be reason why you had the problems, make sure you control that
Swap mode in Ubuntu
Info
You can swap mode in Ubuntu from desktop mode to server mode, by use key combining
- Ctrl + Alt + F1 : To use desktop mode
- Ctrl + Alt + F3: To use shell or server mode
Clean Swap memory
With architecture of linux, swap memory submit crucial role for operating stuff inside machine, bring back stability and performance. Explore about swap memory at Phoenix - Swap Space in Linux: What It Is & How It Works
Warning
The customization into swap memory need to concern before do because you will touch into part with one making decision for performance main system
But you can gently clean that with few commands to help you collect, and get swap memory back to machine. E.g: When you compile java, if you not configure jvm with good behavior, It will use a lot memory and swap is one of those.
To prevent that, you can use command below to disable all swap partition, it will help reclaim memory swap being use
sudo swapoff -aAfter reclaim, you can turn on it again for reusing to continuous provide swap memory for system
sudo swapon -aYou can explore and figure out more configuration and memory with linux through article
- Tecmint - How to Clear RAM Memory Cache, Buffer and Swap Space on Linux
- Kernal Doc - Memory Management
Use environment variables from .env file
Info
Read more about topic in
Stackoverflow: Set environment variables from file of key/value pairs
Use export with except # line in .env file
export $(grep -v '^#' .env | xargs)When you want to work with script, you can use -o allexport
# Multiple line
set -o allexport
source dot/env/file
set +o allexport

# One line
set -o allexport && source dot/env/file && set +o allexport
Update Ubuntu new version
You can use integration tool inside ubuntu to update new version, that will pull and update packages inside host, do that easily with command
# Check the linux version
lsb_release -a

# Use command to update new version ubuntu
do-release-upgrade
Warning
In this situation you update
ubuntu, it will update your kernel so please remember make a big-changes can gain different harden to control, so do know before you doing
Follow some methodology to upgrade new version of kernel, such as
- How to Update Linux Kernel In Ubuntu
- Cập nhật Linux Kernel trên Ubuntu 20.04 (Vietnamese)
- How to Update/Upgrade Linux Kernel in Ubuntu
- Ubuntu Linux Upgrade Linux Kernel Command
Depend on those articles, you can update kernel of Ubuntu via
- Update OS version (e.g. 20.04 ⇒ 22.04)
- Update package of OS dependencies
- Manually Update
When you choose manually update, you can use some following tools
- Mainline
- ubuntu-mainline-kernel.sh
- Directly download use
curlorwgetand installing from pkgs.org
If you see this one from via kubewekend series, I prefer to use update Ubuntu version or use secondly optional via apt like
# check your kernel version, via uname
uname -r

# find the supportive from apt repositories, via apt search
sudo apt search linux-image

# figure out the compatible version, if you come from kubewekend you can use version 5.15.0-116-generic, so we install via
sudo apt install linux-virtual-hwe-20.04 -y

# Reboot to receive the new update
sudo reboot # OR use sudo shutdown -r now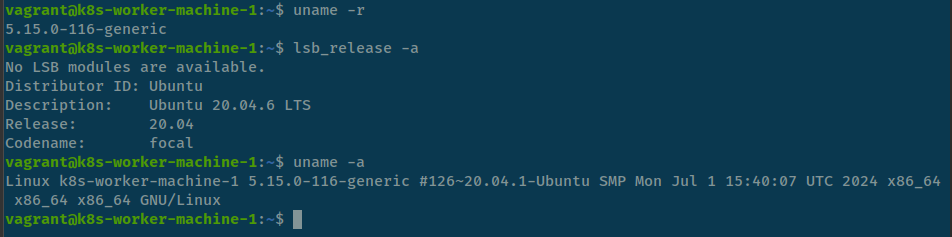
Update alternative version
Quote
When you have multiple version of tools, package or moreover, like
pythonjava jdkshell, you need to switch between of them that why you need the topic
For change and update the configuration between different of tools, debian core offer us the command call update-alternatives. Let digest to its
You can find the manual of the command with --help flag
$ update-alternatives --help
Usage: update-alternatives [<option> ...] <command>

Commands:
  --install <link> <name> <path> <priority>
    [--slave <link> <name> <path>] ...
                           add a group of alternatives to the system.
  --remove <name> <path>   remove <path> from the <name> group alternative.
  --remove-all <name>      remove <name> group from the alternatives system.
  --auto <name>            switch the master link <name> to automatic mode.
  --display <name>         display information about the <name> group.
  --query <name>           machine parseable version of --display <name>.
  --list <name>            display all targets of the <name> group.
  --get-selections         list master alternative names and their status.
  --set-selections         read alternative status from standard input.
  --config <name>          show alternatives for the <name> group and ask the
                           user to select which one to use.
  --set <name> <path>      set <path> as alternative for <name>.
  --all                    call --config on all alternatives.

<link> is the symlink pointing to /etc/alternatives/<name>.
  (e.g. /usr/bin/pager)
<name> is the master name for this link group.
  (e.g. pager)
<path> is the location of one of the alternative target files.
  (e.g. /usr/bin/less)
<priority> is an integer; options with higher numbers have higher priority in
  automatic mode.

Options:
  --altdir <directory>     change the alternatives directory
                             (default is /etc/alternatives).
  --admindir <directory>   change the administrative directory
                             (default is /var/lib/dpkg/alternatives).
  --instdir <directory>    change the installation directory.
  --root <directory>       change the filesystem root directory.
  --log <file>             change the log file.
  --force                  allow replacing files with alternative links.
  --skip-auto              skip prompt for alternatives correctly configured
                           in automatic mode (relevant for --config only)
  --quiet                  quiet operation, minimal output.
  --verbose                verbose operation, more output.
  --debug                  debug output, way more output.
  --help                   show this help message.
  --version                show the version.
When you want to take a look how the version we have, such as java you can call with --list flag and name, example
$ update-alternatives --list java
/usr/lib/jvm/java-11-openjdk-amd64/bin/java
/usr/lib/jvm/java-18-openjdk-amd64/bin/java
And when you have decision, on my situation java on my machine on 11 but I want to switch to 18, you can perform this command
# Check version java
$ java --version
openjdk 11.0.22 2024-01-16
OpenJDK Runtime Environment (build 11.0.22+7-post-Ubuntu-0ubuntu222.04.1)
OpenJDK 64-Bit Server VM (build 11.0.22+7-post-Ubuntu-0ubuntu222.04.1, mixed mode, sharing)

# Change version to 18
$ sudo update-alternatives --config java
There are 2 choices for the alternative java (providing /usr/bin/java).

  Selection    Path                                         Priority   Status
------------------------------------------------------------
  0            /usr/lib/jvm/java-18-openjdk-amd64/bin/java   1811      auto mode
* 1            /usr/lib/jvm/java-11-openjdk-amd64/bin/java   1111      manual mode
  2            /usr/lib/jvm/java-18-openjdk-amd64/bin/java   1811      manual mode

Press <enter> to keep the current choice[*], or type selection number: 0
update-alternatives: using /usr/lib/jvm/java-18-openjdk-amd64/bin/java to provide /usr/bin/java (java) in auto mode

# Check the version java again
$ java --version
openjdk 18.0.2-ea 2022-07-19
OpenJDK Runtime Environment (build 18.0.2-ea+9-Ubuntu-222.04)
OpenJDK 64-Bit Server VM (build 18.0.2-ea+9-Ubuntu-222.04, mixed mode, sharing)
Relate documentation
- Switch between multiple java versions
- What exactly does
update-alternativesdo? - The update-alternatives Command in Linux
Rerun the previous command
You can use previous command with !! on your shell, for example
# First if you use clear screen
clear

# You can call clear screen again with !!
!!
Also you can reuse the previous command arguments, for example
$ command <args>
$ 2nd command !$
Comment note in Shell Bash
Info
2 ways for writing the comment to shell bash.
Example and troubleshooting via Link to details
Using the # character for comment
Info
In Bash, a comment starts with the hash symbol (#). Anything after # on that line is considered a comment and is ignored by the Bash interpreter
# This is a comment in Bash

# Output:
# (No output, as comments are not executed)
Using the doctype Here Document for comment multiple line
Info
Bash doesn’t have a specific syntax for multi-line comments like some other languages, but you can use a trick with the : command and a ‘here document’ to achieve the same effect.
: << 'END_COMMENT'
This is a
multi-line comment
in Bash
END_COMMENT

# Output:
# (No output, as comments are not executed)
Reconfiguration for curl template output
Note
Reference: Timing Page Responses With Curl
Templates format to output via curl command
time_namelookup:  %{time_namelookup}s\n
time_connect:  %{time_connect}s\n
time_appconnect:  %{time_appconnect}s\n
time_pretransfer:  %{time_pretransfer}s\n
time_redirect:  %{time_redirect}s\n
time_starttransfer:  %{time_starttransfer}s\n
				 ----------\n
	  time_total:  %{time_total}s\n
To reference the documentation for the time based variables is as follows.
- time_appconnect - The time, in seconds, it took from the start until the SSL/SSH/etc connect/handshake to the remote host was completed.
- time_connect - The time, in seconds, it took from the start until the TCP connect to the remote host (or proxy) was completed.
- time_namelookup - The time, in seconds, it took from the start until the name resolving was completed.
- time_pretransfer - The time, in seconds, it took from the start until the file transfer was just about to begin. This includes all pre-transfer commands and negotiations that are specific to the particular protocol(s) involved.
- time_redirect - The time, in seconds, it took for all redirection steps including name lookup, connect, pretransfer and transfer before the final transaction was started. time_redirect shows the complete execution time for multiple redirections.
- time_starttransfer - The time, in seconds, it took from the start until the first byte was just about to be transferred. This includes time_pretransfer and also the time the server needed to calculate the result.
- time_total - The total time, in seconds, that the full operation lasted.
How to use
Find the PATH which including the curl-formatter.txt file with cd or pwd, Use this with curl command
curl -w "@<file-formatter-above>" -o /dev/null -sL <url>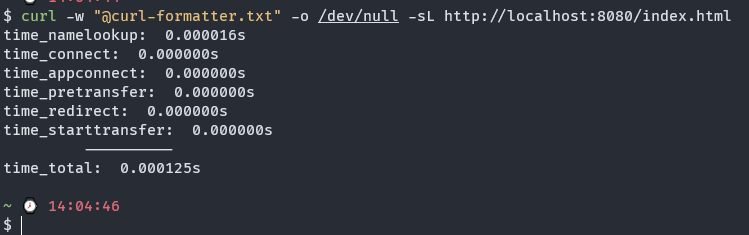
Redirect Output and Error
Note
Reference ▶️ ▶️ ▶️ How to Redirect Output and Error to /dev/null in Linux
Some thing about the output of linux
- In the linux machine,
/dev/nullthat will location where you can return null for your shell likecommand 2>&1 /dev/null - There will have 3 three type of output which linux has
- Standard input (stdin) is designated with 0
- Standard output (stdout) is designated with 1
- Standard error (stderr) is designated with 2
Redirect output to /dev/null in Linux
For example: You run apt install curl but you want your shell not return anything you can redirect output into /dev/null. It will be like
sudo apt install curl 1>/dev/null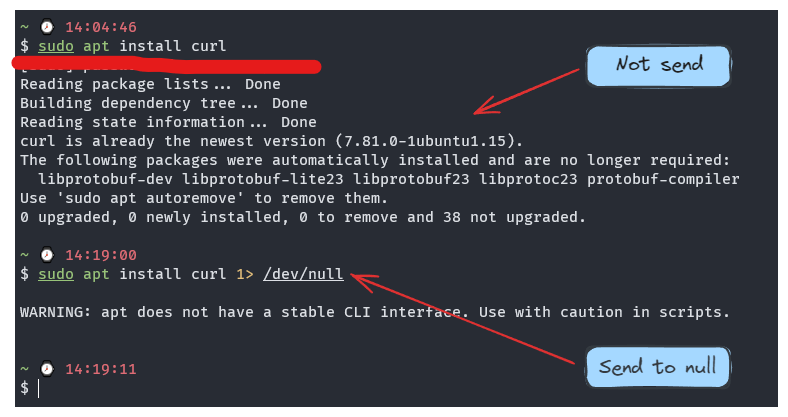
Usage: Used it when you don’t want stdout go to your shell, just removing the odd things and keep the important output
Redirect error to /dev/null in Linux
For example: You run find / but you run with non root, so somecase you will have some permission error output to your shell. You can use /dev/null for removing this messing stuff
find / 2> /dev/null
Combine stdout and stderror into one with this character &
1. Long version
find / 2> /dev/null 1>/dev/null

2. Short version
find / 2>&1 /dev/null (Send error to output and send them to /dev/null)

3. Some other case
find / > /dev/null 2>&1
Sometime you can use version
2of combiningThe
2>&1part means “redirect the error stream into the output stream”, so when you redirect the output stream, error stream gets redirected as well. Even if your program writes tostderrnow, that output would be discarded as well. (Sergey Kalinichenko)
Find this problem ▶️ ▶️ What is /dev/null 2>&1?
User Management in Linux
Info
With User and Group configuration in Linux become potential to managing, and enhance your security, user connection and moreover. Following some situation to keep some command that be useful for us when manipulate this stuff inside Linux
Some articles can be good for us when practicing with those stuff around
- Ubuntu Doc - User management
- User Management in Linux
- How to Manage Users in Linux
- Introduction to usermod command
Change Password
If you want to change password of current user, you can use command
# For Current User
passwd

# For Root User
sudo passwd

# For another user
passwd <username>
Add and Delete user
In this situation, you have multiple command to handle it, such as adduser, useradd, deluser and userdel. With the graduation introduce by Ubuntu Doc, I will choose adduser and deluser to handle this case
# Add user with no need handle much
sudo adduser username

# Del user with no need erase through multiple steps
sudo deluser username
Add and Delete user out of group
There is many way to handle this work, but I prefer to use it with usermod command
# Add user to group
sudo usermod -aG group username

# Remove user out group
sudo usermod -rG group username
Helpful usermod command
Change your user with new name, but you need do it on another user with kill that shell, because if you access to your old account, I will be attached by process
sudo usermod -l old_name new_nameChange the shell of user, you can switch to user to use chsh but this can be done remotely
sudo usermod --shell /path/to/shell usernameMove the content of user’s home directory using usermod command
sudo usermod -d new_dir_path -m user_name