Quote
Hello, Hello @all, welcome back to my new blog. Couple of weeks ago quite busy and enjoyable of myself, I just spend for refresh in holiday and spend a week for my family and friend. So yeah, Let’s turn back again once more time, I don’t have list of things should be written but yeah I spend a little bit time to restructure my homelab and I learn a couple of things. Let’s digest
What is actually Problem ?

Let’s me guess, if you are IT guys or curious people who want to explore more about server, homelab for your own, you will meet many problems for finding platform to manage your homelab, many reason and problem appear when you setup them. Although I think that truly hard for approaching in first step, but you know that kinda good adventure when you build your own one successfully
A couple of problems, you usually tackle with, including
- Platform Management
- Networking
- Hardware
- Techniques
- Moreover
To handle and control over that troubles, in my situation, I choose to use Docker Swarm for managing and control over multiple containers and you will actually like this, but you can use Kubernetes, Openshift or Nomad for your homelab. So why I choose Docker Swarm not my favorite technologies Kubernetes
Docker Swarm
![]()
Info
Docker Swarm
Swarm mode is an advanced feature for managing a cluster of Docker daemons. Current versions of Docker include Swarm mode for natively managing a cluster of Docker Engines called a swarm. Use the Docker CLI to create a swarm, deploy application services to a swarm, and manage swarm behavior. Explore about Key concept of Swarm at Swarm mode key concepts
If you have heard about the theory Container Orchestration like Kubernetes, Swarm is same version but more simple than Kubernetes, learning curves you spend for Swarm is not much and kinda easy to apply. Swarm is isolate multiple features to help you maintain, deploy and control over docker daemons in bunch of hosts, such as
- Cluster management integrated with Docker Engine: Use the Docker Engine CLI to create a swarm of Docker Engines
- Decentralized design
- Declarative service model
- Scaling
- Desired state reconciliation
- Multi-host networking
- Service discovery
- Load balancing
- Secure by default
- Rolling updates
As you can see, really insane with multiple feature but need to use only your Docker CLI for configuration. This is mostly reason why I choose Swarm for my homelab, and secondly reason I choose Swarm because I want to learn both big approaches for Container Orchestration, Kubernetes vs Swarm to open more opportunities to learn and growth up.
Docker Swarm Architecture and How this works
If you wanna explore more information about Docker Swarm Architecture, you can reach to couple of official documentations and articles
- Docker - Administer and maintain a swarm of Docker Engines
- Docker - How nodes work
- Docker - How services work
- Docker - Manage swarm security with public key infrastructure (PKI)
- Docker - Swarm task states
- Medium - Docker Swarm
- Blog - Graduating from Docker to Docker Swarm
With concept of Swarm, you will approach couple of components, including
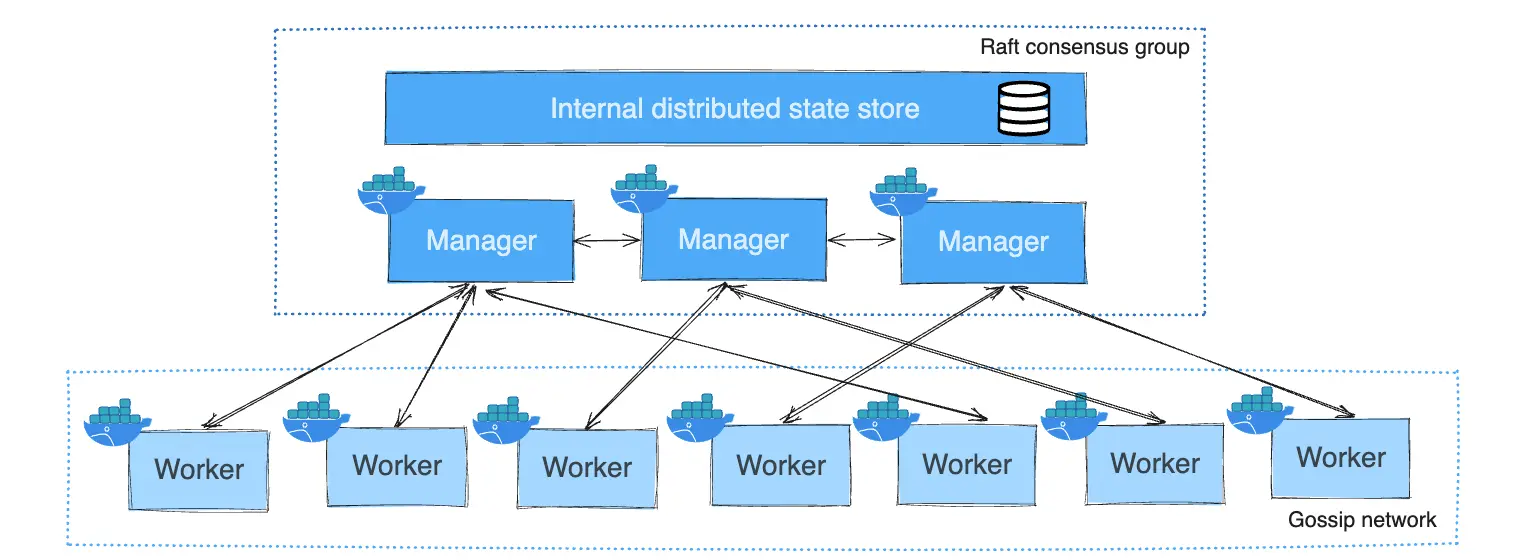
Manager Nodes
Find more information at official documentation
It’s a backbone of Swarm - the centralize node which take the responsibility to doing management tasks
- Maintaining cluster state
- Scheduling services
- Serving Swarm mode HTTP API endpoints
Info
Using a Raft implementation, the managers maintain a consistent internal state of the entire swarm and all the services running on it
Note
To take advantage of Swarm mode’s fault-tolerance features, we recommend you implement an odd number of nodes according to your organization’s high-availability requirements
Worker Nodes
Find more information at official documentation
Info
Worker nodes are also instances of Docker Engine whose sole purpose is to execute containers. Worker nodes don’t participate in the Raft distributed state, make scheduling decisions, or serve the swarm mode HTTP API.
You need at least one manager node for managing bunch of worker nodes. By default, all managers are also workers and you can schedule container to this managers and also workers
Node Management
If you want to tackle with node configuration, you can find out more at Manage nodes in a swarm
docker node ls

ID                           HOSTNAME  STATUS  AVAILABILITY  MANAGER STATUS
46aqrk4e473hjbt745z53cr3t    node-5    Ready   Active        Reachable
61pi3d91s0w3b90ijw3deeb2q    node-4    Ready   Active        Reachable
a5b2m3oghd48m8eu391pefq5u    node-3    Ready   Active
e7p8btxeu3ioshyuj6lxiv6g0    node-2    Ready   Active
ehkv3bcimagdese79dn78otj5 *  node-1    Ready   Active        Leader
Usual, the node will exist three Availability state, including
Activemeans that the scheduler can assign tasks to the node.Pausemeans the scheduler doesn’t assign new tasks to the node, but existing tasks remain running.Drainmeans the scheduler doesn’t assign new tasks to the node. The scheduler shuts down any existing tasks and schedules them on an available node.
With Manager state, you will exist four level
- No value indicates a worker node that does not participate in swarm management.
Leadermeans the node is the primary manager node that makes all swarm management and orchestration decisions for the swarm.Reachablemeans the node is a manager node participating in the Raft consensus quorum. If the leader node becomes unavailable, the node is eligible for election as the new leader.Unavailablemeans the node is a manager that can’t communicate with other managers. If a manager node becomes unavailable, you should either join a new manager node to the swarm or promote a worker node to be a manager.
With Docker Command, you can operate and interact with node for doing interesting stuff, such as
Stack, Service and Task
We will walkthrough into small unit in Swarm concept, including
- Stack
- Service
- Task
Info
Stack
With Stack, you can image that kinda same
docker-composedefinition, It means you can convert from yourdocker-composeintostackto deploy the service inside yourSwarmcluster. You should learn Compose specification for easier approach thestackfor deployment
Info
Service
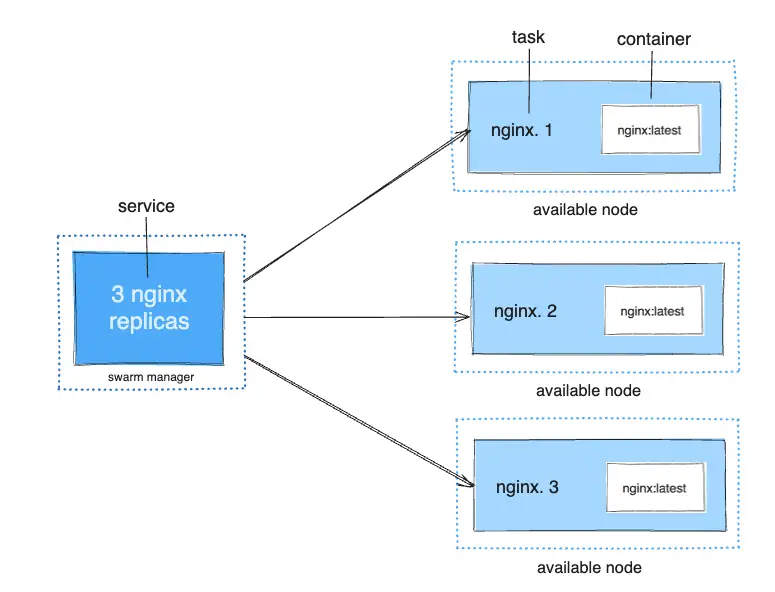
Next, you will reach Service, with
Swarmto deploy an application image when Docker Engine is in Swarm mode, you create a service.When you deploy the service to the swarm, the swarm manager accepts your service definition as the desired state for the service. Then it schedules the service on nodes in the swarm as one or more replica tasks. The tasks run independently of each other on nodes in the swarm.
A container is an isolated process. In the Swarm mode model, each task invokes exactly one container.
Info
Task
A task is the atomic unit of scheduling within a swarm. When you declare a desired service state by creating or updating a service, the orchestrator realizes the desired state by scheduling tasks.
A task is a one-directional mechanism. It progresses monotonically through a series of states: assigned, prepared, running, etc. If the task fails, the orchestrator removes the task and its container and then creates a new task to replace it according to the desired state specified by the service.
Info
Replicated and Global Services
There are two types of service deployments, replicated and global
- Replicated: Distribution deployment with number of identical tasks
- Global: A service that runs one task on every node.
Networking
Quote
This one is one of tuff topics of
Swarmand whatever platform because you know network is things to connect all of things, if not you mess up, you will fu*k up honestly 😄.
So what is structure networking of Swarm, go and check more information at Manage swarm service networks and Youtube Video - Docker Overlay Networking with VxLAN & Docker Swarm Configuration
The following three network concepts are important to swarm services:
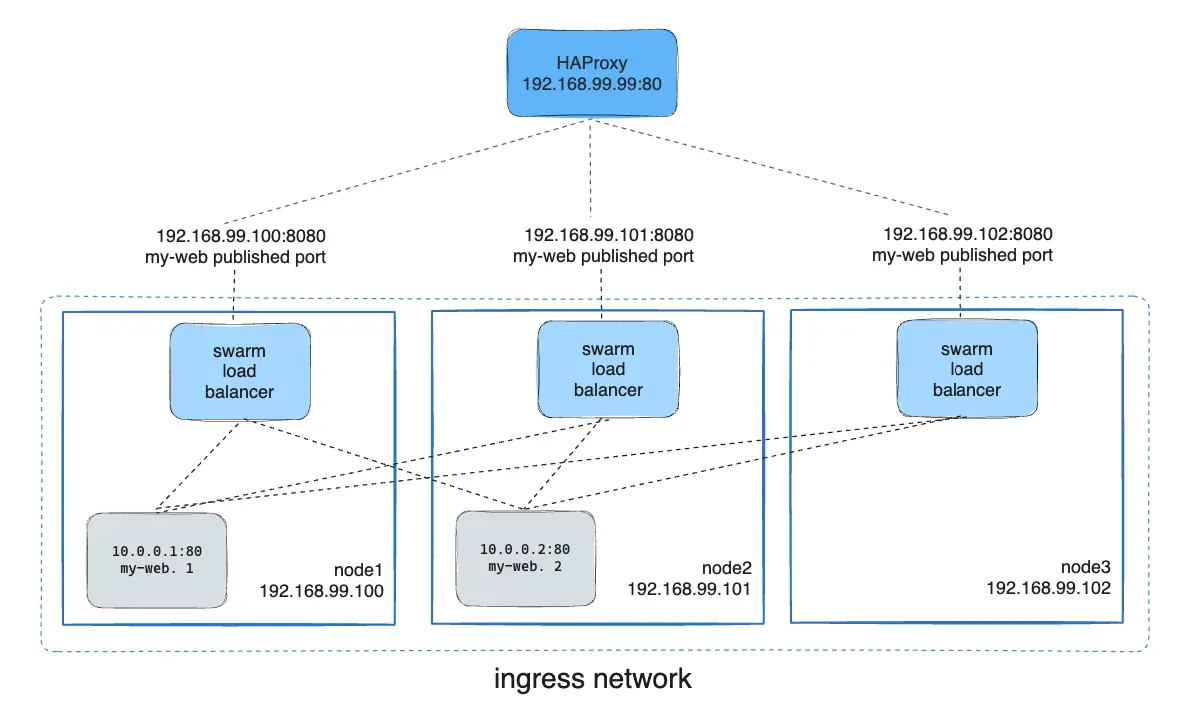
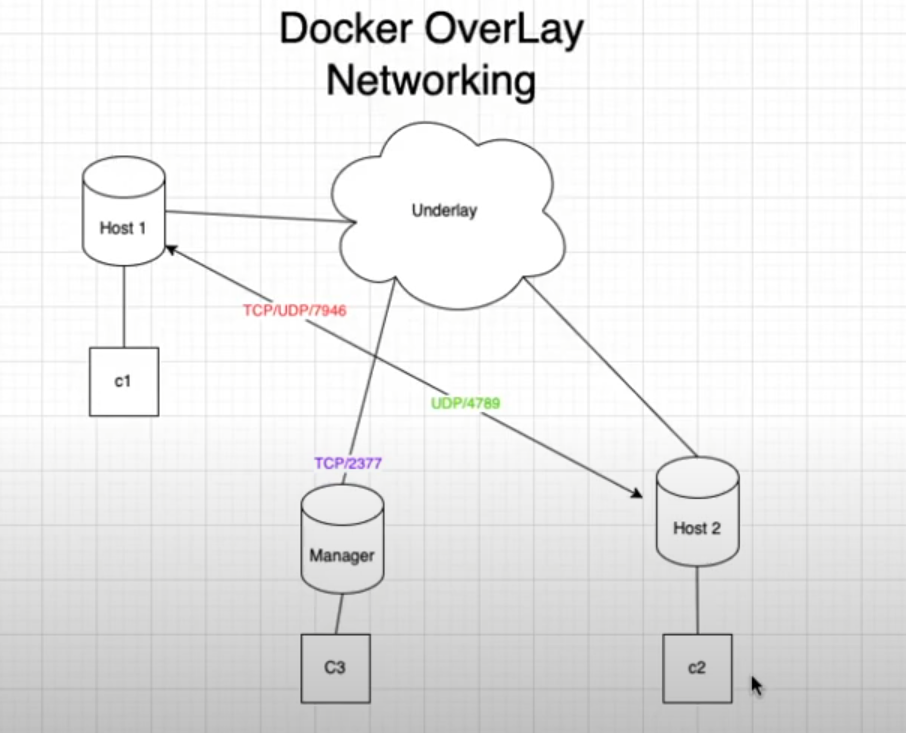
Overlay- Manage communications among the Docker daemons participating in the swarmIngress- A special overlay network that facilitates load balancing among a service’s nodesdocker-gwbridge- A bridge network that connects the overlay networks (including theingressnetwork) to an individual Docker daemon’s physical network.
Tip
See also Networking overview for more details about Swarm networking in general.
When you work Swarm, you need to consider to open these port for handle with cluster (NOTE: Really important cuz I mess up with one for a half of day 😃)
- Port
2377TCP for communication with and between manager nodes - Port
7946TCP/UDP for container network discovery. - Port
4789UDP (configurable) for the overlay network (including ingress) data path.
When you create Swarm and join node into manager, you need to consider to provide couple of flags to make your service able to interact with each other. By default, all swarm traffic is sent over the same interface, including control and management traffic for maintaining the swarm itself and data traffic to and from the service containers
--data-path-addr- used for traffic relating to services.--advertise-addr- used for control and management traffic
# Example
docker swarm init --advertise-addr 10.0.0.1 --data-path-addr 192.168.0.1
Warning
If you go for join node between 2 node with different private network and connect via public IP, you should configuration
--data-path-addrand--advertise-addrto public for peering between two nodes
Conclusion
Quote
That’s @all for
Swarm, actually It contains another one but that really hard to cover if we don’t practice. It seem like that kinda multiple concept but equal 1/3Kubernetes, so that why learnSwarmeasier thanKubernetesand if you wanna find the way to containerization, why not if you chooseSwarm
But wait let’s practice a bit with my HomeLab to see what I do
Practice Session

Server Configuration
With my gear, I just buy and setup a couple of simple servers, including
-
Virtual Machine (Cloud)
- CPU: 2
- Memory: 2 GB
- Volume: 30 GB
- OS: Ubuntu 22.04
-
Raspberry Pi 4 (Local)
- CPU: 4
- Memory: 4 GB
- Volume: 64 GB
- OS: Raspbian
Following my strategy, I will turn both of my setup into components of Swarm and that why prerequisite installation
- docker
# Ubuntu & Raspbian
curl -fsSL https://get.docker.com | sudo bash -- net-tools (optional): Easier for debug, but you can use
ip addrfor default
sudo apt install net-tools curl -yNow, you should prepare the public IP for init and join command via curl
# Get public ip
curl -4 ifconfig.io
Create Swarm cluster
I will divide the two my server into two types
- VM will become
manager - Raspberry Pi will become
worker
In VM, you can double-check the Swarm is already run or not
docker info --format '{{.Swarm.LocalNodeState}}'If it returns active, it will means your Swarm actual running in your host but if not, you should run command below to enable that one
docker swarm init --advertise-addr "PUBLIC_IP_VM"It turn your docker in your host into Swarm mode, and now you can use command to interact with your docker daemon.
If you remember, you should enable a couple of ports on both your host, including
- Port
2377TCP for communication with and between manager nodes - Port
7946TCP/UDP for container network discovery. - Port
4789UDP (configurable) for the overlay network (including ingress) data path.
You can use some techniques for configuring that one
- Security Group or Firewall for Cloud Provider
- NAT Port for local modem and router
So if you already prepare it, you can join your second node into Swarm. In my position, I join my RaspberryPI into cluster with steps
- Get the
join-tokeninmanagerwith command
docker swarm join-token worker- Join your
workerwith generation token
docker swarm join --token token --advertise-addr="PUBLIC_IP_RASP" --data-path-addr="PUBLIC_IP_RASP" PUBLIC_IP_VM:2377- Check in your
managerwith command
docker node lsID HOSTNAME STATUS AVAILABILITY MANAGER STATUS ENGINE VERSION
xxxxxxxxxx raspberrypi Ready Active 20.10.24+dfsg1
yyyyyyyyyy * ubuntu-2gb-hil-1 Ready Active Leader 27.3.1Now your Swarm is already in use, you can setup a couple tools for easier managing your cluster with UI and Portainer for your Swarm. If you want understand more about Portainer, explore at Monitoring with Portainer
Setup Portainer CE
Portainer consists of two elements, the Portainer Server and the Portainer Agent. Both elements run as lightweight Docker containers on a Docker engine. So for following the official documentation, you can follow my setup like
- Download the compose file of
Portainer
curl -L https://downloads.portainer.io/ce2-21/portainer-agent-stack.yml -o portainer-agent-stack.ymlservices:
agent:
image: portainer/agent:2.21.5
volumes:
- /var/run/docker.sock:/var/run/docker.sock
- /var/lib/docker/volumes:/var/lib/docker/volumes
networks:
- agent_network
deploy:
mode: global
placement:
constraints: [node.platform.os == linux]
portainer:
image: portainer/portainer-ce:2.21.5
command: -H tcp://tasks.agent:9001 --tlsskipverify
volumes:
- portainer_data:/data
networks:
- agent_network
- webanalytics_proxy_app
deploy:
mode: replicated
replicas: 1
placement:
constraints: [node.role == manager]
networks:
agent_network:
driver: overlay
attachable: true
volumes:
portainer_data:- Deploy this
stackas Service inSwarm
docker stack deploy -c portainer-agent-stack.yml portainer - Check state of deployment in service
portainer
docker stack ps portainerCurrently, you will create a new stack for proxy your portainer with domain, I truly prefer Caddy for handle this. Explore more about Caddy at Caddy Server
---
services:
  proxy:
    image: caddy:latest
    ports:
      - 80:80
      - 443:443
    volumes:
      - caddy-data:/data
      - ./Caddyfile:/etc/caddy/Caddyfile
    depends_on:
      - umami
    networks:
      - portainer_agent_network
    deploy:
      mode: replicated
      replicas: 1
      placement:
        constraints: [node.role == manager]

volumes:
  caddy-data:

networks:
  portainer_agent_network:
    external: true
With this stack will deploy new proxy server Caddy server with some configuration
- Point to same network with
Portainer - Deploy into
Managernode with number replica 1 - Mount Volume
caddy-dataandCaddyfilefor managing proxy configuration - Open Port 80 and 443, require by
Caddy
You should be prepare Caddyfile at this directory with configuration like this
https://portainer.example.com {
        handle_path /api/websocket {
                reverse_proxy tasks.portainer:9000/api/websocket
        }

        handle {
                reverse_proxy tasks.portainer:9000
        }
}
Now you kick off stack and your service will be deployed
docker stack deploy -c proxy.yml proxyGo to your browser and typing your domain (e.g: https://portainer.example.com)

Conclusion

Success
That’s @all for today, I hope you enjoy the adventure to build self-host and homelab server with me and maybe you can get one for yourself. I turn back after two week and really happy to do it something like this one, truly kinda open and refresh to learn more. Maybe I will try to balance more my life and write blog, so let’s see what we will get in next session.
Quote
Learn and practice is quite fun and what I wanna do with my blog, so hope you continue support and enjoy with my content, I prepare a lot of stuff to share but not much time to write but I will share one to one, don’t worry. Therefore, Stay safe, keep moving on and learning more and I will see you on next weekend. Bye Bye and have great weekend 👋