Quote
Hi @all, after one week in my new job, I feel much better and am now back and continuing to learn and do my best. During this time, I spent a lot of time learning about and working with the new storage technology
Longhornto build new things with this platform, so I want to write and share my experience setting it up and working with it. Don’t worry; we’ll start right now. Let’s begin.
What is Longhorn?
Note
Before we start, this blog will content more concepts about Kubernetes and Storage inside Cluster. For ensure to carry or easier to approach, you can spend a bit time to consult via couple of blogs of myself and community
- Kubewekend Session 3: Basically about Kubernetes architecture
- Kubewekend Session 6: CSI and Ceph with Kubewekend
- Kubernetes Documentation - Custom Resources
- Kubernetes Documentation - The Kubernetes API
- Kubernetes Documentation - Workloads
- …
Introduce
![]()
Info
Longhorn
Longhorn is a lightweight, reliable, and powerful distributed block storage system for Kubernetes.
Longhorn implements distributed block storage using containers and microservices. Longhorn creates a dedicated storage controller for each block device volume and synchronously replicates the volume across multiple replicas stored on multiple nodes. The storage controller and replicas are themselves orchestrated using Kubernetes.
If you feel struggle to choice one of storage platform for your Kubernetes, Longhorn will deserve for top of priorities of your consideration. When i read about discussion about comparison between OpenSource storage on Kubernetes: OpenEBS vs Rook vs Longhorn vs GlusterFS vs LINSTOR on Reddit, there are many comment to choose Longhorn with highly upvote from community

Those responses bring many evidence to prove Longhorn is legit option for storage inside Kubernetes, with cool features
- Highly available persistent storage for Kubernetes
- Easy incremental snapshots and backups
- Cross-cluster disaster recovery
- Automated, non-disruptive upgrades. You can upgrade the entire Longhorn software stack without disrupting running storage volumes.
- Backup to secondary storage (NFS or S3-compatible object storage) built on efficient change block detection
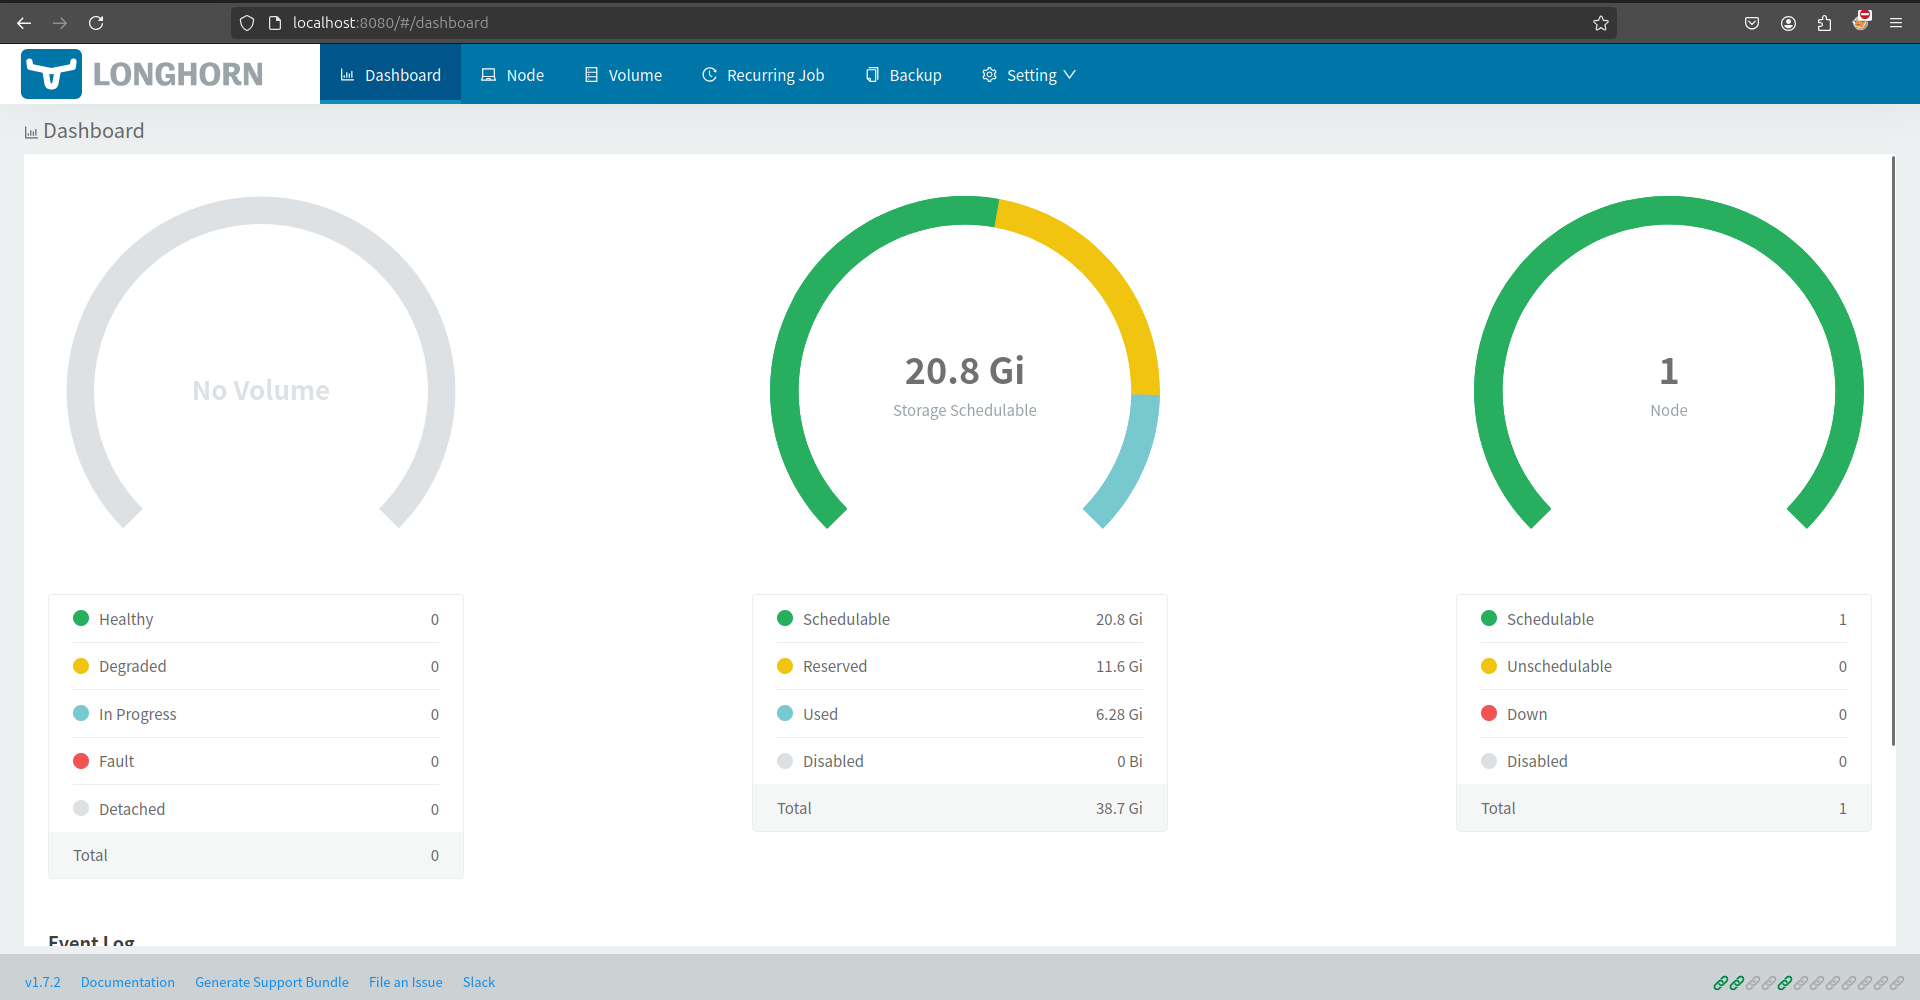
BTW, Longhorn has UI Dashboard for providing friendly interaction method with Longhorn manager running inside cluster, that really useful for people who want to control or have clearly visualization to see landscape of Longhorn and storage state of Kubernetes
Info
One things is really surprise cuz Longhorn easy to use as well, that provide kinda clean documentation and mention about feature inside cluster, especially I prefer how to setup NFS Server with this platform. Let’s talk about in practice session
In currently, Longhorn is standing on version 1.7.2 for stable, but you can set up and retrieve older version for your purpose through some installations, including
You can catch up a new update of Longhorn release via couple of links
Components
Following the Longhorn, Longhorn will provide couple of components and libraries corresponding for each features.
| Component | What it does | GitHub repo |
|---|---|---|
| Longhorn Backing Image Manager | Backing image download, sync, and deletion in a disk | longhorn/backing-image-manager |
| Longhorn Instance Manager | Controller/replica instance lifecycle management | longhorn/longhorn-instance-manager |
| Longhorn Manager | Longhorn orchestration, includes CSI driver for Kubernetes | longhorn/longhorn-manager |
| Longhorn Share Manager | NFS provisioner that exposes Longhorn volumes as ReadWriteMany volumes | longhorn/longhorn-share-manager |
| Longhorn UI | The Longhorn dashboard | longhorn/longhorn-ui |
| Library | What it does | GitHub repo |
|---|---|---|
| Longhorn Engine | V1 Core controller/replica logic | longhorn/longhorn-engine |
| Longhorn SPDK Engine | V2 Core controller/replica logic | longhorn/longhorn-spdk-engine |
| iSCSI Helper | V1 iSCSI client and server libraries | longhorn/go-iscsi-helper |
| SPDK Helper | V2 SPDK client and server libraries | longhorn/go-spdk-helper |
| Backup Store | Backkup libraries | longhorn/backupstore |
| Common Libraries | longhorn/go-common-libs |
Info
To understand more couple of components inside Longhorn cluster, you can reach to architecture to understand more about concept
Architecture

Architecture of Longhorn Engine and Manager
Before you dive deep into architecture, you should read official documentation about Longhorn - Architecture and Concepts. Therefore, I will take couple of important notes to mechanism of platform
Info
Longhorn creates a dedicated storage controller for each volume and synchronously replicates the volume across multiple replicas stored on multiple nodes.
As you catch up components of Longhorn and take a look the picture, Longhorn will do some functionality to control storage
-
Create
daemonsetLonghorn manager, it means each node will exist manager to control method help you create new volume via API calls. -
Use mechanism of Kubernetes API to create new volume mapping that through action create longhorn volume CR that depend on CRD provided by Longhorn
backingimagedatasources.longhorn.io backingimagemanagers.longhorn.io backingimages.longhorn.io backups.longhorn.io backuptargets.longhorn.io backupvolumes.longhorn.io engineimages.longhorn.io engines.longhorn.io instancemanagers.longhorn.io nodes.longhorn.io orphans.longhorn.io recurringjobs.longhorn.io replicas.longhorn.io settings.longhorn.io sharemanagers.longhorn.io snapshots.longhorn.io supportbundles.longhorn.io systembackups.longhorn.io systemrestores.longhorn.io volumes.longhorn.io -
With each volume created, Longhorn will create a Longhorn Engine instance on the node the volume is attached to, and it creates a replica on each node where a replica will be placed. Replicas should be placed on separate hosts to ensure maximum availability.
-
The Longhorn Engine always runs in the same node as the Pod that uses the Longhorn volume. It synchronously replicates the volume across the multiple replicas stored on multiple nodes.
Note
It’s a kinda basic mechanism cover a bit about simple way communication between main components, how to come from manager to volume inside Kubernetes. But if you want to understand more and more concept, such as backup, provision volume, replicas, … Longhorn - Architecture and Concepts is truly useful as well
Alternative
If you find another tools to get more and more options to choose compatible storage platform for your kubernetes, you can double-check a bit check list below
- linstor-server: High Performance Software-Defined Block Storage for container, cloud and virtualisation. Fully integrated with Docker, Kubernetes, Openstack, Proxmox etc.
- MinIO: MinIO Object Storage for Kubernetes
- Rook: An open source cloud-native storage orchestrator, providing the platform, framework, and support for Ceph storage to natively integrate with cloud-native environments.
Quote
I have tried Ceph with Rook in the previous, it’s not easily experience for experimenting with this storage inside cluster because Ceph is truly powerful but complex in high level with multiple storage layer to learn and discover as well
Longhorn Resources
If you want to explore more couple about Longhorn, you can take your time to learn about
- Upgrading Longhorn Manager
- RWX Volume Fast Failover
- longhorn-share-manager - GitHub about NFS Service of LongHorn
- The Longhorn Documentation
Success
Longhorn is actual huge storage platform for Kubernetes and it’s pretty well to explore and research about platform look interesting as well. Before start practice session to practice Longhorn, we will figure out reason why use longhorn NFS server is convenience for sure.
NFS - The big story behind the scenes
Info
To learn more about story of mine, we will turn back in couple of decades ago, and see what the come up of
nfsprotocol and see what it things support by this protocol. Big shout out to my coworker - Son Do to give me reason why and what the useful when usingnfs.
To learn more about NFS protocol and another stories, you can explore that via
- NFS Vs. SMB A Crash Course On Network File Sharing
- AWS - What’s the Difference Between NFS and SMB?
- RFC - Network File System (NFS) Version 4 Minor Version 1 Protocol
- Azure - Network File System overview
- Azure - Recommendations for working with large directories in NFS Azure file shares
The big take

Question
When the problem come up with idea to how transfer large file inside the Kubernetes, It means we need to transfer from big file such as model AI/ML from side to side, pod to pod, container to container and CI/CD to cluster, it does matter when you choose download via HTTP, but it’s actual work or optimize the time when you try to access direct into volume reservation and execute for example your programming in that location. Truly convenience 😁
When I try to read the article Performance Tuning on Linux — NFS, that covey me a lot of things around NFS, how to performance tunning and the new way to think
- NFS is truly long life, it’s current support to V4.2 version with interesting feature. You can try to discover at What’s New in NFS 4.2? or PDF
- NFS is non blocking, it can be created a bit of disturb with security in some way.
- Deliver more way to tuning the NFS
At the end, they gonna try to introduce the things that legit interesting, new protocol to boost this protocol become faster and reduce a lot of problems related CPU. It called RDMA, or Remote Direct Memory Access
RDMA, or Remote Direct Memory Access
Info
DMA and RDMA
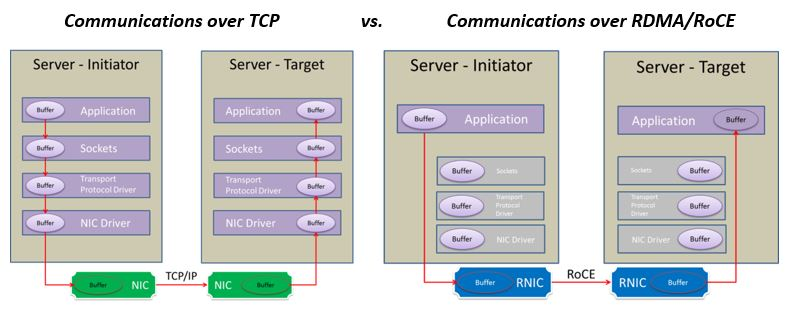
DMA or Direct Memory Access is a mechanism to allow an application to more directly read and write from and to local hardware, with fewer operating systems modules and buffers along the way.
RDMA extends that across a LAN, where an Ethernet packet arrives with RDMA extension. The application communicates directly with the Ethernet adapter. Application DMA access to the RDMA-capable Ethernet card is much like reaching across the LAN to the remote Ethernet adapter and through it to its application. This decreases latency and increases throughput (a rare case of making both better at once) and it decreases the CPU load at both ends. RDMA requires recent server-class Ethernet adapters, a recent kernel, and user-space tools.
To learn more about RDMA, I try to google to search about this topic, and luckily I found the interesting article Nvidia - Doubling Network File System Performance with RDMA-Enabled Networking
If you read the article, they try point to reason about with the evolution of networking speed nowadays, it truly big things to leverage this quality and implement the state of art protocol, next gen with creating high performance, such as client-to-NFS communications like leaving more CPU cycles free to run business applications and maximizes the data center efficiency.
That why we have RDMA, makes data transfers more efficient and enables fast data movement between servers and storage without involving its CPU. Throughput is increased, latency reduced, and CPU power is freed up for the applications.
Info
The growing deployment of RDMA-enabled networking solutions in public and private clouds—like RoCE that enables ruining RDMA over Ethernet, plus the recent NFS protocol extensions—enables NFS communication over RoCE
And what the connection between RDMA, NFS and Longhorn. It has connection meaning as well cuz Longhorn use nfs-ganesha - an NFSv3,v4,v4.1 fileserver that runs in user mode on most UNIX/Linux systems to build up the longhorn-sharing-manager, the component of Longhorn work as NFS server via this storage platform
There is one of experiment and describe about combination Network File System (NFS) Remote Direct Memory Access (RDMA) Problem Statement
Longhorn about Network Mechanism with NFS, RDMA, and iSCSI

Note
Involving with concept,
nfs-ganeshasupport RDMA but no longer support but in the couple month ago, it seems like we have new Issue: How does nfs-ganesha support RDMA ? and it gonna end with implementation from ffilz - who really contribute a new thing fornfs-ganeshaand he will kick of RDMA to bring up again feature intonfs-ganeshaand in the nearest future, we will have this protocol integrated inside Longhorn. But now, I think it non’t and we will keep to usetcpoverrdma. BTW, you can explore it in Wiki - RDMA
Longhorn also use iscsi for main things to make Longhorn can communicate interact with storage via networking local. Honestly, Longhorn is legit insane when communicate at all through network and keep that stable, and deliver many solution. Glad to have opportunity to learn 🥰
Info
iSCSI or Internet Small Computer Systems Interface is is an Internet Protocol-based storage networking standard for linking data storage facilities. iSCSI provides block-level access to storage devices by carrying SCSI commands over a TCP/IP network.
iSCSI is becoming part requirement by Longhorn to provide persistent volume of this storage platform. If you have time, spend to read iSCSI through Wikipedia and try to figure out AWS - What’s the Difference Between NFS and iSCSI? to understand more interesting topic
Quote
I know this blog become more hardcore but i just wanna capture against about bit time spend for researching, it’s truly useful to help me cover a lot of information about NFS, Longhorn, DMA, RDMA and iSCSI, learn about the old technology but the combination with modern, it’s kinda ubiquitous and enchanting 😄
Practice Session
Question
With Longhorn, this technology provide us the csi plugin to control over volume or storage inside Kubernetes. It’s really method for using NFS to distribute volume for multiple workloads communication, it means one pods can use same volume. In this practice session, we will find out how to setup Longhorn, enable NFS internal cluster and can be able to connect from external also
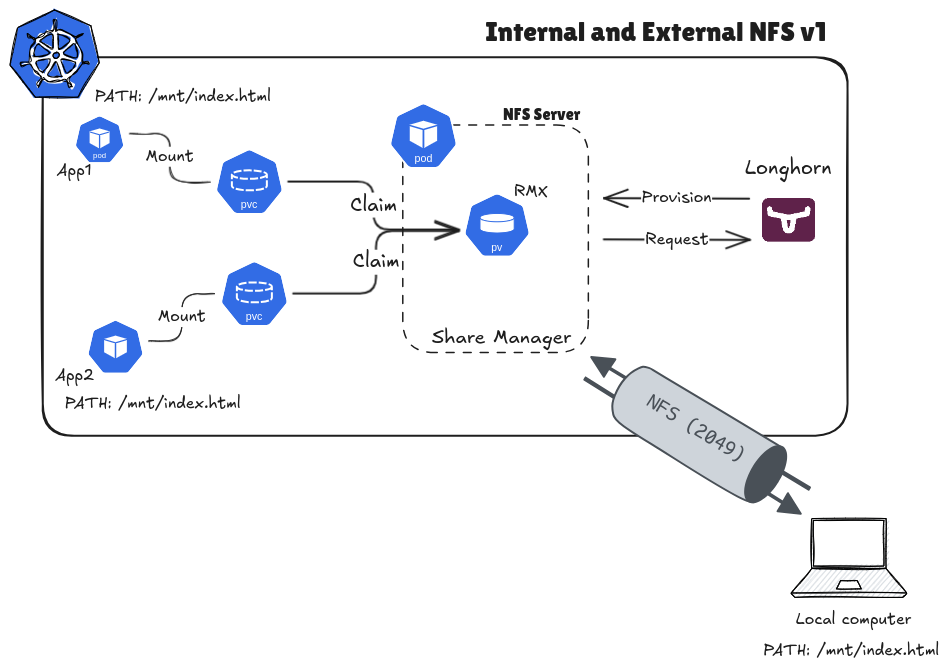
Longhorn with NFS (Source: By me)
Experiment environment
Info
For not make any change in your host, I choose
vargrantandvirtualboxis suitable environment for making sandbox for this practical session. If you wanna learn how to setupvargrantandvirtualbox, I will recommend you to back again in Kubewekend Session 1: Build up your host with Vagrant for more information
I will try to write a basic Vagrantfile and put the raw machine inside virtualbox
Vagrant.configure("2") do |config|
  # # Handle multiple machine in one block of Vagrantfile
  # # https://developer.hashicorp.com/vagrant/docs/multi-machine
  config.vm.define "k8s-master-sandbox", primary: true do |config|
    config.vm.box = "ubuntu/focal64"
    config.vm.hostname = "k8s-master-sandbox"
    config.vm.communicator = "ssh"
    # Default enable 2222 for ssh communication (Add id: "ssh" to disable default)
    # https://realguess.net/2015/10/06/overriding-the-default-forwarded-ssh-port-in-vagrant/
    config.vm.network "forwarded_port", guest: 22, host: 6996, protocol: "tcp", id: "ssh", host_ip: "127.0.0.1"
    config.vm.box_check_update = false
    config.ssh.username = ENV["SSH_USER"]
    config.ssh.private_key_path = ENV["SSH_PRIV_KEY_PATH"]
    config.ssh.port = 6996
    config.ssh.guest_port = 22

    # # Disable to generate a key pair inside .vargrant directory, use insecure_private_keys
    # # instead of using private_key
    # config.ssh.insert_key = false

    config.ssh.forward_agent = true

    config.vm.provider "virtualbox" do |config|
      config.name = "k8s-master-sandbox"
      # Change here when you need more memory to prevent Errors: 137 in Kubernetes
      config.memory = 2048
      config.cpus = 2
    end
  end
end
Now you can use command to bring up your machine (NOTE: Cuz you only have one machine provisioning so that why you just only use command, not need specific anymore)
vagrant upAfter that you can connect into machine with command
vagrant sshThat’s it you have your machine, next install and setup docker inside your host
sudo apt update
curl -fsSL https://get.docker.com | sudo bash -
Add the permission for your shell to call docker command and reboot machine again
# Add permission
sudo usermod -aG docker $USER
sudo systemctl enable docker.service

# Reboot
sudo reboot
Next we setup Kubernetes cluster with kind, you need to prepare kind config and install kind for your host
sudo apt install -y apt-transport-https ca-certificates curl gpg wget
wget -q https://kind.sigs.k8s.io/dl/v0.23.0/kind-linux-amd64 -O ./kind
chmod +x ./kind
sudo mv ./kind /usr/local/bin/kindkind: Cluster
apiVersion: kind.x-k8s.io/v1alpha4
name: longhorn-experiment
networking:
apiServerAddress: "0.0.0.0"
apiServerPort: 6996
podSubnet: 10.244.0.0/16
serviceSubnet: 10.96.0.0/16
disableDefaultCNI: false
kubeProxyMode: "iptables"
nodes:
- role: control-plane
image: "kindest/node:v1.28.9"Now you can run command to provision new kind cluster
kind create cluster --config kind-config.yamlWait 1-2 mins and now you have your cluster in your virtual machine, you need to install kubectl or use what ever tool to management cluster, explore at Cluster Management Tools. For me, I choose kubectl for easier and convenience
# Install kubectl
curl -LO "https://dl.k8s.io/release/$(curl -L -s https://dl.k8s.io/release/stable.txt)/bin/linux/amd64/kubectl"
sudo chmod +x kubectl
sudo mv kubectl /usr/local/bin
Now you run command with kubectl to get your nodes
# Get nodes
kubectl get nodes

# Get all workload inside
kubectl get all -A
Install Longhorn
Like I told about in the introduce Longhorn, this platform is submit a lot of ways to deploying Longhorn cluster, explore at Longhorn - Quickstart install
First of all, Longhorn need iscsi to operate and provision persistent volume, you can double-check about that above. To install, just easier run command
sudo apt install open-iscsi -yAdd iscsi to your kernel to help your linux serve this protocol
# Enable iscsi daemon
sudo systemctl start iscsid
sudo systemctl status iscsid

# Add iscsi to kernel
sudo modprobe iscsi_tcp

# Check iscsi in your kernel
lsmod | grep -e "iscsi"
Note
Assume you have 100 or 200 node inside your cluster, and you don’t have much time to execute to each node-shell to install, you can use manifest as
daemonsetto installiscsiinto your host. Explore at: deploy/prerequisite/longhorn-iscsi-installation.yaml
kubectl apply -f https://raw.githubusercontent.com/longhorn/longhorn/v1.7.2/deploy/prerequisite/longhorn-iscsi-installation.yamlNext, you can install nfs-client for your machine to execute your nfs protocol inside kernel of Longhorn
# Check support both nfs v4.1 and v4.2 (e.g: response Y mean yes)
cat /boot/config-`uname -r`| grep CONFIG_NFS_V4_1
cat /boot/config-`uname -r`| grep CONFIG_NFS_V4_2

# Install nfs into your cluster host
sudo apt install nfs-common -y

# Add into kernel
sudo modprobe nfs

# Check about configuration
lsmod | grep -e "nfs"
Note
Like as installation
iscsi, you can do same way fornfs-client, explore the script at: deploy/prerequisite/longhorn-nfs-installation.yaml
kubectl apply -f https://raw.githubusercontent.com/longhorn/longhorn/v1.7.2/deploy/prerequisite/longhorn-nfs-installation.yamlIn my situation, I choose install that via manifest for easier handling, you can install that via kuebctl command
kubectl apply -f https://raw.githubusercontent.com/longhorn/longhorn/v1.7.2/deploy/longhorn.yaml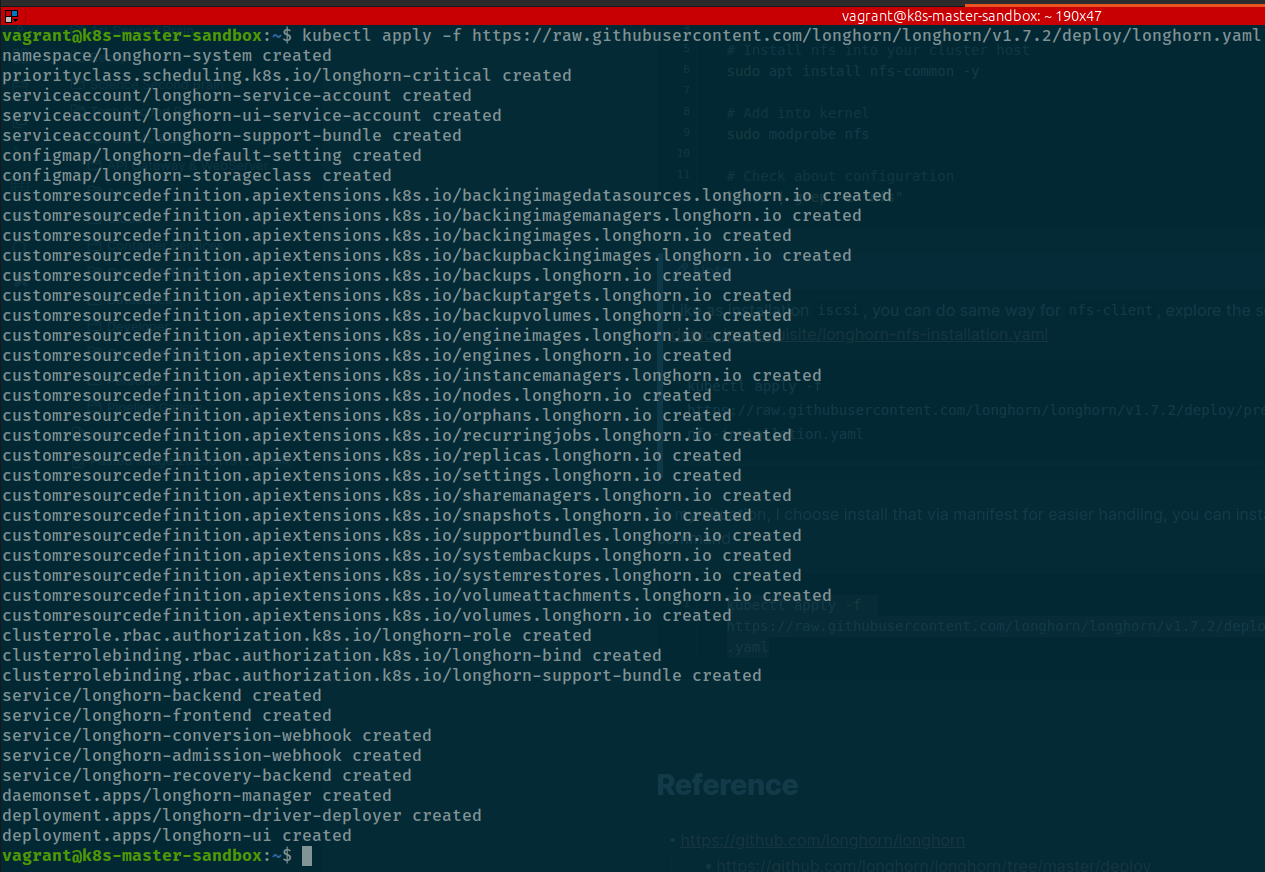
Quote
Bunch of things will install inside your host, including
- Namespace
- Serviceaccount
- Configmap
- CRD
- RBAC
- Service
- Daemonset Longhorn
- Deployment provide UI and CSI Driver for Longhorn
- Storage Class
Now use kubectl to view deployment state, successful or not
kubectl get all -n longhorn-systemTo make your longhorn can make conversation, you need create storageclass to define the methodology for this platform and it actual integrate with longhorn installation. You can ensure via command
vagrant@k8s-master-sandbox:~$ kubectl get storageclass longhorn -o yaml
allowVolumeExpansion: true
apiVersion: storage.k8s.io/v1
kind: StorageClass
metadata:
  annotations:
    longhorn.io/last-applied-configmap: |
      kind: StorageClass
      apiVersion: storage.k8s.io/v1
      metadata:
        name: longhorn
        annotations:
          storageclass.kubernetes.io/is-default-class: "true"
      provisioner: driver.longhorn.io
      allowVolumeExpansion: true
      reclaimPolicy: "Delete"
      volumeBindingMode: Immediate
      parameters:
        numberOfReplicas: "3"
        staleReplicaTimeout: "30"
        fromBackup: ""
        fsType: "ext4"
        dataLocality: "disabled"
        unmapMarkSnapChainRemoved: "ignored"
        disableRevisionCounter: "true"
        dataEngine: "v1"
    storageclass.kubernetes.io/is-default-class: "true"
  creationTimestamp: "2025-01-19T04:28:00Z"
  name: longhorn
  resourceVersion: "4255"
  uid: c341ce3b-1a85-4496-a662-0759316179a2
parameters:
  dataEngine: v1
  dataLocality: disabled
  disableRevisionCounter: "true"
  fromBackup: ""
  fsType: ext4
  numberOfReplicas: "3"
  staleReplicaTimeout: "30"
  unmapMarkSnapChainRemoved: ignored
provisioner: driver.longhorn.io
reclaimPolicy: Delete
volumeBindingMode: Immediate
BTW, you can double check longhorn instance via UI. You need to port-forward port of longhorn into your vagrant host and tunnel that into your machine, check command to practice
# Expose the longhorn UI into vagrant
kubectl port-forward -n longhorn-system services/longhorn-frontend 8080:80
It will expose pod from internal cluster into vagrant, and now use need to tunnel method via ssh protocol
To prepare the connection, you need retrieve ssh-config of your host to see what the private_key to use
vagrant ssh-configIf you find the ssh-key used by your host, you can run the command below to tunnel
ssh -N -L 8080:127.0.0.1:8080 -i /path/to/your/private_key vagrant@127.0.0.1 -p 6996Check your browser at URL http://localhost:8080 and boom, here is it longhorn in da host 😄
Setup NFS with Longhorn and how it work
Next we focus into install and setup nfs-server via longhorn provided, it’s pretty easy because longhorn support volume be able read write many by multiple pod-pod, container-container. You can find more information at ReadWriteMany (RWX) Volume
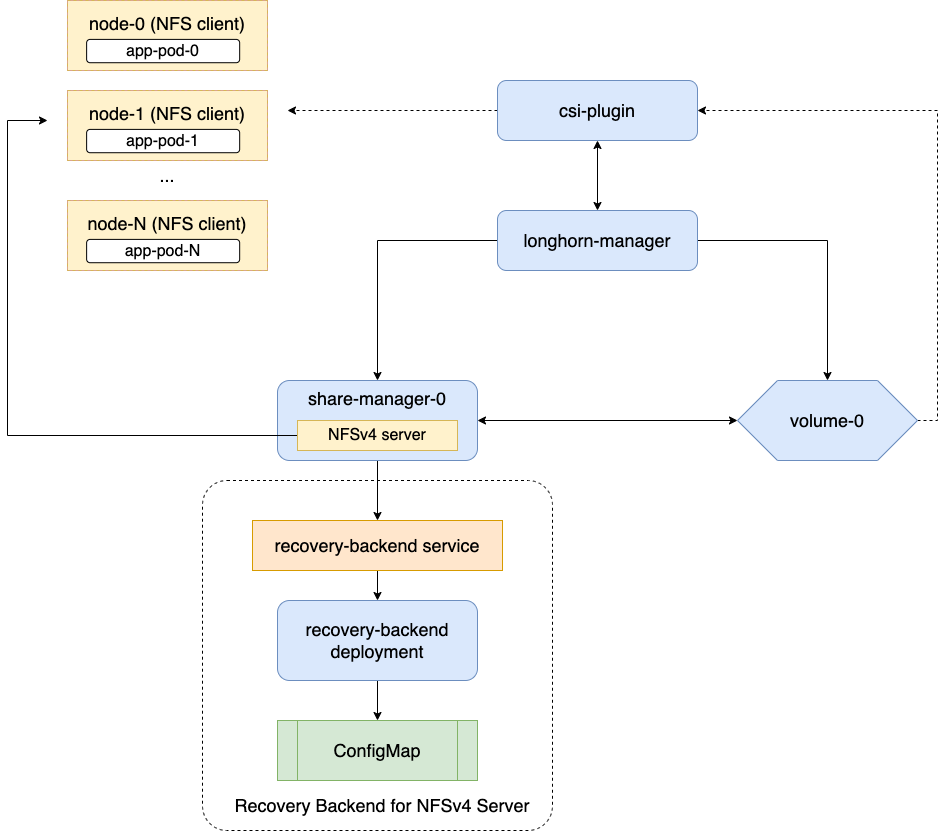
Longhorn NFS (Source: Longhorn)
As you can see, when you create the volume with mode RWX by longhorn, Longhorn will use volume cr to setup new component corresponding volume using API sharemanagers.longhorn.io with supporting Recovery backend for NFSv4 Server like image.
It means pods or workload will not use directly volume mounting, in term of situation, pods and workload will use nfs-client for instead to connect directory from NFSv4 Server into each of them, how cool is it right 😃
Okay, let’s practice to figure out, I will point each of part important related with each provisioning step
First of all, we will try to create PVC use Longhorn storageclass to see what volume provision and what happen after that. You need to prepare manifest file pvc.yaml
apiVersion: v1
kind: PersistentVolumeClaim
metadata:
  name: rwx-test
  namespace: default
spec:
  accessModes:
    - ReadWriteMany
  storageClassName: longhorn
  resources:
    requests:
      storage: 1Gi
This script will provide
- PVC name
rwx-testin namespacedefault - PV will have access mode
ReadWriteMany - PV will use Longhorn
storageclassand request 1GB
Let’s apply it
kubectl apply -f pvc.yamlNow query that with get command
# Get pvc
kubectl get pvc -n default

# Get pv
kubectl get pv -n default
Now, you can see one volume and reserved by one pvc. But the miracle is one of pod to add into longhorn-system namespace for taking responsibility nfs-server but in current, you will not see that before have another pod mounting this PV via nfs protocol. Instead, you can find that component created via crd of longhorn with type sharemanager
kubectl get sharemanager -n longhorn-system
Current state of share-manager is mark stopped but if you trigger mount, this one will turn into running. Now we create workload and use this pvc to see how it work. You should prepare workload-rwx.yaml to take experiment
apiVersion: apps/v1
kind: Deployment
metadata:
  name: rwx-test
  labels:
    app: rwx-test
  namespace: default
spec:
  replicas: 2
  selector:
    matchLabels:
      app: rwx-test
  strategy:
    type: Recreate
  template:
    metadata:
      labels:
        app: rwx-test
    spec:
      containers:
        - image: ubuntu:xenial
          imagePullPolicy: IfNotPresent
          command: [ "/bin/sh", "-c" ]
          args:
            - sleep 10; touch /data/index.html; while true; do date >> /data/index.html; sleep 1; done;
          name: rwx-test
          stdin: true
          tty: true
          volumeMounts:
            - mountPath: /data
              name: rwx-test
        - image: nginx:stable
          imagePullPolicy: IfNotPresent
          name: nginx
          ports:
            - containerPort: 80
              name: http
          volumeMounts:
            - mountPath: /usr/share/nginx/html
              name: rwx-test
      restartPolicy: Always
      volumes:
        - name: rwx-test
          persistentVolumeClaim:
            claimName: rwx-test
If you look into the script, you can figure out
- It will create deployment with provide two containers, one for
nginxand one forubuntufor writing thedatetimeeach loop - Mounting the
pvcnamermx-testinto each containers in pod, and we will have two pods to check each scenarios, e.g: container-container, pod-pod
Now apply it and we will see a bit miracle
kubectl apply -f workload-rwx.yamlBoom, you will meet the error because you are install and work with version 1.7.x and it integrates encrypt method into Longhorn core after I try to debug inside share-manager node
vagrant@k8s-master-sandbox:~$ kubectl logs -f pods/share-manager-pvc-ecbdac4d-a323-4ba9-9a6f-2df8190da064 -n longhorn-system

time="2025-01-19T06:26:56Z" level=info msg="starting RLIMIT_NOFILE rlimit.Cur 1048576, rlimit.Max 1048576"
time="2025-01-19T06:26:56Z" level=info msg="Ending RLIMIT_NOFILE rlimit.Cur 1048576, rlimit.Max 1048576"
time="2025-01-19T06:26:56Z" level=warning msg="Waiting with nfs server start, volume is not attached" encrypted=false volume=pvc-ecbdac4d-a323-4ba9-9a6f-2df8190da064
time="2025-01-19T06:26:56Z" level=info msg="Listening on share manager gRPC server :9600" func=cmd.start.func2 file="server.go:135"
time="2025-01-19T06:27:01Z" level=warning msg="Waiting with nfs server start, volume is not attached" encrypted=false volume=pvc-ecbdac4d-a323-4ba9-9a6f-2df8190da064
time="2025-01-19T06:27:06Z" level=warning msg="Waiting with nfs server start, volume is not attached" encrypted=false volume=pvc-ecbdac4d-a323-4ba9-9a6f-2df8190da064
time="2025-01-19T06:27:11Z" level=warning msg="Waiting with nfs server start, volume is not attached" encrypted=false volume=pvc-ecbdac4d-a323-4ba9-9a6f-2df8190da064
time="2025-01-19T06:27:16Z" level=warning msg="Waiting with nfs server start, volume is not attached" encrypted=false volume=pvc-ecbdac4d-a323-4ba9-9a6f-2df8190da064
time="2025-01-19T06:27:21Z" level=warning msg="Waiting with nfs server start, volume is not attached" encrypted=false volume=pvc-ecbdac4d-a323-4ba9-9a6f-2df8190da064
time="2025-01-19T06:27:23Z" level=info msg="NFS server is not running, skip unexporting and unmounting volume" volume=pvc-ecbdac4d-a323-4ba9-9a6f-2df8190da064
time="2025-01-19T06:27:23Z" level=info msg="share manager received signal terminated to exit"
time="2025-01-19T06:27:23Z" level=info msg="NFS server is not running, skip unexporting and unmounting volume" volume=pvc-ecbdac4d-a323-4ba9-9a6f-2df8190da064
time="2025-01-19T06:27:23Z" level=info msg="NFS server is not running, skip unexporting and unmounting volume" volume=pvc-ecbdac4d-a323-4ba9-9a6f-2df8190da064
time="2025-01-19T06:27:23Z" level=info msg="NFS server is not running, skip unexporting and unmounting volume" volume=pvc-ecbdac4d-a323-4ba9-9a6f-2df8190da064
time="2025-01-19T06:27:24Z" level=info msg="NFS server is not running, skip unexporting and unmounting volume" volume=pvc-ecbdac4d-a323-4ba9-9a6f-2df8190da064
time="2025-01-19T06:27:26Z" level=info msg="NFS server is shutting down" encrypted=false volume=pvc-ecbdac4d-a323-4ba9-9a6f-2df8190da064
time="2025-01-19T06:27:26Z" level=error msg="Failed to unmount volume" encrypted=false error="unmount failed: exit status 32\nUnmounting arguments: /export/pvc-ecbdac4d-a323-4ba9-9a6f-2df8190da064\nOutput: umount: /export/pvc-ecbdac4d-a323-4ba9-9a6f-2df8190da064: no mount point specified.\n" volume=pvc-ecbdac4d-a323-4ba9-9a6f-2df8190da064
time="2025-01-19T06:27:26Z" level=debug msg="Device /dev/mapper/pvc-ecbdac4d-a323-4ba9-9a6f-2df8190da064 is not an active LUKS device" func=crypto.DeviceEncryptionStatus file="crypto.go:89" error="failed to execute: /usr/bin/nsenter [nsenter --mount=/host/proc/123608/ns/mnt --ipc=/host/proc/123608/ns/ipc cryptsetup status pvc-ecbdac4d-a323-4ba9-9a6f-2df8190da064], output , stderr nsenter: failed to execute cryptsetup: No such file or directory\n: exit status 127"
It means you need to install library to support do in this step. Explore at Installing Cryptsetup and LUKS. You need exec into container kind and run command to install cryptsetup
apt update
apt install cryptsetup -y
After work and checking and redeploy, I just figure out that not work with kind cluster, if you try to with another selfhosted like
- K3s
- Rancher
- Kubeadm
It means you should install directly your Kubernetes core into your host with not need virtualization one time again like my situation through virutalbox because it’s really not try to allocate volume with some configuration, like replica and encrypt. That’s tuff but I am not choose follow if it not gonna be go somewhere
time="2025-01-19T08:25:06Z" level=error msg="There's no available disk for replica pvc-29615277-d9aa-4792-b1bd-2250104ff889-r-d81463f4, size 2147483648" func="scheduler.(*ReplicaScheduler).ScheduleReplica" file="replica_scheduler.go:74"
time="2025-01-19T08:25:06Z" level=warning msg="Failed to schedule replica" func="controller.(*VolumeController).reconcileVolumeCondition" file="volume_controller.go:1749" accessMode=rwo controller=longhorn-volume frontend=blockdev migratable=false node=longhorn-experiment-control-plane owner=longhorn-experiment-control-plane replica=pvc-29615277-d9aa-4792-b1bd-2250104ff889-r-d81463f4 state=attaching volume=pvc-29615277-d9aa-4792-b1bd-2250104ff889
time="2025-01-19T08:25:06Z" level=error msg="There's no available disk for replica pvc-29615277-d9aa-4792-b1bd-2250104ff889-r-a56b9bac, size 2147483648" func="scheduler.(*ReplicaScheduler).ScheduleReplica" file="replica_scheduler.go:74"
time="2025-01-19T08:25:06Z" level=warning msg="Failed to schedule replica" func="controller.(*VolumeController).reconcileVolumeCondition" file="volume_controller.go:1749" accessMode=rwo controller=longhorn-volume frontend=blockdev migratable=false node=longhorn-experiment-control-plane owner=longhorn-experiment-control-plane replica=pvc-29615277-d9aa-4792-b1bd-2250104ff889-r-a56b9bac state=attaching volume=pvc-29615277-d9aa-4792-b1bd-2250104ff889
time="2025-01-19T08:25:06Z" level=info msg="Creating instance pvc-29615277-d9aa-4792-b1bd-2250104ff889-e-0" func="controller.(*InstanceHandler).createInstance" file="instance_handler.go:489"
time="2025-01-19T08:25:06Z" level=info msg="Event(v1.ObjectReference{Kind:\"Engine\", Namespace:\"longhorn-system\", Name:\"pvc-29615277-d9aa-4792-b1bd-2250104ff889-e-0\", UID:\"f4ab54a7-c7cb-4f9c-9843-4370d16a0a03\", APIVersion:\"longhorn.io/v1beta2\", ResourceVersion:\"15221\", FieldPath:\"\"}): type: 'Normal' reason: 'Start' Starts pvc-29615277-d9aa-4792-b1bd-2250104ff889-e-0" func="record.(*eventBroadcasterImpl).StartLogging.func1" file="event.go:377"
time="2025-01-19T08:25:07Z" level=error msg="There's no available disk for replica pvc-29615277-d9aa-4792-b1bd-2250104ff889-r-d81463f4, size 2147483648" func="scheduler.(*ReplicaScheduler).ScheduleReplica" file="replica_scheduler.go:74"
time="2025-01-19T08:25:07Z" level=warning msg="Failed to schedule replica" func="controller.(*VolumeController).reconcileVolumeCondition" file="volume_controller.go:1749" accessMode=rwo controller=longhorn-volume frontend=blockdev migratable=false node=longhorn-experiment-control-plane owner=longhorn-experiment-control-plane replica=pvc-29615277-d9aa-4792-b1bd-2250104ff889-r-d81463f4 state=attaching volume=pvc-29615277-d9aa-4792-b1bd-2250104ff889
time="2025-01-19T08:25:07Z" level=error msg="There's no available disk for replica pvc-29615277-d9aa-4792-b1bd-2250104ff889-r-a56b9bac, size 2147483648" func="scheduler.(*ReplicaScheduler).ScheduleReplica" file="replica_scheduler.go:74"
time="2025-01-19T08:25:07Z" level=warning msg="Failed to schedule replica" func="controller.(*VolumeController).reconcileVolumeCondition" file="volume_controller.go:1749" accessMode=rwo controller=longhorn-volume frontend=blockdev migratable=false node=longhorn-experiment-control-plane owner=longhorn-experiment-control-plane replica=pvc-29615277-d9aa-4792-b1bd-2250104ff889-r-a56b9bac state=attaching volume=pvc-29615277-d9aa-4792-b1bd-2250104ff889
Yup, then after I try to search again and see the log, that make me give the conclusion for all problems
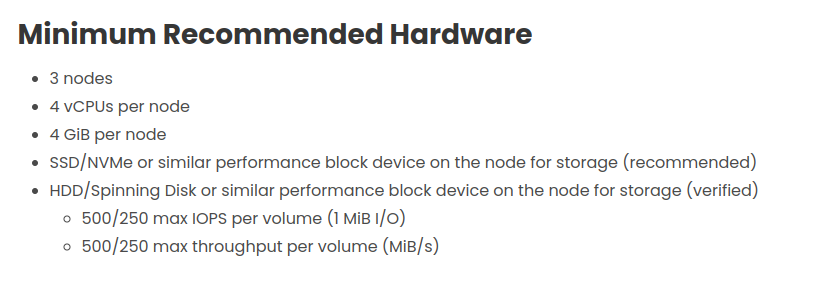
Following the Longhorn - best practice, I can figure out the hardware is not same as recommendation, it means that cause replica schedule stuck and your volume will not work. And solution in this situation is try to add more node to create HA cluster, It means you can use virtualization but need add not only one but at least 3 node into your cluster.
It’s on couple of problems like multipath and encryption disk, we can consider to implement for except more problem
- ISSUE - Failing to mount encrypted volumes
- ISSUE - Share-Manager is restarted in infinitely
- ISSUE - longhorn RWX doesn’t work on freshly created volume
Success
I will stop the experiment in this
kindlab playground and I will try to run on other implementation in rancher cluster. So we can easier implement and get result with step by step
Experiment in successful environment
Note
If I try to run in the environment with same configuration but compatible for hardware recommendation, we will get the result
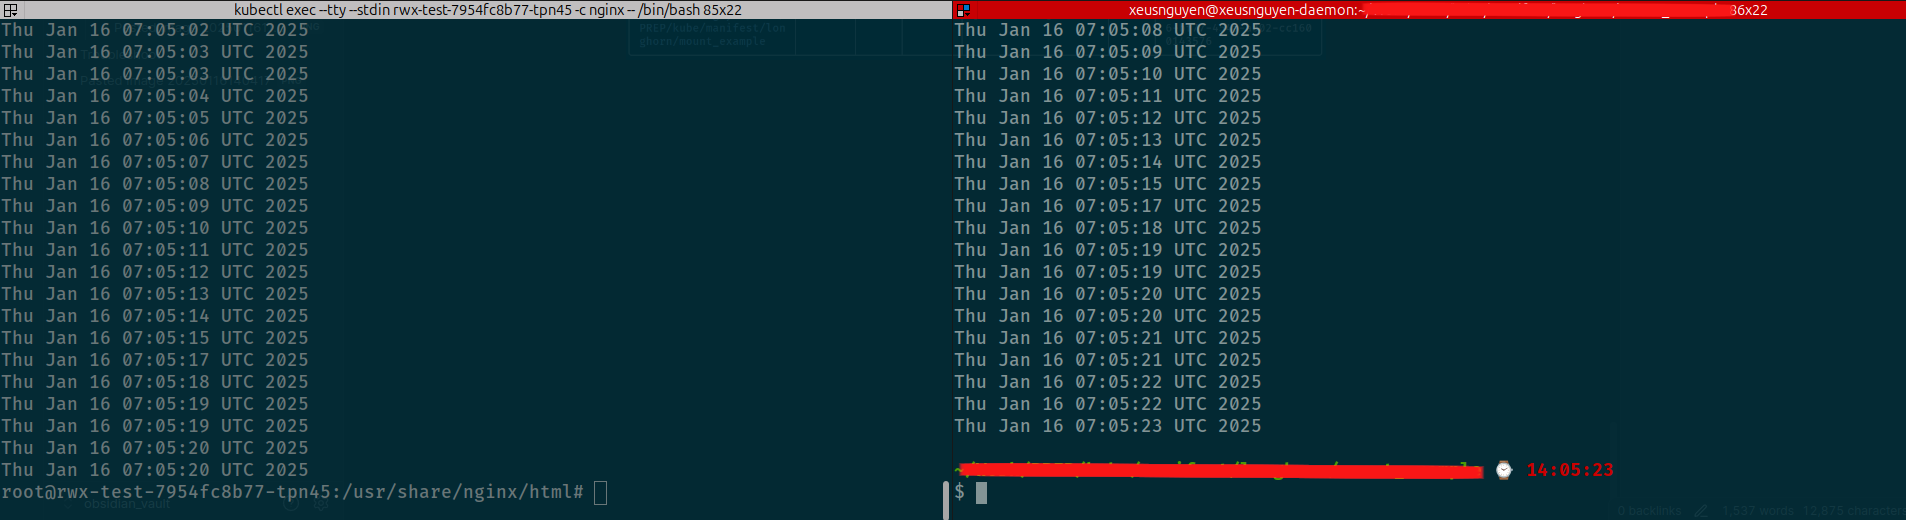
When we try to exec into two container, you can see that sync each other and share same directory to send datetime message into index.html
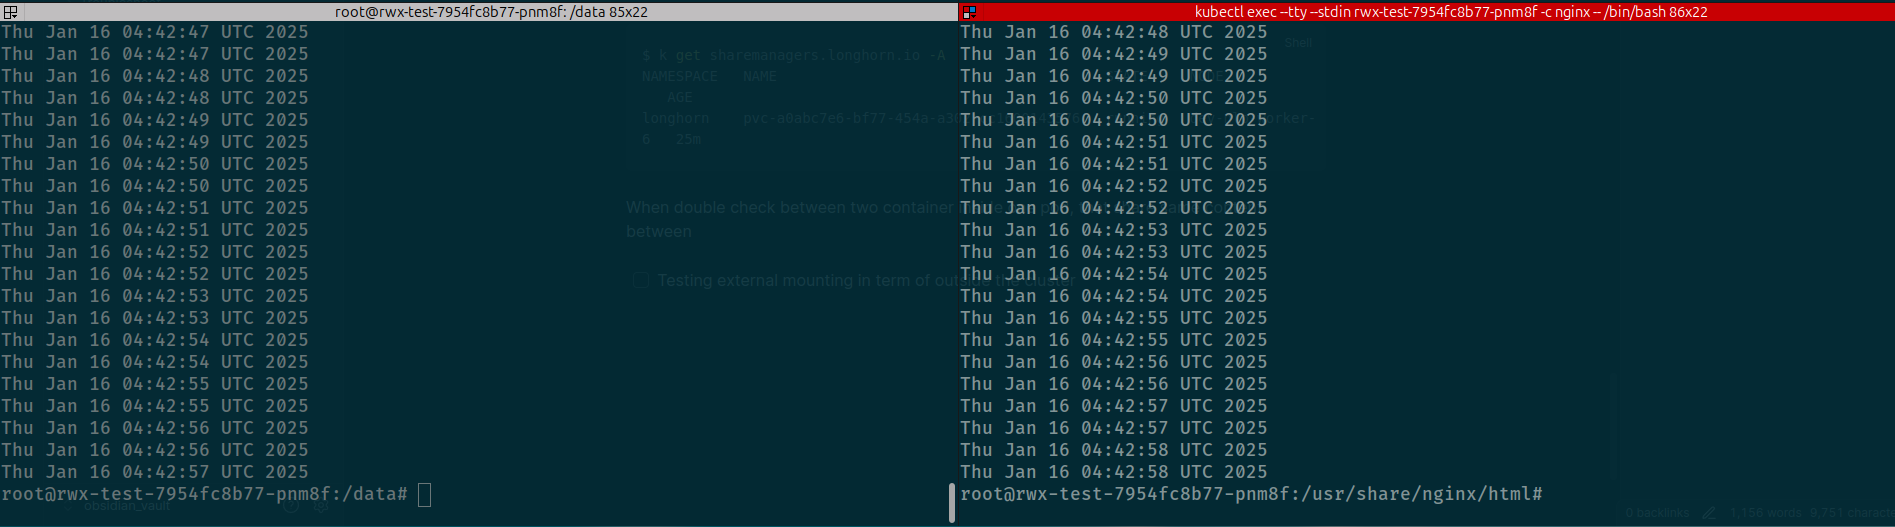
Container to Container in once pod
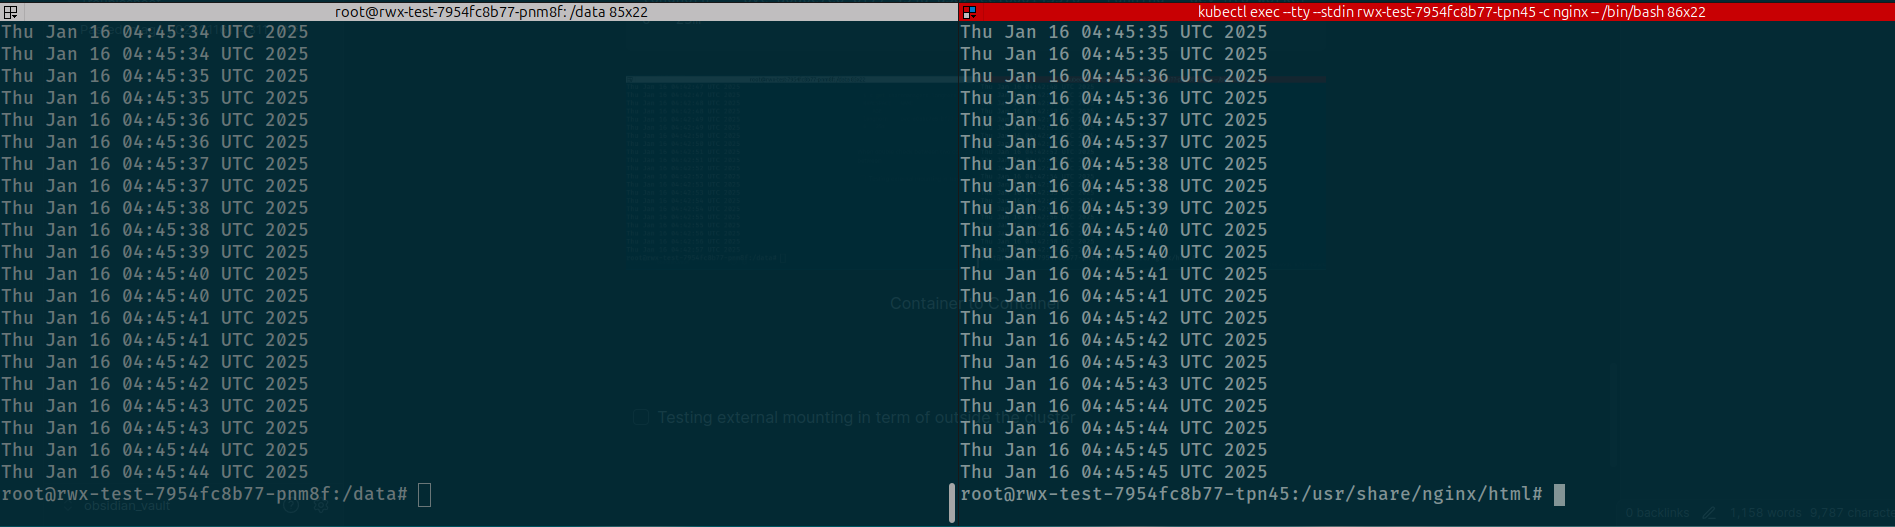
Pod to Pod
Success
Succeeding to sharing between workload in same namespace where the pvc was provisioned
When create a pv RWX mode, longhorn will provision one share-manager that submitted nfs-server role, it means you be able to have
One endpoint for nfs-client to access via longhorn, it’s totally stand for API integrate inside longhorn (NOTE: that won’t create any pod to control over as nfs-server, longhorn manger will take responsibility). You can retrieve that endpoint through command
# This one will create inside namespace longhorn
kubectl get sharemanagers.longhorn.io -n longhorn-system pvc-a0abc7e6-bf77-454a-a302-cc1600143576 -o yamlapiVersion: longhorn.io/v1beta2
kind: ShareManager
metadata:
creationTimestamp: "2025-01-16T04:14:23Z"
finalizers:
- longhorn.io
generation: 1
labels:
longhorn.io/component: share-manager
longhorn.io/managed-by: longhorn-manager
longhorn.io/share-manager: pvc-a0abc7e6-bf77-454a-a302-cc1600143576
longhorn.io/share-manager-image: smi-24068d2c
name: pvc-a0abc7e6-bf77-454a-a302-cc1600143576
namespace: longhorn
ownerReferences:
- apiVersion: longhorn.io/v1beta2
kind: Volume
name: pvc-a0abc7e6-bf77-454a-a302-cc1600143576
uid: cdde8976-0520-4cae-b863-aead3691a589
resourceVersion: "112535004"
uid: 66a6868d-4a03-4aaa-b5a4-1e3978516d46
spec:
image: longhornio/longhorn-share-manager:v1.4.0
status:
# Endpoint will expose in this path
endpoint: nfs://172.28.9.86/pvc-a0abc7e6-bf77-454a-a302-cc1600143576
ownerID: xxxxxxxxxxxxxx
state: runningTo get your host connect, you can try to expose tcp connection via tunnel used port-forward command
First of all, you should get service exposed inside namespace longhorn-system, it will exist service expose pvc you in port 2409 (NFS Port)
kubectl get services -n longhorn-system pvc-a0abc7e6-bf77-454a-a302-cc1600143576

pvc-a0abc7e6-bf77-454a-a302-cc1600143576   ClusterIP   172.28.9.86      <none>        2049/TCP    24m
Now you can use port-foward to nat port outside the cluster
kubectl port-forward -n longhorn-system service/pvc-a0abc7e6-bf77-454a-a302-cc1600143576 2049:2049
Forwarding from 127.0.0.1:2049 -> 2049
Forwarding from [::1]:2049 -> 2049
Now you can use mount command inside local to access that nfs-server in your localhost. For example, I create new mount directory as mount_example and try to mount nfs server into that location
# Create new directory for mounting
mkdir -p mount_example

# Mount nfs into your machine
sudo mount 127.0.0.1:/pvc-a0abc7e6-bf77-454a-a302-cc1600143576 mount_example
It will hit into nfs-server to request access and in your host, you can join into nfs-server sharing and be able to have permission to open contents inside nfs directory

Mount NFS directory into your host
Success
See that truly work and we have finish the environment to handle mount directory across environment via
nfs-server
Conclusion

Success
That’s all for today, really tough weekend with spending time to learn a bit interesting thing and share with you. This blog is not sure completely but we try again in next session, really see we have multiple problems when use and separate implementation through out virtualization layer, ceph and longhorn, actually good things and I just miss some things to actual bring that into
kindcluster. Hope you find well and have more strategy to hand on with large file with nfs protocol
Quote
So we reach to end of this week, I happy to sit here and learn a lot of stuff with y’all guy. However, Next two week, the frequency will become slow a bit because I spend time for holiday, the biggest one in my country. BTW, It not sure anything because I don’t have any plan so enjoyable and maybe we can see each other in next weekend. Therefore, stay safe, learn more and we will have reservation next weekend, bye bye and see yah 👋