To find more information and example, you can double-check a some manifest collection at
- Kubernetes Examples: About whole manifest of any types in Kubernetes
- Kubernetes Manifests: A collection of K8s manifests to deploy common applications
- K8s Deployment Strategies: About setup deployment strategies of Kubernetes
- Medium - 24 Kubernetes Masters’ Configurations
- Medium - Zero-Downtime Deployments with Kubernetes
Can use volume with cronjobs?
Purpose
This note will content the thing which finding on working progress with K8s. Just take note and link for resolving the problem. Find out detail if it has unique directory
Cronjobs --> Create Jobs (Trigger by scheduled) --> Pod : In this situation, Pod in K8s can used the volume and mount succeed when the script running. But if you applied it with pods, it will not, your command will run faster than mount progress. Checked it in this link
apiVersion: batch/v1beta1
kind: CronJob
metadata:
  name: update-db
spec:
  schedule: "*/1 * * * *"
  jobTemplate:
    spec:
      template:
        spec:
          containers:
          - name: update-fingerprints
            image: python:3.6.2-slim
            command: ["/bin/bash"]
            args: ["-c", "python /client/test.py"]
            volumeMounts:
            - name: application-code
              mountPath: /where/ever
          restartPolicy: OnFailure
          volumes:
          - name: application-code
            persistentVolumeClaim:
              claimName: application-code-pv-claim
Do Kubernetes Pods Really Get Evicted Due to CPU Pressure?
Reference article: Do Kubernetes Pods Really Get Evicted Due to CPU Pressure?
Pods are not directly evicted due to high CPU pressure or usage alone. Instead, Kubernetes relies on CPU throttling mechanisms to manage and limit a pod’s CPU usage, ensuring fair resource sharing among pods on the same node.
While high CPU usage by a pod can indirectly contribute to resource pressure and potentially lead to eviction due to memory or other resource shortages, CPU throttling is the primary mechanism used to manage CPU-intensive workloads
Restart Statefulset workload
For documentations
Notice
- Do not removing
statefulsetworkload, it will scale down to 0 and not bring up anymore. Instead of just removing pods, It will help the pods restart base onstatefulsetstrategy - Rollout
statefulsetis not work when status ofstatefulsetiscompleted - Deleting pods in
statefulsetwill not remove associated volume
Note
Deleting the PVC after the pods have terminated might trigger deletion of the backing Persistent Volumes depending on the storage class and reclaim policy. You should never assume ability to access a volume after claim deletion.
Note: Use caution when deleting a PVC, as it may lead to data loss.
- Complete deletion of a
StatefulSet
To delete everything in a StatefulSet, including the associated pods, you can run a series of commands similar to the following*
grace=$(kubectl get pods <stateful-set-pod> --template '{{.spec.terminationGracePeriodSeconds}}')
kubectl delete statefulset -l app.kubernetes.io/name=MyApp
sleep $grace
kubectl delete pvc -l app.kubernetes.io/name=MyApp
Create troubleshoot pods
You can create stateless pods with no deployments for purpose
- Check and validate the networking in node, cluster like DNS resolve, health check
- Restore and Backup DB
- Debug or access service internal
For doing that, you need to use kubectl
- Use
kubectlfor create manifest of pod
k run <name-pod> --image=debian:11.7 --dry-run=client -o yaml > pods.yaml

apiVersion: v1
kind: Pod
metadata:
  creationTimestamp: null
  labels:
    run: <name-pod>
  name: <name-pod>
spec:
  containers:
  - image: debian:11.7
    name: <name-pod>
    resources: {}
  dnsPolicy: ClusterFirst
  restartPolicy: Always
status: {}- Customize your pods, for keep alive, you should set command of pod to
tail -f /dev/null
apiVersion: v1
kind: Pod
metadata:
  creationTimestamp: null
  labels:
    run: <name-pod>
  name: <name-pod>
spec:
  containers:
  - image: debian:11.7
    name: <name-pod>
    resources: {}
    # Another command: sleep 3600
	command:
	  - tail
	  - -f
	  - /dev/null
  dnsPolicy: ClusterFirst
  restartPolicy: Always
status: {}- Run
applycommand with manifest
k apply -f pods.yaml- Wait few second, exec to the pods with command
k exec --tty --stdin pods/xxxx -- /bin/bash- Once you’ve finished testing, you can press Ctrl+D to escape the terminal session in the Pod. Pod will continue running afterwards. You can keep try with command step 4 or delete.
kubectl delete pod xxxxNOTE: Usually, curlimages/curl is regular used. Try to create new pod with fast as possible
kubectl run mycurlpod --image=curlimages/curl -i --tty -- shStop or run the Cronjob with patch
You can see, cronjob is scheduled workload of Kubernetes which trigger on set-time for executing specify job. But sometimes, on during work time, your test job shouldn’t work, therefore you will concert about suspend state of jobs. You can update state with command
k patch -n <namespace> cronjobs.batch <cronjobs-name> -p '{"spec": {"suspend": true}}'Enable again by change true ⇒ false
k patch -n <namespace> cronjobs.batch <cronjobs-name> -p '{"spec": {"suspend": false}}'Furthermore, you can use patch for multiple purpose
- Update a container’s image
- Partially update a node
- Disable a deployment livenessProbe using json patch
- Update a deployment’s replica count
Updating resources
You can handle graceful restart, rollback version with roolout command
# Graceful restart deployments, statefulset and deamonset
k rollout restart -n <namespace> <type-workload>/<name>

# Rollback version
kubectl rollout undo <type-workload>/<name>
kubectl rollout undo <type-workload>/<name> --to-revision=2

# Check the rollout status
kubectl rollout status -w <type-workload>/<name>
Kubernetes has some values with help to distinguish service with each others, specify identifying attributes of objects, attach arbitrary non-identifying metadata to objects, …
- Label
- Annotations
And you can update that with kubectl via label and anotation command
# Add a Label
kubectl label pods my-pod new-label=awesome
# Remove a label
kubectl label pods my-pod new-label-
# Overwrite an existing value
kubectl label pods my-pod new-label=new-value --overwrite
# Add an annotation
kubectl annotate pods my-pod icon-url=http://goo.gl/XXBTWq
# Remove annotation
kubectl annotate pods my-pod icon-url-
Next, you can update autoscale for deployment by command autoscale
kubectl autoscale deployment foo --min=2 --max=10Edit YAML manifest
kubectl can help you directly change manifest on your shell. If you Linux or macos user, you can use nano or vim to use feature
# Edit the service named docker-registry
kubectl edit svc/docker-registry
# Use an alternative editor
KUBE_EDITOR="nano" kubectl edit svc/docker-registry
When you hit to complete button, your workload or resource will change immediately
Delete resources
Use the delete command for executing
# Delete a pod using the type and name specified in pod.json
kubectl delete -f ./pod.json
# Delete a pod with no grace period
kubectl delete pod unwanted --now
kubectl delete pods <pod> --grace-period=0
# Delete pods and services with same names "baz" and "foo"
kubectl delete pod,service baz foo
Health check and interact with cluster, node and workload
Use the events command for detect what happen occur on cluster node
# List Events sorted by timestamp
kubectl get events --sort-by=.metadata.creationTimestamp

# List all warning events
kubectl events --types=Warning
If the status of workload are not available or running, you can use describe for verbose check workload
# Describe commands with verbose output
kubectl describe nodes my-node
kubectl describe pods my-pod
When the problem does not come up from workload, you can check log for extract more information
# dump pod logs (stdout)
kubectl logs my-pod

# dump pod logs (stdout) for a previous instantiation of a container. Usually use for crashloopback
kubectl logs my-pod --previous

# dump pod container logs (stdout, multi-container case) for a previous instantiation of a container
kubectl logs my-pod -c my-container --previous

# stream pod logs (stdout)
kubectl logs -f my-pod
If you check any situation on workload, especially pods, container without results, you can return to check resources usage on cluster.
# Show metrics for all nodes
kubectl top node
# Show metrics for a given node
kubectl top node my-node
# For total overview, you resource-capacity plugin
# print information includes quantity available instead of percentage used
kubectl resource-capacity -a
# print information includes resource utilization, pods in output
kubectl resource-capacity --until -p
kubectl can help you disable or manipulation node with command
# Mark my-node as unschedulable
kubectl cordon my-node
# Drain my-node in preparation for maintenance
kubectl drain my-node
# Mark my-node as schedulable
kubectl uncordon my-node
Tips
For explore more, you can do lots of things with
kubectl. To read and understand command, you should use manual with--helpflag
Setup metrics-server
Metrics server will part if you self-hosted your kubernetes, It means you need learn how setup metrics-server , and this quite very easily. Read more about metrics-server at GitHub
Via kubectl you can applied manifest
kubectl apply -f https://github.com/kubernetes-sigs/metrics-server/releases/latest/download/components.yamlOr you can use helm to release metrics-server chart at helm
# Add repo to your cluster
helm repo add metrics-server https://kubernetes-sigs.github.io/metrics-server/

# Create the metrics with find the helm-template inside repo
helm upgrade --install metrics-server metrics-server/metrics-server
Warning
Your
metrics-serverwill stuck, because it meet problem to not authenticationtlsinside them withkube-apiserver
But don’t worry about it, you can bypass this via some trick. Read more about solution at
So solution about using edit command of kubectl to edit manifest of deployments kube-server, you can do like this
# First of all, you can configure your editor to nano (Optional), you can't do this step if you prefer vim
export KUBE_EDITOR="nano"

# Use edit to change manifest of deployment
kubectl edit deployments -n kube-system metrics-server
Now scroll to args of container metrics-server, you can change them into
      - args:
        - --cert-dir=/tmp
        - --secure-port=10250
        - --kubelet-preferred-address-types=InternalIP,ExternalIP,Hostname
        - --kubelet-use-node-status-port
        - --metric-resolution=15s
        - --kubelet-insecure-tls=true # This will help you bypass authentication
And now your metrics-server will restart and running after 30s

Learn more about kubernetes metrics, read the article Kubernetes’ Native Metrics and States
Configure Liveness, Readiness and Startup Probes
Kubernetes implement multiple probles type for health check your applications. See more at Liveness, Readiness and Startup Probes
If you want to learn about configuration, use this documentation
Tip
Probes have a number of fields that you can use to more precisely control the behavior of startup, liveness and readiness checks
Liveness
Info
Liveness probes determine when to restart a container. For example, liveness probes could catch a deadlock, when an application is running, but unable to make progress.
If a container fails its liveness probe repeatedly, the kubelet restarts the container.
You can set up liveness probe with command configuration
apiVersion: v1
kind: Pod
metadata:
  labels:
    test: liveness
  name: liveness-exec
spec:
  containers:
  - name: liveness
    image: registry.k8s.io/busybox
    args:
    - /bin/sh
    - -c
    - touch /tmp/healthy; sleep 30; rm -f /tmp/healthy; sleep 600
    livenessProbe:
      exec:
        command:
        - cat
        - /tmp/healthy
      initialDelaySeconds: 5
      periodSeconds: 5
Or use can use liveness probe with HTTP request configuration
spec:
containers:
    livenessProbe:
      httpGet:
        path: /healthz
        port: 8080
        httpHeaders:
        - name: Custom-Header
          value: Awesome
      initialDelaySeconds: 3
      periodSeconds: 3
You can use another protocol with liveness, such as
Readiness
Info
Readiness probes determine when a container is ready to start accepting traffic. This is useful when waiting for an application to perform time-consuming initial tasks, such as establishing network connections, loading files, and warming caches.
If the readiness probe returns a failed state, Kubernetes removes the pod from all matching service endpoints.
You can try configure readiness proble with
readinessProbe:
  exec:
    command:
    - cat
    - /tmp/healthy
  initialDelaySeconds: 5
  periodSeconds: 5
Configuration for HTTP and TCP readiness probes also remains identical to liveness probes.
Info
Readiness and liveness probes can be used in parallel for the same container. Using both can ensure that traffic does not reach a container that is not ready for it, and that containers are restarted when they fail.
Note
Readiness probes runs on the container during its whole lifecycle.
Startup
Info
A startup probe verifies whether the application within a container is started. This can be used to adopt liveness checks on slow starting containers, avoiding them getting killed by the kubelet before they are up and running.
If such a probe is configured, it disables liveness and readiness checks until it succeeds.
You can configure for you pod with configuration
livenessProbe:
  httpGet:
    path: /healthz
    port: liveness-port
  failureThreshold: 1
  periodSeconds: 10
And mostly startup for helping Kubernetes to protect slow starting containers
Note
This type of probe is only executed at startup, unlike readiness probes, which are run periodically
Setup SnapShotter for Elasticsearch
Following this documentation about snapshot with elasticsearch for Azure Cloud, explore at Elastic Cloud on Kubernetes (ECK) Quickstart with Azure Kubernetes Service,Istio and Azure Repository plugin
You can use terraform with manifest to apply this configuration
# https://www.linkedin.com/pulse/elastic-cloud-kubernetes-eck-quickstart-azure-repository-ajay-singh/

resource "kubernetes_secret" "azure_snapshot_secret" {
  metadata {
    name      = "azure-snapshot-secret"
    namespace = var.namespace
  }
  binary_data = {
    "azure.client.default.account" = base64encode(var.remote_state.backup_storage_account_name)
    "azure.client.default.key"     = base64encode(var.remote_state.backup_storage_account_key)
  }
  depends_on = [
    helm_release.elastic_operator
  ]
}

# Register the Azure snapshot with the Elasticsearch cluster
resource "kubectl_manifest" "elasticsearch_register_snapshot" {
  yaml_body  = <<YAML
apiVersion: batch/v1
kind: Job
metadata:
  name: ${var.name}-register-snapshot
  namespace: ${var.namespace}
spec:
  template:
    spec:
      containers:
      - name: register-snapshot
        image: curlimages/curl:latest
        volumeMounts:
          - name: es-basic-auth
            mountPath: /mnt/elastic/es-basic-auth
        command:
        - /bin/sh
        args:
#        - -x # Can be used to debug the command, but don't use it in production as it will leak secrets.
        - -c
        - |
          curl  -s -i -k -u "elastic:$(cat /mnt/elastic/es-basic-auth/elastic)" -X PUT \
          'https://${var.name}-es-http:9200/_snapshot/azure' \
          --header 'Content-Type: application/json' \
          --data-raw '{
            "type": "azure",
            "settings": {
              "client": "default"
            }
          }' | tee /dev/stderr | grep "200 OK"
      restartPolicy: Never
      volumes:
      - name: es-basic-auth
        secret:
          secretName: ${var.name}-es-elastic-user
YAML
  depends_on = [kubectl_manifest.elasticsearch]
}

# Create the snapshotter cronjob.
resource "kubectl_manifest" "elasticsearch_snapshotter" {
  yaml_body  = <<YAML
apiVersion: batch/v1
kind: CronJob
metadata:
  name: ${var.name}-snapshotter
  namespace: ${var.namespace}
spec:
  schedule: "0 16 * * 0"
  concurrencyPolicy: Forbid
  jobTemplate:
    spec:
      template:
        spec:
          nodeSelector:
            pool: infrapool
          containers:
          - name: snapshotter
            image: curlimages/curl:latest
            volumeMounts:
              - name: es-basic-auth
                mountPath: /mnt/elastic/es-basic-auth
            command:
            - /bin/sh
            args:
            - -c
            - 'curl -s -i -k -u "elastic:$(cat /mnt/elastic/es-basic-auth/elastic)" -XPUT "https://${var.name}-es-http:9200/_snapshot/azure/%3Csnapshot-%7Bnow%7Byyyy-MM-dd%7D%7D%3E" | tee /dev/stderr | grep "200 OK"'
          restartPolicy: OnFailure
          volumes:
          - name: es-basic-auth
            secret:
              secretName: ${var.name}-es-elastic-user
YAML
  depends_on = [kubectl_manifest.elasticsearch_register_snapshot]
}

resource "kubectl_manifest" "elastic_cleanup_snapshots" {
  yaml_body = <<YAML
apiVersion: batch/v1
kind: CronJob
metadata:
  name: ${var.name}-cleanup-snapshotter
  namespace: ${var.namespace}
spec:
  schedule: "@daily"
  ttlSecondsAfterFinished: 86400
  backoffLimit: 3
  concurrencyPolicy: Forbid
  jobTemplate:
    spec:
      template:
        spec:
          nodeSelector:
            pool: infrapool
          containers:
          - name: clean-snapshotter
            image: debian:11.7
            imagePullPolicy: IfNotPresent
            volumeMounts:
              - name: es-basic-auth
                mountPath: /mnt/elastic/es-basic-auth
            command:
            - /bin/sh
            args:
            - -c
            - |
              # Update and install curl package
              apt update && apt install -y curl

              # Get the date base on decision which mark to deleting
              deletionDate=$(date -d "$date -${var.retention_date} days" +%Y-%m-%d)

              # Get list elasticsearch snapshot with including in deletion date
              listElasticSnapshots=$(curl --insecure -X GET "https://elastic:$(cat /mnt/elastic/es-basic-auth/elastic)@${var.name}-es-http:9200/_cat/snapshots/azure" | awk '{print $1}' | grep -e "$deletionDate")

              # Check if list snapshots are null or not
              if [ "$listElasticSnapshots" = "" ]; then
                  # Ignore deleted snapshots if no snapshots available
                  echo "Not existing your deletion date"
                  exit 0
              else
                  # For remove only or multiple snapshot in deletion date
                  for snapshot in $listElasticSnapshots;
                  do
                      res=$(curl -X DELETE --insecure "https://elastic:$(cat /mnt/elastic/es-basic-auth/elastic)@${var.name}-es-http:9200/_snapshot/azure/$snapshot" 2> /dev/null || echo "false")
                      if [ "$res" != "false" ]; then
                          echo "Deleted $snapshot"
                      else
                          echo "Failed to delete $snapshot"
                      fi
                  done
              fi
          restartPolicy: OnFailure
          volumes:
          - name: es-basic-auth
            secret:
              secretName: ${var.name}-es-elastic-user
YAML
  depends_on = [kubectl_manifest.elasticsearch_register_snapshot]
}
Maintain Node in Kubernetes
Following this article Linkedin - Node Maintenance Commands In Kubernetes, we can catch up with how to maintain once of node inside your Kubernetes cluster
You will use two command to execute this workflow
- kubectl drain: Command safely evicts all the pods from a node before you perform any maintenance operation on it
- kubectl cordon: Command marks a node as unschedulable, which means that no new pods will be scheduled on that node
A workflow would be
- Run kubectl cordon node-name to mark the node as unschedulable.
- Run kubectl drain node-name to evict all the pods from the node.
- Perform your maintenance tasks on the node.
- Run kubectl uncordon node-name to mark the node as schedulable again.
The ultimate drain command should use like this
kubectl drain nodes <node-name> --ignore-daemonset --delete-emptydir-data --force --grace-period=-1In advantage, you can do some sort of configuration for best practice
- Configure a disruption budget. Explore at PodDisruptionBudget and how to configure a PodDisruptionBudgets
- You also use API provider to eviction your workload. Explore at API-initiated eviction.
- Learn and do practice in case you want to update your node. Explore at Upgrading kubeadm clusters
- In fun way, you can use operator inside Kubernetes cluster via API System used CRD. Explore at node-maintenance-operator
Assign Pods to Nodes
You have multiple ways to configuration to assign pods to specific nodes depend on a couple of conditions and it’s make you easier for control cluster, such as
Use Node Label and pick it up with nodeSelector
Explore at: nodeSelector field matching against node labels
If you setup couple of tags for your node, you can try to retrieve that with nodeSelector for selecting where pods be able to spawn into
In the situation, you wanna add more label and supplied it for your deployment, sure you can use kubectl label to handle that
# Add a Label
kubectl label pods my-pod new-label=awesome

# Remove a label
kubectl label pods my-pod new-label-

# Overwrite an existing value
kubectl label pods my-pod new-label=new-value --overwrite
View that with get command
kubectl get pods --show-labelsYou can modify or set nodeSelector for picking node or resource matching with label
# Assumes the existence of the label: node-role.kubernetes.io/master, and tries to assign the pod to the labelled node.
---
apiVersion: v1
kind: Pod
metadata:
  name: pod-node-selector-simple
spec:
  containers:
    - command: ["sleep", "3600"]
      image: busybox
      name: pod-node-selector-simple-container
  nodeSelector:
    node-role.kubernetes.io/master: ""
Use affinity and anti-affinity
Documentation: Affinity and anti-affinity
Info
nodeSelectoris the simplest way to constrain Pods to nodes with specific labels. Affinity and anti-affinity expands the types of constraints you can define.
With Node affinity
You will have two types
requiredDuringSchedulingIgnoredDuringExecution: The scheduler can’t schedule the Pod unless the rule is met. This functions likenodeSelector, but with a more expressive syntax.preferredDuringSchedulingIgnoredDuringExecution: The scheduler tries to find a node that meets the rule. If a matching node is not available, the scheduler still schedules the Pod.
You can specify node affinities using the .spec.affinity.nodeAffinity
apiVersion: v1
kind: Pod
metadata:
  name: with-node-affinity
spec:
  affinity:
    nodeAffinity:
      requiredDuringSchedulingIgnoredDuringExecution:
        nodeSelectorTerms:
        - matchExpressions:
          - key: topology.kubernetes.io/zone
            operator: In
            values:
            - antarctica-east1
            - antarctica-west1
      preferredDuringSchedulingIgnoredDuringExecution:
      - weight: 1
        preference:
          matchExpressions:
          - key: another-node-label-key
            operator: In
            values:
            - another-node-label-value
  containers:
  - name: with-node-affinity
    image: registry.k8s.io/pause:3.8
Info
You can use the
operatorfield to specify a logical operator for Kubernetes to use when interpreting the rules. You can useIn,NotIn,Exists,DoesNotExist,GtandLt. Explore more about it at Operators
You can explore more about extend things with affinity
- Node affinity weight
- Node affinity per scheduling profile
- Inter-pod affinity and anti-affinity
- matchLabelKeys and mismatchLabelKeys
- More practical use-cases
Learn more with some article
- Quan Huynh - DevOpsVN - Kubernetes Series - Bài 18 - Advanced scheduling: node affinity and pod affinity
- StackState - Mastering Node Affinity in Kubernetes
Use taint and tolerration
Documentation: Taints and Tolerations
One more way to configuration schedule is use taint and tolerration, opposite with affnity because taint used for repel a set of pods out of node
But you can use tolerration for bypass to schedule workload into pod match with that taint
For example, you try to taint node like
# Add taint
kubectl taint nodes node1 key1=value1:NoSchedule

# Remove taint
kubectl taint nodes node1 key1=value1:NoSchedule-
For deploy your workload into node with taint, you can use tolerration and set it for matching with taint configuration for example
apiVersion: v1
kind: Pod
metadata:
  name: nginx
  labels:
    env: test
spec:
  containers:
  - name: nginx
    image: nginx
    imagePullPolicy: IfNotPresent
# Configuration
  tolerations:
  - key: "key1"
    operator: "Equal"
    value: "value1"
    effect: "NoSchedule"

# Another way
#  tolerations:
#  - key: "key1"
#    operator: "Exists"
#    effect: "NoSchedule"
Note
The default value for
operatorisEqual.
A toleration “matches” a taint if the keys are the same and the effects are the same, and:
- the
operatorisExists(in which case novalueshould be specified), or - the
operatorisEqualand the values should be equal.
The allowed values for the effect field are:
NoExecute
This affects pods that are already running on the node as follows:
NoSchedule
No new Pods will be scheduled on the tainted node unless they have a matching toleration. Pods currently running on the node are not evicted.
PreferNoSchedule
A “preference” or “soft” version of NoSchedule. The control plane will try to avoid placing a Pod that does not tolerate the taint on the node, but it is not guaranteed.
Warning
You can put multiple taints on the same node and multiple tolerations on the same pod. The way Kubernetes processes multiple taints and tolerations is like a filter: start with all of a node’s taints, then ignore the ones for which the pod has a matching toleration; the remaining un-ignored taints have the indicated effects on the pod. In particular,
- if there is at least one un-ignored taint with effect
NoSchedulethen Kubernetes will not schedule the pod onto that node- if there is no un-ignored taint with effect
NoSchedulebut there is at least one un-ignored taint with effectPreferNoSchedulethen Kubernetes will try to not schedule the pod onto the node- if there is at least one un-ignored taint with effect
NoExecutethen the pod will be evicted from the node (if it is already running on the node), and will not be scheduled onto the node (if it is not yet running on the node).
If you want to explore use-case and example, find out with
Map external service inside Kubernetes
In some situations, if you wanna use external resource, such as minio, you can consider to setup couple method of Kubernetes for permitting us do stuff like NAT Network
When you inspect kubectl command and kubernetes concept, you will know about network structure inside Kubernetes, including
Use service without selector
When you work with Kubernetes, you usually meet Service and Ingress for mapping service but stand behind, It use Endpoint for define how the service make conversation with pod, so we can use this endpoint to define external service. Explore more about at Service without selectors
Info
Services most commonly abstract access to Kubernetes Pods thanks to the selector, but when used with a corresponding set of EndpointSlices objects and without a selector, the Service can abstract other kinds of backends, including ones that run outside the cluster.
Luckily, I found the solution to create external service and use that inside Kubernetes, StackOverFlow - How to explicitely define an Endpoint of an Kubernetes Service and I reuse that for setup my MinIO for example via local connection
apiVersion: v1
kind: Service
metadata:
  name: external-minio
spec:
  ports:
    - protocol: TCP
      port: 9090
targetPort: 9090apiVersion: v1
kind: Endpoints
metadata:
name: external-minio
subsets:
- addresses:
- ip: 192.168.96.69
ports:
- port: 9090Now you can use service to connect directly into your external service via Kubernetes components, you can do with strategies for setup ingress and map DNS for your external service via ingress controller, such as nginx, haproxy, …
apiVersion: networking.k8s.io/v1
kind: Ingress
metadata:
  name: nginx-minio
spec:
  ingressClassName: nginx
  rules:
  - host: minio.example.xyz
    http:
      paths:
      - backend:
          service:
            name: external_minio
            port:
              number: 9090
        path: /
        pathType: Prefix
status:
  loadBalancer: {}
Use ExternalName Service
If you gracefully update the documentation, you will see Kubernetes that have four service methodology, and one of them is rarely know about it, that’s ExternalName
ExternalName permits to map service to DNS name, you can imagine if you have database with FQDN, you can try to map your service as DNS for resolve this location, similarly CNAME
You can follow this article to create once for your own How to use a Kubernetes External Service
apiVersion: v1
kind: Service
metadata:
  name: httpbin-service
  namespace: default
spec:
  type: ExternalName
  externalName: httpbin.org
Info
An External Service pointing to httpbin.org, a simple HTTP request/response service. It’s a valuable tool for testing and debugging as it can simulate various HTTP responses.
Longhorn maintaining
If you go for double-check longhorn, you should consider to double-check couple of contents
- Harvester - Evicting Replicas From a Disk (the CLI way)
- Longhorn - Node Maintenance and Kubernetes Upgrade Guide
- Longhorn Manual Testcase - Test Node Delete
When you encounter the issue your Node mask down state in your kubernetes like this

It can come from a couple of issue, such as
- (BUG) Wrong nodeOrDiskEvicted collected in node monitor
- (BUG) Unable to delete node: “spec and status of disks on node are being syncing and please retry later”
- (BUG) Delete kubernetes node did not remove node.longhorn.io
Completely Solutions
In my experience, I just combine multiple steps from 3 source above and gather this workaround like
Warning
This workaround will only spend for state node with no-disk inside, if the node exist disk and replica, you should follow Harvester - Evicting Replicas From a Disk (the CLI way) to evict all replica for preventing mismatch
- Drain node for maintaining
kubectl drain <node-name> --ignore-daemonset --delete-emptydir-data --force --grace-period=-1Double-check the state of whole pods turn back and terminate on this node
- Taint node for remove longhorn stuff out of this node
kubectl taint nodes <node-name> nodetype=storage:NoExecuteDouble-check the state of pod related in daemonset of longhorn kick out of node.
Warning
It’s will turn down your pod run in this node, so remember
cordondrainandtaint. It will keep your application to prevent downtime
- Now we can delete
nodes.longhorn.iovia UI or CLI
Use CLI
kubectl delete -n <longhorn-ns> nodes.longhorn.io node-nameUse UI
Click Remove Node and Click Ok. Now your longhorn node will be removed
- Next we
untaintnode for return longhorn stuff to this node one more time, but should beuncordonfor preventing stuck
kubectl uncordon <node-name>kubectl taint nodes <node-name> nodetype=storage:NoExecute-Follow the kubectl and daemonset application of longhorn will install again, and your node will be return. If you wanna know about taint, you should read at Kubernetes - Taints and Tolerations
Trick Solution
Quote
Sometimes, the above stuff will not make you feel comfortable, for example, if your node become huge than ever like (200GB Memory Reserve), 100% for sure you don’t wanna touch any in this node for not cause downtime
So that’s why I have experience and give a try to retrieve this trick, but first of all, if you stuck on the step delete longhorn nodes because in couple of situations, your node will stuck with the validation of longhorn-webhook-validator. So you can follow this solution to ignore that stuck at (BUG) Wrong nodeOrDiskEvicted collected in node monitor

- Disable the validator through
longhorn-webhook-validator, just need to runeditcommand withkubectl
kubectl edit validatingwebhookconfigurations.admissionregistration.k8s.io longhorn-webhook-validator- Delete the rule for node validation and save it (usually it is first rule)
  - apiGroups:
    - longhorn.io
    apiVersions:
    - v1beta2
    operations:
    - UPDATE
    resources:
    - nodes
scope: Namespaced- Now, if you lucky, your node will be erase following the rule updated, but not you can use
kubectlor longhorn-ui to delete disk or not what you want. In my situations, I delete longhorn node stuck with command
kubectl delete nodes.longhorn.io <name-node>- If you wanna turn this node back again, It has trick by deleting pods
longhorn-managerin that node
# Find it via -o wide to see what manager running in that node
kubectl get pods -o wide | grep -e "longhorn-manager"

# Next if you detected it, you can delete this pod for restarting this
kubectl delete pods <name-longhorn-managers>
Now your node will one more time addition again, it’s will install instance-manager for your longhorn node
- Lastly, you should regenerate rule again by deleting pods managed it, via command
kubectl delete pod -l app=longhorn-admission-webhookTurn back again and you will see your node will be added successfully, if need you should be restart deployment longhorn-driver-deployer for reinstalling driver on this node, but carefully
kubectl rollout restart deployment/longhorn-driver-deployerDebug network with Pods
Honestly to say, Network is one of things hard to learn and control with any system, so to let anything become more easier, we need to prepare a couple of solution to hand on. Following the Blog - Cách mình troubleshoot network trong Kubernetes bằng một Pod đa năng (Vietnamese), the author lists for us some image to take a hand for this debug
praqma/network-multitool- Includecurl,telnet,iperf3,web server(Simple Level)wbitt/network-multitool- Include multiple tools, alsotcpdumportcptraceroute(Immediately Level)nicolaka/netshoot- Wide range tools with superb likeiptable,tshark, … (Complex Level)
For playground with those one, you just need only spin off one of this pod into Kubernetes Cluster with kubectl command
# If you want to spin up a throw away container for debugging
kubectl run tmp-shell --rm -i --tty --image your_req_image -- /bin/bash

# If you want to spin up a container on the host's network namespace.
kubectl run tmp-shell --rm -i --tty --overrides='{"spec": {"hostNetwork": true}}' --image your_req_image -- /bin/bash
Install CRD
When you want to install extension API for Kubernetes, in usual Kubernetes provides us the standard called CRD (Custom Resources Definitions). But in some situations, you apply the CRD get over the most bytes able for created and cause the error
k apply -f rayjobs-crd.yaml
The CustomResourceDefinition "rayjobs.ray.io" is invalid: metadata.annotations: Too long: must have at most 262144 bytes
You can bypass it via applying in server-side
k apply -f rayjobs-crd.yaml --server-sideOOM Killed
Info
OOM (Out of Memory) is one of popular type of error in Kubernetes Cluster, but you know about how many does this error represent ? Let’s take a look below for find more techniques for investigate and resolve your problems
In Kernel Layer
After read this article Medium - Tracking Down “Invisible” OOM Kills in Kubernetes, I actually figure out I have something great experience to encounter the problem with OOM in Kernel, It’s hard to see if I only work in Cloud
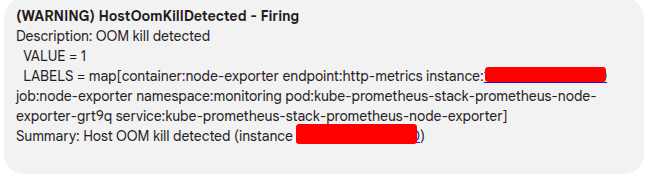
When you double-check, you OOM is not executing at Kubernetes Layer, it means your pod will not restart if meet limit (NOTE: this really’s strange, in my case our application run with multiple child process in parent, and it’s only killed child instead parent)
You can use journalctl to double-check this OOM killed
journalctl --utc -keThis command allow you use journalctl to read information from kernel, and expose it into utc time. First of all, it’s really easier for debugging than using another tool like dmesg (same result)

Now you can see the error about OOM and figure out what happen with your application, if you use RKE2, you can double-check your killed process corresponds to what container
ctr -a /run/k3s/containerd/containerd.sock -n k8s.io containers ls | grep -e "<id-container>"