Quote
Hi @all, It’s me again. How is your week? I still good and enjoy a lot with my new job. I wonder ask myself about how much time do I work with GitLab and GitLab Runner ? Most of guys use this but maybe skip useful features of this platform, I actually talk about one of them. So why not if we continue to learn about GitLab, today. Let’s digest
The list of my articles actually relate about GitLab and features of this platform
- AWS SSO from Self Gitlab Terraform Module Registry
- Integration automation test with GitLab CI
- Awesome GitLabCI
GitLab and standard platform with any project
![]()
Quote
One upon again, I will confirm GitLab is one of platform to define good behavior when you think about CI/CD, GitOps or Automation Testing. GitLab supports a lot of features and for my experience, I don’t use all of them at GitLab but It’s really familiar who want to explore more about this platform. Documentation
Info
What is GitLab
GitLab is The DevSecOps Platform - a combination of development, security, and operations. It is an approach to software development that integrates security throughout the development lifecycle.
There are some reasons why you should choose GitLab, explore more at GitLab - Why GitLab
- 7x faster cycle time, Manage the growing complexities of developing, securing, and deploying software
- Integrated AI across the software development lifecycle
- Security automation and governance at every step
- End-to-end compliance and auditability
- Flexible deployment
- …
When we talk about GitLab and actually understand more about GitLab, only this blog isn’t enough, you need to spend from 3 - 6 months to actually to understand each features of this platform. It brings you more value but you need to consider what features actually good for your organization
So In this blog, I want to go specific in this platform about automation, CI/CD platform and runners because It have another features, which I truly refer in this blog, including
- GitLab Runner
- GitLab Runner - Executor
- How to register GitLab Runner
- GitLab Runner and Advanced Configuration
- GitLab Cache and Boosted Behavior
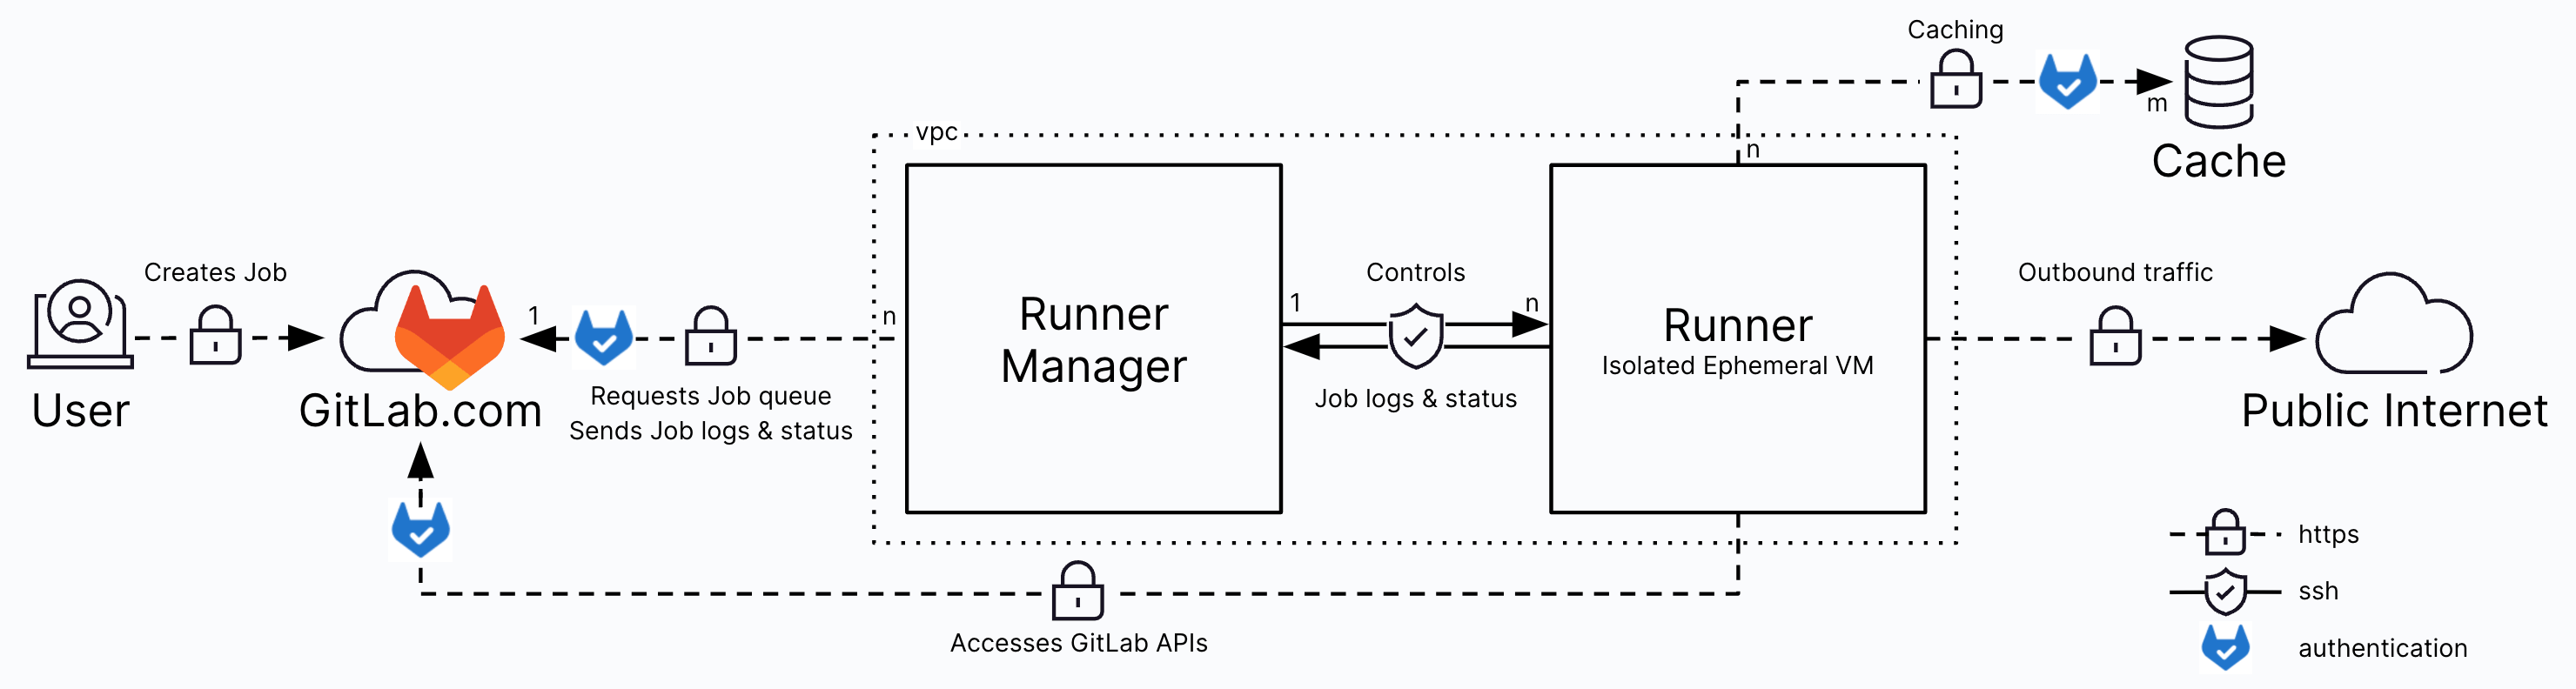
Following what I refer today, we will learn how to your pipeline and CI/CD running in your GitLab, How it use runner for executing your job. We can self-hosted for your own, applying advanced configuration like caching for boosting your productivity of pipeline.
GitLab Runner and Configuration
GitLab Runner is an application that works with GitLab CI/CD to run jobs in a pipeline. It submit a role as backbone of your development lifecycle. You have multiple ways to use runners and GitLab let us able to Selfhosted or GitLab-hosted runners managed by GitLab.
You can install GitLab Runner in almost OS nowadays, from Linux, MacOS or Windows. You can run GitLab Runner with
- GitLab Runner - Binary CLI - Download at GitLab Runner bleeding edge releases
- Docker
- GitLab Runner Helm chart - Self-hosted runner inside Kubernetes
With Runner of GitLab, It will let you configuration multiple types of executor for your job, It truly flex if you want to run your job in different environment, such as
- Docker executor - Uses the Docker executor to run jobs on Docker images.
- Shell executor - Use the Shell executor to execute builds locally on the machine where GitLab Runner is installed
- Kubernetes executor - Use Kubernetes clusters for your builds. The executor calls the Kubernetes cluster API and creates a pod for each GitLab CI job.
- SSH executor - Allows you to execute builds on a remote machine by executing commands over SSH.
- Moreover
Info
To use runner, you can help definition it inside your pipeline via
.gitlab-ci.ymlfile and it helps your job find available runner with compatible tags, types, status and capabilities
To make your runner become available and valid with advanced features, you will reach to file config.toml which used for managing your GitLab Runner with advanced configuration
You can find the config.toml file in:
/etc/gitlab-runner/on *nix systems when GitLab Runner is executed as root. This directory is also the path for service configuration.~/.gitlab-runner/on *nix systems when GitLab Runner is executed as non-root../on other systems.
Note
GitLab Runner does not require a restart when you change most options, If a runner was already registered, you don’t need to register it again. GitLab Runner checks for configuration modifications every 3 seconds and reloads if necessary. GitLab Runner also reloads the configuration in response to the
SIGHUPsignal.
Spin on your self-hosted GitLab Runner
To choose self-hosted GitLab Runner, you can choose what type of hosted valid for your system. For me, I choose docker because it’s quite simple and easier for deeply configuring
Let’s setup project ReactJS for example to reuse it in next stage. You can grab your own in here - Simple ReactJS + Vite + Typescript.
When you setup your gitlab-runner inside container, you can double-check two repository for official or trusted image
First of all, you need to create the gitlab-runner via API or UI of your GitLab
-
Go to
Settings>CI/CD>Runners>New Project Runnerfor adding new your runner -
Put the
tagsand set some rule and description for your runner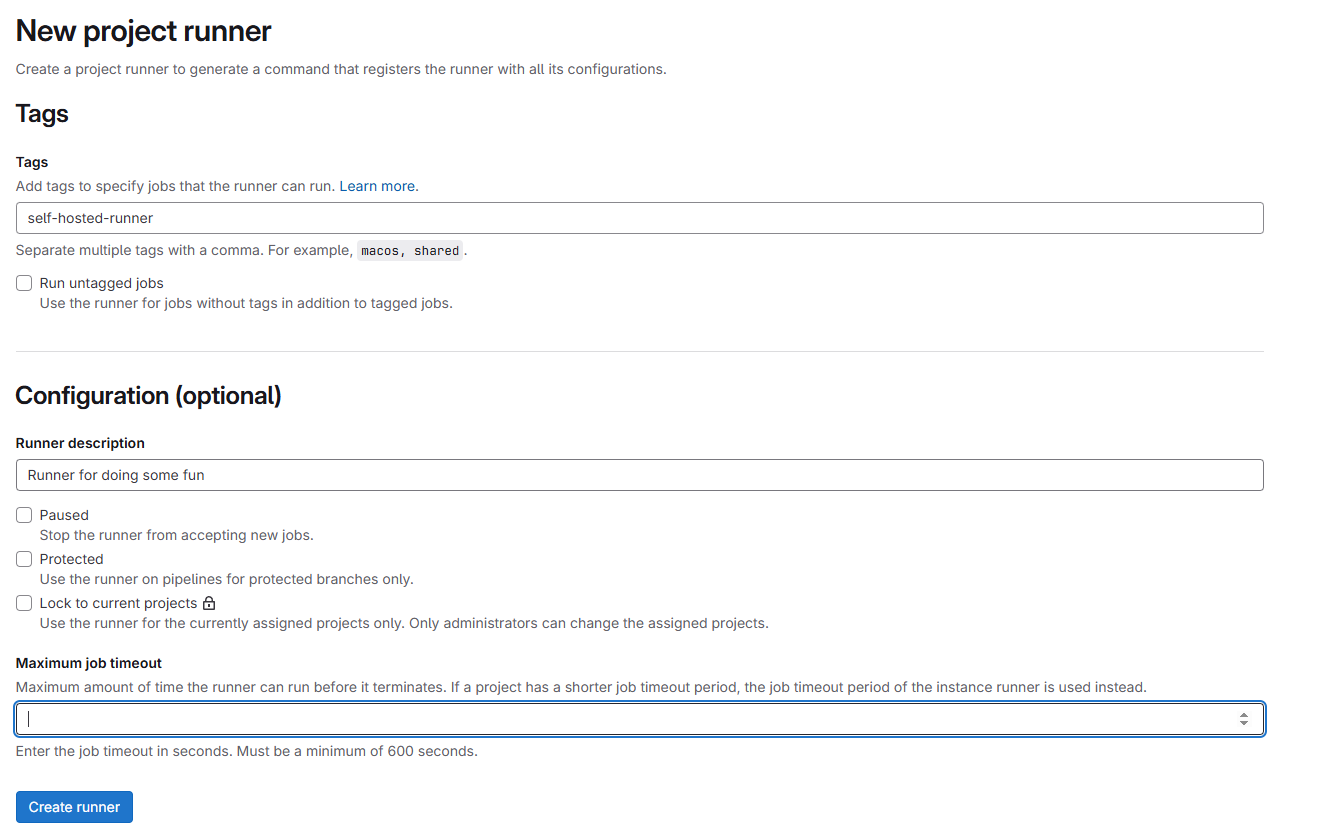
-
Create runner and grab
tokenfor your self-hosted. Prefix of token will start byglrt-
Now go to the location where you self-hosted your agent, I will choose my WSL2 in Windows Machine to run example docker container
I will try to setup this directory, like
.
├── config
├── register.sh
├── run.sh
└── unregister.sh

1 directory, 3 files- Config is a directory for mounting inside
gitlab-runnerwhere we storeconfig.toml register.sh,run.shandunregister.shwill the script for help us grab command into find for easier modifying
Next we will workaround with register.sh file. After first step you will get the token for helping you connect your container with GitLab. So with the gitlab-runner image, It will hit to entrypoint with gitlab-runner command, so you can attached args when your run container.
If you not set args, It will default use run command with configuration. To let’s your gitlab-runner pick your job, you should run register command, and it will create the config.toml at ./config
# /bin/bash

docker run -d --name gitlab-runner \
-v ./config:/etc/gitlab-runner \
-v /var/run/docker.sock:/var/run/docker.sock \
gitlab/gitlab-runner:v17.4.2 register \
--non-interactive \
--url your-gitlab-url \
--token your-gitlab-runner-token \
--executor docker \
--docker-image alpine:latest- This command will spin container in
detachmode withgitlab-runneras name - Use two volume
configforconfig.tomland second one for helpdockerexecutor can be execution. - Use
registercommand to register runner with providing information, such asurltokenexecutorordocker-image
Now trigger this command for register your GitLab-Runner
chmod +x register.sh
./register.sh
Wait a bit and check the logs of GitLab-Runner, if it doesn’t show error, It means your registration is success
docker logs -f gitlab-runner This message will let you now your registration progress is done, now you can view your Runner in UI

Now run your container to make it first time conversation via run.sh
#!/bin/bash

docker rm gitlab-runner
docker run -d --name gitlab-runner \
-v ./config:/etc/gitlab-runner \
-v /var/run/docker.sock:/var/run/docker.sock \
gitlab/gitlab-runner:v17.4.2- This command will remove the same name
gitlab-runnerfor registration progress, It will not clean your volume stored configuration file, It just wipe out your container - Next, we will run same name container with not specific any
args, it means that equallyruncommand ofgitlab-runner CLI
chmod +x run.sh
./run.sh
Now back again GitLab UI and your GitLab-Runner will be active

So we will view a config.toml is generated by runner when register. Let’s configure a bit like change name of your runner for example (NOTE: Remember run it with sudo because you run your runner in root user)
concurrent = 1
check_interval = 0
connection_max_age = "15m0s"
shutdown_timeout = 0

[session_server]
  session_timeout = 1800

[[runners]]
  name = "xxxxxxx64f52"
  url = "https://gitlab.com"
  id = xxxxxxx
  token = "xxxxxxxxxx"
  token_obtained_at = 2025-04-06T08:22:14Z
  token_expires_at = 0001-01-01T00:00:00Z
  executor = "docker"
  [runners.custom_build_dir]
  [runners.cache]
    MaxUploadedArchiveSize = 0
    [runners.cache.s3]
    [runners.cache.gcs]
    [runners.cache.azure]
  [runners.docker]
    tls_verify = false
    image = "alpine:latest"
    privileged = false
    disable_entrypoint_overwrite = false
    oom_kill_disable = false
    disable_cache = false
    volumes = ["/cache"]
    shm_size = 0
    network_mtu = 0
It truly simple which store your runner token and add-on configuration which we define for this runner like
- Executor:
docker - Image:
alpine:latest
And we can see more about
disable_cache = false: It means your cache is enabled in this runnervolume = ["/cache"]: It show us what volume and location to save the cache.
This configuration will be value for us on next part. Explore more about why you should configuration this for enable cache with Unix socket on a shared volume
Now let’s change the name of runner to Runner-Job-01 and wait 3s and back to your GitLab UI and see your new name updated (Not any cause 😄, but check log it really tell about our configuration reloaded)
In the end, if you want to stop the GitLab for maintain machine, you can unregister your gitlab-runner. You can use it via unregister.sh
#!/bin/bash
docker stop gitlab-runner
docker rm gitlab-runner
docker run -d --name gitlab-runner \
-v ./config:/etc/gitlab-runner \
-v /var/run/docker.sock:/var/run/docker.sock
gitlab/gitlab-runner:v17.4.2 unregister \
--url your-gitlab-url \
--token your-gitlab-runner-token- This one will stop gitlab-runner and remove it, and trigger again gitlab-runner with
unregistercommand to deactivegitlab-runner
chmod +x unregister.sh
./unregister.sh
Turn back into your GitLab UI and your runner will set deactive state
Let’s turn it back with run.sh command and we will kick off next part
Cache - The efficiency behavior for your GitLab
Now turn back to our vite project, let’s define .gitlab-ci.yml to help we trigger the job in our runner
# Define stage for running job inside
stages:
  - 'build-code'

# Choose the default image if not set, it will use it
default:
  image:
    name: node:18-bullseye

# Default, run script before you run the script on job
before_script:
  - npm i -g yarn --force
  - yarn install

build-code-job:
  stage: build-code
  retry: 1
  script:
    - yarn build
    - cp -a dist/. public/
# Upload artifact to gitlab, on path and keep on time
  artifacts:
    untracked: false
    when: on_success
    expire_in: "30 days"
    paths:
      - "./public"
  allow_failure: false
  tags:
	- self-hosted-runner
This file will define one stage build-code, it will use yarn for installing package run build command with vite and in the end, it will public artifact in our host. Let’s save and push your first .gitlab-ci.yml
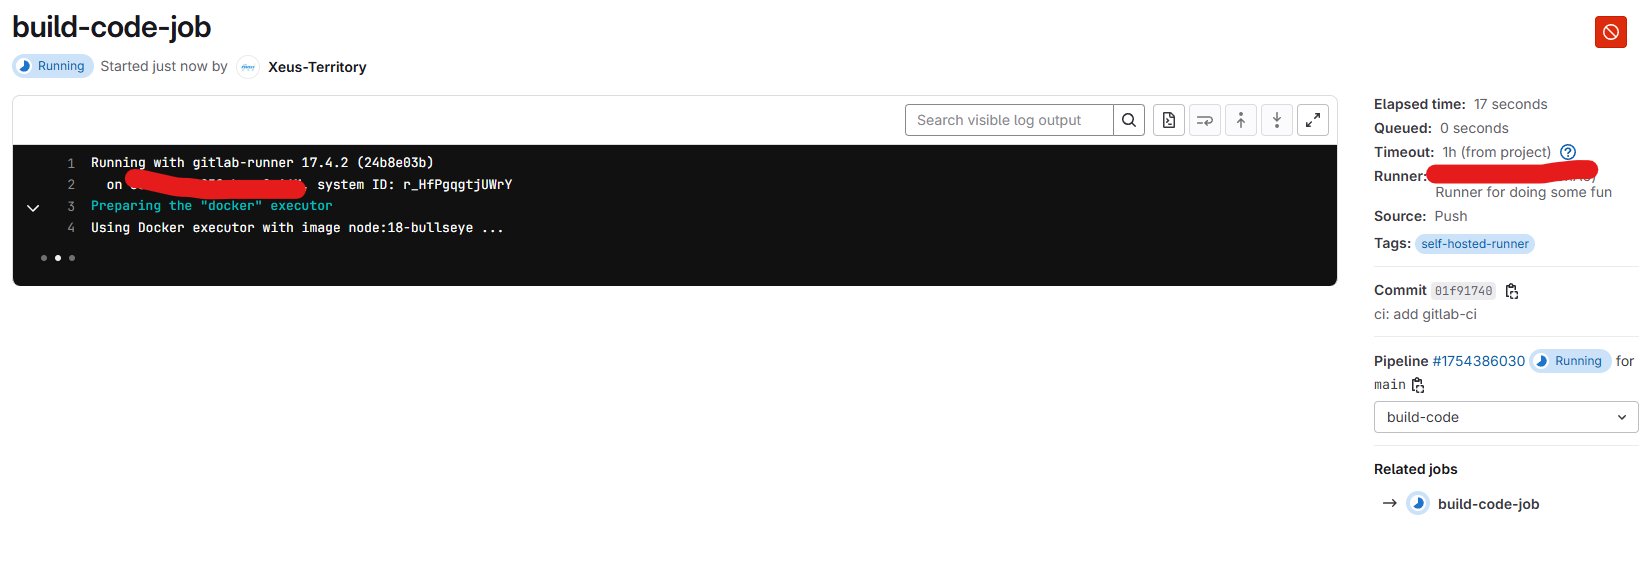
Now, check in pipeline in GitLab and we will see build-code-job is triggered in our runner
If you read my DueWeekly Tech in the Session 5: 24-02-2025 to 09-03-2025, you will read about the blog tell to use GitLab Cache to boost up your pipeline at DIY node_modules cache for Docker in your CI but it in docker level. So can we do same thing at gitlab level
GitLab let us defind cache inside our pipeline to keep the requirement for project, pass between job and reuse again when we need. It will reduce much of time to download and dedoubling your job with same behavior, such as
- NodeJS: Install again and render to
node_modules,.npm - Python: Install again and render to
.cache/pipor.cache/pypoetry - PHP: Install again and render to
vendor - …
You can define cache inside your .gitlab-ci.yml. Read more at GitLab Cache
In our situation, we can use cache to backup our node_module to reduce to installation
# Define stage for running job inside
stages:
  - 'build-code'

# Choose the default image if not set, it will use it
default:
  image:
    name: node:18-bullseye

# Default, run script before you run the script on job
before_script:
  - npm i -g yarn --force
  - yarn install

build-code-job:
  stage: build-code
  retry: 1
  script:
    - yarn build
    - cp -a dist/. public/
# Upload artifact to gitlab, on path and keep on time
  artifacts:
    untracked: false
    when: on_success
    expire_in: "30 days"
    paths:
      - "./public"
  cache:
    paths:
      - node_modules
  allow_failure: false
  tags:
   - self-hosted-runner
I will try to cache node_modules for reduce the time to except installation from internet, let’s push again
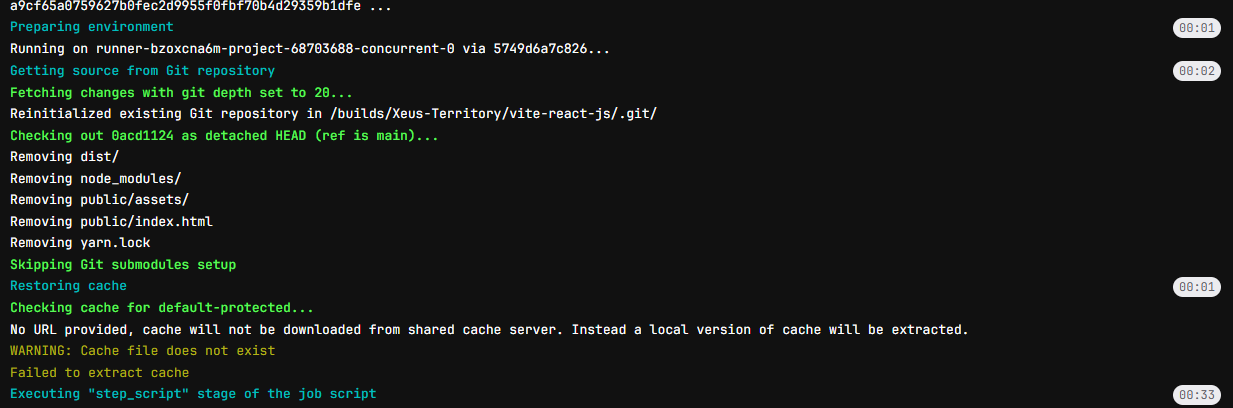
As you can see in the first time, you won’t have cache and it will run install and download from internet, and in the end it will encapsulate cache via volume in our gitlab-runner host

Now if you re-run the job again, It will retrieve the cache from your volume

Now your node_module will restore into your runner and it will remove a bit time to install a package, it’s example but imagine you have huge project and download will reserve much time for installation job, you should be consider to apply cache for part of pipeline
For best practices, you can apply a couple of configurations for your cache, such as
- Policy for
pull-pushyour cache. Explore more at Use a variable to control a job’s cache policy - Use fallback key with cache. Explore more at Use a fallback cache key
- Configuration
protectedandunprotected, in some situations, you need to bypass to help reuse cache fromprotectedbranch. Explore more at Use the same cache for all branches
Conclusion

Success
This is @all for today, hope you find well information about GitLab, Runner and moreover information to integrate cache into your pipeline job. Leverage in GitLab strategies can help your gain more value and efficiency for your project, and I think GitLab is great one for helping us retrieve that result. GitLab is super fun and interesting, It have some thing disturb but not anyone can say GitLab is one of best DevSevOps Platform, Code Version management nowadays.
Quote
I have some couple of day off today for holiday, so I just enjoy and release some articles for y’all. Once upon again, I hope you guy always have well health, stay safe and we will meet each other next weekend. See yah and bye !!!