Quote
Hello y’all guys, Alongside the return of kubewekend this weekend, we’re also going to learn how to build a complete Helm repository that you can use for your applications, homelab, or anything else you might need. It’s time to settle in and set up your Helm repository together! 🚀
🤔 Why should you get one for yourself ?
Question
If you already or new to work with Kubernetes, you should figure out for yourself one or more way to deploy your application in Cluster, and
helmis one of them. Before we go to details why should we go to find couple of solutions for your starting
I don’t know actual how many ways can be used for deploy application into Kubernetes, base on my knowledge, we have a list like
-
Using Manifest - as the “old but gold” foundational method for deploying Kubernetes. Manifests are the root of all other deployment strategies, essential for setting up Kubernetes with its controllers and APIs. Their straightforward nature makes them easy to approach for beginners. Refer to more articles to deepen your understanding.
-
Not up for debate, Helm continues to prove itself as a top-tier tool in Kubernetes. By leveraging existing manifests to create a more generic and flexible deployment method, Helm has become widely adopted by countless companies (and I’m not kidding!). Nowadays, when I consider
Kubernetesdeployment solutions, I have complete faith in Helm. -
Next, if you want to manage your manifests dynamically, you’ll encounter Kustomize. It helps you customize your manifests using configurations defined in a
kustomization.yamlfile, allowing you to tailor your application for various environments. While I haven’t personally used it, it’s widely regarded as an excellent tool for getting started with Kubernetes. -
If you prefer JSON over YAML, Jsonnet (https://jsonnet.org/) is an excellent tool for you. It’s designed for general configuration of anything in JSON, including Kubernetes components, making it ideal for those looking to deepen their Kubernetes strategies using JSON. Nowadays, Jsonnet is integrated as a library or SDK in various programming languages, offering a new way to make Kubernetes more engaging, especially when combined with tools like Tanka or Kapitan.
-
Nowadays, there is some things coolest release for CI/CD Integration, it will define your pipeline from build docker image to apply into Kubernetes. If you wanna set it up, you should reach to werf - Next gen for Kubernetes deployment with
helmalternative with nelm -
Lastly, we have the GitOps concept - A framework that streamlines application and infrastructure deployment using Git workflows and CI/CD. It leverages tools like
Kustomize,manifests, orHelm. Today, you have diverse and user-friendly options for implementing GitOps in your Kubernetes cluster. From my perspective, GitOps is perfect for modern teams that need rapid iteration; you’ll absolutely love it. Here are some options you might consider- argo-cd : A declarative, GitOps continuous delivery tool for Kubernetes 🌟 (Recommended)
- flux2: Open and extensible continuous delivery solution for Kubernetes. Powered by GitOps Toolkit 🌟 (Recommended)
- Fleet: Deploy workloads from Git to large fleets of Kubernetes clusters by Rancher
- harness: an end-to-end developer platform
- Cyclops: an open-source dev tool that simplifies Kubernetes with an easy-to-use UI
As you can see, you will face off the huge marketplace in tools, technologies and that why you find the answer for finding first solution for Kubernetes is pretty hard. If you wanna find alternative, read more
- Codefresh - GitOps Tools: 6 Tools You Need to Know
- Northflank - 7 Helm alternatives to simplify Kubernetes deployments
To unravel this complexity, we’ll take it step by step, starting with the smallest piece: defining the manifest to showcase your desired workflow. In my case, I prefer working with Helm and Argo CD. That’s why I’ll create a template for my own Helm workspace, with the repository maintaining template versions. This will help me define my application to work seamlessly with our cluster concept, specifically within my Kubewekend project.
To achieve this, I’ll follow these steps to create my first Helm template and repository:
- Define my first Helm template version.
- Set up the repositories to host your Helm templates, leveraging options like GitHub Pages, OCI, or ChartMuseum.
- Create a workflow to release and maintain our versions, allowing Helm to access the repository and pull my Helm charts.
- Integrate helm-docs to enhance reliability and establish trust in your Helm charts.
🏗️ Build your first helm chart template

Coming to hot topic, you wonder how to create a helm template, it looks pretty hard because you required to have knowledge about
- Kubernetes Workload: A couple of controllers, components for starting like
deployment,serviceaccount,ingress, … - Understanding the structure of Helm Chart like
Chart,templates,values,_helper, …
Info
But nowadays, you can easier to create general helm chart with only
helmcommand. Find the way to installhelm-cliin your host at Helm: Installation Guide
Now you can use create function to create your first helm chart
helm create <chart-name>After that, you will have the directory with full components to become a helm chart with structure
common
├── charts
├── Chart.yaml
├── .helmignore
├── templates
│   ├── deployment.yaml
│   ├── _helpers.tpl
│   ├── hpa.yaml
│   ├── ingress.yaml
│   ├── NOTES.txt
│   ├── serviceaccount.yaml
│   ├── service.yaml
│   └── tests
└── values.yaml
I will try to brief with short version about Helm Chart Template, otherwise you should read these articles - long version because it provides a lot of information for catching up this conceptual
Let’s start with Chart.yaml. This essential file defines your chart’s metadata and is where information about your chart is displayed upon deployment. While Chart.yaml offers extensive configuration options, you should primarily focus on the required fields. For more detailed information, refer to the official Helm documentation on The Chart.yaml File.
Here are key fields within Chart.yaml:
apiVersion: Defines your Chart API Version. For Helm 3, you should usev2;v1is for previous Helm versions.name: Sets your Helm chart’s name. This name will correspond to your application when the component is rendered in the Kubernetes cluster.version: Specifies your Helm chart’s version.description: Provides the purpose of your Helm chart. This will serve as the title when your chart is released, aiding in distinguishing it within repositories containing multiple charts.type: Indicates the type of chart, eitherapplicationorlibrary. The default isapplication. If you intend to create alibrarychart, consult the Library Charts documentation.appVersion: Represents the version of the application contained within this chart. While related to theversionfield, you can set them to be the same value if desired.
Next, you should take a look to templates/ directory, which is truly important where help your chart render to Kubernetes workloads. In this part, it defines via Go Template with specific syntax, but believe me this gonna a pretty hard to understand for who start to use this one. When you use create command, that will support you to create some basic workload and it’s completely able to deploy.
Let take a example, you can choose start from service.yaml or ingress.yaml to learn the connect between these files
{{- if .Values.ingress.enabled -}}
apiVersion: networking.k8s.io/v1
kind: Ingress
metadata:
  name: {{ include "common.fullname" . }}
  labels:
    {{- include "common.labels" . | nindent 4 }}
  {{- with .Values.ingress.annotations }}
  annotations:
    {{- toYaml . | nindent 4 }}
  {{- end }}
spec:
  {{- with .Values.ingress.className }}
  ingressClassName: {{ . }}
  {{- end }}
  {{- if .Values.ingress.tls }}
  tls:
    {{- range .Values.ingress.tls }}
    - hosts:
        {{- range .hosts }}
        - {{ . | quote }}
        {{- end }}
      secretName: {{ .secretName }}
    {{- end }}
  {{- end }}
  rules:
    {{- range .Values.ingress.hosts }}
    - host: {{ .host | quote }}
      http:
        paths:
          {{- range .paths }}
          - path: {{ .path }}
            {{- with .pathType }}
            pathType: {{ . }}
            {{- end }}
            backend:
              service:
                name: {{ include "common.fullname" $ }}
                port:
                  number: {{ $.Values.service.port }}
          {{- end }}
    {{- end }}
{{- end }}
For more deep dive into this file, which consider linked with
_helper.tpl- called viaincludewhich let you define the information in your chart as function, you can add more logic inside for creating expected value when chart renderingvalues.yaml- called via.Valuesused to expose configuration that can be set at the time of deployment. The defaults for this object are defined in the values.yaml file
Other there, you will have NOTE.txt or LICENSE for let you define your chart information when it render or validate when you try publish your chart to public purpose. Like git, you will have .helmignore to let your what file not render or use by helm
Now you can preview your chart via debug mode, it has a couple of ways but you can try with two command
# Option 1: with `template`
helm template <name-app> ./path/to/your/Chart.yaml -f ./path/to/your/values.yaml --debug > install.yaml

# Option 2: with `install`
helm install --dry-run --debug ./path/to/your/Chart.yaml

# Others option at https://helm.sh/docs/chart_template_guide/debugging
To upgrade and learn more about the template, you can find to these repositories with can inspire you a lot
🚧 Repository and Release your helm chart
Tip
If you’re satisfied with your Helm Chart and plan to share it with colleagues or others for reuse, you should consider setting up a self-hosted repository to publish it.
Setup Repository
Following the documentation of Helm
Info
A chart repository is an HTTP server that houses an
index.yamlfile and optionally some packaged charts
That’s pretty ease to approach and with HTTP Server can serve GET request, that why almost platform like storage object, source code management are preferring for build Helm Repository.
When you work Helm repositories, there are two format need to support by your web server, include index.yaml and <chart>.tgz. The index.yaml will define the sitemap for your helping helm can pull specific chart in your repositories
To retrieve and understand why you will have twice of them, you can use helm command
First of all, for create <chart>.tgz, you have package command which help package your chart as compress file. You can do for all project or specific
helm package ./path/to/your/chartIt will write these packages in current directory where you execute this command, but you can specific output location via --destination or -d option
After you have your package, currently you can create index.yaml to indexing your repositories into sitemap which help helm able to find your chart
helm repo index . --url <url-publish-chart>For example, you will have this file like
apiVersion: v1
entries:
  common:
  - apiVersion: v1
    appVersion: 1.16.0
    created: "2025-06-25T15:31:03.454561644+07:00"
    description: A Helm chart for Kubernetes
    digest: 068866d02750b354c1edeece52293371db86ede2d24df6be245784e4cea09210
    name: common
    type: application
    urls:
    - common-0.1.0.tgz
    version: 0.1.0
  lib-common:
  - apiVersion: v2
    appVersion: 1.16.0
    created: "2025-06-25T15:31:03.455217867+07:00"
    description: A Helm chart for Kubernetes
    digest: c249f7738b3dfb9aec6e42d5cc3f69c1d4160266197fc9d5b62a6c0a77458300
    name: lib-common
    type: application
    urls:
    - lib-common-0.1.0.tgz
    version: 0.1.0
generated: "2025-06-25T15:31:03.453727327+07:00"
Now you can have enough condition to build your own repositories, and you should decide what platform to publish your chart. Some options are considered, like
- ChartMuseum: an open-source Helm Chart Repository server written in Go (Golang), with support for cloud storage backends
- GitHub Page or Ordinary web servers
- OCI Registry
To easier workaround and approach, I think most of us familiar with GitHub and GitHub Page are such wonderful option to start because it’s totally free and have large storage to help you publish your chart
Moving on GitHub Page, you have really many options to serve your page but for keeping anything basic, I think Jekyll is kinda suitable. One more reason I prefer Jekyll because there are many action, plugin are written for GitHub Action, and Jekyll is default framework static generator of GitHub Action to parse your README.md or any markdown file into HTML. There are something about this framework you will interested
For making this kind work, you should is owner of repositories of GitHub and can access into settings to turn on the GitHub Page. Read more at GitHub documentation
Tip
In my opinion, you should add
README.mdin/directory of project, it will helpJekyllconvert your markdown intoindex.htmlat./_sitewhen generating in actions
You can go live your page from source, because I prefer much with GitHub Actions that why I try to a workflow to handle release GitHub Page
But you can choose Deploy from a branch to let it set it up classic release your page instead of GitHub Action (required your definition 😄).
I will define workflow at ./github/workflows directory, you can write a new file gh-page.yaml for example, and use the basic code base of GitHub
name: Deploy GitHub Pages

on:
  # Runs on pushes targeting the default branch
  push:
    branches: ["main"]

  # Allows you to run this workflow manually from the Actions tab
  workflow_dispatch:

# Sets permissions of the GITHUB_TOKEN to allow deployment to GitHub Pages
permissions:
  contents: read
  pages: write
  id-token: write

# Allow only one concurrent deployment, skipping runs queued between the run in-progress and latest queued.
# However, do NOT cancel in-progress runs as we want to allow these production deployments to complete.
concurrency:
  group: "pages"
  cancel-in-progress: false

jobs:
  # Build job
  build:
    runs-on: ubuntu-latest
    steps:
      - name: Checkout
        uses: actions/checkout@v4
      - name: Setup Pages
        uses: actions/configure-pages@v5
      - name: Build with Jekyll
        uses: actions/jekyll-build-pages@v1
        with:
          source: ./
          destination: ./_site
      - name: Upload artifact
        uses: actions/upload-pages-artifact@v3

  # Deployment job
  deploy:
    environment:
      name: github-pages
      url: ${{ steps.deployment.outputs.page_url }}
    runs-on: ubuntu-latest
    needs: build
    steps:
      - name: Deploy to GitHub Pages
        id: deployment
        uses: actions/deploy-pages@v4
Actions will implement to process two jobs, including
- Build: Use
jekyllto add build your markdown or another docs concept to html and save all of them in./_sitedirectory - Deploy: Upload the static contents for serving your page
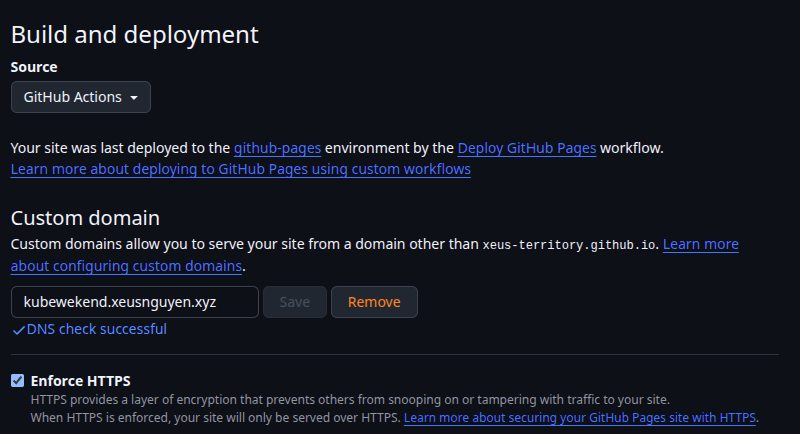
You will have webpage for helm repository, and you can try to locate into directory where have your index.yaml, e.g: https://kubewekend.xeusnguyen.xyz/kubernetes/charts
$ helm repo add kubewekend https://kubewekend.xeusnguyen.xyz/kubernetes/charts
$ helm search repo kubewekend
Workflow for auto releasing
But for more enhancement, we can reduce a lot of step like package, index for our repository with Chart Releaser
Talk a bit about Chart Releaser, if you read about above article, you will know about helm provide us Actions and CLI, which cut of time to manually provide index.yaml, instead of we can use tag to release your Helm Chart, let’s go to deeper
First of all, we will create the releaser workflow for let GitHub know we will trigger release after merging into main branch. I will create a new workflow named release.yaml at ./github/workflows directory
name: Release Charts
on:
push:
branches:
- main
paths:
- kubernetes/charts/**
# Allows you to run this workflow manually from the Actions tab
workflow_dispatch:
jobs:
release:
permissions:
contents: write
runs-on: ubuntu-latest
steps:
- name: Checkout
uses: actions/checkout@v4
with:
fetch-depth: 0
- name: Configure Git
run: |
git config user.name "$GITHUB_ACTOR"
git config user.email "$GITHUB_ACTOR@users.noreply.github.com"
- name: Run chart-releaser
uses: helm/chart-releaser-action@v1.6.0
with:
skip_existing: true
charts_dir: kubernetes/charts
env:
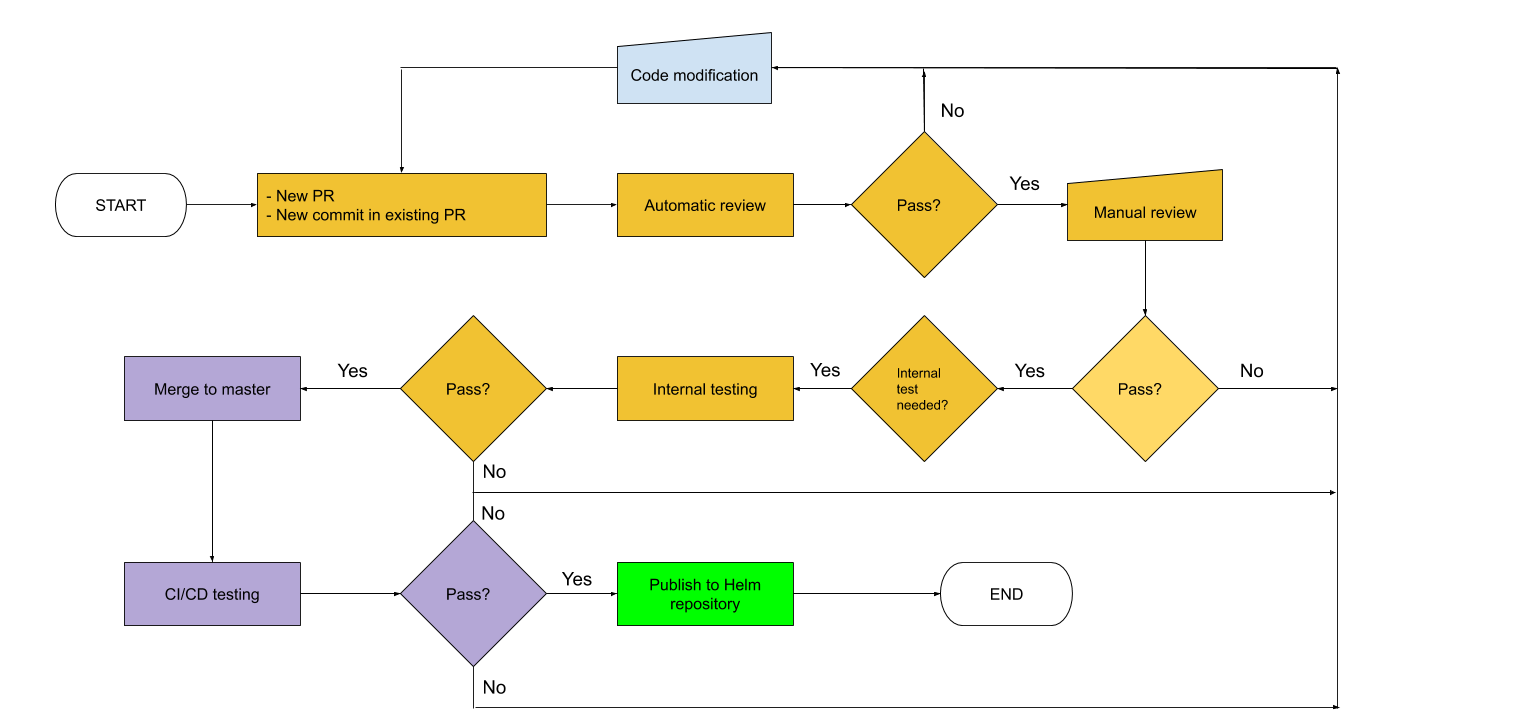
CR_TOKEN: "${{ secrets.GITHUB_TOKEN }}"Let’s delve into the specifics of this workflow:
-
Trigger Condition: The workflow is triggered by pushes to the
mainbranch, meaning any merge intomainwill initiate the workflow. -
Job Definition: We will execute a single job named
release, configured with write permissions to your repository. -
Release Handling: This job will configure Git and invoke the
chart-releaser-actionto manage the release process. You can find detailed parameter configurations for thechart-releaserCLI at this link. In my scenario, I’ll provide the following configurations to work with this action:skip_existing: true: This setting allows the workflow to skip releasing a chart if the same version already exists and I haven’t incremented the version number. (Note: While automatic version bumping is possible, it’s not covered in this article.)charts_dir: kubernetes/charts: I’ve specified my charts’ location. You can omit this parameter if yourchartsdirectory is located in the root of your repository.pages_branch (default: gh-pages): This action utilizes this branch to publish yourindex.yamland chart packages. You can choose any branch, but be cautious about settingmainor a protected branch, as this could lead to failures if not properly configured for write access.
Success
Upon the successful completion of the action, your package will be released as a tag on your branch. You can verify this directly in your GitHub repository where you’ve self-hosted this action. We only need to set up the action, and
chart-releaserwill handle the rest of the tasks, making it truly convenient! 🙌
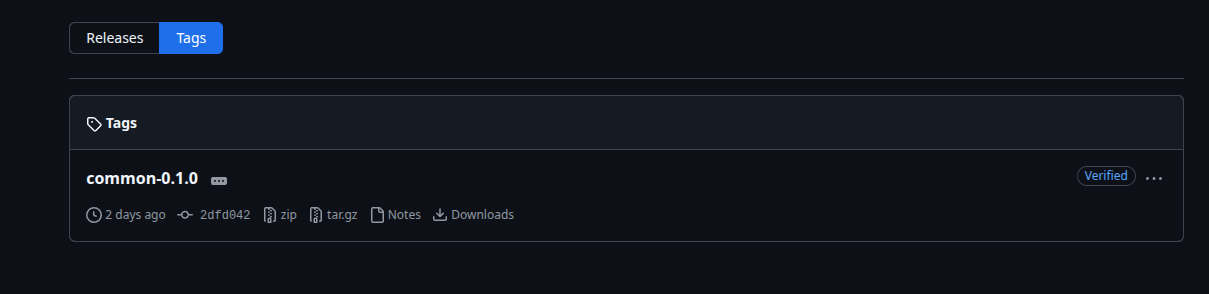
Your gh-pages branch will now publish your index.yaml. You can verify this by checking the branch URL of the .tgz link to the release artifact; for example, common-0.1.0 will correspond to https://github.com/Xeus-Territory/kubewekend/releases/download/common-0.1.0/common-0.1.0.tgz.
However, the setup isn’t complete, as your gh-pages branch is currently publishing to the main branch, meaning your webpage won’t include the necessary routing for index.yaml. This will cause your helm commands to fail synchronization. To resolve this, we need to perform a few steps:
- Adjust GITHUB-TOKEN Permissions: Change your
GITHUB_TOKENenvironment settings to specifically target thegh-pagesbranch. This will allowgh-pagesto deploy as your default site, rather than themainbranch. - Establish Workflow Dependency: Make your
gh-pages.yamlworkflow dependent on another workflow. Specifically, yourreleasejob should run first, and yourgh-pages.yamlworkflow will execute only after the release process is successfully completed.
Now, you can modify your gh-pages.yaml action to depend on the state of release.yaml by using the workflow_run trigger.
name: Deploy GitHub Pages

on:
  workflow_run:
    workflows: [Release Charts]
    types:
      - completed

  # Allows you to run this workflow manually from the Actions tab
  workflow_dispatch:

# Sets permissions of the GITHUB_TOKEN to allow deployment to GitHub Pages
permissions:
  contents: read
  pages: write
  id-token: write

# Allow only one concurrent deployment, skipping runs queued between the run in-progress and latest queued.
# However, do NOT cancel in-progress runs as we want to allow these production deployments to complete.
concurrency:
  group: "pages"
  cancel-in-progress: false

jobs:
  # Build job
  build:
    runs-on: ubuntu-latest
    steps:
      - name: Checkout
        uses: actions/checkout@v4
      - name: Setup Pages
        uses: actions/configure-pages@v5
      - name: Build with Jekyll
        uses: actions/jekyll-build-pages@v1
        with:
          source: ./
          destination: ./_site
      - name: Upload artifact
        uses: actions/upload-pages-artifact@v3

  # Deployment job
  deploy:
    environment:
      name: github-pages
      url: ${{ steps.deployment.outputs.page_url }}
    runs-on: ubuntu-latest
    needs: build
    steps:
      - name: Deploy to GitHub Pages
        id: deployment
        uses: actions/deploy-pages@v4

Your index.yaml will push by action into root directory, it means you should update your chart url with new version
# Remove the old one
helm repo remove kubewekend

# Add new repo kubewekend
helm repo add kubewekend https://kubewekend.xeusnguyen.xyz
🦸 Make your Chart to Hero

Quote
As this journey concludes, it’s vital to capture your inspiration and insights, whether through documentation, paragraphs, or other forms. Your chart can truly shine by not only offering a repository to pull from, but also by providing a high-quality
README.mdthat clearly outlines its default parameters and core concepts. This kind of detailed documentation is incredibly valuable in today’s landscape! 😄
You have several excellent options to enhance your Helm chart repository, and helm-docs is a standout. This tool automatically generates Markdown documentation for your charts, offering flexibility in how you use it:
- Locally: Naturally, you can run
helm-docsdirectly on your local machine. - In CI/CD: For a more advanced setup, integrate it into your Continuous Integration/Continuous Delivery pipeline. This can be complex, but it ensures documentation is always up-to-date with your releases.
- Pre-Commit Hook: For an incredibly efficient workflow, integrate
helm-docsas a pre-commit hook. This ensures your documentation is generated before you even commit your changes, keeping it perfectly in sync. - Containerized (Docker): Since
helm-docscan run in a Docker container, you can use it consistently across any environment
Now we have all of arsenal, let’s delve to build your Chart documentation
Info
This tools is written in gotemplate, it will parse your definition in go version (default:
README.md.gotmpl) toREADME.md
First of all, we should install helm-docs for practicing a bit, you can read more about Installation but I will choose download from source with go (Requirement: You need have go in your host to trigger)
go install github.com/norwoodj/helm-docs/cmd/helm-docs@latestBut if you not have go, you can setup that via bundle version for deb, rpm, darwin or windows version at Release v1.14.2 (Latest)
Next, you go to directory of your Chart where we define Chart.yaml and we put the template file in there README.md.gotmpl
{{ template "chart.header" . }}
{{ template "chart.deprecationWarning" . }}

{{ template "chart.badgesSection" . }}

{{ template "chart.description" . }}

{{ template "chart.homepageLine" . }}

{{ template "chart.maintainersSection" . }}

{{ template "chart.sourcesSection" . }}

{{ template "chart.requirementsSection" . }}

{{ template "chart.valuesSection" . }}

{{ template "helm-docs.versionFooter" . }}
This is default version, I try to copy from helm-docs source with provide a good quality documentation, like version, valuesSection, … You can refer that at Markdown Rendering for more options and detail describing
Info
The tool also includes the sprig templating library, so those functions can be used in the templates you supply
Now you can use helm-docs command for doing this magic function and your result will be written into README.md in same folder where you put your template
helm-docs --chart-search-root kubernetes/charts --template-files=README.md.gotmplI will provide two option for specific in my situation, including
--chart-search-root: Pointing to where conclude my Chart need to render--template-files: Setup your default nametemplate-filesto help render your Chart
Info
You can handle render multiple charts with a new update, you can choose specific them if you have requirement
Externally helm-docs offer pre-commit hook for automatically trigger this action. To sync up this action before you commit, you can define the .pre-commit-config.yaml at root directory
---
repos:
  - repo: https://github.com/norwoodj/helm-docs
    rev:  "v1.14.2"
    hooks:
      - id: helm-docs
        args:
          # Make the tool search for charts only under the `charts` directory
          - --chart-search-root=kubernetes/charts
          - --template-files=README.md.gotmpl
This one look pretty same as command we run in local, it does and you can choose another option from docker to built version. Read more at: Pre-commit hook
For install your hook in your project, you can install pre-commit and run command
# Install pre-commit hook
pre-commit install
pre-commit install-hooks
Success
Now your commit requires pass the commit condition before it able to committing, that’s really make your
README.mdautomatically update because we usually forget them 😄
🤾 Conclusion

Success
That’s all for this article, hope you find the good way and define for yourself the path to own your first
helmchart repository. This will become the condition or value for next action when you want to create or manage your application in Kubernetes Cluster with Helm and GitOps
Quote
After week to week, finally I truly comeback for writing something, BTW it costs me a lot of time to practicing, learning and completing this article. So we always see a new in next features, technologies is not stopping so I need to run and ready for all of these challenges. I hope y’all guys will always stay safe, learn and upgrade yourself and see yeah on next weekend. BTW, hope you can double-check my post Dueweekly Tech: 16-06-2025 to 29-06-2025 in this week