
VirtualBox Error in Ubuntu
Error when setup virtualbox in Ubuntu
Info
That issue come from when you install the
virtualboxin OS with enable secure boot in theBIOS, usually come from individual machine, I thinks. Mostly you installvirtualboxfromapt, it will not applied when your machine meet that problem. Can explain more 😅
You can find the solution for secure boot at
- I can’t execute command modprobe vboxdrv
- Could not load ‘vboxdrv’ after upgrade to Ubuntu 16.04 (and I want to keep secure boot)
Quote
That is tough think for new start, I know but you have 2 way to resolve the problem, i dunno make sure you follow what but, this is the same between them but one side is manually generate and other use
debwith include that step. Follow if you solve the problem
First method: Manually generate MOK
Note
Manually generate, and submit
mokfor authentication secure boot, that new for me and cost me time to understand 😄 but that gradually valuable
# Install the mkutil package to be able to do signed
# Often, your host will include this tool, if not download it
sudo apt update
sudo apt install mokutil -y

# Generate the signature file
openssl req -new -x509 -newkey rsa:2048 -keyout MOK.priv -outform DER -out MOK.der -nodes -days 36500 -subj "/CN=VirtualBox/"

# Add it to the kernal
sudo /usr/src/linux-headers-$(uname -r)/scripts/sign-file sha256 ./MOK.priv ./MOK.der $(modinfo -n vboxdrv)

# Register it for the Secure Boot
# In this step, it will ask you provide the password
# provide it what you want, remember and retype when reboot MOK again
sudo mokutil --import MOK.der

# Do the reboot machine now, with reboot or shutdown command
sudo shutdown -r now # sudo reboot (same actions)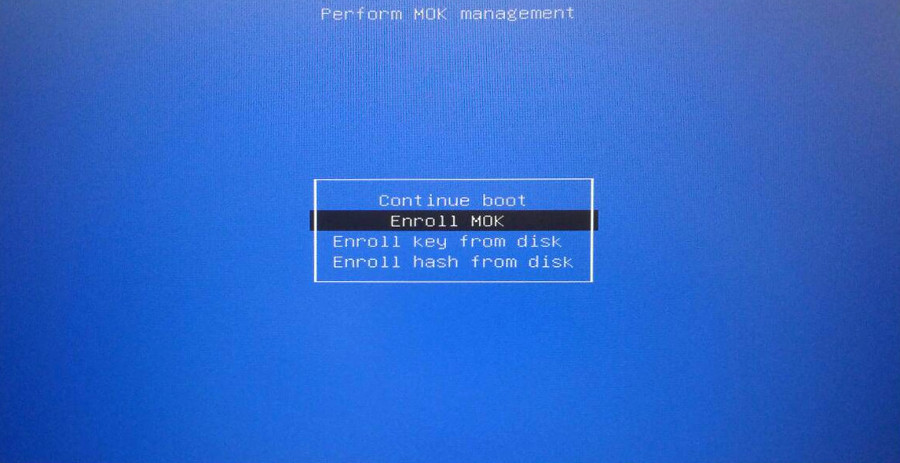
When reboot you will see the screen, choose Enroll MOK to continue. Answer the step in blue screen Enroll MOK > Continue > Yes > and it will ask you for the password > reboot. That will boot you to ubuntu. After that to validate it work or not, you can do
# Check version and problems of virtualbox, if not
# Use are completely resolving the problem
VBoxManage --version

# (Optional) To check MOK key, sign and status, use
sudo mokutil --list-enrolled
If not work at all, you need to delete the MOK key and will do the another optional
# Delete the key (On the situation, you continue keep key)\
# basically, you just need delete with key selected
sudo mokutil --delete /your/key/enrolled

# Check the key will add to queue to delete
sudo mokutil --list-delete # exist, it will be okay

# Reboot, and do enroll MOK boot like above
sudo reboot
Your work will have different, you can follow Enroll MOK > Delete > Yes > and it will ask you for the password > reboot . That all you remove the old key, if you delete or forgot where you put the key, follow this step
# You will export the key you enrolled
mokutil --export

# Usually, that will have name with syntax, e.g: MOK-xxxx.der
# take a look list-enrolled, map that with the key, for example
# If your key which want delete on location, you will choose
# MOK-0002.der with same command above
sudo mokutil --delete MOK-0002.der
Second method: Automatically generate MOK
Note
That will simple, but make sure you do same thing above but the
virtualboxwill give you all step and just need prompt your password, remember for re-typing again in MOK
This method will require you install virtualbox from official documentation, you can use wget , curl or you can directly click and install that, here the link
After that, you need install that with --fix-broken to help you install dependencies packages with your deb
# For example, I use Ubuntu 24.04. It can be done like this
# You will ask to prompt password in the last step
sudo apt --fix-broken install ./virtualbox-7.0_7.0.18-162988~Ubuntu~noble_amd64.deb -y

# Reboot and do MOK step like above
sudo shutdown -r now
Success
That will help you resolve this case, maybe when you have new version of Ubuntu that can be reason why you had the problems, make sure you control that
VMSetError: VirtualBox can’t enable the AMD-V extension
Following these discussions
- StackOverFlow - AMD-V is being used by another hypervisor. (VERR_SVM_IN_USE)
- VirtualBox - VMSetError: VirtualBox can’t enable the AMD-V extension
It let me know about this error is coming from the conflict between VirtualBox and KVM module in Kernel. To fixing it, you need to remove that conflict from kernel via rmmod command or modprobe command
# remove virtualbox (optional)
sudo rmmod vboxdrv
sudo rmmod vboxnetflt

#remove kvm (obligatory) - Fixed
sudo rmmod kvm_amd
sudo rmmod kvm
After applying this change, you can use Virtualbox with Vagrant for setup a new virtual machine. But after reboot, it can load into your kernel one again and you can fix it with 100% by adding blacklist into your grub, explore more at StackOverFlow - How to blacklist kernel modules?
Setup Environment Variables
Set and use environment variables from .env file
Info
Read more about topic at
Use export with except # line in .env file
export $(grep -v '^#' .env | xargs)When you want to work with script, you can use -o allexport
# Multiple line
set -o allexport
source dot/env/file
set +o allexport

# One line
set -o allexport && source dot/env/file && set +o allexport
In some case, you wanna disable a environment in current shell, so you can
unset ENVIRONMENT_VARIABLESetup Global environment for multiple users
Following the StackOverFlow - Setting global environment variable for everyone, you can have possibility to setup the environment in global mode and anyone who inherit will have fully access this environment variables
For example, I want to update my PATH for all use in system, so you need login to root for easier make a change with /etc/environment
# Go to sudo
sudo -i

# Make a change with nano or vim
nano /etc/environent

# e.g: Add a new path /usr/local/nvidia/tooklit
## export PATH="/usr/bin/:/usr/local/bin:/usr/local/nvidia/toolkit"
Save it file and make login again with another user, you will see your PATH is already update new route, you can use source to apply change for this file in current
Warning
But it will change for users not for root, so it means you root need to define into
.profilefile or.bashrcor.zshrcto apply the variables
For more enhancement, you can consider to modify with new script in /etc/profile.d where we can store script and trigger for all user who login into shell. Read more at:
- StackExchange - Setting variable in /etc/environment has no effect
- Ubuntu Community - System-wide environment variables
Ubuntu version and Patch Linux/Kernel Package
Upgrade Ubuntu Version
You can use integration tool inside ubuntu to update new version, that will pull and update packages inside host, do that easily with command
# Check the linux version
lsb_release -a

# Use command to update new version ubuntu
# You should update all package before try this command
# sudo apt update
# sudo apt upgrade -y # Upgrade major package
# sudo apt dist-upgrade -y # Upgrade distribute package
do-release-upgrade
Warning
In this situation you update
ubuntu, it will update your kernel so please remember make a big-changes can gain different harden to control, so do know before you doing
Upgrade your kernel
Follow some methodology to upgrade new version of kernel, such as
- How to Update Linux Kernel In Ubuntu
- Cập nhật Linux Kernel trên Ubuntu 20.04 (Vietnamese)
- How to Update/Upgrade Linux Kernel in Ubuntu
- Ubuntu Linux Upgrade Linux Kernel Command
Depend on those articles, you can update kernel of Ubuntu via
- Update OS version (e.g. 20.04 ⇒ 22.04)
- Update package of OS dependencies
- Manually Update
When you choose manually update, you can use some following tools
- Mainline
- ubuntu-mainline-kernel.sh
- Directly download use
curlorwgetand installing from pkgs.org
If you see this one from via kubewekend series, I prefer to use update Ubuntu version or use secondly optional via apt like
# check your kernel version, via uname
uname -r

# find the supportive from apt repositories, via apt search
sudo apt search linux-image

# figure out the compatible version, if you come from kubewekend you can use version 5.15.0-116-generic, so we install via
sudo apt install linux-virtual-hwe-20.04 -y

# Reboot to receive the new update
sudo reboot # OR use sudo shutdown -r now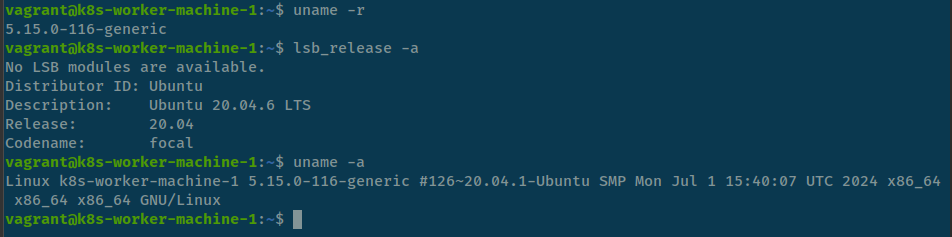
Error when install package but you can’t
Link for resolve: Reddit
If you package problem, for example (Code). You need to perform these commands
# Location the error or missing package
sudo apt policy code

# Reinstall or purge your package cause error
sudo dpkg --remove --force-remove-reinstreq code
sudo apt purge code --autoremove
sudo apt install --fix-broken
sudo apt update
libssl error in Ubuntu 22.04
Info
Ubuntu 22.04 has upgraded libssl to 3 and does not propose libssl1.1, so when you install packages that meet the problems, with me when setup
Azure agent, read at The SSL connection could not be established, and No usable version of libssl was found. But when you need to revert some other version problem will mess up, you can follow this one and reboot your machine to applied compatible version oflibssl
Link issue: StackOverFlow - MongoDB Install Fails on Ubuntu 22.04 - Depends on libssl1.1 but it is not installable
Package: libssl1.1_1.1.1f-1ubuntu2_amd64.deb
- Install via source-list when you import the key
# Write a source of package into apt, to retrieve the version of package
echo "deb http://security.ubuntu.com/ubuntu focal-security main" | sudo tee /etc/apt/sources.list.d/focal-security.list

sudo apt-get update
sudo apt-get install libssl1.1

# Delete the focal-security list file you just created
sudo rm /etc/apt/sources.list.d/focal-security.list- Manually installed
# Retrive the package from ubuntu repositories
wget http://archive.ubuntu.com/ubuntu/pool/main/o/openssl/libssl1.1_1.1.1f-1ubuntu2_amd64.deb

# Install the lib debian file which you download
sudo dpkg -i libssl1.1_1.1.1f-1ubuntu2_amd64.deb
Update alternative version
Quote
When you have multiple version of tools, package or moreover, like
pythonjava jdkshell, you need to switch between of them that why you need the topic
For change and update the configuration between different of tools, debian core offer us the command call update-alternatives. Let digest to its
You can find the manual of the command with --help flag
$ update-alternatives --help
Usage: update-alternatives [<option> ...] <command>

Commands:
  --install <link> <name> <path> <priority>
    [--slave <link> <name> <path>] ...
                           add a group of alternatives to the system.
  --remove <name> <path>   remove <path> from the <name> group alternative.
  --remove-all <name>      remove <name> group from the alternatives system.
  --auto <name>            switch the master link <name> to automatic mode.
  --display <name>         display information about the <name> group.
  --query <name>           machine parseable version of --display <name>.
  --list <name>            display all targets of the <name> group.
  --get-selections         list master alternative names and their status.
  --set-selections         read alternative status from standard input.
  --config <name>          show alternatives for the <name> group and ask the
                           user to select which one to use.
  --set <name> <path>      set <path> as alternative for <name>.
  --all                    call --config on all alternatives.

<link> is the symlink pointing to /etc/alternatives/<name>.
  (e.g. /usr/bin/pager)
<name> is the master name for this link group.
  (e.g. pager)
<path> is the location of one of the alternative target files.
  (e.g. /usr/bin/less)
<priority> is an integer; options with higher numbers have higher priority in
  automatic mode.

Options:
  --altdir <directory>     change the alternatives directory
                             (default is /etc/alternatives).
  --admindir <directory>   change the administrative directory
                             (default is /var/lib/dpkg/alternatives).
  --instdir <directory>    change the installation directory.
  --root <directory>       change the filesystem root directory.
  --log <file>             change the log file.
  --force                  allow replacing files with alternative links.
  --skip-auto              skip prompt for alternatives correctly configured
                           in automatic mode (relevant for --config only)
  --quiet                  quiet operation, minimal output.
  --verbose                verbose operation, more output.
  --debug                  debug output, way more output.
  --help                   show this help message.
  --version                show the version.
When you want to take a look how the version we have, such as java you can call with --list flag and name, example
$ update-alternatives --list java
/usr/lib/jvm/java-11-openjdk-amd64/bin/java
/usr/lib/jvm/java-18-openjdk-amd64/bin/java
And when you have decision, on my situation java on my machine on 11 but I want to switch to 18, you can perform this command
# Check version java
$ java --version
openjdk 11.0.22 2024-01-16
OpenJDK Runtime Environment (build 11.0.22+7-post-Ubuntu-0ubuntu222.04.1)
OpenJDK 64-Bit Server VM (build 11.0.22+7-post-Ubuntu-0ubuntu222.04.1, mixed mode, sharing)

# Change version to 18
$ sudo update-alternatives --config java
There are 2 choices for the alternative java (providing /usr/bin/java).

  Selection    Path                                         Priority   Status
------------------------------------------------------------
  0            /usr/lib/jvm/java-18-openjdk-amd64/bin/java   1811      auto mode
* 1            /usr/lib/jvm/java-11-openjdk-amd64/bin/java   1111      manual mode
  2            /usr/lib/jvm/java-18-openjdk-amd64/bin/java   1811      manual mode

Press <enter> to keep the current choice[*], or type selection number: 0
update-alternatives: using /usr/lib/jvm/java-18-openjdk-amd64/bin/java to provide /usr/bin/java (java) in auto mode

# Check the version java again
$ java --version
openjdk 18.0.2-ea 2022-07-19
OpenJDK Runtime Environment (build 18.0.2-ea+9-Ubuntu-222.04)
OpenJDK 64-Bit Server VM (build 18.0.2-ea+9-Ubuntu-222.04, mixed mode, sharing)
Relate documentation
- Switch between multiple java versions
- What exactly does
update-alternativesdo? - The update-alternatives Command in Linux
Linux System and Kernel
SSH problems
When you see the situation about your key for authentication a destination host have changing because your action or hacker, from your side you can resolve when exection ssh by flushing the old key like
ssh-keygen -f "/home/user/.ssh/known_hosts" -R "[127.0.0.1]:6996"Success
It will help you update your known_hosts, and give you permission to authentication remote host with new cred
If you meet situation about, cannot auth ssh via password. It means, usually your host will protect your VM with no enable PasswordAuthentication in /etc/ssh/sshd_conf. If you want to enable, you need to perform
# Change content sshd_config
sudo sed -i 's/#PasswordAuthentication no/PasswordAuthentication yes/' /etc/ssh/sshd_config

# Restart ssh vervice
sudo systemctl restart sshd

# OR
sudo /etc/init.d/ssh force-reload
sudo /etc/init.d/ssh restart
Sometimes, you will encounter the issue too many authenticate failures, it means your SSH already brute force by someone and somehow, there are couple things to deal with these situation
- Prefer use ssh-key than password, that’s truely wonderful option than you prompt the password (NOTE: Remember add your public key in
~/.ssh/authorized_keysfor what user you want to access)
ssh -i /path/to/ssh/key user@host- If you want continue to authenticate SSH via password, you should add couple of options to bypass the issue above
# Add the IdentityOnly (From client side)
ssh -o IdentityOnly=yes user@host

# Add the preferpassword (From clientside)
ssh -o PreferredAuthentications=password user@root

# If you already add the ssh but want to use password
ssh -o PubkeyAuthentication=no user@root
Control Kernel Parameter
Read more and detail about Kernel with proc directory at RedHat - The proc File System
At the core of the operating system, the Linux Kernel has two primary functions: it controls access to the computer’s physical devices and schedules when and how processes interact with those devices.
To provide a window into its current state, the kernel uses the /proc file system. This hierarchy of special files allows applications and users to peer directly into the kernel’s view of the system.
A unique part of this filesystem is the /proc/sys/ directory. Unlike other files in /proc, this directory not only provides information but also allows the system administrator to immediately enable or disable specific kernel features.
To easily modify these features, Linux provides the sysctl command. In some situations, changing a few parameters with sysctl can save your life. For example.
- GitHub - Fluentd in_tail plugin randomly fails with “too many open files” 🌟 (Recommended)
- Kind - Pod errors due to “too many open files”
- Stackoverflow - ENOSPC: System limit for number of file watchers reached
- Unix&Linux - Who’s consuming my inotify resources?
By default, the configuration will update temporary with sysctl command
sudo sysctl -w fs.inotify.max_user_instances=1024
sudo sysctl -w fs.inotify.max_user_watches=524288
However, you want to apply the persistent configuration, you can add your configuration into file /etc/sysctl.conf
# Modify on the file
sudo nano /etc/sysctl.conf
# Add the line
fs.inotify.max_user_watches=524288

# Or can use directly
echo fs.inotify.max_user_watches=524288 | sudo tee -a /etc/sysctl.conf
After that, you need remember to reload for apply the change
# reload
sudo sysctl -p

# view the value
sudo sysctl fs.inotify.max_user_watches
# or
cat /proc/sys/fs/inotify/max_user_watches
Explore more about these configurations at
- StackOverFlow - sysctl vs writing directly to /proc/*
- Kubernetes - Using sysctls in a Kubernetes Cluster
- PhoenixNAP - sysctl Command in Linux with Examples
Comment note in Shell Bash
Info
2 ways for writing the comment to shell bash.
Example and troubleshooting via Link to details
Using the # character for comment
Info
In Bash, a comment starts with the hash symbol (#). Anything after # on that line is considered a comment and is ignored by the Bash interpreter
# This is a comment in Bash

# Output:
# (No output, as comments are not executed)
Using the doctype Here Document for comment multiple line
Info
Bash doesn’t have a specific syntax for multi-line comments like some other languages, but you can use a trick with the : command and a ‘here document’ to achieve the same effect.
: << 'END_COMMENT'
This is a
multi-line comment
in Bash
END_COMMENT

# Output:
# (No output, as comments are not executed)
Reconfiguration for curl template output
Note
Reference: Timing Page Responses With Curl
Templates format to output via curl command
time_namelookup:  %{time_namelookup}s\n
time_connect:  %{time_connect}s\n
time_appconnect:  %{time_appconnect}s\n
time_pretransfer:  %{time_pretransfer}s\n
time_redirect:  %{time_redirect}s\n
time_starttransfer:  %{time_starttransfer}s\n
				 ----------\n
	  time_total:  %{time_total}s\n
To reference the documentation for the time based variables is as follows.
- time_appconnect - The time, in seconds, it took from the start until the SSL/SSH/etc connect/handshake to the remote host was completed.
- time_connect - The time, in seconds, it took from the start until the TCP connect to the remote host (or proxy) was completed.
- time_namelookup - The time, in seconds, it took from the start until the name resolving was completed.
- time_pretransfer - The time, in seconds, it took from the start until the file transfer was just about to begin. This includes all pre-transfer commands and negotiations that are specific to the particular protocol(s) involved.
- time_redirect - The time, in seconds, it took for all redirection steps including name lookup, connect, pretransfer and transfer before the final transaction was started. time_redirect shows the complete execution time for multiple redirections.
- time_starttransfer - The time, in seconds, it took from the start until the first byte was just about to be transferred. This includes time_pretransfer and also the time the server needed to calculate the result.
- time_total - The total time, in seconds, that the full operation lasted.
How to use
Find the PATH which including the curl-formatter.txt file with cd or pwd, Use this with curl command
curl -w "@<file-formatter-above>" -o /dev/null -sL <url>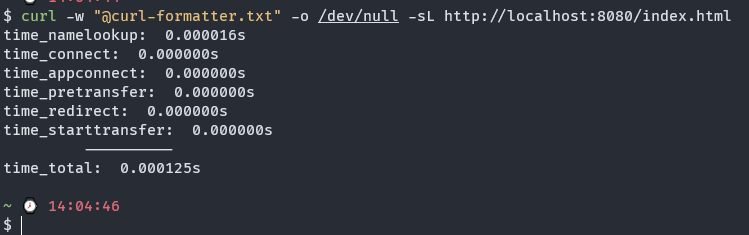
Redirect Output and Error
Note
Reference ▶️ ▶️ ▶️ How to Redirect Output and Error to /dev/null in Linux
Some thing about the output of linux
- In the linux machine,
/dev/nullthat will location where you can return null for your shell likecommand 2>&1 /dev/null - There will have 3 three type of output which linux has
- Standard input (stdin) is designated with 0
- Standard output (stdout) is designated with 1
- Standard error (stderr) is designated with 2
Redirect output to /dev/null in Linux
For example: You run apt install curl but you want your shell not return anything you can redirect output into /dev/null. It will be like
sudo apt install curl 1>/dev/null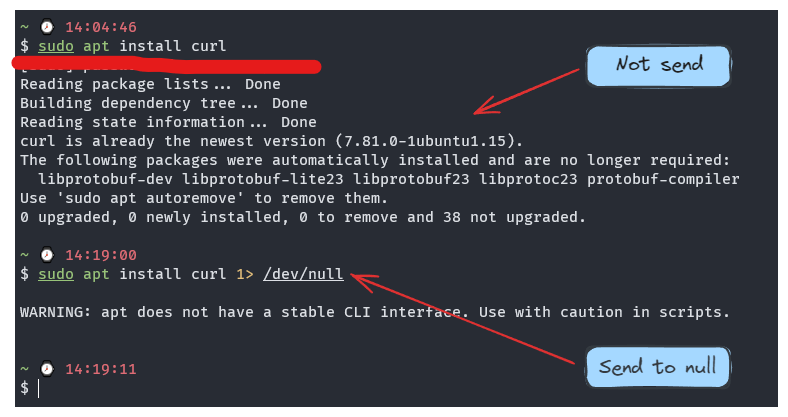
Usage: Used it when you don’t want stdout go to your shell, just removing the odd things and keep the important output
Redirect error to /dev/null in Linux
For example: You run find / but you run with non root, so somecase you will have some permission error output to your shell. You can use /dev/null for removing this messing stuff
find / 2> /dev/null
Combine stdout and stderror into one with this character &
1. Long version
find / 2> /dev/null 1>/dev/null

2. Short version
find / 2>&1 /dev/null (Send error to output and send them to /dev/null)

3. Some other case
find / > /dev/null 2>&1
Sometime you can use version
2of combiningThe
2>&1part means “redirect the error stream into the output stream”, so when you redirect the output stream, error stream gets redirected as well. Even if your program writes tostderrnow, that output would be discarded as well. (Sergey Kalinichenko)
Find this problem ▶️ ▶️ What is /dev/null 2>&1?
User Management in Linux
Info
With User and Group configuration in Linux become potential to managing, and enhance your security, user connection and moreover. Following some situation to keep some command that be useful for us when manipulate this stuff inside Linux
Some articles can be good for us when practicing with those stuff around
- Ubuntu Doc - User management
- User Management in Linux
- How to Manage Users in Linux
- Introduction to usermod command
Change Password
If you want to change password of current user, you can use command
# For Current User
passwd

# For Root User
sudo passwd

# For another user
passwd <username>
Add and Delete user
In this situation, you have multiple command to handle it, such as adduser, useradd, deluser and userdel. With the graduation introduce by Ubuntu Doc, I will choose adduser and deluser to handle this case
# Add user with no need handle much
sudo adduser username

# Del user with no need erase through multiple steps
sudo deluser username
Add and Delete user out of group
There is many way to handle this work, but I prefer to use it with usermod command
# Add user to group
sudo usermod -aG group username

# Remove user out group
sudo usermod -rG group username # sometime not work
# use deluser or gpasswd instead
sudo deluser <group> <user>
sudo gpasswd --delete user group
Add and Delete user out of Sudo (Root) Group
More about add, remove user in group with specific case for sudo permission
In more case specific sudo permission, technically, that’s truly direct affected for security and permission to your user
To grant user to root permission, your account should belong sudo group by command
# Via usermod
sudo usermod -aG sudo username

# Via gpasswd
sudo gpasswd -a username sudo

# via adduser
adduser existinguser sudo
But if you want to create a new user and add into sudo group, you can use
useradd newuser -m -G sudo
passwd newuser
However, this command is work around the file called sudoers file, that control the whole sudo permission of system for each user, to edit the file (NOTE: before read carefully the configuration below)
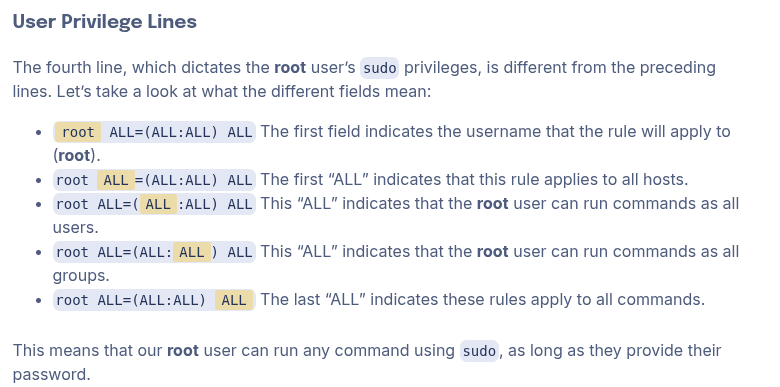
sudo visudoTo see more your group, id and what user permission, you can work around with file /etc/passwd, /etc/shadow and /etc/group (But carefully that expose your password but in hash version, maybe can be brutefore some how, that why leaking these configuration really dangerous) or you can use
id # too show full uid,gid, group belong to of this accountMore about disable root account, and couple of things around root for diving into
- AskUbuntu - Disable root account in Ubuntu?
- Digital Ocean - How To Disable Root Login on Ubuntu 20.04
Helpful usermod command
Change your user with new name, but you need do it on another user with kill that shell, because if you access to your old account, I will be attached by process
sudo usermod -l old_name new_nameChange the shell of user, you can switch to user to use chsh but this can be done remotely
sudo usermod --shell /path/to/shell usernameMove the content of user’s home directory using usermod command
sudo usermod -m -d new_dir_path user_nameRun Background Command
Info
In some situation, when you want to multitasking on your shell but the task become sophisticated and should run in longtime for initiating or deleting somethings, you should move that into background and run to complete, you can use couple of tools and utilities of Linux to handle this, such as
Ampersand (&),screen,tmux, …
You can double-check some articles to gather more information
- Phoenixnap - How to Run Linux Commands in Background
- GitHub - tmux shortcuts & cheatsheet
- GitHub - how-to-tmux-background-process.md
- How to Use Linux’s screen Command
Use Ampersand (&)
This is one of utilities already integrating inside your linux, you just playground with & with your command
# Run command in background
[command] &

# e.g
ping -4 google.com &
This will move this command into background and run to successful, you can check that via jobs command
# List all jobs background in your host
jobs
You can use fg for turn back command from background to current your shell
# Back with command
fg %<command> # e.g fg %nano

# Back with PID
fg <pid>
If you wanna suspend command, you can just hotkey ctrl + z to move process running into background and if you wanna run again in background, you can use bg command
Use screen
This one is one kind of popular method, you can use screen command to help you move the command into screen and you can control and manipulate multitask in multiple screen.
To install screen, you can use
sudo apt install screen -yNow use screen to move your shell into screen mode
screenNow, you can operate that one, try run long command such as ping and run hotkey ctrl+a d to attach this session
List all screen, you can use
screen -lsTo turn screen again, you can use with id of screen output from ls option or use name of shell
# Return by id
screen -r 2429028

# If you set your screen name like, e.g screen -S curl-command
# Return by name
screen -r curl-command
Use tmux
If I have talk about background process, most of my friend will relate tmux and I know many linux user use tmux every single day, so why not learn a bit about that one
For tmux installation, you can use
sudo apt install tmux -yNow run tmux command for executing new session
tmuxYou are in tmux, so try to run ping or curl command in longtime and you can use hotkey ctrl+b d for detaching your session into background
Now if you wanna turn your tmux again, you can use tmux with attach option
tmux a # or tmux attachFor more specific, you can add name for new session and turn it back with the name for more distinguish between multitasking
# specific name
tmux new -s tmux-first

# turn it back with name
tmux attach -t tmux-first
For list tmux session, you can use
tmux lsSome cool functionality of tmux with hotkey, including
- Create a new tab:
[CTRL]+[b], [c] - Switch to tab number:
[CTRL]+[b], <number> - Enable Scrolling up / Page up:
[CTRL]+[b], [ - Vertical Split:
[CTRL]+[b], % - Horizontal Split:
[CTRL]+[b], " - Kill tab:
[CTRL]+[b], x
Networking with Linux
Find more the couple of articles below for troubleshooting Linux Networking
- Medium - How To Evaluate the Network Performance of a Linux System
- Ubuntu - Networking
- Netplan - YAML Configuration
- How to Disable IPv6 on Ubuntu Linux
Network Lost in Gaming Mainboard

This network is probably weird than any I ever intercept, this comes from feature/bug of Gaming mother board when used it as Linux Machine, e.g: Ubuntu, LinuxMint or Arch. Explore more at
- LinuxMint - (SOLVED) Internet randomly disconnects: PCIe link lost
- Arch - (SOLVED) Network connection dies randomly
- Reddit - Network card (Intel Ethernet Controller I225-V, igc) keeps dropping after 1 hour on linux - solved with kernel param
Following Reddit Thread, This issue come from i255 network device and it’s really tough things which I don’t wonder to touch anytime but it occur frequently in machine, especially with high workload, it’s truly disturb and nightmare. So these articles and discussion come from by solution to exchange kernel params
In particular, we need to “disable power management on the PCIe entirely with pcie_port_pm=off. In the file /etc/default/grub, line GRUB_CMDLINE_LINUX_DEFAULT we can add pcie_port_pm=off and then run update-grub to rebuild the boot config”
Fix DNS Issues

If you encounter several fail when your DNS on local machine doesn’t resolve the domain, and it response DNS_PROBE_FINISHED_NXDOMAIN, it means you have some problem with your DNS, the action are able to used here, including
- Flush the DNS Cache to clean the cache DNS with error response
- Change DNS Servers
The action usually perform when encounter this type error, by flush the cache on your linux machine to make it become standard state. Check more at StackOverFlow - How do I clear the DNS cache?
# Flush the cache
sudo resolvectl flush-caches

# Check the statistic cache
sudo resolvectl statistics
If you want to validate the DNS Server for Ubuntu machine, you can change, edit or simple add more DNS Server for your machine at /etc/resolv.conf or /etc/systemd/resolved.conf Check more at
- StackOverFlow - How do I configure my DNS settings in Ubuntu server?
- PhoenixNAP - How to Set DNS Nameserver on Ubuntu
Warning
Modern Linux distros use systemd-resolved. Therefore, the /etc/resolv.conf file is a symbolic link managed by systemd-resolved. This means the file is dynamically generated and should not be edited manually. You can still edit them manually, but the changes are not permanent.
Instead you can edit with resolved.conf of systemd to change with systemd-resolved and enable DNS and FallbackDNS options and add the custom nameserver
sudo nano /etc/systemd/resolved.conf[Resolve]
# Some examples of DNS servers which may be used for DNS= and FallbackDNS=:
# Cloudflare: 1.1.1.1#cloudflare-dns.com 1.0.0.1#cloudflare-dns.com 2606:4700:4700::1111#cloudflare-dns.com 2606:4700:4700::1001#cloudflare-dns.com
# Google: 8.8.8.8#dns.google 8.8.4.4#dns.google 2001:4860:4860::8888#dns.google 2001:4860:4860::8844#dns.google
# Quad9: 9.9.9.9#dns.quad9.net 149.112.112.112#dns.quad9.net 2620:fe::fe#dns.quad9.net 2620:fe::9#dns.quad9.net
DNS=1.1.1.1 1.0.0.1
FallbackDNS=8.8.8.8 8.8.4.4
#Domains=
#DNSSEC=no
#DNSOverTLS=no
#MulticastDNS=no
#LLMNR=no
#Cache=no-negative
#CacheFromLocalhost=no
#DNSStubListener=yes
#DNSStubListenerExtra=
#ReadEtcHosts=yes
#ResolveUnicastSingleLabel=noSave and restart with systemctl command
sudo systemctl restart systemd-resolvedYou can also change it via netplan and network settings, it’s up to you but truly recommend to use systemd-resolved for permanent applying
You can double check more error about DNS and Issue about this one, and try to find the best option to fix it
- Hostinger - DNS_PROBE_FINISHED_NXDOMAIN: what it is and 9 ways to fix it
- CloudFlare - Common DNS issues and how to fix them
About disk, partition, storage and volume in Linux
Note
This implement show us how you can workaround with your storage, disk and partition inside Linux. Learn and leverage these techniques for building a success

Before you go into partition (advantaged), you can view another functionality with disk in another my example
- [[Awesome Azure Cloud#add-a-new-disk-for-your-linux-virtual-machine|Add a new disk for your
linuxvirtual machine]] - Ceph prerequisites with addition disk
Mount and Unmount Disk in Linux
- Devconnected - How To Mount and Unmount Drives on Linux
- Networkwolrd - Linux commands for managing, partitioning, troubleshooting
- Internet - How to Change Permissions on Mounted Drive in Linux
- Askubuntu - How to merge partitions?
To mount disk into your host, you should have sudo permission for handling that task
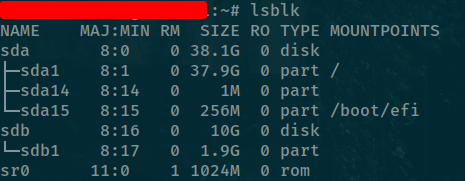
First of all, check the disk in your host via
lsblk -fIf you see your disk inject into your host, like nvme0n2 for example, you should check this disk format or not, if does, you should format this one
For partition the disk when you attach a new one, you can follow instruction about Create a Partition in Linux - A Step-by-Step Guide, Prepare a new empty disk, How to Format Disk Partitions in Linux to understand way to handle that
sudo mkfs -t ext4 /dev/nvme0n2If you wanna file system format, you can double-check at File System Comparison: NTFS, FAT32, exFAT, and EXT, Which File System Should I Use
| File System | Supported File Size | Compatibility | Ideal Usage |
| FAT32 | up to 4 GB | Windows, Mac, Linux | For maximum compatibility |
| NTFS | 16 EiB – 1 KB | Windows, Mac (read-only), most Linux distributions | For internal drives and Windows system file |
| Ext4 | 16 GiB – 16 TiB | Windows, Mac, Linux (requires extra drivers to access) | For files larger than 4 GB |
| Double check again with command |
lsblk -fMount your partition disk into the directories of machine via mount
sudo mount /dev/nvme0n2 /path/to/mountCheck your disk is add to /etc/fstab, you can use blkid to handle that
sudo blkidAfter that you can be make some mistake but if you want grant permission, you can continue for your progress in down below
# Change ownership of your drive
sudo chown <your-username> /dev/nvme0n2

# Change mount write permission
# NOTE: Umount before to do
sudo umount /dev/nvme0n2
sudo mount -o /dev/nvme0n2 /my-drive-locate

# Change permission of your file inside to user
sudo chown -R <user>:<group> /my-drive-locate
If you want unmount your disk, you can follow
sudo umount /dev/nvme0n2Create a new partition
You can follow the article “PhoenixNAP - How to Create Partitions in Linux” to create a new partition on your disk. While multiple command-line tools are available for managing partitions, fdisk and parted are two popular options to consider.
Warning
To practice disk partitioning, you should always use a brand new volume or a disk that is not currently in use and has no existing partitions. Experimenting on your boot disk is extremely risky. You cannot partition or shrink a disk that is actively in use, which is why a fresh or unallocated disk is essential.
I prefer to use fdisk with good interaction and transparent what are you doing with your disk
First of all, you can check your disk attached on your machine via command
# Check your disk, partion and mountpoint
lsblk -f # View full your disk existing in your host (file-system)
lsblk -o NAME,HCTL,SIZE,MOUNTPOINT # expose less information

# Check with the fdisk also return good quality
fdisk -l # List all information about disk,partion
fdisk -x # see more information
Next, you can understand what target to part into small piece, you can use fdisk to playground with your disk
# e.g your disk is /dev/sdb for example
fdisk /dev/sdb
Now you will be loaded into new command shell, and inhere you can use m to view help
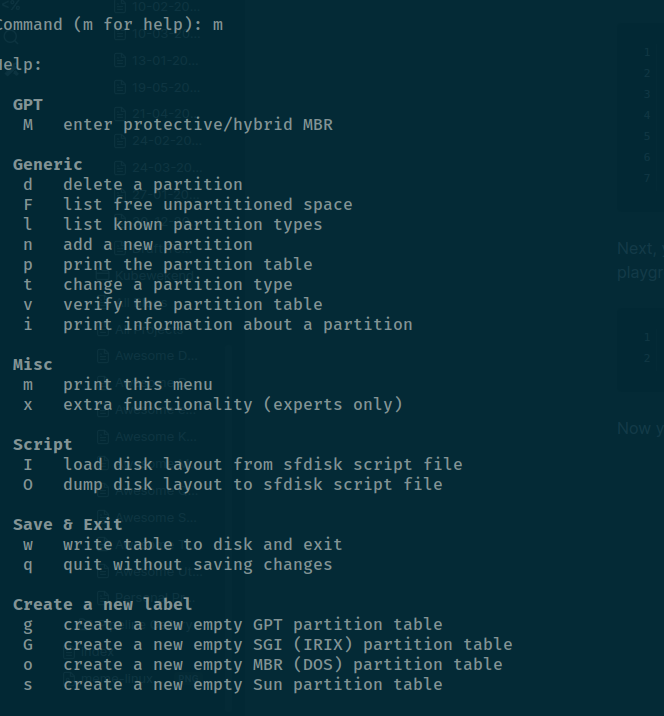
So we focus to use n to help us create a new partition for your disk
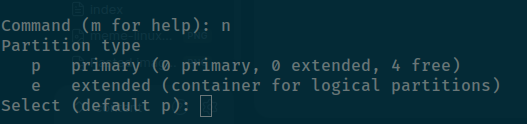
You can choose p to create a primary partition. When prompted, select a partition number (typically from 1 to 4, though it can extend up to 128 depending on the partitioning scheme). Then, define the first and last sectors, specifying the size in units like kilobytes (KB), megabytes (MB), gigabytes (GB), …

Validate your partition before confirm to write it into the partition by p
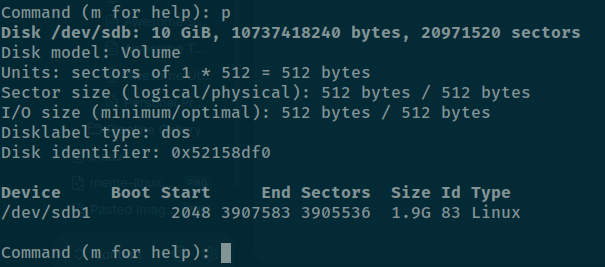
Now confirm it with w to confirm your partition table and you can confirm your disk will contain a new partition, e.g: /dev/sdb1
Now you can format your disk and use this as usual to used. Explore more at above: Mount and Unmount Disk in Linux
Delete a partition
Similar to creating partitions, you also have the option to delete them using fdisk. You can find more details in the article “PhoenixNAP - How to Delete Partition in Linux.” While fdisk allows you to modify (e.g., delete) partitions on your disk, it is strongly recommended that you unmount (umount) any mounted filesystems and turn off any swap space (swapoff) on that disk before using fdisk to avoid data corruption or loss.
# e.g: your disk is /dev/sdb
fdisk /dev/sdb
Now you are into fdisk shell and you can choose d option to remove your partition, if you have multiple partition in your disk, it will ask you remove what partition and if not it will remove your only partition in your disk
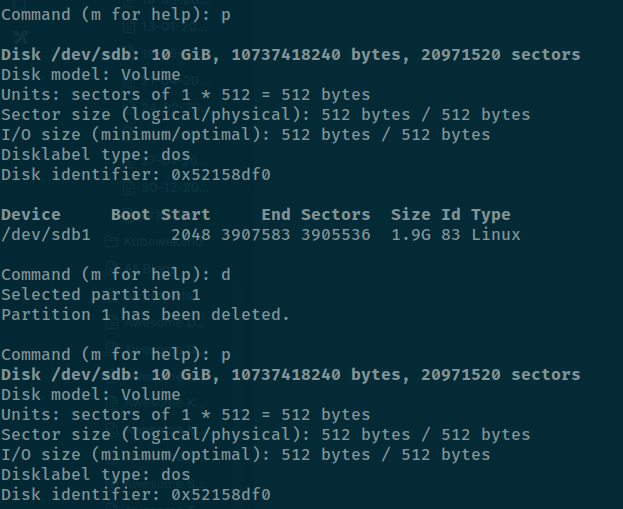
If you decide overwrite and complete after view partition table, you can confirm that with w option

Warning
If you disk are still using as your mounting, your partition will work on next reboot, it means your partition still there
Now you can view your attach volume with lsblk -f command and you can see your partition will disappear
Resize or extend the partition
Question
If you encounter an “out of volume” error for your
/(root) directory, but have ample unused space on your volume system, you can try extending your current partition. Here are some instructions you can review to handle this configuration.
Explore more information with these articles
- Medium - How to Resize AWS EBS Volume (NVMe) and Extend Linux Partitions
- AWS Docs - Extend the file system after resizing an Amazon EBS volume
- Redhat - What is growpart utility and how to use it ?
- Alibaba - Extend the partitions and file systems of disks on a Linux instance
- Unix & Linux - How do I resize partitions and filesystems on them?
- TectMint - 8 Parted Commands to Manage Disk Partitions in Linux
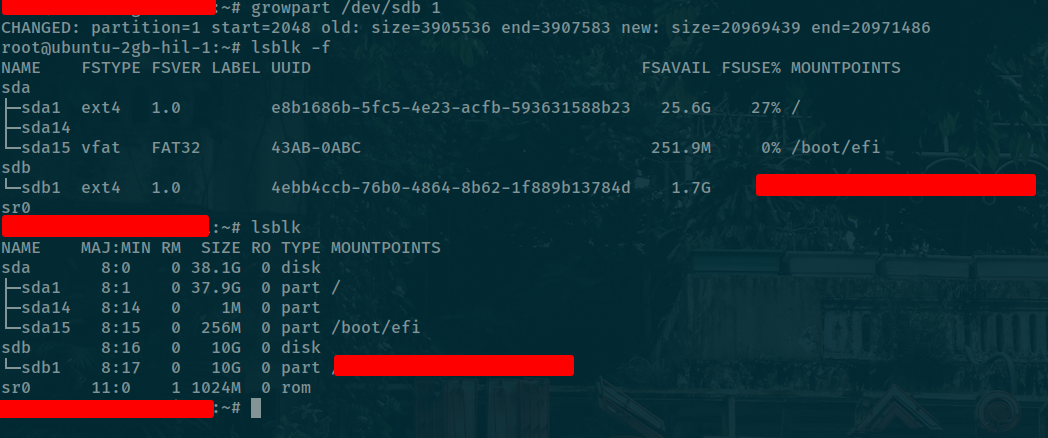
For example, I have disk 10GB and use only first partition 2GB but currently my partition is out of space but we have second partition contain 8GB not use for any tasks. That’s why I should extend first partition with second partition to resolve about out of space

Now you need to extend your sdb1 with sdb2 with few steps. For resizing task, you can choose growpart, resize2fs for tools able handle configuration.
Info
If your disk is free space but format by
ext4, you can’t extend your partition because current your disk is used all and not able to modify. Why ?growpartis for maximal, contiguous extension. It will use all available free space. But if you want to advantage, you should usepartedcommand for instead
growpart /dev/sdb 1Warning
Remembering you need to aware about space between your directory
/dev/sdband number partition for examplesdb 1to let you extend your partition

That’s why you should remove the sdb2 partition to collect free space for sdb1 partition with fdisk and now you can use growpart to extend free space
growpart /dev/sdb 1
Now you can double-check with lsblk to see how your modification
Info
You can see the your partition is extend to 10GB but current your file-system is still used 1.7GB, so you need one step with
resize2fsfor confirm your resizing
resize2fs /dev/sdb1Now you can use lsblk -f of df -hT and you can see your disk will be formatted
Warning
For more advantaged, you should learn and practical with parted, it’s a command-line of gparted GUI which used for shrinking and workaround with your partition, but remembering you should consider for what you doing before applying anything with these tools. Read more at TectMint - 8 Parted Commands to Manage Disk Partitions in Linux
Resize tmpfs in Linux
Question
When you meet some problem related
tmpfs, it is a file system which keeps all of its files in virtual memory, explore more at: Kernel - Tmpfs.So mostly it will use
tmpfsfor/rundirectory and you canrebootto free virtual memory, but in some cases, you can’t do this operation and it will cause couple annoying
But luckily, I found the techniques for helping us remount but not corrupt any data in this location, expand method always good for us. Check it at Medium - How to resize tmpfs in Linux
You can use mount command with option remount to expand the size, it requires sudo so you should take this permission
sudo mount -o remount,size=new_size /path/to/tmpfs

# e.g expand full disk /run (as tmpfs). Check it with df -h
sudo mount -o remount,size=10G /run
It will expand your /run immediately, so don’t worry corrupt or loss data. If fail, It will pop up the error at mount point
mount: /run: mount point not mounted or bad option.
       dmesg(1) may have more information after failed mount system call.
Auto mount addition disk when rebooting
Warning
If you have an additional disk that has been successfully formatted and mounted to a directory on your host, you will find that after a reboot or turning the machine on/off, the disk will not mount automatically. This means you’ll have to manually remount it every time.
This behavior is quite annoying and poses a risk to data availability. To ensure the disk mounts automatically upon startup, you need to modify the /etc/fstab file
Read more at
- Bitzflu - Tạo file system và cấu hình mount volume trong /etc/fstab (Vietnamese Version)
- StackExchange - How to mount a new drive on startup
- ArchLinux - Fstab manual
Following these articles, we can walk in progress through
Info
(RECOMMEND) You should to use
uuidof disk instead of the name partition, that will let you map exactly what disk you own into machine and not cause any error in using progress
To check the uuid, you can use blkid command
blkidWhen you know about your uuid of targeting, you can edit the /etc/fstab to set it up
sudo nano /etc/fstab# <device> <dir> <type> <options> <dump> <fsck>
UUID=0a3407de-014b-458b-b5c1-848e92a327a3 /data ext4 defaults 0 0Info
Now save and on the next reboot, it will automatically mount your disk to machine. If you wan to trigger mount in the current boot, you can safely run
# Reload whole your daemon, require when you update the /etc/fstab
# More about at: https://www.reddit.com/r/linuxquestions/comments/1eic1d8/fstabsystemd/
systemctl daemon-reload

# Run mount all base on fstab configuration
mount -a
Warning
Error can be occur if you make anything wrong, therefore if you encounter the error, please review your
/etc/fstaband try again with command above
Check and Fix filesystems with fsck
If you want to automatically fix file-system, preview the error of them or simply check state, Linux offer for use fsck (File System Consistency Check) to handle these stuff. Read more at
To run and check the specific disk, you can run fsck command
sudo fsck /path/to/file/systemThe exit code returned by fsck is the sum of the following conditions:
0 - No errors
1 - File system errors corrected
2 - System should be rebooted
4 - File system errors left uncorrected
8 - Operational error
16 - Usage or syntax error
32 - Fsck canceled by user request
128 - Shared library error
Note
The exit code returned when multiple file systems are checked is the bit-wise OR of the exit codes for each file system that is checked.
You can do multiple stuff with fsck for automatically repair and run dry-run in the file-system which encounter error
# Run the dry-run mode
sudo fsck -N /path/to/file/system

# Fix detection error automatically
sudo fsck -y /path/to/file/system

# Skip fix but show the error
sudo fsck -n /path/to/file/system

# Force to do a filesystem check
sudo fsck -f /path/to/file/system
Linux Memory
Clean Swap memory
With architecture of linux, swap memory submit crucial role for operating stuff inside machine, bring back stability and performance. Explore about swap memory at Phoenix - Swap Space in Linux: What It Is & How It Works
Warning
The customization into swap memory need to concern before do because you will touch into part with one making decision for performance main system
But you can gently clean that with few commands to help you collect, and get swap memory back to machine. E.g: When you compile java, if you not configure jvm with good behavior, It will use a lot memory and swap is one of those.
To prevent that, you can use command below to disable all swap partition, it will help reclaim memory swap being use
sudo swapoff -aAfter reclaim, you can turn on it again for reusing to continuous provide swap memory for system
sudo swapon -aYou can explore and figure out more configuration and memory with linux through article
- Tecmint - How to Clear RAM Memory Cache, Buffer and Swap Space on Linux
- Kernal Doc - Memory Management
Clean Cache/Buffer in Linux
There are many types of cache in Linux, and you should choose what the cache you work with and clean them if you need but not make any affect for others
But before go to my perspective, you should double-check to understand more what you wait for
- StackOverFlow - what are pagecache, dentries, inodes?
- Baeldung - Empty the Buffer and Cache in Linux
- YugabyteDB - Linux Performance Tuning: Dealing with Memory and Disk IO
- Baeldung - Restrict Size of the Buffer Cache in Linux
- ucartz - How to clear the buffer/pagecache (disk cache) under Linux
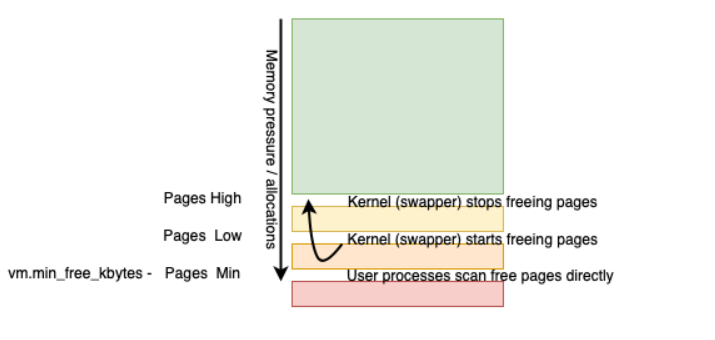
Paging Cache
Info
Paging Cache could contain any memory mappings to blocks on disk. That could conceivably be buffered I/O, memory mapped files, paged areas of executables—anything that the OS could hold in memory from a file.
Dentries and Inodes
Info
With Memory Caching, it work as directory structure, you can say Inodes is a data structure that represents a file, with Dentries is a data structure that represents a directory. These structures could be used to build a memory cache that represents the file structure on a disk. To get a directly listing, the OS could go to the dentries—if the directory is there—list its contents (a series of inodes). If not there, go to the disk and read it into memory so that it can be used again.
Buffer Cache
Info
Buffer Cache live in the memory, thus reading and writing to them is much faster compared to disks. For this reason, instead of going to the disk every time, Linux performs those write operations to those buffer caches. It then does some bookkeeping so that it knows which piece of data is cached, and it schedules regular flushes of that data onto the actual disks.
Warning
While using buffer caches can greatly improve the overall performance, they can sometimes claim a significant part of the main memory. This can add additional latency when we want to reclaim that memory and is therefore negatively impacting the running processes
To clean them you have two way for working that parameter via system variables used sysctl or directly in /proc/sys/vm/drop_caches file
With sysctl 🔦 (Considering)
# free the pagecache only
sysctl -w vm.drop_caches=1

# free the inodes and dentries
sysctl -w vm.drop_caches=2

# free both pagecache and inodes & dentries
sysctl -w vm.drop_caches=3
About using /proc/sys/vm/drop_caches 🌟 (Recommended)
(NOTE: sync command used for flush the file system buffer. But it’ optional, The sync command allows the kernel write as many dirty cache pages to disk as it can (to maximize the number of data cache pages that can be dropped))
# free the pagecache only
sudo sync; echo 1 > /proc/sys/vm/drop_caches
# Or due permission with echo, use
echo 1 | sudo tee /proc/sys/vm/drop_caches

# free the Dentries and Inodes
sudo sync; echo 2 > /proc/sys/vm/drop_caches
# Or due permission with echo, use
echo 2 | sudo tee /proc/sys/vm/drop_caches

# free both pagecache and inodes & dentries
sudo sync; echo 3 > /proc/sys/vm/drop_caches
# Or due permission with echo, use
echo 3 | sudo tee /proc/sys/vm/drop_caches
Now you can use free -h of vmstat -s -SM to double-check again your memory
Note
One more time to say again, you should read these articles above for knowledge, it’s truly useful and provide more information to deal in tuning your memory performance
GPU In Linux
Deprecated udevadm ⇒ systemd-hwdb
Following this articles StackOverFlow - Ubuntu 24.04 Nvidia drivers for understanding why and next action for you to exchange the legacy to another version when you find nvidia-drivers in Ubuntu 24.04 at /usr/lib/python3/dist-packages/UbuntuDrivers/detect.py
sudo nano /usr/lib/python3/dist-packages/UbuntuDrivers/detect.py Find the keyword udevadm
Old version
try:
        out = subprocess.check_output(['udevadm', 'hwdb', '--test=' + alias],
                                      universal_newlines=True)
    except (OSError, subprocess.CalledProcessError) as e:
        logging.debug('_get_db_name(%s, %s): udevadm hwdb failed: %s', syspath, alias, str(e))
        return (None, None)
New version
try:
    out = subprocess.check_output(['systemd-hwdb', 'query', alias],
                                  universal_newlines=True)
except (OSError, subprocess.CalledProcessError) as e:
    logging.debug('_get_db_name(%s, %s): systemd-hwdb failed: %s', syspath, alias, str(e))
    return (None, None)
Saving and try again
ubuntu-drivers devicesBIOS Resizable BAR and Secure Boot
This error relate about Ubuntu not able to see any GPU graphic card even it already inject and work because of BIOS/UEFI Configuration, especially a new series like RTX 5090, including Resizable BAR & Secure Boot
Following this discusstion from Nvidia Forum - NVIDIA RTX 5090 Not Detected by nvidia-smi on Ubuntu Server 24.04, you next action to remediation this freaky bug, including
Unable to determine the device handle for GPU
I encounter this issue when I try to run nvidia-smi in the machine after running for long-term but the another card in this machine still alive, it continuous being charge. There are several ways to resolving this case. Therefore, you can try to
Reboot your machine, because i figure out it can be overheat or error in PCI Error when I try to debug with journalctl (Working)
journalctl -xekOct 15 11:36:00 4090-machine kernel: i40e 0000:03:00.0: PCIe Bus Error: severity=Correctable, type=Data Link Layer, (Transmitter ID)
Oct 15 11:36:00 4090-machine kernel: i40e 0000:03:00.0: device [8086:15ff] error status/mask=00001000/00000000
Oct 15 11:36:00 4090-machine kernel: i40e 0000:03:00.0: [12] Timeout
Oct 15 11:36:05 4090-machine kernel: nvidia 0000:02:00.0: PCIe Bus Error: severity=Correctable, type=Physical Layer, (Receiver ID)
Oct 15 11:36:05 4090-machine kernel: nvidia 0000:02:00.0: device [10de:2684] error status/mask=00000001/00000000
Oct 15 11:36:05 4090-machine kernel: nvidia 0000:02:00.0: [ 0] RxErr (First)
Oct 15 11:36:06 4090-machine kernel: nvidia 0000:02:00.0: PCIe Bus Error: severity=Correctable, type=Physical Layer, (Receiver ID)
Oct 15 11:36:06 4090-machine kernel: nvidia 0000:02:00.0: device [10de:2684] error status/mask=00000001/00000000
Oct 15 11:36:06 4090-machine kernel: nvidia 0000:02:00.0: [ 0] RxErr (First)
Oct 15 11:36:07 4090-machine kernel: nvidia 0000:02:00.0: PCIe Bus Error: severity=Correctable, type=Physical Layer, (Receiver ID)
Oct 15 11:36:07 4090-machine kernel: nvidia 0000:02:00.0: device [10de:2684] error status/mask=00000001/00000000
Oct 15 11:36:07 4090-machine kernel: nvidia 0000:02:00.0: [ 0] RxErr (First)
Oct 15 11:36:08 4090-machine kernel: nvidia 0000:02:00.0: PCIe Bus Error: severity=Correctable, type=Physical Layer, (Receiver ID)
Oct 15 11:36:08 4090-machine kernel: nvidia 0000:02:00.0: device [10de:2684] error status/mask=00000001/00000000
Oct 15 11:36:08 4090-machine kernel: nvidia 0000:02:00.0: [ 0] RxErr (First)
Oct 15 11:36:11 4090-machine kernel: nvidia 0000:02:00.0: PCIe Bus Error: severity=Correctable, type=Physical Layer, (Receiver ID)
Oct 15 11:36:11 4090-machine kernel: nvidia 0000:02:00.0: device [10de:2684] error status/mask=00000001/00000000
Oct 15 11:36:11 4090-machine kernel: nvidia 0000:02:00.0: [ 0] RxErr (First)
Oct 15 11:36:12 4090-machine kernel: nvidia 0000:02:00.0: PCIe Bus Error: severity=Correctable, type=Physical Layer, (Receiver ID)
Oct 15 11:36:12 4090-machine kernel: nvidia 0000:02:00.0: device [10de:2684] error status/mask=00000001/00000000
Oct 15 11:36:12 4090-machine kernel: nvidia 0000:02:00.0: [ 0] RxErr (First)
Oct 15 11:36:13 4090-machine kernel: nvidia 0000:02:00.0: PCIe Bus Error: severity=Correctable, type=Physical Layer, (Receiver ID)
Oct 15 11:36:13 4090-machine kernel: nvidia 0000:02:00.0: device [10de:2684] error status/mask=00000001/00000000
Oct 15 11:36:13 4090-machine kernel: nvidia 0000:02:00.0: [ 0] RxErr (First)You can try another way to update the boot for your kernel loading with add more parameter to grub. Read here: StackOverFlow - PCIe Bus error severity=Corrected (WARNING: It can make your machine coming with another problem, please aware to use this)
# Use editor to edit grub
sudo nano /etc/default/grub

# Add 'pci=nomsi' to this value
GRUB_CMDLINE_LINUX_DEFAULT="quiet splash pci=nomsi"

# Update configuration of grub
sudo update-grub
And in another post of Nvidia Forum - Unable to determine the device handle for GPU 0000:01:00.0: Not Found, there are something tell about it can come from your driver, so reinstall with open-kernel version and it can tackle this problem
Monitoring Resources in Linux
Calculate Percentage CPU
If you are user of Linux, sometime the tools top, htop or bpytop don’t show you the need requirement about CPU, because it’s hard to figure out how much you CPU already reserve by process in machine in full core, not usage. So that why, you need to combine with several command and I think that pretty good to see what percentage of your CPU with /proc/stat. You can read more about these command below at StackOverFlow - How to get overall CPU usage (e.g. 57%) on Linux
Following the answer in this post, I found some qualify command to help you get the result
Overall CPU Usage in all the cores
grep 'cpu ' /proc/stat | awk '{usage=($2+$4)*100/($2+$4+$5)} END {print usage "%"}'Current CPU usage
awk '{u=$2+$4; t=$2+$4+$5; if (NR==1){u1=u; t1=t;} else print ($2+$4-u1) * 100 / (t-t1) "%"; }' \
<(grep 'cpu ' /proc/stat) <(sleep 1;grep 'cpu ' /proc/stat)
If you want to use top command, you can calculate CPU usage
top -bn1 | grep "Cpu(s)" | \
           sed "s/.*, *\([0-9.]*\)%* id.*/\1/" | \
           awk '{print 100 - $1"%"}'
Self-signed Certificate
Create
In some situation, you want to create the self-certificate fore SSL and trusted by CA. You can use openssl to generate the own one and signed it by yourself. Explore detail at
- DigitalOcean - OpenSSL Essentials: Working with SSL Certificates, Private Keys and CSRs
- FreeCodeCamp - OpenSSL Cheatsheet
- GitHub GIST - OpenSSL Cheat Sheet 🔐
Generate your key and cert to create cert authority (CA)
# Gen key with RSA Algo, or DSA with specific bits
openssl genrsa -out ca.key 2048

# Gen crt with key created above
openssl req -x509 -new -nodes -key ca.key -sha256 -days 3650 -out ca.crt \
-subj "/CN=Local-Testing-CA"
Signed with CA created before to output a certificate signing request (CSR)
openssl x509 -in ca.crt -signkey ca.key -x509toreq -out ca.csr -sha256 -days 3650Generate a new private key and certificate signing request
openssl req -new -newkey rsa:2048 -nodes -out ca.csr -keyout ca.key(Options) You can do more stuff configuration like configure SANS IP. For example, I configure etcd-node required signed from CA. Explore more at GitHub Gist - Creating a CSR and SSL Certificate with SAN Extensions
openssl genrsa -out etcd-node1.key 2048

cat > temp.cnf <<EOF
[ req ]
distinguished_name = req_distinguished_name
req_extensions = v3_req
[ req_distinguished_name ]
[ v3_req ]
subjectAltName = @alt_names
[ alt_names ]
IP.1 = 192.168.60.103
IP.2 = 127.0.0.1
EOF

# Generate csr for
openssl req -new -key ca.key -out etcd-node1.csr \
  -subj "/C=US/ST=YourState/L=YourCity/O=YourOrganization/OU=YourUnit/CN=etcd-node1" \
  -config temp.cnf

# Sign the cert
openssl x509 -req -in etcd-node1.csr -CA ca.crt -CAkey ca.key -CAcreateserial \
  -out etcd-node1.crt -days 7300 -sha256 -extensions v3_req -extfile temp.cnf

# Verify the cert and be sure you see Subject Name Alternative
openssl x509 -in etcd-node1.crt -text -noout | grep -A1 "Subject Alternative Name"
View and Check
To check and validate your key and certificate, you can use command to convert readable of your certificate
# check key
openssl rsa -check -in ca.key

# check crt
openssl x509 -text -noout -in ca.crt

# check csr
openssl req -text -noout -verify -in ca.csr
Set Trusted for Certificate
As usual, your certificate will be work only for serving SSL but it will continue warning you about the privacy error, because your browser is not recognize your CA as valid authority. To help these application trust your certificate
- Linux: Install
ca-certificatesand copy yourca.crtto directory/usr/share/ca-certificatesas root after that update yourca-ceriticates. Explore more at Unix&Linux - Adding a self-signed certificate to the “trusted list” - Chrome: Settings > Privacy and security > Security > Manage certificates and import your certificate file into Authorities or Trusted Root Certification Authorities Tab. Explore more at Set up an HTTPS certificate authority
With ca-certificate, you can follow these step
- Install
ca-certificatewithapt
sudo apt install ca-certificates -y- Copy your certificate into location
/usr/share/ca-cetificatesor/usr/local/share/ca-certificates
sudo cp self-ca.crt /usr/share/ca-certificates- Rebuild the directory with certificates include
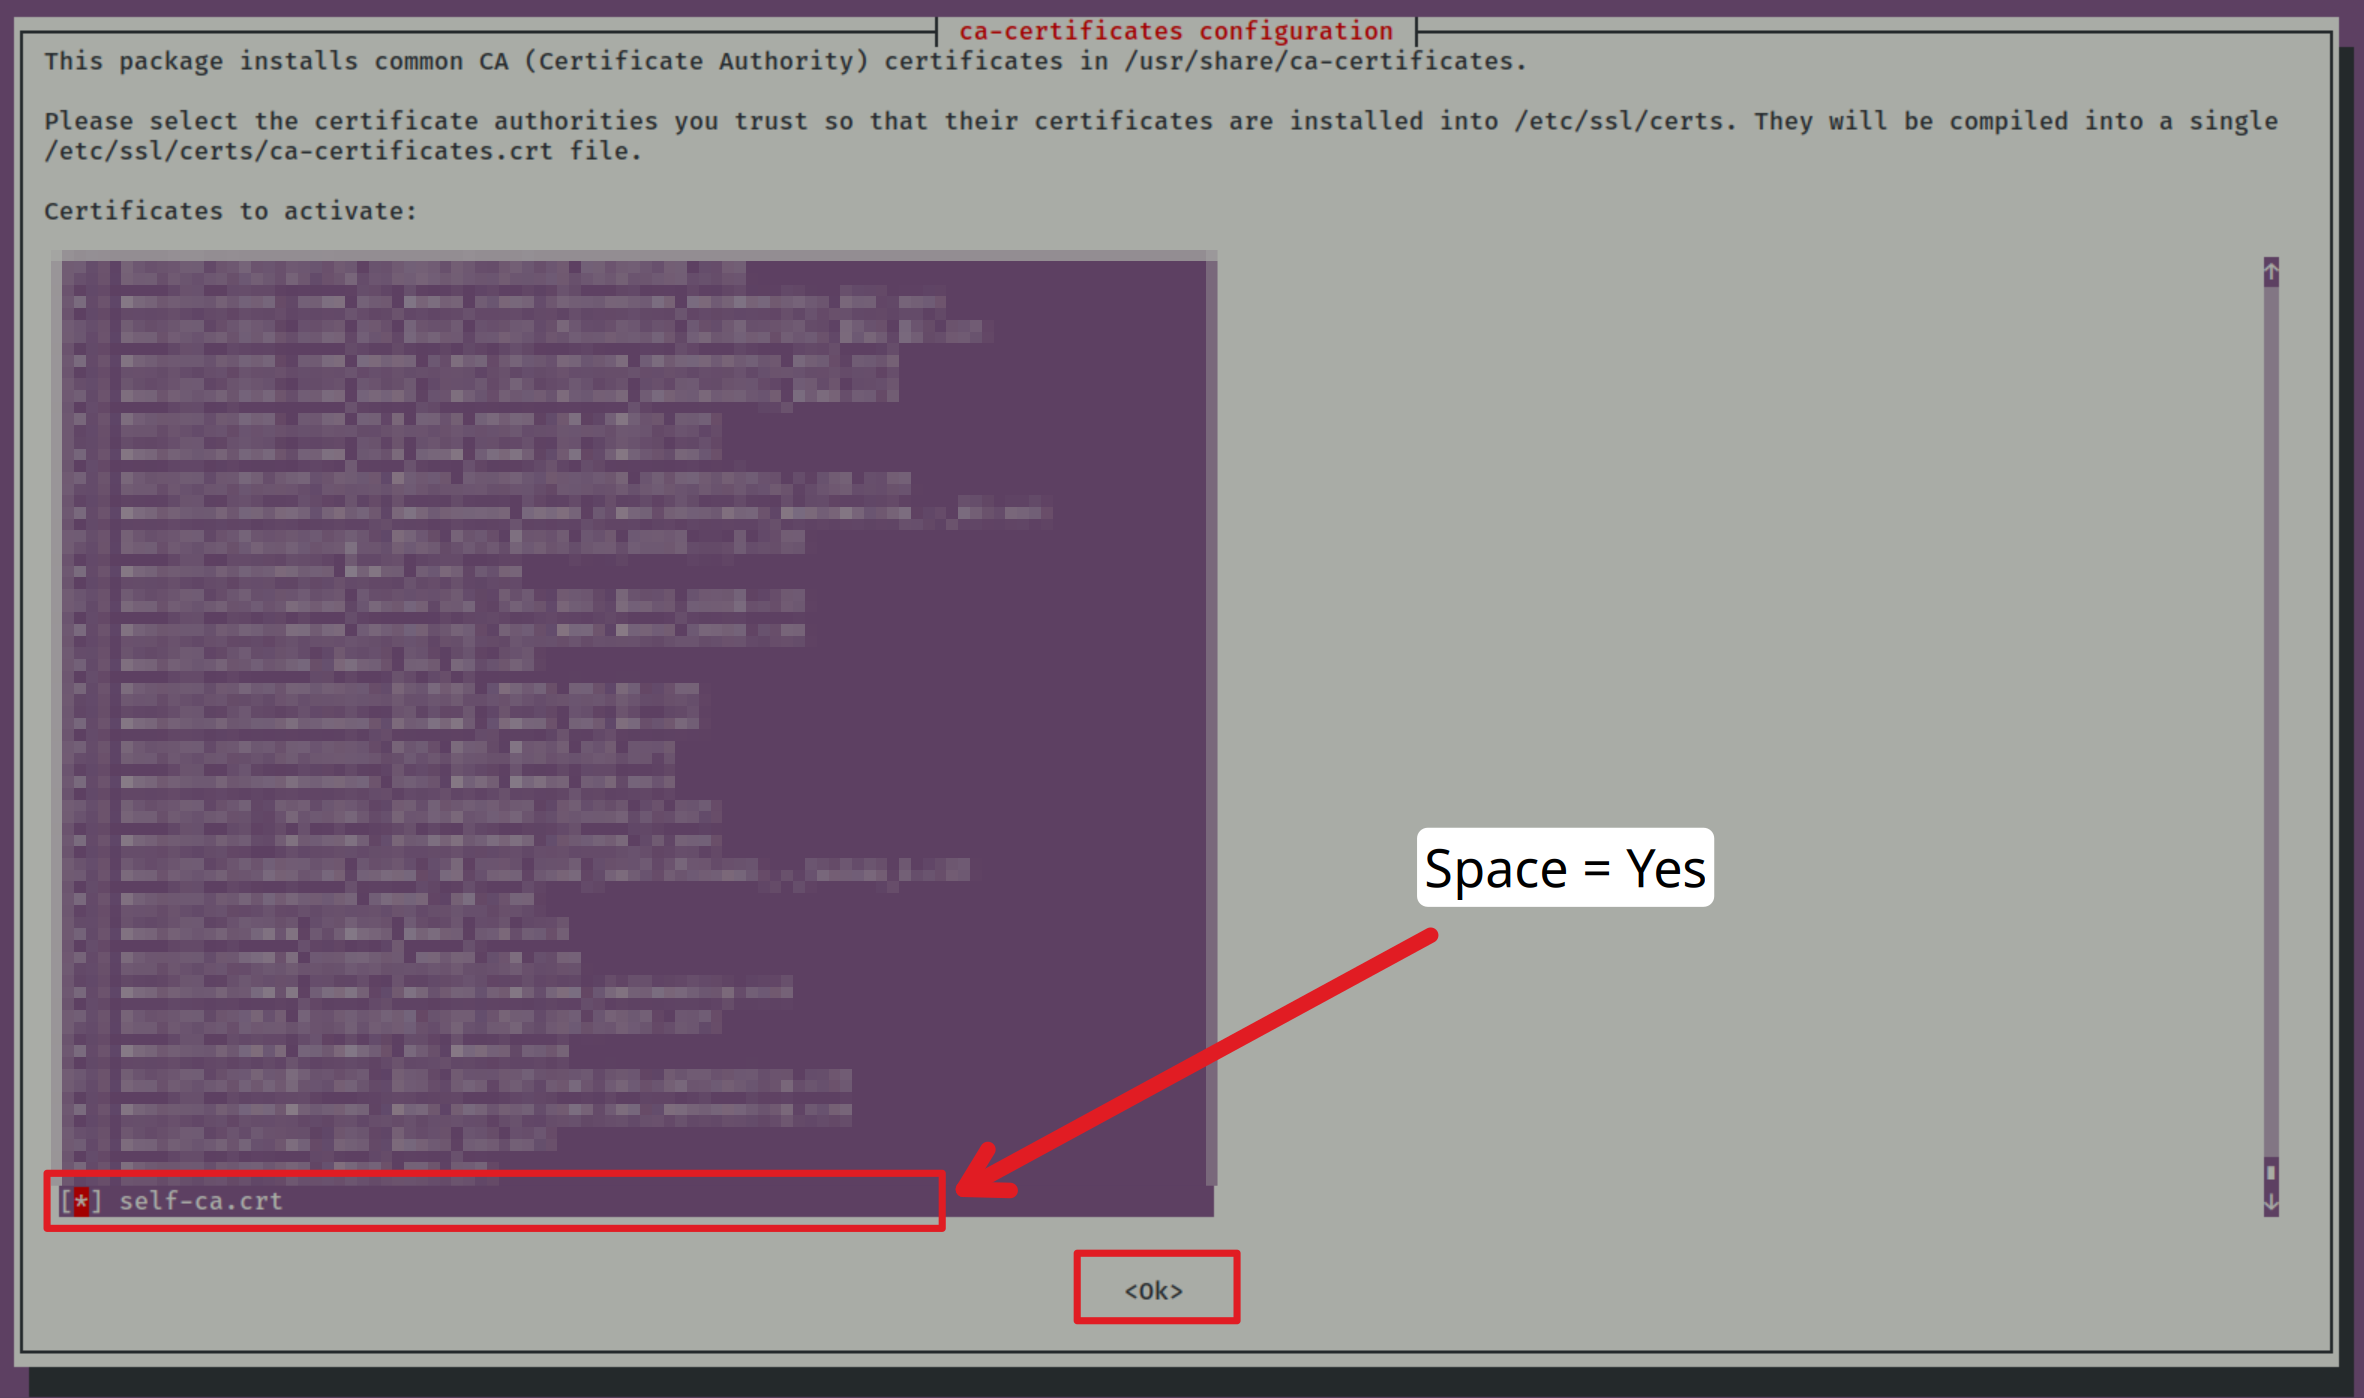
# This one will be interaction option
sudo dpkg-reconfigure ca-certificates

# Or non interact by
sudo update-ca-certificates
Note
With interaction mode, you need to use space for tick new certificate, by prompt Yes > Scroll and find your new CA > Space to tick > Ok
Note
In some situation, you need to close your browser to make your certificate to trusting, or simply open anonymous web for new request