Quote
“Hi everyone! It’s been a while since I’ve blogged. I encountered a couple of health problems a few weeks ago, but I’m fully recovered now and eager to get back to what I love. Today, I’m thrilled to dive into the topic of data lakehouses. I’m incredibly curious about this subject and excited to share some thoughts with you. Let’s delve in!”
Data Lakehouse and The mysteries of them
Data Lakehouse is one of the heck things in data world, no doubt, it make you become curious with the the complex of them from definition to techstack, a new category to tackle and many keywords need to explore. I wonder to see it growth up in next future, but luckily for me for have a chance to approach and build one of them for my work
As usual, before go to build the something, I will go to the definition of them first, and I want share more my perspective of them
Data Lakehouse
Following the idea of my colleague, Shout out to Anh Nhan Phan - AI Engineer, he want me to build the first lakehouse and use it for managing and conquer the worthy data. You can try to explore more about the Lakehouse and related topics via these contents
- Blog - Data Lake vs Data Warehouse 🌟 **(Recommended)
- Blog - Data Warehouse, Data Lake, Data Lakehouse, Data Mesh: What They Are and How They Differ
- Databricks - Data Lakehouse
- Paper - Lakehouse: A New Generation of Open Platforms that Unify Data Warehousing and Advanced Analytics
- DataBricks - 6 Guiding Principles to Build an Effective Data Lakehouse
Info
Data Lakehouse
Data Lakehouse is a new data management architecture combination the flexible, scale and cost-efficiency of data lake with powered structured and ACID strategies of Data Warehouse
With the information of these blogs, Data Lakehouse will help you managing any types structure of data with easy taking with query. It’s hard for you get their future if you keep on track with trandition data-warehouse and not doubt, it’s really complicated somehow.
Lakehouse will leverage in object storage like (S3, Azure Storage Account or HDFS), up to you to choose what compatible for your business. it built the data to become small layer and save them in new types, like Parquet, Avro or ORC, it’s truly optimize, fast and more efficiency with new query engine.
Therefore summaries about Lakehouse, we will have a couple of valaues, such as
- Unified Architecture - Built on object storage but able to analysis structure data
- ACID Transaction - Offered transaction guarantees
- Schema-on-read/write with ACID transactions
- Scalable, cost-efficient storage
Over them, when you adapt Lakehouse, you will
- Add the metadata layer for data lakes
- Optimize and with compatible with many new query engine, designed for high-performance SQL
- Optimize and able to ease approaching for Data Science and Machine Learning
When we talk about Lakehouse, you will approach to couple of candidates which will become more popular nowadays, such as
Explore more about at via these articles and repositories
- Atlan - Apache Iceberg Alternatives: What Are Your Options for Lakehouse Architectures?
- GitHub - Awesome Lakehouse
- Dremio - Open Source and the Data Lakehouse: Apache Arrow, Apache Iceberg, Nessie and Dremio
Lakehouse is evolving really fast

Source: Vu Trinh
Here are the reasons why many companies are choosing to adopt or apply the lakehouse architecture for their business:
- The combination of features from data lakes and data warehouses transforms the lakehouse into a general system for data control, helping to centralize data in one place without needing to access multiple systems.
- It also builds and provides a robust solution for machine learning and data science workloads.
- Key attributes of this architecture that help achieve business objectives include its ability to enforce complex schemas and support ACID transactions, a significant benefit traditionally associated with data warehouses.
While Data Lakehouse architectures offer compelling advantages, it’s crucial to consider whether they genuinely align with your business needs and operational maturity. There are several reasons why a Lakehouse might not be the immediate “silver bullet”:
- Complexity in Operation and Management: The Lakehouse architecture is inherently complex, integrating multiple components and demanding sophisticated management. While ideal for research into performance, deploying it in production inherently carries significant risks due to this complexity.
- Early Stage Technology: The Lakehouse concept is still in its nascent stages. This means the architecture is continuously evolving, and significant changes or new developments could potentially break existing systems, necessitating careful and deliberate adoption.
- Documentation and Hidden Nuances: The documentation for tools like Polaris and Iceberg can be extensive and complex. There are often many hidden details and subtle techniques required to get these tools working optimally, demanding a high level of technical expertise and significant effort to explore and implement successfully. It’s not always easy for a first-time implementer.
Following the Open Source Data Engineering Landscape 2025 by Alireza Sadeghi, Data Lake Platforms, particularly with the growth of Iceberg and Open Table Formats, have undoubtedly become a sizzling and significant topic in data engineering. I’ve had the honor and pleasure of witnessing and contributing to this work in a business context.
Metadata and Catalog nurturing the lakehouse
Going a bit deeper into the Data Lakehouse, especially with Iceberg, you’ll frequently encounter the concepts of the Metadata Layer and Data Catalog. These might seem simple on the surface, but understanding them is crucial for learning about and successfully building your Data Lakehouse.
Let’s explore some key information via these articles before I offer my own explanation
- AWS - Data Catalog
- Medium - Data Catalogs and metadata management
- LakeFS - Apache Iceberg Catalogs: Types & How to Choose the Right Catalog
- Medium - Iceberg Catalogs: A Guide for Data Engineers
- Onehouse - Comprehensive Data Catalog Comparison 🌟 (Recommended)
- IceBerg - REST Catalog Spec
Info
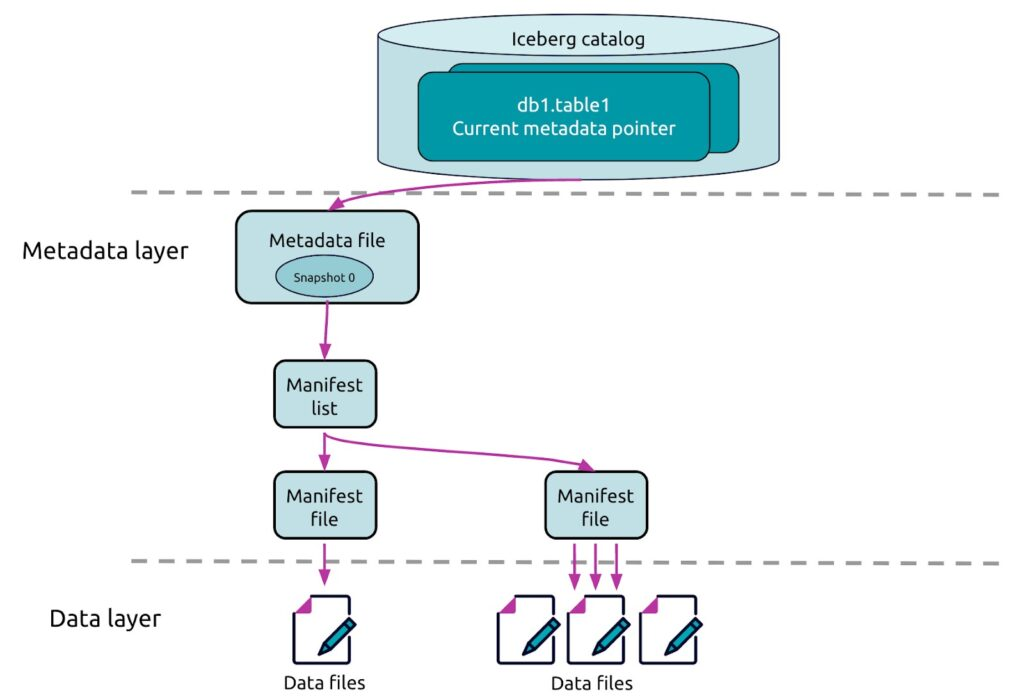
Metadata Layer
Metadata Layer is an abstraction layer built on top of your raw data files, e.g Parquet in Cloud Storage like S3 Bucket. It’s a structured way of organizing and managing your data within the data lake
Iceberg specifically, and Lakehouse architectures in general, leverage a metadata layer for table versioning. This means that any change in the data layer, such as appends, updates, deletes, or schema edits, will result in the creation of a new snapshot of your table’s state.
Info
Data Catalog
Data Catalog is an organized inventory of data assets within an organization. It helps users discover, understand, and manage the data available for use. A data catalog typically includes metadata combined with data discovery and management tools, and it provides an inventory of data assets across all your data sources.
Leveraging a Data Catalog provides several key advantages:
- Data Discovery and Exploration: It allows users to quickly find, understand, and explore available data assets across an organization.
- Data Governance - Access Control: It aids in implementing and enforcing access policies, ensuring that only authorized users can view or modify specific datasets.
- Data Governance - Compliance: It helps organizations meet regulatory requirements (like GDPR, HIPAA) by tracking data usage, lineage, and ensuring data privacy.
- Data Lineage and Documentation: It provides a clear view of where data comes from, how it’s transformed, and where it goes, along with comprehensive documentation about its meaning and quality.
- Data Quality Management: It supports efforts to monitor and improve data quality by providing insights into data health, identifying anomalies, and tracking quality metrics.
Quote
Understanding these two layers is fundamental to grasping how Iceberg provides data warehousing capabilities on top of cost-effective data lake storage, making it a cornerstone of the modern data lakehouse.
I truly recommend starting your Lakehouse journey with Iceberg. It offers a robust ecosystem with generally good instructions (though sometimes they can be a bit scattered 😄) and numerous tools built specifically for it, representing the next generation for achieving greater efficiency in the data world
- Hadoop Catalog: This is a file-based catalog that stores metadata directly in a file system (like HDFS or S3). It’s simple to set up, ideal for development, and works across various file systems, but it’s not typically recommended for high-concurrency production environments.
- Hive Catalog: This option leverages an existing Hive Metastore to manage metadata. It’s highly compatible with existing big data tools and is cloud-agnostic, making it a popular choice in environments already using Hive.
- AWS Glue Catalog: A fully managed, serverless catalog provided by AWS. It’s perfect for organizations deeply integrated into the AWS ecosystem, offering seamless integration with other AWS services.
- Nessie Catalog: This provides Git-like version control semantics for your data. It allows for branching, merging, and rolling back data tables, bringing “data as code” principles to the data lakehouse.
- JDBC Catalog: This catalog uses any relational database (via JDBC) as its backend to store the metadata pointers, offering a flexible option for integration with existing database infrastructure.
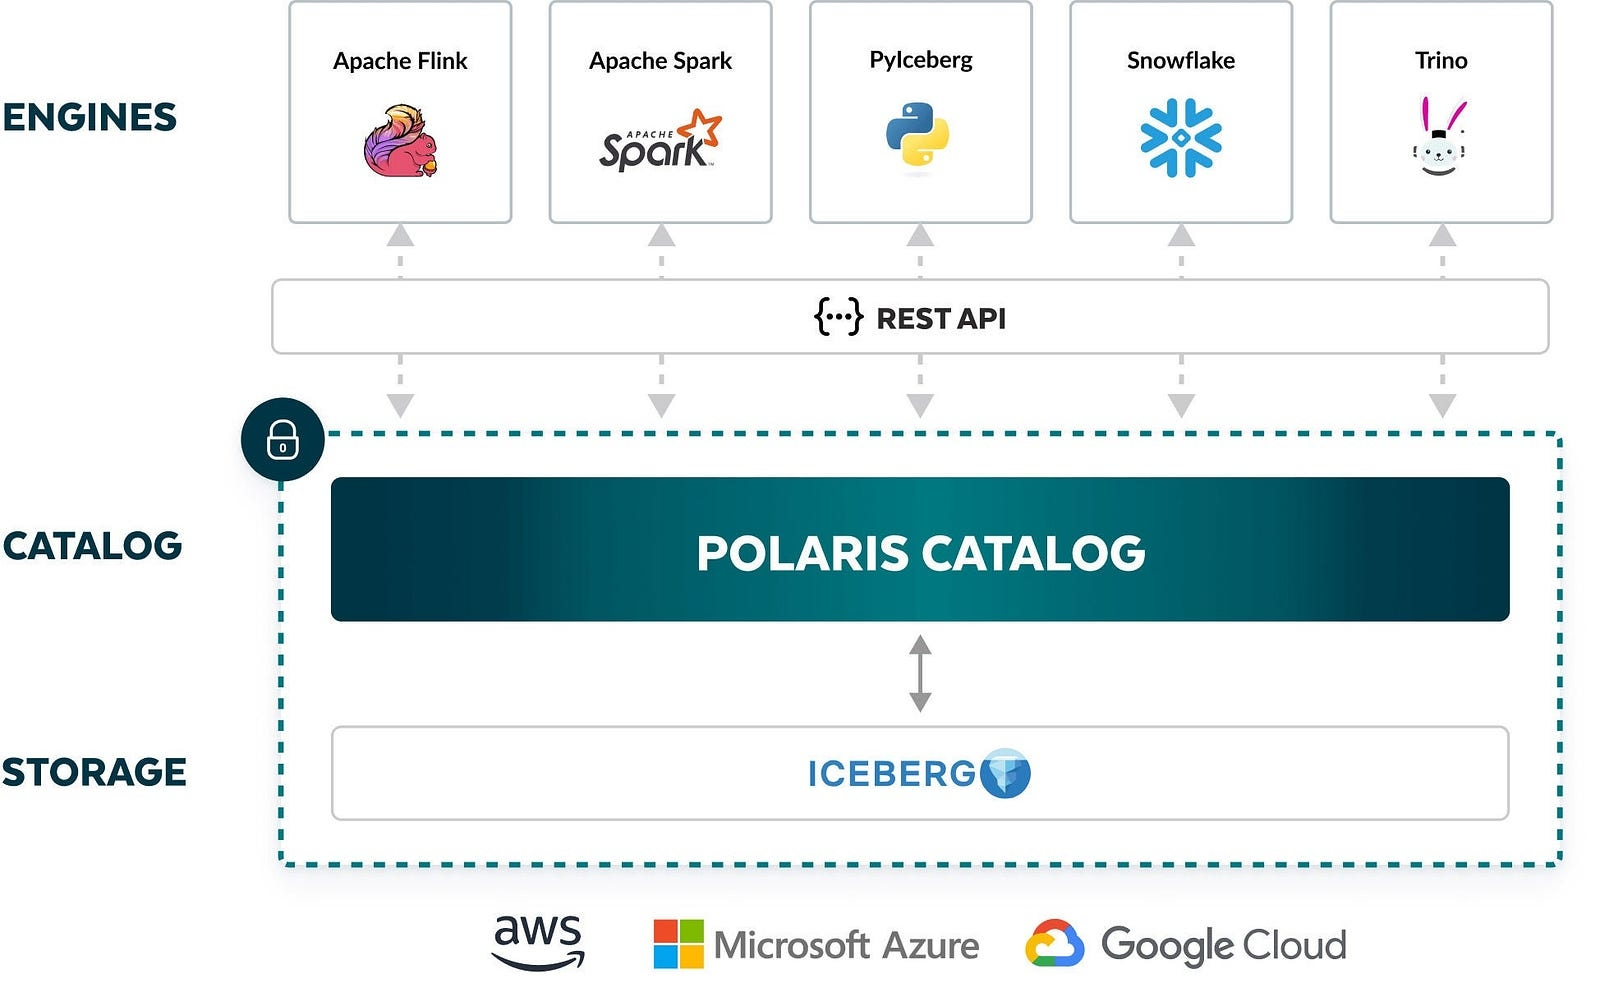
- REST Catalog: A modern, language-agnostic catalog specification that allows clients to interact with a centralized catalog service via REST APIs. This promotes interoperability across diverse programming languages and engines, as the catalog logic is centralized (e.g., Apache Polaris is a REST Catalog implementation).
In my opinion and my experience, you can try to experiment couple tech-stack for Lakehouse like
-
Iceberg + MinIO + Polaris + Trino/Spark (My Choice 🌟)
- This stack leverages a REST Catalog with Polaris, supporting the creation of more secure data lakehouse systems with pre-defined RBAC.
- It is considered a complex stack to operate and is still actively under development, sometimes not rating as highly as other options in terms of maturity.
-
Apache Hudi + S3/ADLS/GCS + Apache Flink + Trino/Spark:
- This stack is designed to meet strong real-time requirements, focusing on frequent data modifications, hybrid workloads, and fine-grained control over data.
-
Delta Lake + Databricks Lakehouse Platform (Managed Cloud-Native):
- This is the preferred choice when you prioritize a highly integrated, managed platform with a strong emphasis on MLOps.
- It offers simplified development through Delta Live Tables (DLT) and is ideal if you prefer a single vendor for a significant portion of your data platform.
Build The First Lakehouse
Like I related above, I choose techstack, include Iceberg + MinIO + Polaris + Trino/Spark for my first lakehouse. Why I choose that because two reason
- First off, a big shout-out to my colleague Anh Nhan Phan - AI Engineer, who encouraged me to pursue this stack, and it’s been a great experience.
- Second, this stack aligns with how Netflix built their successful Data Lakehouse, as shared by their engineers at an AWS conference, which is truly inspiring.
-
Third one, this stack is not new and it’s totally had many experience engineers write about that, such as
The vision and conclude of mine
This stack is genuinely challenging due to its high complexity, and you’re likely to encounter several problems:
- Limited Polaris Documentation: As an incubating project, Polaris’s documentation for configuration is not yet fully comprehensive. This makes it a very tough choice for newcomers.
- Spark’s Complexity: Spark, despite being a powerful query engine, is complex to manage, especially concerning its multiple versions and required packages. It can be uncomfortable to work with without significant experience.
- Lack of REST Catalog Resources: There aren’t many detailed blogs or resources explaining Polaris’s REST Catalog, and many organizations haven’t rated Polaris highly recently.
However, if you are able to adapt to and master this stack, it will lead to a truly satisfying and unique experience. If I discover any helpful tips during setup, I’ll be sure to note them for you.
Before you begin, always remember to consult the official documentation and source code:
- Polaris - Documentation v1.0.0 and GitHub - Polaris v1.0.0
- Iceberg - Documentation about Spark
- GitHub - docker-spark-iceberg
Setup the environment
Quote
Following documentations and articles, I learn a lot about this stack from configuration, best practice and what challenge of them encountered when operate them. But I just complete a haft journey to build and operate them in Docker Environment, BTW, the production uses Kubernetes and i will try release another one when it already in production and able to work as expectation
Prerequisite installed for starting
- Docker: v27.5.1
- Docker Compose: v2.34.0
You can find more about how to setup at Awesome Docker CLI>Installing
Note
I strongly recommend using
docker-composeat least version 2.34 or 2.3.x, as some functionalities, particularly depends_on with conditions, are implemented only in these versions, and older versions may lead to failures.
After you finish setup docker and docker-compose, here is structure of project you need to build
data-lakehouse
├── conf
│   └── spark
│       └── spark-default.conf
├── docker-compose.yaml
├── .dockerignore
├── examples
│   └── spark-catalog-polaris.sql
├── .gitignore
├── images
├── README.md
└── scripts
    ├── run-spark-sql.sh
    └── setup-catalog.sh
First of all, we will go to analysis and run the compose
services:
  # MinIO for Object Storage
  minio:
    image: minio/minio:latest
    environment:
      AWS_ACCESS_KEY_ID: admin
      AWS_SECRET_ACCESS_KEY: password
      AWS_REGION: dummy-region
      MINIO_ROOT_USER: admin
      MINIO_ROOT_PASSWORD: password
      MINIO_DOMAIN: minio
    networks:
      lakehouse_net:
        aliases:
          - warehouse.minio
    volumes:
          - minio_data:/data
    ports:
      - "9001:9001"
      - "9000:9000"
    command: ["server", "/data", "--console-address", ":9001"]

  # MinIO Client for setting up the bucket automatically
  minio-client:
    image: minio/mc:latest
    depends_on:
      - minio
    networks:
      - lakehouse_net
    environment:
      AWS_ACCESS_KEY_ID: admin
      AWS_SECRET_ACCESS_KEY: password
      AWS_REGION: dummy-region
    entrypoint: >
      /bin/sh -c "
      until (mc alias set minio http://minio:9000 admin password) do echo '...waiting...' && sleep 1; done;
      mc rm -r --force minio/warehouse;
      mc mb minio/warehouse;
      mc anonymous set private minio/warehouse;
      tail -f /dev/null
      "

  # Polaris for IceBerg REST Catalog
  polaris:
    image: apache/polaris:1.1.0-incubating
    hostname: polaris
    ports:
      - "8181:8181" # Polaris REST Catalog API
      - "8182:8182" # Polaris Management UI (if available/configured)
    environment:
      # These environment variables configure Polaris to use MinIO as its storage backend
      AWS_ACCESS_KEY_ID: admin
      AWS_SECRET_ACCESS_KEY: password
      AWS_REGION: us-east-1 # Or any region, as it's local MinIO
      AWS_ENDPOINT_URL_S3: http://minio:9000 # Point to MinIO's S3 API endpoint
      AWS_ENDPOINT_URL_STS: http://minio:9000 # Needed for some authentication flows
      polaris.features.DROP_WITH_PURGE_ENABLED: true # allow dropping tables from the SQL client
      polaris.realm-context.realms: polaris
      # Setup the metastore for Polaris to keep on track your Polaris Action in DB instead of memory
      polaris.persistence.type: relational-jdbc
      QUARKUS_DATASOURCE_DB_KIND: postgresql
      QUARKUS_DATASOURCE_USERNAME: postgres
      QUARKUS_DATASOURCE_PASSWORD: postgres
      quarkus.datasource.jdbc.url: jdbc:postgresql://db:5432/polaris
    depends_on:
      minio:
        condition: service_started
      db:
        condition: service_healthy
        restart: true
      # # Only use for first time to bootstrap polaris with JDBC
      # polaris-bootstrap:
      #   condition: service_completed_successfully
    networks:
      - lakehouse_net

  # Spark container with Iceberg dependencies and PySpark enabled
  spark-iceberg:
    # Using a pre-built image from Tabulario (commonly used for quickstarts)
    image: tabulario/spark-iceberg:latest
    environment:
      # Spark configuration for Iceberg catalog and S3 access
      AWS_ACCESS_KEY_ID: admin
      AWS_SECRET_ACCESS_KEY: password
      AWS_REGION: us-east-1
      # # Point Spark to MinIO for data access
      SPARK_CONF_DIR: /opt/spark/conf # Path for spark-defaults.conf
    volumes:
      - ./notebooks:/home/iceberg/notebooks # For Jupyter notebooks if you add a Jupyter layer
      - ./conf/spark:/opt/spark/conf # Mount local Spark config
    ports:
      - "8080:8080" # Spark Master UI (optional, often changes based on Spark setup)
      - "4040:4040" # Spark UI for applications (optional)
      - "8888:8888"
    depends_on:
      - minio
      - polaris
    networks:
      - lakehouse_net

  # PostgreSQL for MetaStore of Polaris
  db:
    image: postgres:14-alpine
    environment:
      POSTGRES_USER: postgres
      POSTGRES_PASSWORD: postgres
      POSTGRES_DB: polaris
    volumes:
      - database_data:/var/lib/postgresql/data
    restart: always
    healthcheck:
      test: ["CMD-SHELL", "pg_isready -U $${POSTGRES_USER} -d $${POSTGRES_DB}"]
      interval: 5s
      timeout: 5s
      retries: 5
    networks:
      - lakehouse_net

  # Bootstrap of Polaris when you use DB for MetaStore
  polaris-bootstrap:
    image: apache/polaris-admin-tool:latest
    environment:
      POLARIS_PERSISTENCE_TYPE: relational-jdbc
      QUARKUS_DATASOURCE_JDBC_URL: jdbc:postgresql://db:5432/polaris
      QUARKUS_DATASOURCE_USERNAME: postgres
      QUARKUS_DATASOURCE_PASSWORD: postgres
    command:
      - "bootstrap"
      - "--realm=polaris"
      - "--credential=polaris,root,secret"
    depends_on:
      db:
        condition: service_healthy
        restart: true
    networks:
      - lakehouse_net

volumes:
  minio_data:
  database_data:

networks:
  lakehouse_net:
    name: local-iceberg-lakehouse-network
This is entire docker-compose to setup full stack Polaris, IceBerg and Spark, so here is key feature of my docker-compose
- For cost efficiency and local development, MinIO is a great option to choose but you can choose other option with LocalStack S3, both of them is S3 Platform and work as S3 compatible, where is data layer to keep your data in action of
IceBerg. You will haveminio-clientbuild parallel for first time to automatically setup bucket - Next, Polaris, it will contain entire configuration to build the production version of Polaris with MetaStore to keep the information like RBAC, Bootstrap, … Read and explore more at Configuring Polaris for Production (NOTE: This Polaris still doesn’t serve OAuth2 and realm header, you can activate it but still not big deal in development environment)
- About Spark, I choose the image
tabulario/spark-iceberg:latestwhich build on the good environment, not latest but use stable version of IceBerg v1.9.2 and Spark v3.5.5, explore more about this image at GitHub - Dockefile - Database PostgreSQL for keep entities of Polaris, it’s truly important to save bootstrap and metadata for query, which one provide good behavior for Polaris. DB will base on Quarkus Framework to setup datasource and when you configure it, it will try to bootstrap at your DB with schema:
polaris_schema - The last one, Polaris Bootstrap, this is really important to let your Polaris work because if not will miss the Realm and Root account for operating successfully. You should read more at Admin Tool to know what need to do. (NOTE: I truly forgot to read this and you know why it work because I try and find the Schema V1 with the bootstrap via admin tool by Docker Image). Therefore, I actual finish to setup the techstack in Docker Compose
Next we will turn it up with step by step below
First of all, we need to bring up DB and Bootstrap first for creating schema and migration which thing to provide for Polaris to use when it up
docker compose up -d db polaris-bootstrapNote
With
polaris-bootstrap, I already set thedepends_oncondition for them for starting because there have time boot DB and Healthcheck, so it can let yourpolaris-bootstrapencounter fail so why I write it
  polaris-bootstrap:
    image: apache/polaris-admin-tool:latest
    environment:
      POLARIS_PERSISTENCE_TYPE: relational-jdbc
      QUARKUS_DATASOURCE_JDBC_URL: jdbc:postgresql://db:5432/polaris
      QUARKUS_DATASOURCE_USERNAME: postgres
      QUARKUS_DATASOURCE_PASSWORD: postgres
    command:
      - "bootstrap"
      - "--realm=polaris"
      - "--credential=polaris,root,secret"
    depends_on:
      db:
        condition: service_healthy
        restart: true
    networks:
      - lakehouse_net
Now your DB will ready to use for Polaris, you can try to more check up when bootstrap finished and completed
docker compose exec -it db psql -U postgres -d polaris -c "SELECT schema_name FROM information_schema.schemata;"

    schema_name
--------------------
 pg_toast
 pg_catalog
 public
 information_schema
 polaris_schema
(5 rows)
If you see polaris_schema in your DB, it’s totally fine to use with polaris
Next, you will bring up the other stack in docker-compose, include: polaris, spark, minio and minio-client
Note
minio-clientshould run for first time to bootstrap your MinIO and in next time this one should be ignored
# Create the notebooks for saving your code in spark
mkdir -p notebooks

# Run and setup the fully compose
docker compose up -d minio minio-client polaris spark-iceberg
Now, you can run the script to fully setup catalog for your REALM in Polaris, including
- Catalog
- Principle
- Principle Role
You can use my script - inspired by Gilles Philippart to build the script for completely workaround with API of Polaris, See the explanation at Medium - Build a Data Lakehouse with Apache Iceberg, Polaris, Trino & MinIO. Saving this script below to ./scripts/
#!/bin/bash

# Your definition to workaround with Polaris
REALM="polaris"
CLIENT_ID="root"
CLIENT_SECRET="secret"
CATALOG_NAME="polariscatalog"
S3_ENDPOINT="http://minio:9000"
S3_ACCESS_KEY_ID="admin"
S3_ACCESS_KEY_SECRET="password"

# 1. Create token and login
ACCESS_TOKEN=$(curl -s -X POST http://localhost:8181/api/catalog/v1/oauth/tokens \
  -H "Polaris-Realm: $REALM" \
  -d "grant_type=client_credentials&client_id=$CLIENT_ID&client_secret=$CLIENT_SECRET&scope=PRINCIPAL_ROLE:ALL" | jq -r '.access_token')

# 2. Create catalog
curl -s -X POST \
  -H "Polaris-Realm: $REALM" \
  -H "Authorization: Bearer $ACCESS_TOKEN" \
  http://localhost:8181/api/management/v1/catalogs \
  --json '{
    "name": "'"$CATALOG_NAME"'",
    "type": "INTERNAL",
    "properties": {
      "default-base-location": "s3://warehouse",
      "s3.region": "us-east-1",
      "s3.path-style-access": true,
      "s3.endpoint": "'"$S3_ENDPOINT"'",
      "s3.access-key-id": "'"$S3_ACCESS_KEY_ID"'",
      "s3.secret-access-key": "'"$S3_ACCESS_KEY_SECRET"'"
    },
    "storageConfigInfo": {
      "storageType": "S3",
      "roleArn": "arn:aws:iam::000000000000:role/minio-polaris-role",
      "allowedLocations": [
        "s3://warehouse/*"
      ]
    }
  }'

curl -s -X GET http://localhost:8181/api/management/v1/catalogs \
  -H "Polaris-Realm: $REALM" \
  -H "Authorization: Bearer $ACCESS_TOKEN" \
  -H "Content-Type: application/json"


# 3. Grant permission for cataglog
# Create a catalog admin role
curl -X PUT http://localhost:8181/api/management/v1/catalogs/$CATALOG_NAME/catalog-roles/catalog_admin/grants \
  -H "Polaris-Realm: $REALM" \
  -H "Authorization: Bearer $ACCESS_TOKEN" \
  --json '{"grant":{"type":"catalog", "privilege":"CATALOG_MANAGE_CONTENT"}}'

# Create a data engineer role
curl -X POST http://localhost:8181/api/management/v1/principal-roles \
  -H "Polaris-Realm: $REALM" \
  -H "Authorization: Bearer $ACCESS_TOKEN" \
  --json '{"principalRole":{"name":"data_engineer"}}'

# Connect the roles
curl -X PUT http://localhost:8181/api/management/v1/principal-roles/data_engineer/catalog-roles/$CATALOG_NAME \
  -H "Polaris-Realm: $REALM" \
  -H "Authorization: Bearer $ACCESS_TOKEN" \
  --json '{"catalogRole":{"name":"catalog_admin"}}'

# Give root the data engineer role
curl -X PUT http://localhost:8181/api/management/v1/principals/root/principal-roles \
  -H "Polaris-Realm: $REALM" \
  -H "Authorization: Bearer $ACCESS_TOKEN" \
  --json '{"principalRole": {"name":"data_engineer"}}'

curl -X GET http://localhost:8181/api/management/v1/principals/root/principal-roles \
  -H "Polaris-Realm: $REALM" \
  -H "Authorization: Bearer $ACCESS_TOKEN" | jq

# 4. Delete catalog
# curl -X 'DELETE' \
#   'http://localhost:8181/api/management/v1/catalogs/$CATALOG_NAME' \
#    -H "Polaris-Realm: $REALM" \
#   -H "Authorization: Bearer $ACCESS_TOKEN" \
#   -H "Content-Type: application/json"
After that trigger the script
bash ./scripts/setup-catalog.shYou can watch the log of Polaris to see what things happen inside Polaris REST HTTP will trigger inside, it will help you get information or track the exception.
docker compose logs -f polarisNow you already completely setup the Polaris, Spark and IceBerg with MinIO. Next time, when you want to turn back to stack at savepoint, you just need to use
docker compose up -d db minio polaris spark-icebergPlayaround with Spark
Honestly, this part is one I struggle, because you know spark which includes many configuration and no generic documentation write about this one work with IceBerg and S3 Customization like MinIO. I cost 2 days to figure out and found it. Before that let’s take a look about configuration from IceBerg Page
I try to write that into scripts and conf to use, let see
# Spark configuration for Iceberg and MinIO (S3-compatible)

# Iceberg Catalog Configuration (to use Polaris)
spark.sql.catalog.polariscatalog=org.apache.iceberg.spark.SparkCatalog
spark.sql.catalog.polariscatalog.type= rest
spark.sql.catalog.polariscatalog.uri=http://polaris:8181/api/catalog # Polaris endpoint
spark.sql.catalog.polariscatalog.warehouse=polariscatalog # Warehouse location
spark.sql.catalog.polariscatalog.io-impl=org.apache.iceberg.aws.s3.S3FileIO # For S3/MinIO
spark.sql.catalog.polariscatalog.s3.endpoint=http://minio:9000 # MinIO S3 endpoint
spark.sql.catalog.polariscatalog.s3.access-key=admin
spark.sql.catalog.polariscatalog.s3.secret-key=password
spark.sql.catalog.polariscatalog.s3.path-style-access=true # Crucial for MinIO compatibility

# Ensure Spark can interact with S3-compatible storage
spark.hadoop.fs.s3a.endpoint=http://minio:9000
spark.hadoop.fs.s3a.access.key=admin
spark.hadoop.fs.s3a.secret.key=password
spark.hadoop.fs.s3a.path.style.access=true
spark.hadoop.fs.s3a.impl=org.apache.hadoop.fs.s3a.S3AFileSystem
spark.hadoop.fs.s3a.connection.ssl.enabled=false # Set to true if using HTTPS for MinIO
I doesn’t know work or not but I give a try and it cause a lot of exception, so why I exchange into second option use via command, and spark-sql is one tool able interact in terminal
#!/bin/bash

# start Spark SQL client shell
docker compose exec -it spark-iceberg spark-sql  \
    --packages org.apache.iceberg:iceberg-spark-runtime-3.5_2.12:1.9.2,org.apache.iceberg:iceberg-aws-bundle:1.9.2 \
    --conf spark.sql.extensions=org.apache.iceberg.spark.extensions.IcebergSparkSessionExtensions \
    --conf spark.sql.defaultCatalog=polariscatalog \
    --conf spark.sql.catalog.polariscatalog=org.apache.iceberg.spark.SparkCatalog \
    --conf spark.sql.catalog.polariscatalog.type=rest \
    --conf spark.sql.catalog.polariscatalog.io-impl=org.apache.iceberg.aws.s3.S3FileIO \
    --conf spark.sql.catalog.polariscatalog.uri=http://polaris:8181/api/catalog \
    --conf spark.sql.catalog.polariscatalog.warehouse=polariscatalog \
    --conf spark.sql.catalog.polariscatalog.credential='root:secret' \
    --conf spark.sql.catalog.polariscatalog.scope='PRINCIPAL_ROLE:ALL' \
    --conf spark.sql.catalog.polariscatalog.token-refresh-enabled=true \
    --conf spark.sql.catalog.polariscatalog.s3.endpoint=http://minio:9000 \
    --conf spark.sql.catalog.polariscatalog.s3.access-key=admin \
    --conf spark.sql.catalog.polariscatalog.s3.secret-key=password \
    --conf spark.sql.catalog.polariscatalog.s3.path-style-access=true \
    --conf spark.hadoop.fs.s3a.endpoint=http://minio:9000 \
    --conf spark.hadoop.fs.s3a.access.key=admin \
    --conf spark.hadoop.fs.s3a.secret.key=password \
    --conf spark.hadoop.fs.s3a.path.style.access=true \
    --conf spark.hadoop.fs.s3a.impl=org.apache.hadoop.fs.s3a.S3AFileSystem \
    --conf spark.hadoop.fs.s3a.connection.ssl.enabled=false
The script is completely version of spark-default.conf and when you trigger
bash ./scripts/run-spark-sql.shIt will success connect your terminal into spark-sql and now you can run a couple query in catalog
# Create NameSpace in your Catalog, DB is your namespace
CREATE NAMESPACE IF NOT EXISTS polariscatalog.db;
# Create Table names inside DB Namespace
CREATE TABLE polariscatalog.db.names (name STRING) USING iceberg;
# Insert Data into that Namespaces
INSERT INTO polariscatalog.db.names VALUES ('Xeus Nguyen'), ('Nhan Phan');
# Select the data in this catalog
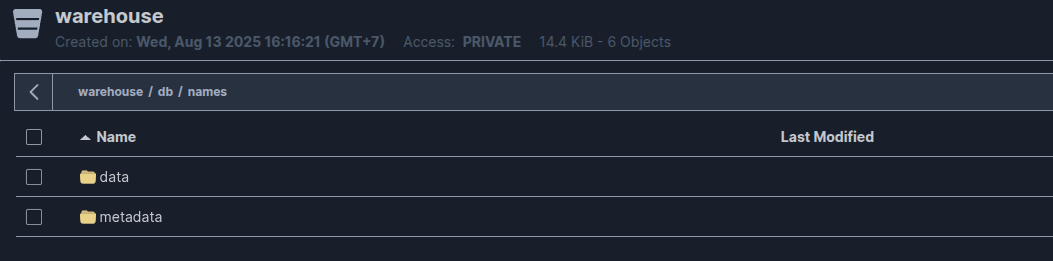
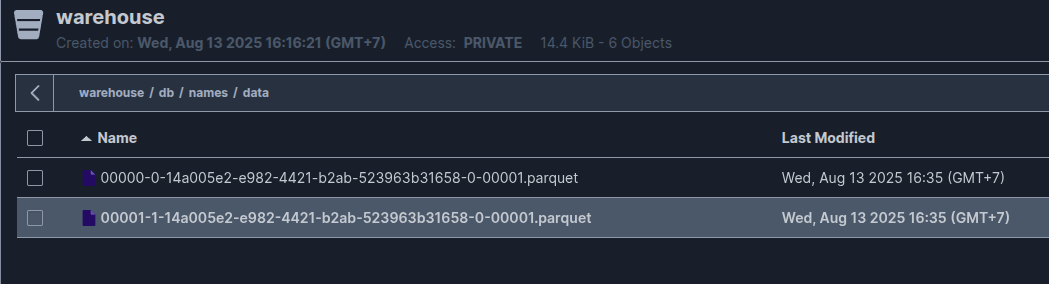
SELECT * FROM polariscatalog.db.names;Your data will save at location warehouse (catalog) > db (namespace) > names (table)
With data, it will save in Parquet format
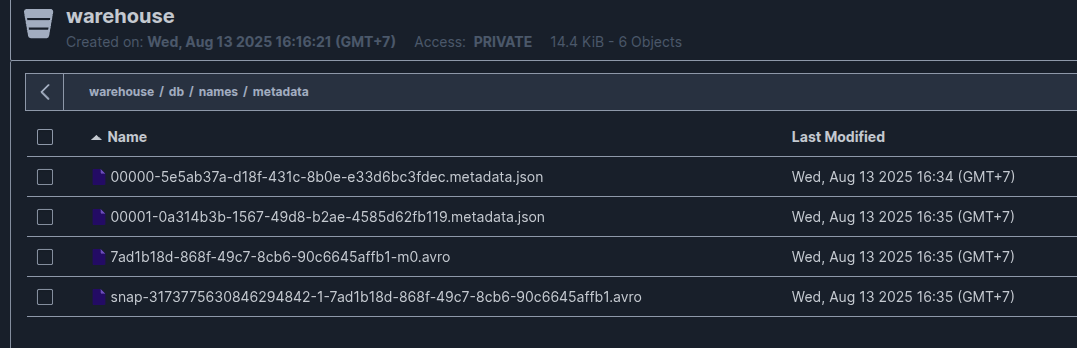
With metadata, it will save in json and avro format
Deploying Polaris to Kubernetes (Updated 10/2025)
Currently, when I write the updated for this blog, you already have the way to operate Polaris to Kubernetes environment. That’s pretty useful for system nowadays, and I am not exception. But it’s trying to repeat almost step in Docker, but more sophisticated and reduce a lot of workload when you work with them in Kubernetes.
You can find the helm chart in any version of Polaris, especially, I recommend you use them in releast/* tag because it’s already stable than main version. Explore them via these links below
When I try to overview the helm-chart, because this project is written by apache, so the values define truly detail as well, and you can easier to understand, and change them for suitable with your configuration
Like the docker version, I will change couple of configuration following the Production Operating
- Use an
rsa-key-pairfor the authentication method, defining your ownpublic.keyandprivate.key. - Do not require a header. We are skipping this feature to simplify the delivery process.
- Change the metastore configuration from the default
in_memorysetting torelational-jdbcwith a PostgreSQL Database. - To use
relational-jdbc, you must bootstrap the database to create the necessarypolaris_schemafor metastore storage. - Change the
FILEstorage type to support S3 and Azure.
First of all, we need to define the secrets in Kubernetes with great optional for let your helm generate the secrets and mapping into Polaris
Configure OAuth2 for Polaris
Note
By default, Polaris will use
rsa-key-pairfor authentication method, that why if you let polaris generate then by own, it will lead to trouble when you have demands for scaling Polaris 👉👉 READ MORE AT: Polaris - Configure OAuth2
- To generate the key-pair by your own, you can handle by command
openssl genpkey -algorithm RSA -out private.key -pkeyopt rsa_keygen_bits:2048
openssl rsa -in private.key -pubout -out public.key- After that, you can create the secret in
Kubernetesbase on them
kubectl create secret generic --namespace polaris polaris-auth-secrets \
    --from-file="public.key=./public.key" \
    --from-file="private.key=./private.key" \
--dry-run=client --output yaml > polaris-auth-secrets.yaml- Applying this file to Kubernetes
kubectl apply -f polaris-auth-secrets.yamlDatabase Secrets for Polaris
Note
Polaris will use
in-memoryfor metastore, it means when Polaris restarts that will be purged whole things, so why we need to change that intorelation-jdbcwith any database. But currently, Polaris supports great for PostgreSQL
- To create secret, you need to prepare the files, including
Warning
Because Polaris use Quarkus framework for setting, that why it support driver to connect DB and when I deploy for first time, it encounter error when doesn’t understand the value in secrets. Quarkus only support
jdbcUrlnot wrap in double-quote"", that why you need to put only rawjdbcURL, so do the same forusernameandpassword
username=your-db-username
password=your-db-password
jdbcUrl=jdbc:postgresql://your-db-ip:5432/polaris- After that, you can create the secret in Kubenetes via
kubectlcommand base on them
kubectl create secret generic --namespace polaris polaris-db-secrets \
    --from-env-file db.env \
--dry-run=client --output yaml > polaris-db-secrets.yaml- Applying this file
kubectl apply -f polaris-db-secrets.yamlStorage Secrets for Polaris
Note
The critical feature of Polaris is interact and management catalog of IceBerg with object storage, such as S3, GCS, … For the workspace, I use MinIO for alternative solution of S3 in Local Environment, to let polaris able to connect, you need create secret and mount them to Kubernetes, or you can use S3 but not need to define any alternative endpoint
- To create secret, you need to prepare the files, including
awsAccessKeyId="awsAccessKeyId"
awsSecretAccessKey="awsSecretAccessKey"- After that, you can create the secret in Kubenetes via
kubectlcommand base on them
kubectl create secret generic --namespace polaris polaris-storage-secrets \
    --from-file storage.env \
--dry-run=client --output yaml > polaris-storage-secrets.yaml- Applying this file
kubectl apply -f polaris-storage-secrets.yamlFor double-check all of secrets created in polaris namespace, you can use get command
kubectl get secrets -n polarisNext step, we need to bootstrap PostgreSQL Database
To reduce the complex when setup the polaris tools, I recommend you to use docker version for instead of binary version by including all of them container when we create with image apache/polaris-admin-tool:latest
You should login to postgresql database, and create database for your user to connect to db. But for testing, I prefer use the root user of PostgreSQL
Warning
For production environment, I prefer you to create another user with specific permission in
polarisDB
psql -h database-host -U username -d postgres -c "CREATE DATABASE polaris;"Prompt password and you will create success new empty database polaris in PostgreSQL. Next, you can use docker to run the bootstrap
docker run -it --name polaris-bootstrap-db \
    --env POLARIS_PERSISTENCE_TYPE="relational-jdbc" \
    --env QUARKUS_DATASOURCE_JDBC_URL="jdbc:postgresql://your-db-ip:5432/polaris" \
    --env QUARKUS_DATASOURCE_USERNAME="your-db-username" \
    --env QUARKUS_DATASOURCE_PASSWORD="your-db-password" \
    apache/polaris-admin-tool:latest bootstrap --realm=<realm> --credential='<realm,clientId,clientSecret>'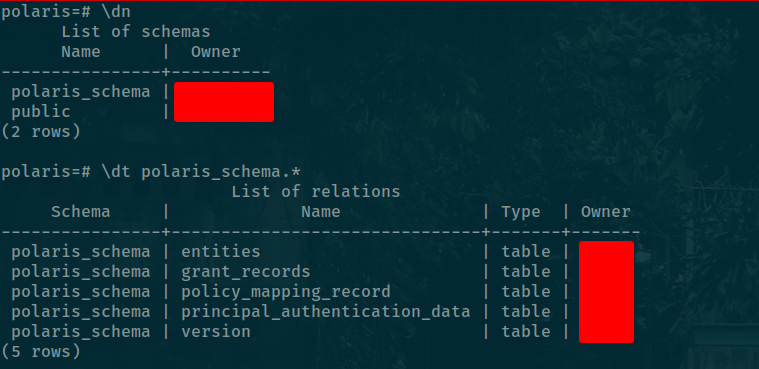
Now you already prepare enough stuff for Polaris, at the end you need to customize the values.yaml of Polaris Helm chart. Let go into the detail thing what i change
- Specific version for Polaris (NOTE: one of important thing for make your service consistent)
image:
  # -- The image repository to pull from.
  repository: apache/polaris
  # -- The image pull policy.
  pullPolicy: IfNotPresent
  # -- The image tag.
  tag: "1.1.0-incubating"
  # -- The path to the directory where the application.properties file, and other configuration
  # files, if any, should be mounted.
  # Note: if you are using EclipseLink, then this value must be at least two folders down to the
  # root folder, e.g. `/deployments/config` is OK, whereas `/deployments` is not.
configDir: /deployments/config- Update the resources for Polaris
resources:
  limits:
    memory: 1Gi
  requests:
    cpu: 100m
memory: 1Gi- Add advanced config for
polaris.features.DROP_WITH_PURGE_ENABLED
advancedConfig:
polaris.features.DROP_WITH_PURGE_ENABLED: true- Next add extraEnv for bucket information, especially if you use MinIO for S3 features
extraEnv:
  - name: AWS_REGION
    value: us-east-1
  - name: AWS_ENDPOINT_URL_S3
    value: https://s3.example.com
  - name: AWS_ENDPOINT_URL_STS
    value: https://s3.example.com
  - name: quarkus.datasource.db-kind
value: postgresql- Change the default realmContext for matching with bootstrap in DB (POLARIS ⇒ polaris)
# -- Realm context resolver configuration.
realmContext:
  # -- The type of realm context resolver to use. Two built-in types are supported: default and test;
  # test is not recommended for production as it does not perform any realm validation.
  type: default
  # -- List of valid realms, for use with the default realm context resolver. The first realm in
  # the list is the default realm. Realms not in this list will be rejected.
  realms:
- polaris- Disable
FILEstorage type toS3only at features
# -- Polaris features configuration.
features:
  SUPPORTED_CATALOG_STORAGE_TYPES:
    - S3
realmOverrides: {}- Set the secrets for metastore saving with
postgresql, it should match with key you create in secretspolaris-db-secrets
# -- Polaris persistence configuration.
persistence:
  # -- The type of persistence to use. Two built-in types are supported: in-memory and relational-jdbc.
  # The eclipse-link type is also supported but is deprecated.
  type: relational-jdbc  # relational-jdbc
  # -- The configuration for the relational-jdbc persistence manager.
  relationalJdbc:
    # -- The secret name to pull the database connection properties from.
    secret:
      # -- The secret name to pull database connection properties from
      name: polaris-db-secrets
      # -- The secret key holding the database username for authentication
      username: username
      # -- The secret key holding the database password for authentication
      password: password
      # -- The secret key holding the database JDBC connection URL
jdbcUrl: jdbcUrl- Set the secrets for storage type, following we use
MinIOwill be matched with AWS
# -- Storage credentials for the server. If the following properties are unset, default
# credentials will be used, in which case the pod must have the necessary permissions to access the storage.
storage:
  # -- The secret to pull storage credentials from.
  secret:
    # -- The name of the secret to pull storage credentials from.
    name: polaris-storage-secrets
    # -- The key in the secret to pull the AWS access key ID from. Only required when using AWS.
    awsAccessKeyId: awsAccessKeyId
    # -- The key in the secret to pull the AWS secret access key from. Only required when using AWS.
    awsSecretAccessKey: awsSecretAccessKey
    # -- The key in the secret to pull the GCP token from. Only required when using GCP.
    gcpToken: ~
    # -- The key in the secret to pull the GCP token expiration time from. Only required when using GCP. Must be a valid ISO 8601 duration. The default is PT1H (1 hour).
gcpTokenLifespan: ~- Lastly, set the secrets for OIDC authentication with
rsa-key-pairvalue
# -- Polaris authentication configuration.
authentication:
  # -- The type of authentication to use. Three built-in types are supported: internal, external, and mixed.
  type: internal
  # -- The `Authenticator` implementation to use. Only one built-in type is supported: default.
  authenticator:
    type: default
  # -- The token service (`IcebergRestOAuth2ApiService`) implementation to use. Two built-in types are supported: default and disabled.
  # Only relevant when using internal (or mixed) authentication. When using external authentication, the token service is always disabled.
  tokenService:
    type: default
  # -- The `TokenBroker` implementation to use. Two built-in types are supported: rsa-key-pair and symmetric-key.
  # Only relevant when using internal (or mixed) authentication. When using external authentication, the token broker is not used.
  tokenBroker:
    type: rsa-key-pair  # symmetric-key
    # -- Maximum token generation duration (e.g., PT1H for 1 hour).
    maxTokenGeneration: PT1H
    # -- The secret name to pull the public and private keys, or the symmetric key secret from.
    secret:
      # -- The name of the secret to pull the keys from. If not provided, a key pair will be generated.
      # This is not recommended for production.
      name: polaris-auth-secrets
      # -- DEPRECATED: Use `authentication.tokenBroker.secret.rsaKeyPair.publicKey` instead.
      # Key name inside the secret for the public key
      publicKey: public.pem
      # -- DEPRECATED: Use `authentication.tokenBroker.secret.rsaKeyPair.privateKey` instead.
      # Key name inside the secret for the private key
      privateKey: private.pem
      # -- DEPRECATED: Use `authentication.tokenBroker.secret.symmetricKey.secretKey` instead.
      # Key name inside the secret for the symmetric key
      secretKey: symmetric.pem
      # -- Optional: configuration specific to RSA key pair secret.
      rsaKeyPair:
        # -- Key name inside the secret for the public key
        publicKey: public.key
        # -- Key name inside the secret for the private key
        privateKey: private.key
      # -- Optional: configuration specific to symmetric key secret.
      symmetricKey:
        # -- Key name inside the secret for the symmetric key
        secretKey: symmetric.key
  # -- Authentication configuration overrides per realm.
  realmOverrides: {}
    # my-realm:
    #   type: external
    #   authenticator:
    #     type: custom
Alright, you already to deploy the polaris to namespace. Because this one is not publish the helm as web-service for check index.yaml, so why you need to download this helm by GitZip - a great tools for download subfolder
Now navigate to helm polaris, and you can build install.yaml with definition template and customize value file
helm template polaris -f values-customize.yaml ./ --debug > install.yamlNow you can apply this file with command kubectl
kubectl apply -f install.yamlWarning
(BONUS) When I work to deploy the
Polariswith ArgoCD, you will encounter the error below to let you render the template in ArgoCD
template: polaris/templates/deployment.yaml:130:12: executing "polaris/templates/deployment.yaml" at <include "polaris.configVolume" .>: error calling include: template: polaris/templates/_helpers.tpl:179:10: executing "polaris.configVolume" at <include "polaris.configVolumeAuthenticationOptions" (list "" .Values.authentication)>: error calling include: template: polaris/templates/_helpers.tpl:348:29: executing "polaris.configVolumeAuthenticationOptions" at <.>: wrong type for value; expected chartutil.Values; got []interface {} Use --debug flag to render out invalid YAMLThis error relate when calling the template via include and parsing the context (dot or . )
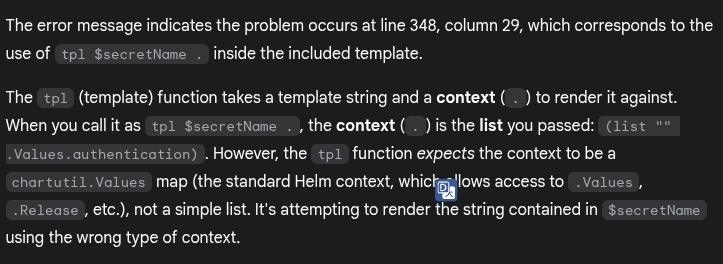
Therefore, I try to edit these template files to fix in _helpers.tpl , following below
First we edit the template polaris.configVolumeAuthenticationOptions for setting another definition rootContext
Info
The inner template should be modified to extract the needed variables and the root context (
.) from the dictionary (or list) passed to it.
{{/*
Sets authentication options for a given realm in the projected config volume.
*/}}
{{- define "polaris.configVolumeAuthenticationOptions" -}}
{{- $realm := index . 0 -}}
{{- $auth := index . 1 -}}
{{- $rootContext := index . 2 -}} # <--- Add this to capture the root context
{{- $authType := coalesce $auth.type "internal" -}}
{{- if (or (eq $authType "mixed") (eq $authType "internal")) }}
{{- $secretName := dig "tokenBroker" "secret" "name" "" $auth -}}
{{- if $secretName -}}
{{- $tokenBrokerType := dig "tokenBroker" "type" "rsa-key-pair" $auth -}}
{{- $subpath := empty $realm | ternary "" (printf "%s/" (urlquery $realm)) -}}
- secret:
    name: {{ tpl $secretName $rootContext }} # <--- Use $rootContext here
    items:
    {{- if eq $tokenBrokerType "rsa-key-pair" }}
      {{- /* Backward compatibility for publicKey: new takes precedence */ -}}
      {{- $publicKey := coalesce (dig "tokenBroker" "secret" "rsaKeyPair" "publicKey" "" $auth) (dig "tokenBroker" "secret" "publicKey" "public.pem" $auth) }}
      {{- /* Backward compatibility for privateKey: new takes precedence */ -}}
      {{- $privateKey := coalesce (dig "tokenBroker" "secret" "rsaKeyPair" "privateKey" "" $auth) (dig "tokenBroker" "secret" "privateKey" "private.pem" $auth) }}
      - key: {{ tpl $publicKey $rootContext }} # <--- Use $rootContext here
        path: {{ $subpath }}public.pem
      - key: {{ tpl $privateKey $rootContext }} # <--- Use $rootContext here
        path: {{ $subpath }}private.pem
    {{- end }}
    {{- if eq $tokenBrokerType "symmetric-key" }}
      {{- /* Backward compatibility for symmetricKey: new takes precedence */ -}}
      {{- $secretKey := coalesce (dig "tokenBroker" "secret" "symmetricKey" "secretKey" "" $auth) (dig "tokenBroker" "secret" "secretKey" "symmetric.key" $auth) }}
      - key: {{ tpl $secretKey $rootContext }} # <--- Use $rootContext here
        path: {{ $subpath }}symmetric.key
    {{- end }}
{{- end }}
{{- end }}
{{- end -}}
Next we update the include which call template above in polaris.configVolume with third element of the list
{{/*
Prints the config volume definition for deployments and jobs.
*/}}
{{- define "polaris.configVolume" -}}
- name: config-volume
  projected:
    sources:
      - configMap:
          name: {{ include "polaris.fullname" . }}
          items:
            - key: application.properties
              path: application.properties
      {{- include "polaris.configVolumeAuthenticationOptions" (list "" .Values.authentication .) | nindent 6 }} # <--- Pass the root context (.)
      {{- range $realm, $auth := .Values.authentication.realmOverrides -}}
      {{- include "polaris.configVolumeAuthenticationOptions" (list $realm $auth .) | nindent 6 }} # <--- Pass the root context (.)
      {{- end -}}
{{- end -}}
By passing the root context (.) as the third element in the list and using it explicitly for the tpl function, you ensure that tpl receives the expected chartutil.Values map, resolving the wrong type for value error
Polaris in Production Ready (Updated 12/2025)
Quote
After the great time of Polaris when run as development mode, it means I only use Docker and Docker Compose to host and workaround with these techstack lakehouse. I decide to bring it to production, and also shift to use Kubernetes to make the From GitLab to Data LakeHouse Pipeline for Orchestration work their missions
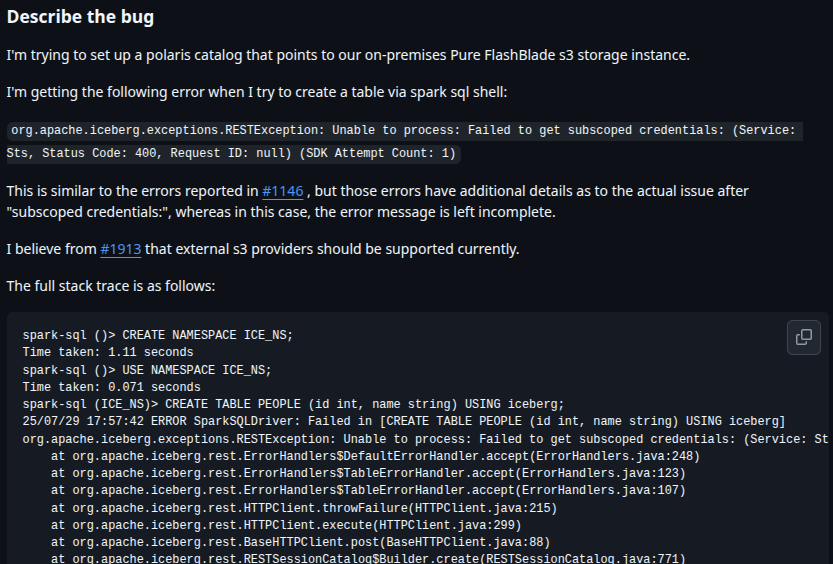
Danger
The issue comes up and it leads to issue about STS - Security Token Service which doesn’t exist in MinIO, so that reason why when I call the polaris via external endpoint and use HTTPS , e.g:
https://polaris.xeusnguyen.xyz. It don’t work as expectation and raise several bug above, and I lost 1 days to find this fix by delving deeper into the issues and source code of Polaris
But first, I have find something about MInIO STS with coming up from version RELEASE.2025-03-27T23-09-45Z or later, this endpoint can generate over HTTPS from version RELEASE.2025-02-06T18-14-59Z. Totally, it doesn’t work with my situation because i have old version of MinIO at RELEASE.2024-10-13T13-34-11Z and not’easy for upgrading to new version
When I think that won’t gonna work, I find the issue to support S3 Storage not support or have STS, Read more at: Polaris - Support S3 storage that does not have STS and give me some insight about another storage already support bypass STS and Apache Ozone already lead to resolve this issue and we can see it detail more at
As you can see, Polaris introduce the another properties when you define S3 Storage Information in Catalog API with key stsUnavailable and when you define this one, your error will be gone, and it will work as your expectation and bypass STS verification. You can double-check the API Create Catalog with MinIO as S3 Storage, or you can check at GitHub - Playaround Data LakeHouse
curl -s -X POST \
  -H "Polaris-Realm: $REALM" \
  -H "Authorization: Bearer $ACCESS_TOKEN" \
  http://localhost:8181/api/management/v1/catalogs \
  --json '{
    "name": "'"$CATALOG_NAME"'",
    "type": "INTERNAL",
    "properties": {
      "default-base-location": "s3://warehouse",
      "s3.region": "us-east-1",
      "s3.path-style-access": true,
      "s3.endpoint": "'"$S3_ENDPOINT"'",
      "s3.access-key-id": "'"$S3_ACCESS_KEY_ID"'",
      "s3.secret-access-key": "'"$S3_ACCESS_KEY_SECRET"'"
    },
    "storageConfigInfo": {
      "storageType": "S3",
      "endpoint":"http://localhost:9000",
      "endpointInternal":"http://minio:9000",
      "stsUnavailable": "true",
      "pathStyleAccess":true,
      "roleArn": "arn:aws:iam::000000000000:role/minio-polaris-role",
      "allowedLocations": [
        "s3://warehouse/*"
      ]
    }
  }'
Conclusion

Success
This marks the conclusion of the article. I hope you found it informative and had a good time reading my publication. It’s been a while since I’ve delved back into learning so much and shared my knowledge on Data Lakehouse, a topic that has always held a curious and mysterious appeal for me in the Data Engineering field.
Quote
I hope you all stay in touch with me, remain safe and well. I’ll have another blog coming out this week, which I hope you’ll also enjoy