Quote
Hello, hello! It’s me again, and today I’m returning with a new solution. This tool seems similar to Airflow but is designed to more directly tackle the challenge of orchestrating data pipelines, especially when dealing with data-lakehouse components. Take a seat, and we will delve deeper into it together.
The journey, From Idea to Reality

Question
The central question I face is how to orchestrate a data pipeline that integrates multiple techniques within our data lakehouse components. A key challenge is ensuring ease of maintenance, troubleshooting, and smooth deployment across the DevOps Engineer and Data Team. My proposal is to leverage Kubernetes to schedule the data pipeline using Jobs and CronJobs within our cluster.
I want to acknowledge my colleague AI Engineer - Nhan Phan Van, who brainstormed with me to list and digest potential solutions. Our ideas converged, and I decided to visualize this concept for implementation and share it with the community, hoping it proves valuable in various use-cases.
Warning
This solution is an initial idea that arose immediately; therefore, its suitability as a best practice is not guaranteed. Before adopting it, you must clearly define your trade-offs and expected outcomes.
The Idea
The initial plan to operate data pipelines in Kubernetes using simple long-running Deployment-type resources presents several core operational weaknesses:
- Platform Ownership and Access Control: The platform is typically managed by DevOps or Platform Engineers, creating a bottleneck where Data Engineers lack the necessary permissions to independently modify or debug their pipelines when required.
- Inefficient GitOps Image Synchronization: Adopting GitOps makes it challenging to quickly iterate on pipeline logic. Data Engineers often need to wait for a full, new deployment cycle to test simple code changes, even when configuration remains untouched, resulting in a slow feedback loop.
- Resource Reservation and Waste: Using long-running controllers like
Deployment,DaemonSet, orStatefulSetfor batch/transient workloads leads to significant resource waste. These resources are over-reserved for peak execution during the pipeline run but remain allocated and unavailable to other tasks after the pipeline completes. - Complex Scheduling Logic: Implementing complex scheduling requirements for data pipelines becomes an insurmountable challenge when relying solely on basic Kubernetes primitives.
These limitations demonstrate that a deployment-centric structure is unsuitable. Although Apache Airflow is considered a mature orchestration solution, its complexity and feature overhead are deemed excessive for this experiment. However, the concept of Airflow’s Kubernetes Executor offers inspiration by providing a model where the orchestration logic (the scheduler) is decoupled from the execution environment, running each pipeline task as a temporary, dedicated Kubernetes resource.
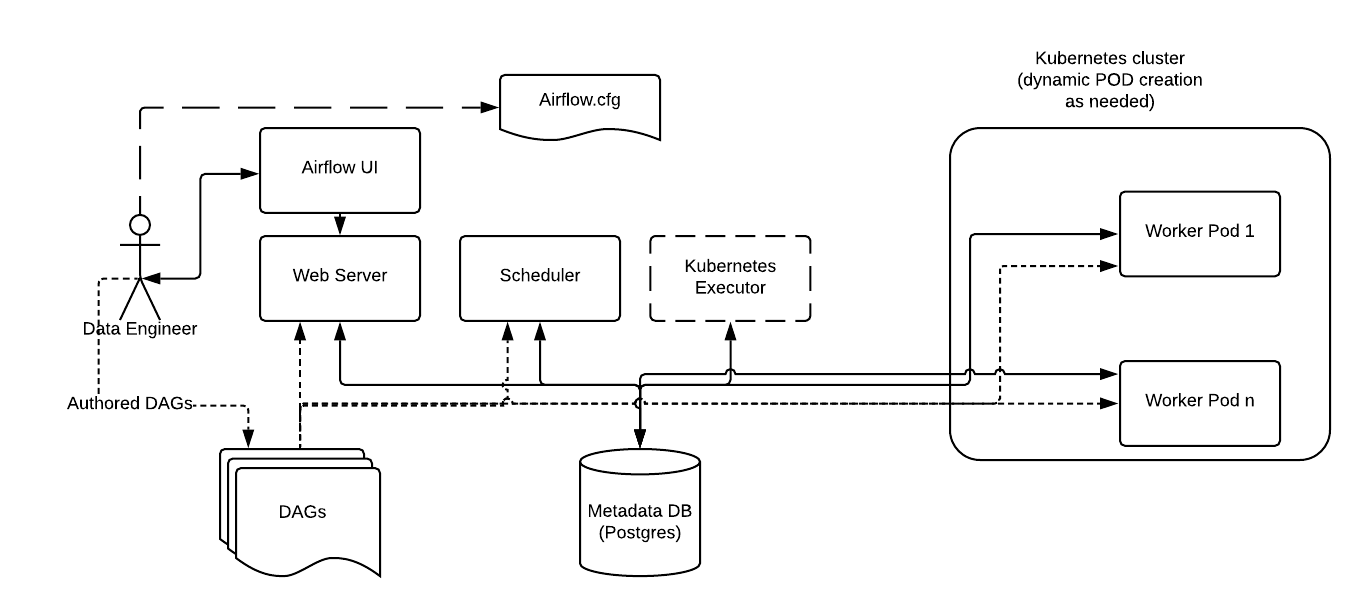
Kubenetes Executor Illustration (Source: Airflow)
The inspiration from the Airflow Kubernetes Executor lies in its ability to provision a temporary Pod for executing pipeline logic, following a workflow defined by a Directed Acyclic Graph (DAG). Upon completion, the Pod is terminated, thereby reclaiming resources.
This model aligns perfectly with the simplicity and resource efficiency of native Kubernetes primitives like Jobs and CronJobs. These controllers are designed to allocate temporary resources for finite tasks and release them afterward, allowing us to completely manipulate resource management.
While our idea offers a solution for specific, less complex use cases, I must emphasize the robust reputation of established open-source orchestrators. These platforms provide superior visualization, monitoring, and complexity management, which are crucial for long-term operational success and bridging the gap between Data and DevOps teams.
I strongly recommend considering one of these industry leaders before proceeding with a custom solution:
- Airflow: A platform to programmatically author, schedule, and monitor workflows. 🌟 (Recommended)
- Dagster: An orchestration platform focused on the development, production, and observation of data assets.
- Argo Workflows: An open-source, container-native workflow engine for orchestrating parallel jobs directly on Kubernetes.
- Prefect: A workflow orchestration framework specifically for building resilient data pipelines in Python.
These tools form the backbone of modern data workflow and orchestration practices. However, if your requirements remain simple and do not necessitate the full feature set or DAG management complexity of these platforms, I will proceed to detail our native Kubernetes solution.
The Reality
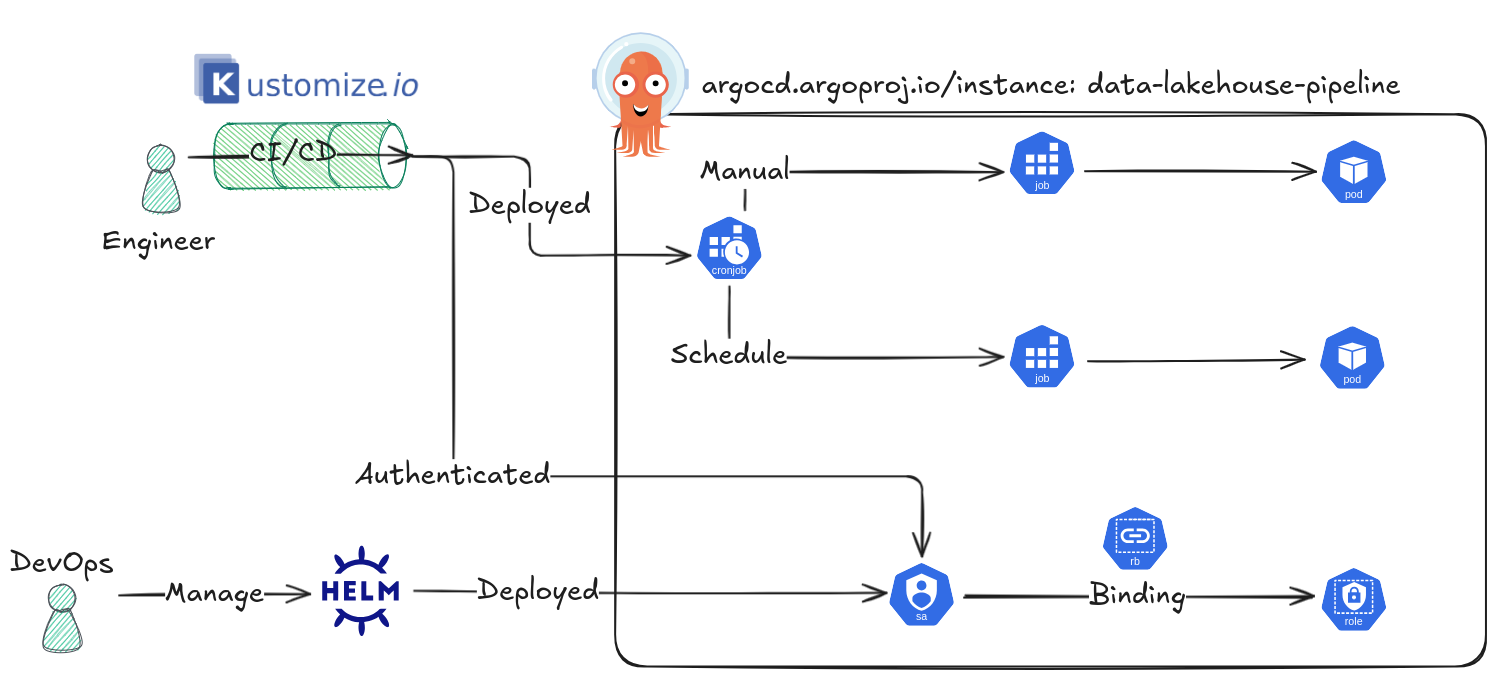
Source: By me
This architectural approach strategically separates provisioning and operational responsibilities, ensuring a robust, secure, and collaborative environment for the data pipeline.
🛠️ DevOps & Platform Engineer Sight
This role is responsible for establishing the secure foundation and access control necessary for the Data Engineers to manage their pipelines natively within Kubernetes. Provisioning is handled via ArgoCD Application (GitOps) and involves the following critical components:
- Service Account: Created specifically for the CI/CD pipeline. This account is attached to applications for securely retrieving secret environments and will be used as the identity to which permissions are granted.
- Role: Defines the granular Kubernetes permissions needed. Specifically, it grants the ability to manage (
create,delete,get,listandpatch)JobsandCronJobswithin the designated namespace. It also grants permission to getPodsand retrieve logs forPodscreated by those jobs. - RoleBinding: The mechanism that associates the defined Role with the Service Account, thereby granting the necessary execution permissions.
Once provisioning is complete, the DevOps team uses kubectl to generate a token from this Service Account. This token is stored securely in CI/CD Variables (e.g., GitLab CI/CD) for authentication, allowing the Engineer’s pipeline to connect to the Kubernetes API.
💻 Data Engineer Sight
The Engineer’s responsibility is the dynamic creation and deployment of the data pipeline workloads using the secure context provided by DevOps.
- Workload Definition: The Engineer creates the necessary
CronJobs(which define the schedules) andJobs(which define the executable task templates) from their side. These definitions provision dynamic, temporary Pods that contain the pipeline logic. - Templating Choice: Various templating approaches can be used to manage Kubernetes definitions, such as
Helm, rawManifests, orKustomize. The decision here is to utilize Kustomize for this experiment to expand the toolset. - CI/CD Integration: The entire process is packaged within the GitLab CI/CD Pipeline. This pipeline uses the secured Service Account Token to authenticate against the Kubernetes Cluster and directly deploy the
CronJobsand associated resources. - Visualization and Debugging: To enhance operational visibility, the Engineer will strategically manipulate labels on all deployed Kubernetes objects (including
CronJobs). This labeling allows these dynamic resources to be displayed and monitored within ArgoCD. This action facilitates direct debugging and log viewing in ArgoCD, streamlining the visualization of the data pipeline workflow.
This combined approach results in a fully self-contained pipeline that utilizes native Kubernetes techniques without reliance on complex third-party orchestrators. It is simple, fun, and directly resolves the resource management and access control challenges identified previously. We are now ready to move into the detailed laboratory implementation.
It’s time for laboratory

Quote
The decision to utilize Kustomize for this session is excellent, as it aligns with the goal of expanding your toolset for Kubernetes deployment and implementation. Let’s delve into its core concepts before applying it to the lab.
Kustomize, Feature and Usage
![]()
It’s exciting that you’re implementing Kustomize from scratch for the first time! Working with native Kubernetes configuration tooling is a valuable skill, especially for achieving the clear separation of concerns required for our DevOps and Data Engineer collaboration.
Info
Kustomize
Kustomize is a tool for customizing Kubernetes configurations. It has the following features to manage application configuration files
- Generating resources from other sources
- Setting cross-cutting fields for resources
- Composing and customizing collections of resources
Quote
The growing popularity of Kustomize within the Kubernetes community, positioning it as a strong alternative to tooling like Helm, is notable. It enables a declarative, template-free approach to configuration management, as further detailed in my other articles like Deployment in Kubernetes.
A significant advantage of Kustomize is its native integration with Kubernetes. You can utilize Kustomize features directly via the standard kubectl command, meaning installing kubectl is sufficient for adoption. Alternatively, a standalone binary is available for download at GitHub - kustomize.
The core of Kustomize’s structure is the kustomization.yaml file. As described in the Kustomize - The Kustomization file documentation, this file defines how to generate or transform KRM Objects (Kubernetes Resource Model). This declarative approach enhances the dynamism and simplicity of your project directories.
Your primary interaction when working with Kustomize involves defining references within the kustomization.yaml file:
- A file system path to a YAML file containing one or more KRM objects.
- A directory (local or in a remote Git repository) that itself contains a
kustomization.yamlfile.
By focusing on this declarative file and the concepts of Bases and Overlays, you gain the ability to manage configuration variations efficiently and simplify the deployment lifecycle.
app1/
  kustomization.yaml
    | resources:
    | - ../base
    | patches:
    | - patch1.yaml
  patch1.yaml

app2/
  kustomization.yaml
    | resources:
    | - ../base
    | patches:
    | - patch2.yaml
  patch2.yaml

base/
  kustomization.yaml
    | resources:
    | - deployment.yaml
    | - configMap.yaml
  deployment.yaml
  configMap.yaml
Quote
I think that’s all for
Kustomize, although it can be more than that, 100%, and I can’t write long stories for this technologies in today topics. Therefore, I will see you in specific topic forkustomizenearest time
For more example and solution, you can reference to these articles
DevOps in the action

Same as the illustration, I will use helm to tackle the responsibility to implementation the required objects to ensure anything from engineer usage smoothly and reliable
Let’s create the following below directory structure, you can use helm or argocd or whatever to create application. In this experiment, I will use argocd to target, but the deploy for this techstack is not sharing in this session
Note
I prepare another session to share detail about this technologies, so sorry, but you need wait, or explore the ideal operate and bootstrap ArgoCD with
App of appspattern in Kind Cluster at Medium - Self Managed Argo CD — App Of Everything 🌟 (Recommended)
.
├── Chart.yaml
├── .helmignore
├── templates
│   └── rbac.yaml
└── values.yaml

2 directories, 4 files
First of all, we come to Chart.yaml file with simple required information
apiVersion: v2
name: data-lakehouse-pipeline
description: A Helm chart for Kubernetes

# A chart can be either an 'application' or a 'library' chart.
#
# Application charts are a collection of templates that can be packaged into versioned archives
# to be deployed.
#
# Library charts provide useful utilities or functions for the chart developer. They're included as
# a dependency of application charts to inject those utilities and functions into the rendering
# pipeline. Library charts do not define any templates and therefore cannot be deployed.
type: application

# This is the chart version. This version number should be incremented each time you make changes
# to the chart and its templates, including the app version.
# Versions are expected to follow Semantic Versioning (https://semver.org/)
version: 0.1.0

# This is the version number of the application being deployed. This version number should be
# incremented each time you make changes to the application. Versions are not expected to
# follow Semantic Versioning. They should reflect the version the application is using.
# It is recommended to use it with quotes.
appVersion: "0.1.0"
Next, we will define the rbac.yaml which include all of stuff managing from DevOps side and provide it for engineer like talking above. But first of all, I recommend you to read about concept of Kubernetes authenticated and authorized via couple of articles
- Kubernetes - Using RBAC Authorization
- Kubernetes - Authenticating
- DevOpsCube - How to Create Kubernetes Service Account and Long Lived Token
In our concept of mine to following to use Service Account Tokens, you will ask service account to the token for authenticating your request to Kubernetes API via Role Binding assigned with our Role definition and turn it into restrict lifecycle in Kubernetes from Authenticated with Authorized Permission.
With these implementation, we can completely build the completely context to secure interact with K8s Cluster. Explore a couple way and get one for yourself at some articles
- Kubernetes - Configure Access to Multiple Clusters
- Kubernetes - Issue a Certificate for a Kubernetes API Client Using A CertificateSigningRequest
- Kubernetes - Generate Certificates Manually
Note
This action is just practicing but great for us, because sometime we use Kubernetes in Cloud, and
kubeconfiggenerated automatically and you will ignore the important important progress to authentication specific Kubernetes
I will turn back to how to build success kubeconfig to specific context with kubectl command in the part of Engineer. Now let define rbac.yaml
{{- if .Values.rbac.create }}
---
apiVersion: rbac.authorization.k8s.io/v1
kind: Role
metadata:
  name: {{ .Values.name }}
  namespace: {{ .Values.namespace }}
rules:
# 1. Full management for Jobs and CronJobs (create, delete, get, list, update and patch)
- apiGroups: ["batch"]
  resources: ["jobs", "cronjobs"]
  verbs: ["*"]
# 2. Required permissions to interact with the Pods created by the Jobs
- apiGroups: [""] # Core API group
  resources: ["pods"]
  verbs: ["get", "list"]
# 3. CRITICAL: Permission to retrieve the logs from the Pods
- apiGroups: [""] # Core API group
  resources: ["pods/log"]
  verbs: ["get"]
---
apiVersion: rbac.authorization.k8s.io/v1
kind: RoleBinding
metadata:
  namespace: {{ .Values.namespace }}
  name: {{ .Values.name }}
roleRef:
  apiGroup: rbac.authorization.k8s.io
  kind: Role
  name: {{ .Values.name }}
subjects:
- kind: ServiceAccount
  # Placeholder ServiceAccount name, will be replaced by overlays
  name: {{ .Values.name }}
  namespace: {{ .Values.namespace }}
{{- end }}
{{- if .Values.serviceaccount.create }}
---
apiVersion: v1
kind: ServiceAccount
metadata:
  name: {{ .Values.name }}
  namespace: {{ .Values.namespace }}
{{ end }}
Alright, lastly define values for let your helm understand the values of your template at values.yaml
# -- Set name for couple of components, such as serviceaccount, role and role-binding
name: data-lakehouse-pipeline

# -- Namespace where template definition
namespace: data-lakehouse

# -- Enable to create rbac
rbac:
  create: true

# -- Enable to create service account
serviceaccount:
  create: true
That’s all, now adapt this chart with helm command or argocd application pattern
helm install data-lakehouse-pipeline ./ -f values.yaml -n data-lakehouse --create-namespaceWait for a bit and you can see these components in your cluster, you can double check with command
kubectl get roles -n data-lakehouse
kubectl get rolebindings -n data-lakehouse
kubectl get serviceaccounts -n data-lakehouse
Aright, we will already have enough stuff in DevOps side, let’s move to Engineer side for completely setup data pipeline with scheduling via cronjobs
Engineer in the action

From Engineer Side, I will try to following step by step to define the standard kustomize structure to support K8s Deployment as cronjobs in GitLab CI/CD
Kustomize Layout and Setup
First of all, I try to following the layout to bootstrap my Kustomize directory, and here what I got
k8s
├── base
│   ├── cronjob.yaml
│   └── kustomization.yaml
└── overlay
    ├── dev
    │   └── lakehouse
    │       └── kustomization.yaml
    └── prod
        └── lakehouse
            └── kustomization.yaml
I kept this simple to avoid unnecessary complexity. Our primary focus is on providing specific roles for creating and maintaining Jobs and CronJobs. To manage the dependencies, we will define a kustomization.yaml file, allowing resources to be rendered as expected from base to overlay.
If this structure is new to you, I recommend checking the official documentation on the API and CronJob structure. This will make it easier to approach them as templates, especially if this is your first time working with these Kubernetes workloads:
While CronJobs and Jobs are different workload types, they are intrinsically linked. This is because a CronJob resource automatically creates Job resources based on its schedule. Do not misunderstand my point; you can certainly create individual Jobs, but the illustration I am providing focuses on their relationship, like this example:

These three Kubernetes workloads CronJob, Job, and Pod establish a complete lifecycle critical for data pipeline execution. This lifecycle involves reserving resources to trigger a specific task, ensuring the task runs to completion, and then releasing resources back to the cluster (via the kubelet). This entire concept perfectly aligns with how we design and deliver reliable data pipelines.
Therefore, shall we define the cronjob.yaml first
apiVersion: batch/v1
kind: CronJob
metadata:
  name: pipeline
spec:
  # Set the schedule for cronjobs
  # Documentation at: https://kubernetes.io/docs/concepts/workloads/controllers/cron-jobs/#schedule-syntax
  schedule: "0 1 * * *" # Default: 1 AM UTC
  concurrencyPolicy: Forbid
  successfulJobsHistoryLimit: 1
  failedJobsHistoryLimit: 3
  jobTemplate:
    spec:
      # Keep the logs/Job resource for 12 hours after completion
      # Documentation at: https://kubernetes.io/docs/concepts/workloads/controllers/ttlafterfinished/
      ttlSecondsAfterFinished: 43200
      backoffLimit: 3
      template:
        metadata:
          annotations:
            # Hashicorp vault annotation for Injector
            # Documentation at: https://developer.hashicorp.com/vault/docs/deploy/kubernetes/injector/annotations
            vault.hashicorp.com/agent-inject: 'true'
            vault.hashicorp.com/agent-inject-secret-config.env: secrets/pipeline/config
            vault.hashicorp.com/agent-inject-template-config.env: |-
              {{ with secret "secrets/pipeline/config" }}
              {{- range $key, $value := .Data.data }}
              export {{ $key }}={{ $value }}
              {{- end }}
              {{- end }}
            vault.hashicorp.com/agent-pre-populate-only: 'true'
            vault.hashicorp.com/auth-path: auth/kubernetes
            vault.hashicorp.com/namespace: data-lakehouse
            vault.hashicorp.com/role: data-lakehouse-pipeline
            vault.hashicorp.com/service: 'http://vault.default.svc.local:9200'
        spec:
          # Assuming this SA has Job permissions
          serviceAccountName: data-pipeline-sa
          # Setup the pipeline container command, resource and image to perform data-pipeline-workload
          containers:
          - name: data-processor
            image: data-pipeline-image:latest # Default image
            imagePullPolicy: Always
            command: ["/app/run.sh"]
            args: ["--mode", "continuous"]
            resources:
              limits:
                memory: "512Mi"
              requests:
                memory: "256Mi"
                cpu: "100m"

          restartPolicy: OnFailure
Here is the base cronjobs to define jobs and pods perform data-pipeline action, it include enough configuration to reduce the error for engineer to reuse them to build the own version
With kustomization.yaml in base directory, it has simple mission to include this cronjobs into file, and let another kustomization.yaml understand this base structure
# Currently, token only support create and manage cronjob and job
# please don't configuration any configmap
resources:
  - cronjob.yaml
Alright, we already prepare the base folder, let’s create specific customize use base to dynamical create the another version cronjobs pipeline
Following the information below, I will create the new cronjobs with information like by customization inside kustomization.yaml
- Name:
lakehouse-pipeline - SA:
data-lakehouse-pipeline - Image:
BusyBox - Command: Run Hello World and show value file environment by Vault injector
- Vault: Retrieve the secret from specific data-pipeline location
- ArgoCD:
data-lakehouse-pipeline
# Set the prefix to help render the metadata, especially name with add on them
# Documentation: https://kubectl.docs.kubernetes.io/references/kustomize/kustomization/nameprefix/
namePrefix: lakehouse-

# Set and maintain pair KV label in template
# Documentation: https://kubectl.docs.kubernetes.io/references/kustomize/kustomization/labels/
labels:
  - pairs:
      argocd.argoproj.io/instance: data-lakehouse-pipeline
      pic: AI.XeusNguyen

# Include the base template with `kustomization.yaml` from there directory
# Or you can define another place, event remote URL
# Documentation: https://kubectl.docs.kubernetes.io/references/kustomize/kustomization/resource/
resources:
  - ../../../base

# -- Use Patch to replace the context compatible for your application (Powerful !!!)
# Documentation: https://kubectl.docs.kubernetes.io/references/kustomize/kustomization/patches/
patches:
  # -- Patch Time Schedule
  - target:
      kind: CronJob
      name: pipeline
    patch: |-
      apiVersion: batch/v1
      kind: CronJob
      metadata:
        name: pipeline
      spec:
        schedule: "*/1 * * * *"

  # -- Patch Vault annotation for external secret
  - target:
      kind: CronJob
      name: pipeline
    patch: |-
      apiVersion: batch/v1
      kind: CronJob
      metadata:
        name: pipeline
      spec:
        jobTemplate:
          spec:
            template:
              metadata:
                annotations:
                  vault.hashicorp.com/agent-inject: 'true'
                  vault.hashicorp.com/agent-inject-secret-config.env: secrets/pipeline/config
                  vault.hashicorp.com/agent-inject-template-config.env: |-
                    {{ with secret "secrets/pipeline/config" }}
                    {{- range $key, $value := .Data.data }}
                    export {{ $key }}={{ $value }}
                    {{- end }}
                    {{- end }}
                  vault.hashicorp.com/agent-pre-populate-only: 'true'
                  vault.hashicorp.com/auth-path: auth/kubernetes
                  vault.hashicorp.com/namespace: data-lakehouse
                  vault.hashicorp.com/role: data-lakehouse-pipeline
                  vault.hashicorp.com/service: 'http://vault.default.svc.local:9200'

  # -- Patch serviceaccount of pipeline
  - target:
      kind: CronJob
      name: pipeline
    patch: |-
      apiVersion: batch/v1
      kind: CronJob
      metadata:
        name: pipeline
      spec:
        jobTemplate:
          spec:
            template:
              spec:
                serviceAccountName: data-lakehouse-pipeline

  # -- Patch container information
  - target:
      kind: CronJob
      name: pipeline
    patch: |-
      apiVersion: batch/v1
      kind: CronJob
      metadata:
        name: pipeline
      spec:
        jobTemplate:
          spec:
            template:
              spec:
                containers:
                - name: data-processor
                  image: busybox:${IMAGE_TAG}
                  command: ["sh", "-c", "cat /vault/secrets/config.env && echo 'Hello, world!'"]
                  args: [""]
If you notice about image in container part, I set it into ${IMAGE_TAG} that have meaning for us to dynamically modify this tag base on CI/CD strategies when using the passing artifact between two task, build and deploy. You can try manipulate them via envsubst, which let us overwrite the variable follow the environment
Install envsubst kinda simple via apt (Ubuntu, Debian) or apk (Alpine) with package gettext
# Ubuntu
sudo apt update && sudo apt install gettext-base -y

# Alpine
apk add gettext
But one more things, if you notice about vault injector have template definition when read the secret from vault, it include $ symbol which lead to couple error when use envsubst so why we need specific option this command for only overwrite IMAGE_TAG only, like this one
envsubst 'IMAGE_TAG=$IMAGE_TAG' Note
You can follow another strategies with
imagesparameter of Kustomize, it helps you modify image and tag also. Read more at Kustomize - images
Combining all of these technique, we can try to perform rendering the cronjobs from template for first time by pipe command with kustomize and envsubst
$ export IMAGE_TAG="stable"

$ kubectl kustomize k8s/overlay/dev/lakehouse/ | envsubst 'IMAGE_TAG=$IMAGE_TAG'
apiVersion: batch/v1
kind: CronJob
metadata:
  labels:
    argocd.argoproj.io/instance: data-lakehouse-pipeline
    pic: AI.XeusNguyen
  name: lakehouse-pipeline
spec:
  concurrencyPolicy: Forbid
  failedJobsHistoryLimit: 3
  jobTemplate:
    spec:
      backoffLimit: 3
      template:
        metadata:
          annotations:
            vault.hashicorp.com/agent-inject: "true"
            vault.hashicorp.com/agent-inject-secret-config.env: secrets/pipeline/config
            vault.hashicorp.com/agent-inject-template-config.env: |-
              {{ with secret "secrets/pipeline/config" }}
              {{- range $key, $value := .Data.data }}
              export {{ $key }}={{ $value }}
              {{- end }}
              {{- end }}
            vault.hashicorp.com/agent-pre-populate-only: "true"
            vault.hashicorp.com/auth-path: auth/kubernetes
            vault.hashicorp.com/namespace: data-lakehouse
            vault.hashicorp.com/role: data-lakehouse-pipeline
            vault.hashicorp.com/service: http://vault.default.svc.local:9200
        spec:
          containers:
          - args:
            - ""
            command:
            - sh
            - -c
            - cat /vault/secrets/config.env && echo 'Hello, world!'
            image: busybox:stable
            imagePullPolicy: Always
            name: data-processor
            resources:
              limits:
                memory: 512Mi
              requests:
                cpu: 100m
                memory: 256Mi
          restartPolicy: OnFailure
          serviceAccountName: data-lakehouse-pipeline
      ttlSecondsAfterFinished: 43200
  schedule: '*/1 * * * *'
  successfulJobsHistoryLimit: 1
Alright, as you can see, you totally dynamically expectation value as new cronjob definition
Token from Service Account
Like I told above, we hit to the next action to get the token to authenticated API, and the basic methodology is using service account token, and you can easily find about this relation at
As you remember, we already create role and bind this to our service account for namespace data-lakehouse to full permission maintain jobs and cronjobs. Therefore, we can use kubectl command with admin certificate to create token-request which include token to authenticate Kubernetes API
kubectl create token data-lakehouse-pipeline --duration=87658h --output json | jq -r '.status.token'You will create token have valid in 10 year as JWT format, so you can already copy them and put into CI/CD variables in GitLab, but if you want to authenticated immediately, let try next command to setup new context and save them in ~/.kube/config
First of all, we need to define cluster for context
kubectl config set-cluster name-cluster --server="http://host-api:port" --insecure-skip-tls-verify=trueRemember, you need to add insecure-skip-tls-verify=true for bypass the certificate requirement, if don’t you will encounter couple error related to certificated not authority, explore more at StackOverFlow - How to disable kubectl insecure approval towards the kube apiserver. Unless, you can create certificate from validation of your Kubernetes, it will permit you to not set insecure-skip-tls-verify=true in this situation
Secondary, we need to define the user with token generated
kubectl config set-credentials data-lakehouse-cred --token="$TOKEN"It will create a new user data-lakehouse-cred with set the token generated from service-account request
Thirdly, we define the context with several things above to connected them all
kubectl config set-context "data-lakehouse-context" --cluster=name-cluster --user=data-lakehouse-cred --namespace=data-lakehouse For using this context, you need to use command to change your current context in ~/.kube/config to this context
kubectl config use-context data-lakehouse-contextNow try again and you an use command get for specific workload in namespace data-lakehouse, like pod, jobs and cronjobs. In the situation, you query another stuff like configmap or secrets, you will receive the failure
From GitLab CI/CD to LakeHouse Pipeline
Now we hit to last progress when operate the lakehouse pipeline is writing the deployment strategies using the above technique
Let’s create a simple .gitlab-ci.yml in root directory of your project
stages:
  - lint
  - security
  - build
  - deploy

variables:
  DOCKER_DRIVER: overlay2
  DOCKER_TLS_CERTDIR: "/certs"
  IMAGE_TAG: $CI_REGISTRY_IMAGE:$CI_COMMIT_SHORT_SHA
  IMAGE_LATEST: $CI_REGISTRY_IMAGE:latest

# Include template files
include:
  # - local: 'ci-templates/base.yml'
  # - local: 'ci-templates/lint.yml'
  # - local: 'ci-templates/security.yml'
  # - local: 'ci-templates/build.yml'
  - local: 'ci-templates/deploy.yml'
  # - local: 'ci-templates/utilities.yml'
Because I only to perform the deploy in this experiment, so why I disable another jobs. As you can see, we will inherit the jobs definition from ci-templates
# Deployment job templates

.deploy_base:
  stage: deploy
  # Use this image for include kubernetes toolkit v1.27 for deployment, e.g helm, kubectl, kind or kustomize integration
  image: xeusnguyen/cpu-kind-sandbox:latest
  before_script:
    # Install and setup envsubst for dynamic replacing environment
    - apk add gettext
    # Setup the kubecontext to let you connect to Kubernetes and deploy
    - kubectl config set-cluster $CLUSTER_NAME --server="$CLUSTER_ADDRESS" --insecure-skip-tls-verify=true
    - kubectl config set-credentials data-lakehouse-cred --token="$CLUSTER_SA_TOKEN"
    - kubectl config set-context $CLUSTER_NAME-context --cluster=$CLUSTER_NAME --user=data-lakehouse-cred --namespace=data-lakehouse
    - kubectl config use-context $CLUSTER_NAME-context

# Define the job deploy
deploy:development:
  extends: .deploy_base
  variables:
    CLUSTER_NAME: kubewekend
    CLUSTER_ADDRESS: $DEV_CLUSTER_ADDRESS
    CLUSTER_SA_TOKEN: $DEV_CLUSTER_SA_TOKEN
    # Example for overwrite tag of pipeline jobs
    IMAGE_TAG: stable

  # Set only run by trigger manually
  when: manual

  # Set rule for only run this pipeline if commit branch is develop
  rules:
    - if: $CI_COMMIT_REF_NAME == "develop"

  # Adapt what we playground above in pipeline
  script:
    # Render the script build by kustomize
    - kubectl kustomize k8s/overlay/dev/lakehouse | envsubst 'IMAGE_TAG=$IMAGE_TAG'
    # Apply the manifest rendered by kustomize
    - kubectl kustomize k8s/overlay/dev/lakehouse | envsubst 'IMAGE_TAG=$IMAGE_TAG' | kubectl apply -f -
Now easily push or open MR to develop branch, but first you need define two variables, including DEV_CLUSTER_ADDRESS and DEV_CLUSTER_SA_TOKEN to GitLab CI/CD variables in Settings part
After handle all of stuff above, and your CI/CD already merge into develop branch, you can trigger it via UI and here is what we got in CI/CD and ArgoCD

Successfully result in GitLab CI/CD
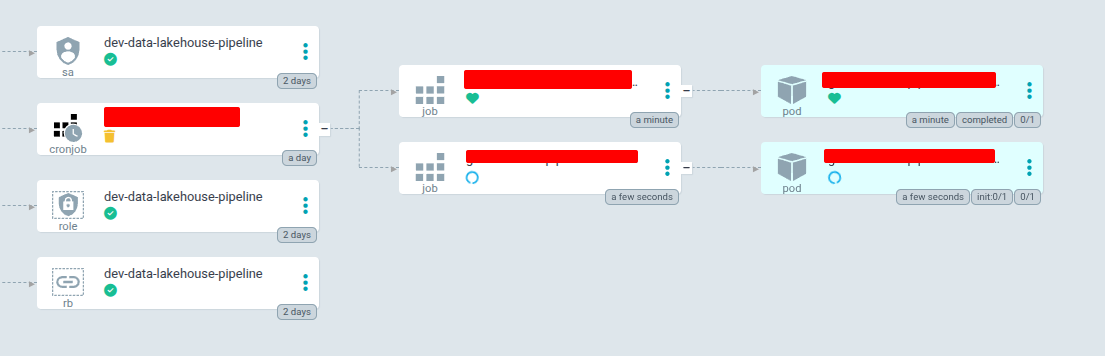
Successfully result in ArgoCD
Note
This is a relatively simple version of a Data Lakehouse. I intentionally did not add complexity to the pipeline, which is why it stops here. Furthermore, you are welcome to organize the CI/CD implementation using ArgoCD based on your own ideas. No worries, I will update this version another day to enhance the CI/CD features tied to this orchestration strategy.
Conclusion
Success
That’s all for today. I hope you gained valuable information on creating orchestration strategies using native Kubernetes features. While this approach helps reduce the complexity often associated with third-party tools, like Airflow, the native version may not offer all the same capabilities. Trust me, however, you won’t be disappointed if you embrace this challenge within your Kubernetes environment.
Quote
I had a lot of fun sparking this idea and turning it into a tangible solution. Although it isn’t overly complicated, it touches upon many core native Kubernetes techniques. Believe me, mastering this knowledge will enable you to resolve many problems and deliver new, data-driven solutions. So, it’s time to say goodbye for now. Please take care of yourself, always keep moving forward, and continue building good skills for the AI Era. We’ll meet each other in another session! 🙌