Quote
Hello everyone! It’s been a pleasure to continue contributing another article on setting up a High Availability (HA) Database from scratch. Today, we will delve deeper into MongoDB, one of the biggest NoSQL Databases in the world, and explore its wonderful ecosystem of useful built-in tools and providers. Let’s see what we can accomplish.
MongoDB and The High-Availability Architecture

When writing about MongoDB, it is striking how complete its ecosystem is. It is true that you don’t necessarily need to integrate many third-party tools to build a successful deployment; you can often achieve your goals using only its built-in tools and features. This completeness even extends to High Availability (HA), which is a key differentiator when compared to databases like PostgreSQL, where external tools or services are typically required for robust clustering and replication.
With its excellent documentation, you can find detailed information to effectively kick-start your implementation. Key areas include:
-
Managing MongoDB Configuration:
- The primary configuration file is located at
/etc/mongod.conf, which directly controls the behavior of themongoddaemon upon service start. - Resource: MongoDB - Self-Managed Configuration File Options
- The primary configuration file is located at
-
Setting up High-Availability with a Replica Set:
- MongoDB’s built-in feature for HA and redundancy.
- Resources:
-
Optimizing and Scaling MongoDB with a Sharded Cluster for Traffic Balancing:
- The horizontal scaling strategy for handling high throughput and large datasets.
- Resources:
As demonstrated, there is no doubt that MongoDB is a remarkably complete database solution. You can implement virtually any desired architecture or pattern, and the most valuable asset in this process is the official documentation. This completeness makes exploring and deploying it from scratch a highly rewarding experience.
ReplicaSet
From the old to new architecture, MongoDB transfer from master-slave that show a couple of weakness for not automatically recover master when encounter trouble, and now we got ReplicaSet for alternative solution to solve problem and bring actual high-availability.
Info
Replica Set
A Replica Set in MongoDB is a cluster of
mongodprocesses that collectively maintain the same data set. This configuration is essential for providing redundancy and High Availability (HA) for MongoDB deployments, particularly in a production environment.
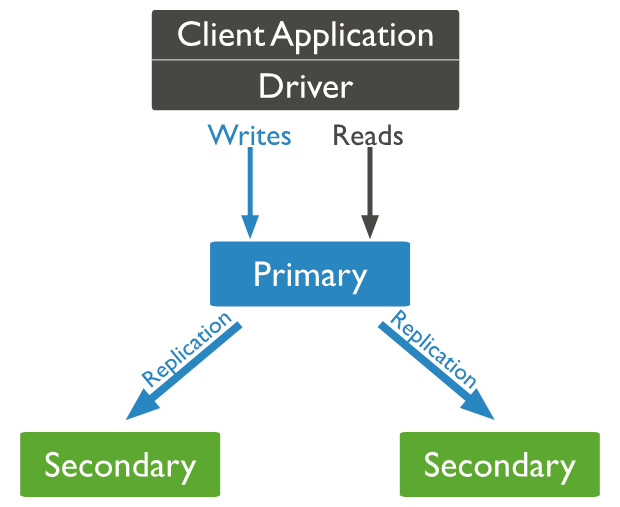
Replica Sets divide the mongod processes into two distinct types of nodes: Primary and Secondary, each with specific responsibilities:
- Primary Node: This node is responsible for handling all write operations and approving read requests by default. A Replica Set can have only one Primary Node at any given time. Any data change is recorded in the operation log (oplog).
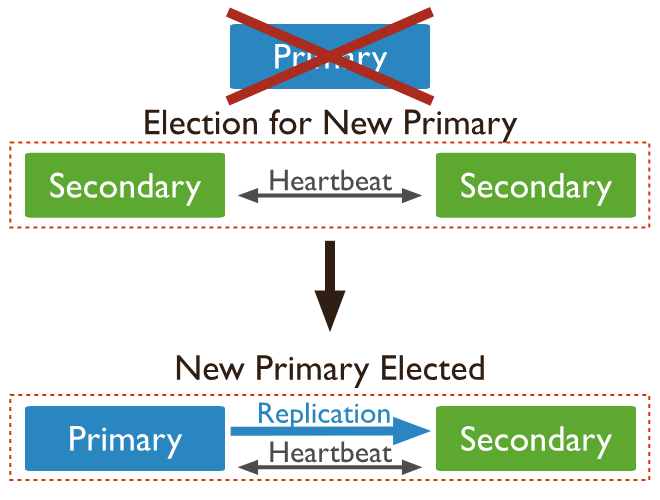
- Secondary Node: These nodes replicate the Primary’s oplog and apply those operations to their own data sets to maintain consistency. Their critical role in High Availability is participating in the election process to elect a new Primary Node if the current one experiences failure or encounters problems.
- Arbiter Node (Special): This type of node is special because it allows you to optimize costs and resources. An Arbiter can join the Replica Set to participate in elections (providing a vote) but does not hold any data or serve read/write requests.
When you set up a Replica Set cluster, your MongoDB deployment automatically gains several crucial features:
- Asynchronous Replication: Secondary members apply changes from the oplog to their data sets asynchronously. This design is fundamental to the Replica Set’s ability to maintain operations and continue functioning despite the failure of one or more members.
- Automatic Failover: When the Primary node fails or encounters an issue, the Secondary nodes automatically initiate and participate in an election process to choose a new Primary. This automatic process significantly reduces downtime and eliminates the need for manual intervention during a Primary failure.
- Distribution Transactions (Read/Write Concerns and Read Preference): A Replica Set provides optimized ways to control where read and write requests are directed, specifically through:
- Read Preference: This allows you to define which data source (Primary or a Secondary) should handle read requests, enabling you to strategically load-balance traffic across the MongoDB cluster.
- Data Consistency Consideration: Because the Replica Set operates using Asynchronous Replication, a Secondary node’s data might momentarily be outdated. Therefore, you must employ a strategic approach using Read Concern and Write Concern to ensure the desired level of data consistency when routing traffic.
These inherent features strongly advocate for choosing a Replica Set architecture for your MongoDB deployment, especially in a Production Environment, to ensure high-availability, stability, automatic failover adoption, and other essential operational capabilities.
Sharding
Shifting focus from High Availability (HA), MongoDB also supports a mechanism for horizontal scaling through its sharding technique. Sharding allows you to effectively handle data distribution across multiple machines, which significantly helps reduce hardware pressure when working with huge datasets.
While I will cover sharding in greater detail in a future topic, here is a brief introduction to the technique within this article.
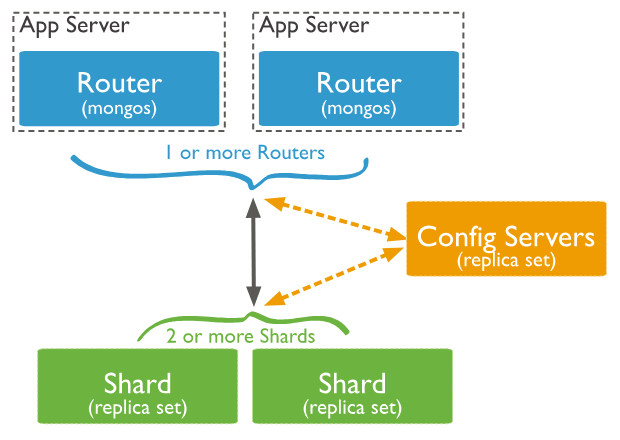
Sharding is built on the concept of splitting the data into smaller, manageable pieces (shards) and distributing them across multiple Replica Sets. To function, the architecture requires a router (the mongos process) to intelligently determine which specific shard holds the data requested by a query, ensuring efficient access to distributed data.
In a real-world scenario, you will often encounter a mix of sharded and non-sharded collections within the same deployment. MongoDB provides support to handle this efficiently. This means you can distribute your large collections across the cluster via sharding, while still saving smaller, non-sharded collections (or even sharded collections that you wish to restrict) within a specific shard. This flexibility allows you to manage both types of data effectively within a single MongoDB cluster.

To connect and interact with a sharded cluster, MongoDB requires the use of the mongos process, which acts as the query router. This eliminates the complex problem of manually determining which shard contains the data based on the shard key.
The mongos process works by following this internal workflow:
- Receive Request: The
mongosrouter receives and processes the initial read or write request from the client application. - Consult Config Servers: It then checks the Config Servers (which store the cluster’s metadata) to determine the location of the relevant data blocks and the shard key range responsible for that query.
- Route Traffic: Finally, the
mongosprocess intelligently routes the traffic to the corresponding shard server (Replica Set) to complete the request processing.
If you want to explore more about this topic, I think these articles for you
- Medium - High-availability MongoDB Cluster Configuration Solutions 🌟 (Recommended)
- MongoDB - Deploy a Self-Managed Replica Set 🌟 (Recommended)
Lab - MongoDB with ReplicaSet

To set up a self-hosted High-Availability (HA) MongoDB cluster, you have several approaches:
- Bare Machine: This is the “raw” strategy, requiring you to perform a complete, manual setup of the MongoDB service, configuration, and networking from scratch on each host.
- Docker: This approach packages the MongoDB service within containers, simplifying deployment by isolating the environment. You will primarily focus on managing the cluster configuration (e.g., Replica Set settings) rather than the underlying service installation.
- Kubernetes: This is the most automated approach, where you operate the MongoDB cluster using a dedicated tool like the MongoDB Operator or the Percona MongoDB Operator, leveraging Kubernetes’ orchestration capabilities.
I prefer the Docker approach as it significantly reduces complexity and allows you to focus mainly on the configuration of the Replica Set
Setup the environment
Coming with Docker, you need to install Docker and Docker Compose in your host to starting this lab, I assume you can completely setup them, or read more at Awesome Docker CLI and Awesome Docker Compose CLI if you need any help
Before we delve into docker, you can read about dockerfile which built MongoDB image to let we bring it on at
As you can see, when you install MongoDB, they try to install bunch of things like daemon (mongod), shell-tool, server, … and if you check about MongoDB - Download Manual (Ubuntu), you can following there steps to fully setup MongoDB. Therefore, you can use my script to install MongoDB to your host
# For example, we will download the mongodb latest version: 8.0
# Download requirement package and import the public key
sudo apt install -y gnupg curl
curl -fsSL https://www.mongodb.org/static/pgp/server-8.0.asc | \
   sudo gpg -o /usr/share/keyrings/mongodb-server-8.0.gpg \
   --dearmor

# Add the file list to help apt find the mongodb repository
. /etc/os-release
echo "deb [ arch=amd64,arm64 signed-by=/usr/share/keyrings/mongodb-server-8.0.gpg ] https://repo.mongodb.org/apt/ubuntu $VERSION_CODENAME/mongodb-org/8.0 multiverse" | sudo tee /etc/apt/sources.list.d/mongodb-org-8.0.list

# Reload package database
sudo apt update

# find and install mongodb community server
sudo apt search mongodb-org
sudo apt install -y mongodb-org

# To specific minor version, you can use
# sudo apt install -y mongodb-org=8.0.3

# When you want to downgrade version, perform with --allow-downgrades
# sudo apt install mongodb-org=8.0.3 --allow-downgrades -y
But with docker, you can escape these one and directly to prepare docker-compose.yaml with helping you turn on the cluster with not typing a lot 😄. BTW, shout out to two author which provided great tutorial and clear docker-compose.yaml to start replicaSet MongoDB
- @Harsh - Setting Up MongoDB Cluster: Replication, Sharding, and High Availability
- Anthony Simmon - The only local MongoDB replica set with Docker Compose guide you’ll ever need!
services:

  mongodb1:
    container_name: mongodb1
    image: mongo:8.0
    command: mongod --configsvr --replSet rs0 --port 27017 --dbpath /data/db
    ports:
      - 40001:27017
    volumes:
      - mongovol1:/data/db

  mongodb2:
    container_name: mongodb2
    image: mongo:8.0
    command: mongod --configsvr --replSet rs0 --port 27017 --dbpath /data/db
    ports:
      - 40002:27017
    volumes:
      - mongovol2:/data/db

  mongodb3:
    container_name: mongodb3
    image: mongo:8.0
    command: mongod --configsvr --replSet rs0 --port 27017 --dbpath /data/db
    ports:
      - 40003:27017
    volumes:
      - mongovol3:/data/db

volumes:
  mongovol1: {}
  mongovol2: {}
  mongovol3: {}
This discussion about the docker-compose setup highlights several key points regarding running a MongoDB server:
-
The
mongodCommand: To run a MongoDB server, whether as a standalone instance or as part of a Replica Set, you primarily use themongodcommand. In the Docker context, this command is executed as the main process of the container, often with arguments defining the Replica Set name, binding IP, and port. -
Configuration Files: While the
mongodcommand allows you to provide startup information directly via command-line flags, when MongoDB is installed directly on a host machine (bare-metal or VM), you can use a configuration file—typically located at/etc/mongod.conf. This file is a best practice, as it helps you bootstrap and manage many server settings (like networking, storage paths, security, and replication details) much more efficiently and completely than relying on command-line arguments alone.
# mongod.conf

# for documentation of all options, see:
#   http://docs.mongodb.org/manual/reference/configuration-options/

# Where and how to store data.
storage:
  dbPath: /var/lib/mongodb
#  engine:
  wiredTiger:
    engineConfig:
      cacheSizeGB: 8

# where to write logging data.
systemLog:
  destination: file
  logAppend: true
  path: /var/log/mongodb/mongod.log

# network interfaces
net:
  port: 27017
  bindIp: 0.0.0.0
  maxIncomingConnections: 5000

# how the process runs
processManagement:
  timeZoneInfo: /usr/share/zoneinfo

# security:

#operationProfiling:

replication:
  replSetName: "rs0"

#sharding:

## Enterprise-Only Options:

#auditLog:
Let’s turn it on and we will go to next step to initialize replicaset
docker compose -f docker-compose.yaml up -dInitialize the replicaset
After you bring on these cluster, you will have three container to enough for setup high-availability concept. Now, you can use any IDE or simply with mongosh to connect primary mongodb and add another node as secondary to cluster
For example, I will choose mongodb1 to become primary node and settle initialize replicaset on this target
# Execution MongoDB 1
docker compose -f docker-compose.yaml exec mongodb1 mongosh
Now you are in the mongod1, let’s init cluster base on MongoDB - Deploy a Self-Managed Replica Set 🌟 (Recommended) and you should trigger these command only one time via function rs.initiate()
I will use dns instead of ip because all of mongodb are on same network which managed by docker. NOTE: you can setup a whole cluster with initiate but we can take slow for understanding workflow
rs.initiate( {
   _id : "rs0",
   members: [
      { _id: 0, host: "mongodb1:27017" }
   ]
})
test> rs.initiate( {
...    _id : "rs0",
...    members: [
...       { _id: 0, host: "mongodb1:27017" }
...    ]
... })
{
  ok: 1,
  '$clusterTime': {
    clusterTime: Timestamp({ t: 1760864152, i: 1 }),
    signature: {
      hash: Binary.createFromBase64('AAAAAAAAAAAAAAAAAAAAAAAAAAA=', 0),
      keyId: Long('0')
    }
  },
  operationTime: Timestamp({ t: 1760864152, i: 1 })
}
rs0 [direct: secondary] test>
After trigger the command, your primary will turn into secondary role for first time to bootstrap, but after a while, it will become primary. Now, you can double-check status of replicaset via rs.status()
rs.status()rs0 [direct: primary] test> rs.status()
{
set: 'rs0',
date: ISODate('2025-10-19T08:58:37.631Z'),
myState: 1,
term: Long('1'),
syncSourceHost: '',
syncSourceId: -1,
configsvr: true,
heartbeatIntervalMillis: Long('2000'),
majorityVoteCount: 1,
writeMajorityCount: 1,
votingMembersCount: 1,
writableVotingMembersCount: 1,
optimes: {
lastCommittedOpTime: { ts: Timestamp({ t: 1760864317, i: 1 }), t: Long('1') },
lastCommittedWallTime: ISODate('2025-10-19T08:58:37.280Z'),
readConcernMajorityOpTime: { ts: Timestamp({ t: 1760864317, i: 1 }), t: Long('1') },
appliedOpTime: { ts: Timestamp({ t: 1760864317, i: 1 }), t: Long('1') },
durableOpTime: { ts: Timestamp({ t: 1760864317, i: 1 }), t: Long('1') },
writtenOpTime: { ts: Timestamp({ t: 1760864317, i: 1 }), t: Long('1') },
lastAppliedWallTime: ISODate('2025-10-19T08:58:37.280Z'),
lastDurableWallTime: ISODate('2025-10-19T08:58:37.280Z'),
lastWrittenWallTime: ISODate('2025-10-19T08:58:37.280Z')
},
lastStableRecoveryTimestamp: Timestamp({ t: 1760864271, i: 1 }),
electionCandidateMetrics: {
lastElectionReason: 'electionTimeout',
lastElectionDate: ISODate('2025-10-19T08:55:52.061Z'),
electionTerm: Long('1'),
lastCommittedOpTimeAtElection: { ts: Timestamp({ t: 1760864152, i: 1 }), t: Long('-1') },
lastSeenWrittenOpTimeAtElection: { ts: Timestamp({ t: 1760864152, i: 1 }), t: Long('-1') },
lastSeenOpTimeAtElection: { ts: Timestamp({ t: 1760864152, i: 1 }), t: Long('-1') },
numVotesNeeded: 1,
priorityAtElection: 1,
electionTimeoutMillis: Long('10000'),
newTermStartDate: ISODate('2025-10-19T08:55:52.088Z'),
wMajorityWriteAvailabilityDate: ISODate('2025-10-19T08:55:52.223Z')
},
members: [
{
_id: 0,
name: 'mongodb1:27017',
health: 1,
state: 1,
stateStr: 'PRIMARY',
uptime: 872,
optime: { ts: Timestamp({ t: 1760864317, i: 1 }), t: Long('1') },
optimeDate: ISODate('2025-10-19T08:58:37.000Z'),
optimeWritten: { ts: Timestamp({ t: 1760864317, i: 1 }), t: Long('1') },
optimeWrittenDate: ISODate('2025-10-19T08:58:37.000Z'),
lastAppliedWallTime: ISODate('2025-10-19T08:58:37.280Z'),
lastDurableWallTime: ISODate('2025-10-19T08:58:37.280Z'),
lastWrittenWallTime: ISODate('2025-10-19T08:58:37.280Z'),
syncSourceHost: '',
syncSourceId: -1,
infoMessage: '',
electionTime: Timestamp({ t: 1760864152, i: 2 }),
electionDate: ISODate('2025-10-19T08:55:52.000Z'),
configVersion: 1,
configTerm: 1,
self: true,
lastHeartbeatMessage: ''
}
],
ok: 1,
'$clusterTime': {
clusterTime: Timestamp({ t: 1760864317, i: 1 }),
signature: {
hash: Binary.createFromBase64('AAAAAAAAAAAAAAAAAAAAAAAAAAA=', 0),
keyId: Long('0')
}
},
operationTime: Timestamp({ t: 1760864317, i: 1 })
}Next we need to add another node into cluster via rs.add()command
rs.add({_id: 1, host: "mongodb2:27017"})
rs.add({_id: 2, host: "mongodb3:27017"})
After add them to cluster, you can double-check again with rs.status() and these node will turn into secondary in your rs0 replicaset
rs.status()rs0 [direct: primary] test> rs.status()
{
set: 'rs0',
date: ISODate('2025-10-19T09:01:14.721Z'),
myState: 1,
term: Long('1'),
syncSourceHost: '',
syncSourceId: -1,
configsvr: true,
heartbeatIntervalMillis: Long('2000'),
majorityVoteCount: 2,
writeMajorityCount: 2,
votingMembersCount: 3,
writableVotingMembersCount: 3,
optimes: {
lastCommittedOpTime: { ts: Timestamp({ t: 1760864474, i: 1 }), t: Long('1') },
lastCommittedWallTime: ISODate('2025-10-19T09:01:14.342Z'),
readConcernMajorityOpTime: { ts: Timestamp({ t: 1760864474, i: 1 }), t: Long('1') },
appliedOpTime: { ts: Timestamp({ t: 1760864474, i: 1 }), t: Long('1') },
durableOpTime: { ts: Timestamp({ t: 1760864474, i: 1 }), t: Long('1') },
writtenOpTime: { ts: Timestamp({ t: 1760864474, i: 1 }), t: Long('1') },
lastAppliedWallTime: ISODate('2025-10-19T09:01:14.342Z'),
lastDurableWallTime: ISODate('2025-10-19T09:01:14.342Z'),
lastWrittenWallTime: ISODate('2025-10-19T09:01:14.342Z')
},
lastStableRecoveryTimestamp: Timestamp({ t: 1760864451, i: 1 }),
electionCandidateMetrics: {
lastElectionReason: 'electionTimeout',
lastElectionDate: ISODate('2025-10-19T08:55:52.061Z'),
electionTerm: Long('1'),
lastCommittedOpTimeAtElection: { ts: Timestamp({ t: 1760864152, i: 1 }), t: Long('-1') },
lastSeenWrittenOpTimeAtElection: { ts: Timestamp({ t: 1760864152, i: 1 }), t: Long('-1') },
lastSeenOpTimeAtElection: { ts: Timestamp({ t: 1760864152, i: 1 }), t: Long('-1') },
numVotesNeeded: 1,
priorityAtElection: 1,
electionTimeoutMillis: Long('10000'),
newTermStartDate: ISODate('2025-10-19T08:55:52.088Z'),
wMajorityWriteAvailabilityDate: ISODate('2025-10-19T08:55:52.223Z')
},
members: [
{
_id: 0,
name: 'mongodb1:27017',
health: 1,
state: 1,
stateStr: 'PRIMARY',
uptime: 1029,
optime: { ts: Timestamp({ t: 1760864474, i: 1 }), t: Long('1') },
optimeDate: ISODate('2025-10-19T09:01:14.000Z'),
optimeWritten: { ts: Timestamp({ t: 1760864474, i: 1 }), t: Long('1') },
optimeWrittenDate: ISODate('2025-10-19T09:01:14.000Z'),
lastAppliedWallTime: ISODate('2025-10-19T09:01:14.342Z'),
lastDurableWallTime: ISODate('2025-10-19T09:01:14.342Z'),
lastWrittenWallTime: ISODate('2025-10-19T09:01:14.342Z'),
syncSourceHost: '',
syncSourceId: -1,
infoMessage: '',
electionTime: Timestamp({ t: 1760864152, i: 2 }),
electionDate: ISODate('2025-10-19T08:55:52.000Z'),
configVersion: 5,
configTerm: 1,
self: true,
lastHeartbeatMessage: ''
},
{
_id: 1,
name: 'mongodb2:27017',
health: 1,
state: 2,
stateStr: 'SECONDARY',
uptime: 67,
optime: { ts: Timestamp({ t: 1760864473, i: 1 }), t: Long('1') },
optimeDurable: { ts: Timestamp({ t: 1760864473, i: 1 }), t: Long('1') },
optimeWritten: { ts: Timestamp({ t: 1760864473, i: 1 }), t: Long('1') },
optimeDate: ISODate('2025-10-19T09:01:13.000Z'),
optimeDurableDate: ISODate('2025-10-19T09:01:13.000Z'),
optimeWrittenDate: ISODate('2025-10-19T09:01:13.000Z'),
lastAppliedWallTime: ISODate('2025-10-19T09:01:14.342Z'),
lastDurableWallTime: ISODate('2025-10-19T09:01:14.342Z'),
lastWrittenWallTime: ISODate('2025-10-19T09:01:14.342Z'),
lastHeartbeat: ISODate('2025-10-19T09:01:13.764Z'),
lastHeartbeatRecv: ISODate('2025-10-19T09:01:13.764Z'),
pingMs: Long('0'),
lastHeartbeatMessage: '',
syncSourceHost: 'mongodb1:27017',
syncSourceId: 0,
infoMessage: '',
configVersion: 5,
configTerm: 1
},
{
_id: 2,
name: 'mongodb3:27017',
health: 1,
state: 2,
stateStr: 'SECONDARY',
uptime: 66,
optime: { ts: Timestamp({ t: 1760864473, i: 1 }), t: Long('1') },
optimeDurable: { ts: Timestamp({ t: 1760864473, i: 1 }), t: Long('1') },
optimeWritten: { ts: Timestamp({ t: 1760864473, i: 1 }), t: Long('1') },
optimeDate: ISODate('2025-10-19T09:01:13.000Z'),
optimeDurableDate: ISODate('2025-10-19T09:01:13.000Z'),
optimeWrittenDate: ISODate('2025-10-19T09:01:13.000Z'),
lastAppliedWallTime: ISODate('2025-10-19T09:01:14.342Z'),
lastDurableWallTime: ISODate('2025-10-19T09:01:14.342Z'),
lastWrittenWallTime: ISODate('2025-10-19T09:01:14.342Z'),
lastHeartbeat: ISODate('2025-10-19T09:01:13.763Z'),
lastHeartbeatRecv: ISODate('2025-10-19T09:01:13.763Z'),
pingMs: Long('0'),
lastHeartbeatMessage: '',
syncSourceHost: 'mongodb1:27017',
syncSourceId: 0,
infoMessage: '',
configVersion: 5,
configTerm: 1
}
],
ok: 1,
'$clusterTime': {
clusterTime: Timestamp({ t: 1760864474, i: 1 }),
signature: {
hash: Binary.createFromBase64('AAAAAAAAAAAAAAAAAAAAAAAAAAA=', 0),
keyId: Long('0')
}
},
operationTime: Timestamp({ t: 1760864474, i: 1 })
}Lastly, you should change priority of node via mongosh, access the primary node for doing this configuration. This modification can bring on the expectation election when any election occur to handle failover events
# Get current config
cfg = rs.conf()

# Set priority
cfg.members[0].priority = 3
cfg.members[1].priority = 2
cfg.members[2].priority = 1

# Update new configuration
rs.reconfig(cfg)
Now you can double-check these change in configuration via rs.conf() command
rs.conf()rs0 [direct: primary] test> rs.conf()
{
_id: 'rs0',
version: 6,
term: 1,
members: [
{
_id: 0,
host: 'mongodb1:27017',
arbiterOnly: false,
buildIndexes: true,
hidden: false,
priority: 3,
tags: {},
secondaryDelaySecs: Long('0'),
votes: 1
},
{
_id: 1,
host: 'mongodb2:27017',
arbiterOnly: false,
buildIndexes: true,
hidden: false,
priority: 2,
tags: {},
secondaryDelaySecs: Long('0'),
votes: 1
},
{
_id: 2,
host: 'mongodb3:27017',
arbiterOnly: false,
buildIndexes: true,
hidden: false,
priority: 1,
tags: {},
secondaryDelaySecs: Long('0'),
votes: 1
}
],
configsvr: true,
protocolVersion: Long('1'),
writeConcernMajorityJournalDefault: true,
settings: {
chainingAllowed: true,
heartbeatIntervalMillis: 2000,
heartbeatTimeoutSecs: 10,
electionTimeoutMillis: 10000,
catchUpTimeoutMillis: -1,
catchUpTakeoverDelayMillis: 30000,
getLastErrorModes: {},
getLastErrorDefaults: { w: 1, wtimeout: 0 },
replicaSetId: ObjectId('68f4a798a7ba6328c6d5ecb8')
}
}Now your cluster are ready to work as high-availability cluster, that’s pretty easier than PostgreSQL or MySQL when we adapt High-availability. I truly recommend you to read these articles to understand more about replicaset and how can managed these member in cluster
- MongoDB - Add Members to a Self-Managed Replica Set
- MongoDB - Add an Arbiter to a Self-Managed Replica Set
- MongoDB - Remove Members from a Self-Managed Replica Set
- MongoDB - Replace a Self-Managed Replica Set Member
- MongoDB - Self-Managed Member Configuration Tutorials
- MongoDB - Self-Managed Replica Set Maintenance Tutorials
Hardener and Security Enhancement
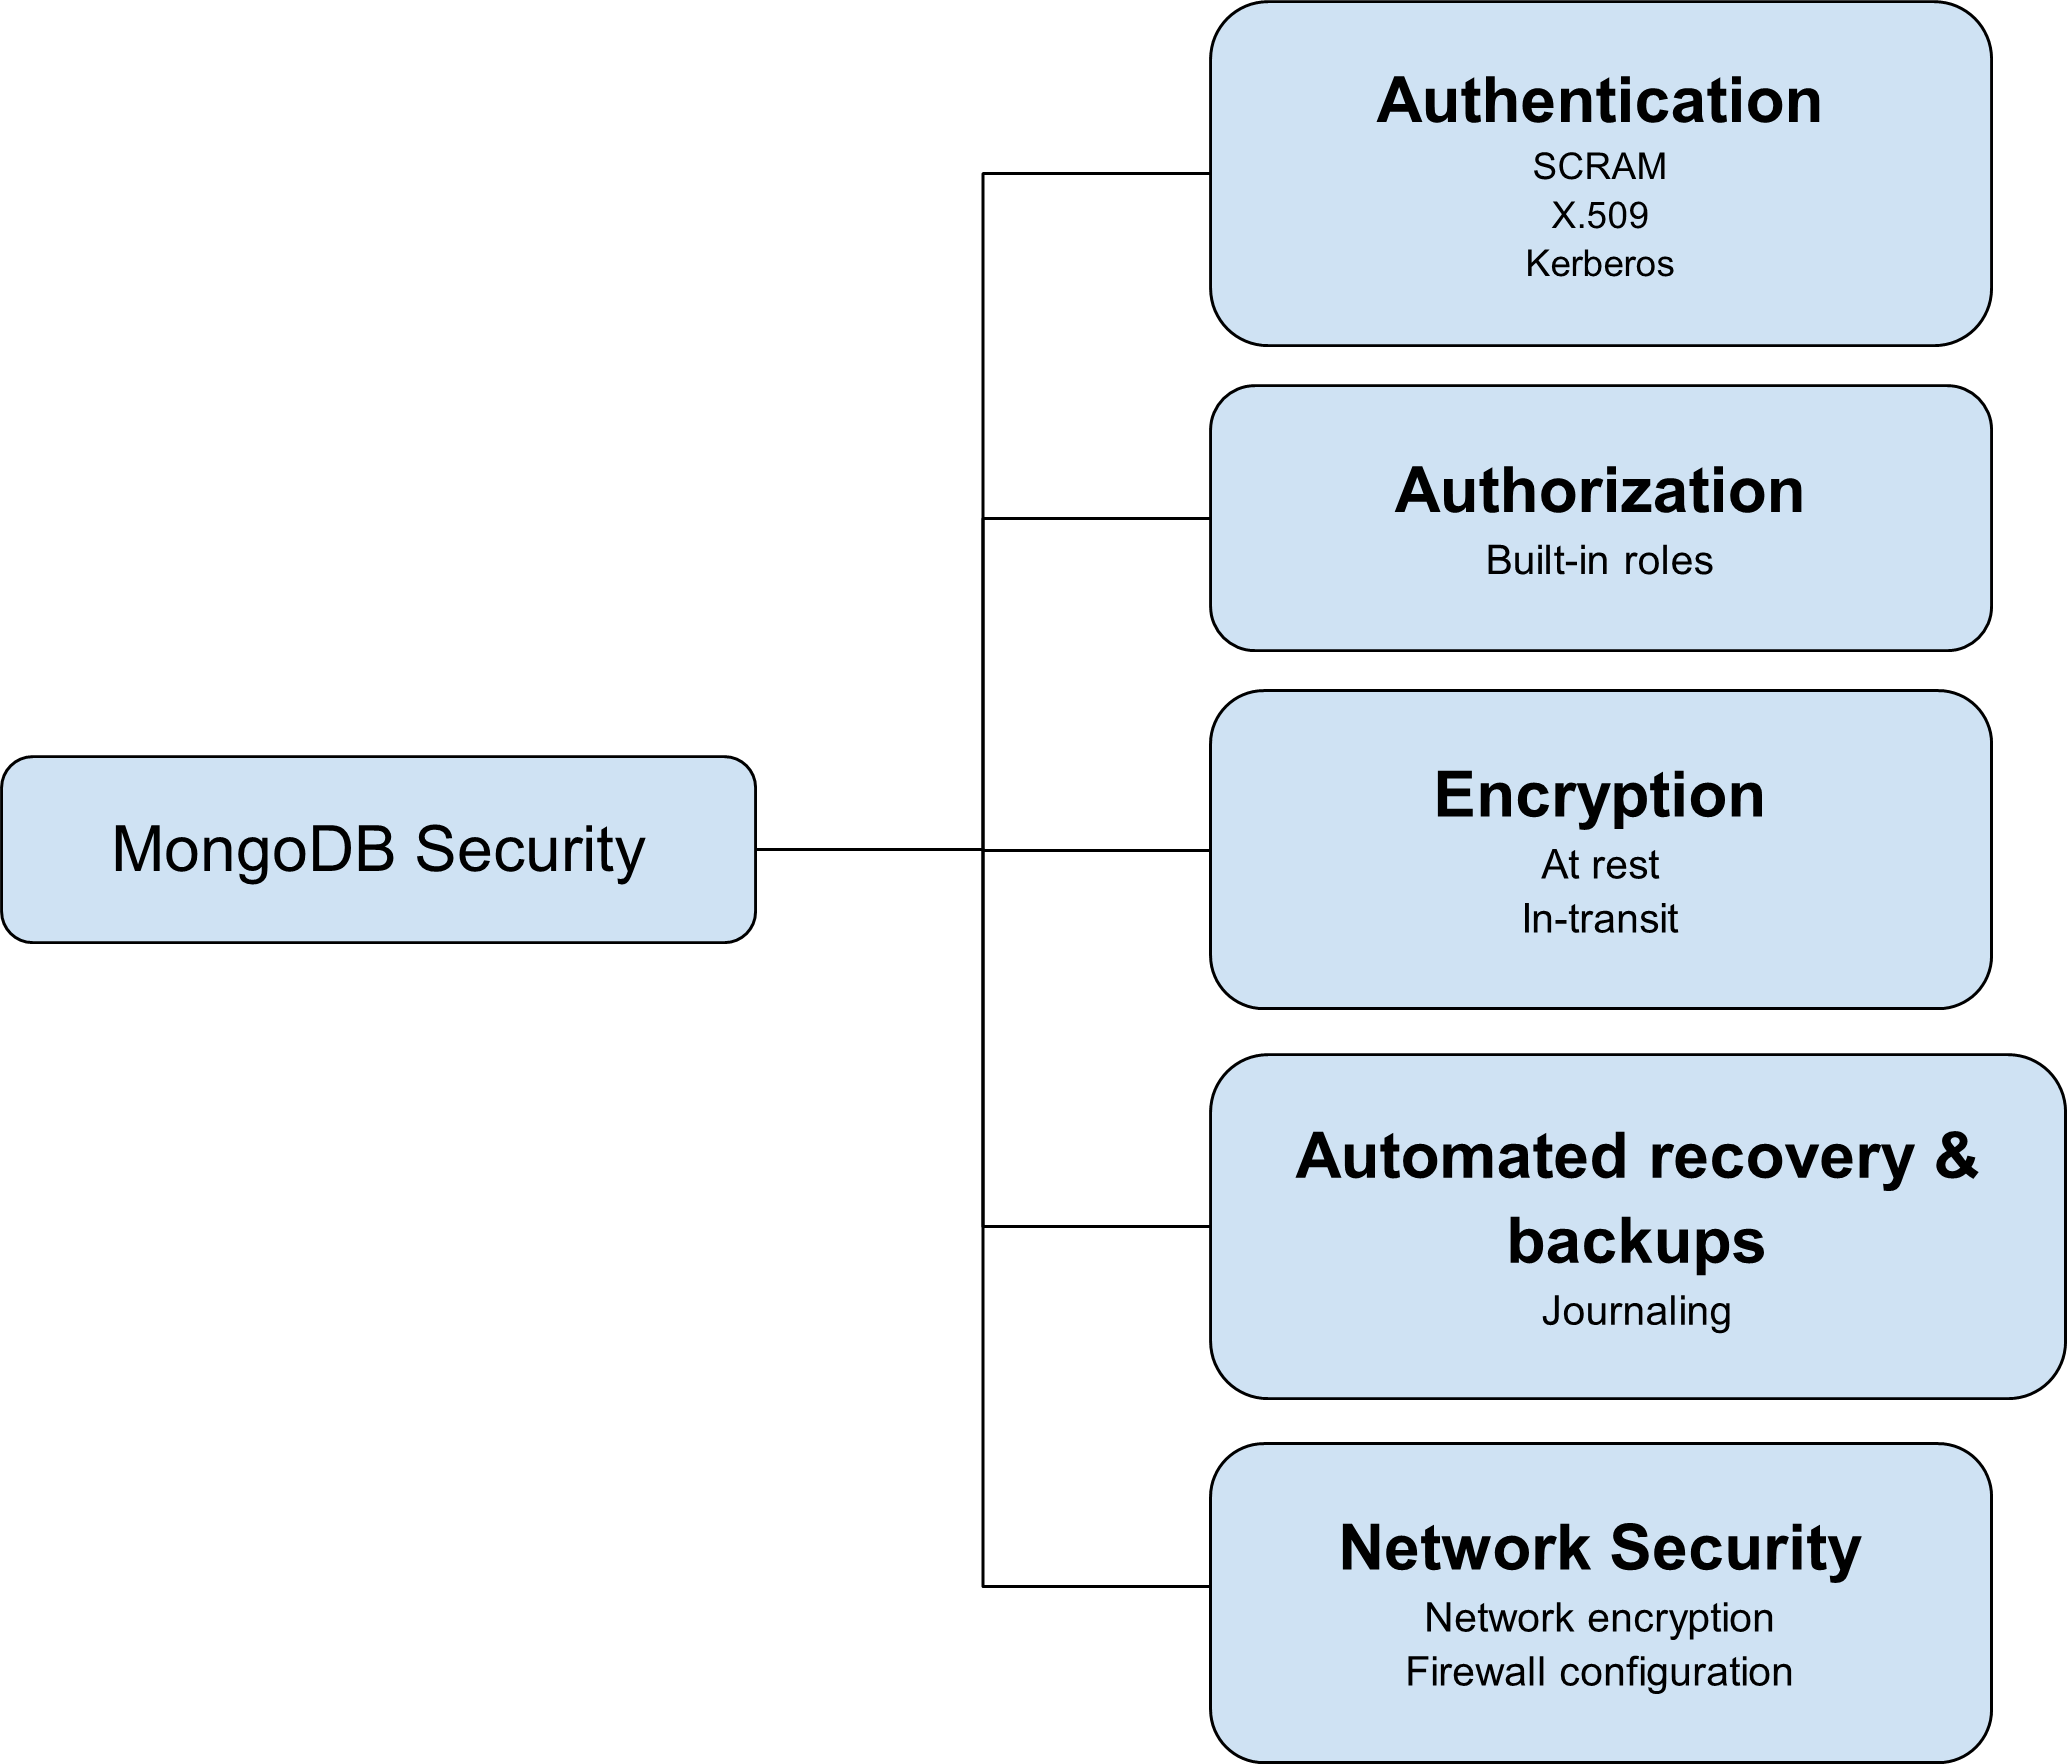
By default, when you set up and bind an address for your MongoDB instance, it is not secure and is not ready for development or production use because security is not enabled. Therefore, at a minimum, you must secure your connection against unauthorized access using a password. For a comprehensive guide on securing your deployment, refer to the MongoDB - Security Checklist for Self-Managed Deployments.
The official recommendation from MongoDB for internal authentication often suggests using Keyfiles for Replica Set members to authenticate with each other. However, for a production environment, the X.509 Certificate method is the superior choice. This is because X.509 offers stronger cryptography, enables SSL/TLS connections, and provides a more robust methodology for members to authenticate with one another, making it more powerful than using keyfiles alone.
In my opinion, the keyfile option is a good starting point, provided you manage the keyfile securely and establish strong passwords for client authentication.
When bootstrapping an initial user for MongoDB in Docker Environment, it is often simplest to provide environment variables such as:
MONGO_INITDB_ROOT_USERNAMEMONGO_INITDB_ROOT_PASSWORD
However, to implement a more controlled internal security model for the Replica Set, the approach is to self-define a keyfile for internal authentication and then structure a set of roles for authorizing access to the MongoDB database.
Let’s create a keyfile by command suggested from MongoDB
# Gen random base64 string with 756 bytes
openssl rand -base64 756 > <path-to-keyfile>

# Set up read only for this file
chmod 400 <path-to-keyfile>
Next, mount the keyfile to each container in docker-compose and update the path for daemon command --keyFile
services:

  mongodb1:
    container_name: mongodb1
    image: mongo:8.0
    command: mongod --configsvr --replSet rs0 --port 27017 --dbpath /data/db --keyFile /data/db/mongodb-keyfile
    ports:
      - 40001:27017
    volumes:
      - mongovol1:/data/db
      - ./mongodb-keyfile:/data/db/mongodb-keyfile

  mongodb2:
    container_name: mongodb2
    image: mongo:8.0
    command: mongod --configsvr --replSet rs0 --port 27017 --dbpath /data/db --keyFile /data/db/mongodb-keyfile
    ports:
      - 40002:27017
    volumes:
      - mongovol2:/data/db
      - ./mongodb-keyfile:/data/db/mongodb-keyfile

  mongodb3:
    container_name: mongodb3
    image: mongo:8.0
    command: mongod --configsvr --replSet rs0 --port 27017 --dbpath /data/db --keyFile /data/db/mongodb-keyfile
    ports:
      - 40003:27017
    volumes:
      - mongovol3:/data/db
      - ./mongodb-keyfile:/data/db/mongodb-keyfile

volumes:
  mongovol1: {}
  mongovol2: {}
  mongovol3: {}
After you testing and mount success keyfile into mongodb, we will create a couple of roles for this MongoDB before we enabled authentication. Read more at MongoDB - Built-In Roles 🌟 (Recommended)
Base on your definition, you can setup the simple to complex role base on your requirement for each database and collection inside MongoDB, but for me, I will try only bootstrap administration role for this experiment with command bellow
# change your account into admin
use admin

# create a root, who carry on about whole configuration, useradmin, readwrite and authentication in any database
db.createUser(
   {
     user: "mongo-root",
     pwd: passwordPrompt(),
     roles: [
        { role: "root", db: "admin" }
     ]
   }
)
When you create this command, it will ask you to prompt your password, set one for yourself and keep them secure and now we can turn back and enable authentication in docker-compose.yaml with --auth
Note
In circumstance, If no users exist, the localhost interface, it means via
mongoshhas access to the database until you create the first user.
services:

  mongodb1:
    container_name: mongodb1
    image: mongo:8.0
    command: mongod --configsvr --replSet rs0 --port 27017 --dbpath /data/db --keyFile /data/db/mongodb-keyfile --auth
    ports:
      - 40001:27017
    volumes:
      - mongovol1:/data/db
      - ./mongodb-keyfile:/data/db/mongodb-keyfile

  mongodb2:
    container_name: mongodb2
    image: mongo:8.0
    command: mongod --configsvr --replSet rs0 --port 27017 --dbpath /data/db --keyFile /data/db/mongodb-keyfile --auth
    ports:
      - 40002:27017
    volumes:
      - mongovol2:/data/db
      - ./mongodb-keyfile:/data/db/mongodb-keyfile

  mongodb3:
    container_name: mongodb3
    image: mongo:8.0
    command: mongod --configsvr --replSet rs0 --port 27017 --dbpath /data/db --keyFile /data/db/mongodb-keyfile --auth
    ports:
      - 40003:27017
    volumes:
      - mongovol3:/data/db
      - ./mongodb-keyfile:/data/db/mongodb-keyfile

volumes:
  mongovol1: {}
  mongovol2: {}
  mongovol3: {}
Use connection_string with mongosh to connect your db because it will require you to authentication at current
docker compose -f docker-compose.yaml exec mongodb1 /
	mongosh 'mongodb://<user>:<pass>@<host>:<port>/<db>?directConnection=true'
Note
In currently, your MongoDB will turn into replicaSet, so if you use
connection_string, you must definedirectConnection=truefor connect directly to specific database, or definereplicaSet=<name>for connecting as cluster mode
Now trigger the command in db and you can see your connection will successfully with authentication via SCRAM mechanism applying keyfiles and built-in roles
# exchange to db-admin
use admin

# show list user inside db with administrator role
db.getUsers({})
rs0 [direct: primary] admin> db.getUsers({})
{
users: [
{
_id: 'admin.mongo-root',
userId: UUID('9f3fa86b-7598-4582-82f7-8d0d62f9a50f'),
user: 'mongo-root',
db: 'admin',
roles: [ { role: 'root', db: 'admin' } ],
mechanisms: [ 'SCRAM-SHA-1', 'SCRAM-SHA-256' ]
}
],
ok: 1,
'$clusterTime': {
clusterTime: Timestamp({ t: 1760924808, i: 1 }),
signature: {
hash: Binary.createFromBase64('hAEmS2QJL4kg32jOhb/caE3q7iM=', 0),
keyId: Long('7562853945538773016')
}
},
operationTime: Timestamp({ t: 1760924808, i: 1 })
}Now you can work with mongoDB by authentication from internal and external, let’s try again with mongosh from external via port 40001
mongosh 'mongodb://user:pass@localhost:40001/admin?directConnection=true'Usage when adapt replicaset
Like I told above, when you adapt replicaset, it will turn your cluster to single endpoint (primary node) for RW requests and multiple endpoint (secondary node) for RO requests. If you leverage this characteristic, you will able to distribute your request and make your mongodb become more effectively
You can try these strategies with couple articles and documentations, below
- PyMongo 4.10.0 - High Availability and PyMongo
- PyMongo 4.15.3 - read_preferences
- MongoDB - Write Concern for Replica Sets
- MongoDB - Read Preference
In my circumstance, I will only use mongosh to test and try couple features in this cluster.
First of all, we have directConnection is good way to you directly connect in specific database in cluster, and we already use above
mongosh 'mongodb://user:pass@localhost:40001/admin?directConnection=true'Secondly, we have replicaset mode to let your connection failover and exchange in cluster
# Error when use use bridge-docker network and not map to host
mongosh 'mongodb://user:pass@host1:port1,host2:port2,host3:port3/admin?replicaSet=rs0'

# Use with docker compose instead
docker compose -f docker-compose.yaml exec mongodb1 \
mongosh 'mongodb://<user>:<pass>@mongodb1:27017,mongodb2:27017,mongodb3:27017/admin?replicaSet=rs0'
Lastly, you can try to connect primary and secondary, and trigger create a data in test db and see the different, i recommend you to use directConnection=true
use test

# insert on primary
db.example.insertOne({
  Name: "Xeus Nguyen",
  Major: "DevOps"
});

db.example.insertMany([
  { Name: "Antony", Major: "Footballer" },
  { Name: "Henry", Major: "Architecture" }
]);

# insert on secondary
db.example.insertOne({
  Name: "Xeus Nguyen 01",
  Major: "Solution Architecture"
});

# find data on both
db.example.find({})
Primary
rs0 [direct: primary] test> db.example.find({})
[
  {
    _id: ObjectId('68f59ed17e3aadbaaf6b140b'),
    Name: 'Xeus Nguyen',
    Major: 'DevOps'
  },
  {
    _id: ObjectId('68f59ee97e3aadbaaf6b140e'),
    Name: 'Antony',
    Major: 'Footballer'
  },
  {
    _id: ObjectId('68f59ee97e3aadbaaf6b140f'),
    Name: 'Henry',
    Major: 'Architecture'
  }
]
Secondary
rs0 [direct: secondary] admin> use test
switched to db test
rs0 [direct: secondary] test> db.example.insertOne({
...   Name: "Xeus Nguyen 01",
...   Major: "Solution Architecture"
... });
MongoServerError[NotWritablePrimary]: not primary
rs0 [direct: secondary] test> db.example.find({})
[
  {
    _id: ObjectId('68f5a03f94f20940d76b140b'),
    Name: 'Xeus Nguyen',
    Major: 'DevOps'
  },
  {
    _id: ObjectId('68f5a04694f20940d76b140d'),
    Name: 'Henry',
    Major: 'Architecture'
  },
  {
    _id: ObjectId('68f5a04694f20940d76b140c'),
    Name: 'Antony',
    Major: 'Footballer'
  }
]
Conclusion

Success
This concludes the article. I hope you found valuable information for building and adopting MongoDB High Availability in a production environment as part of the HA Database Series. From my perspective, MongoDB is a very impressive NoSQL database, offering numerous built-in features, particularly for high-availability and scaling, which effectively address large-scale data problems.
Quote
It has been some time since I returned to write and publish this article, and the process felt both intriguing and advanced as I delved deeper into MongoDB. I am keen to continue this series with a focus on other database systems, so stay tuned. In the meantime, stay safe, keep moving forward, and enjoy your work in the field of technology. Thank you, and peace! 🙌