Welcome back! In this next post on my High Availability (HA) database journey, we’re going to dive into how to operate HA with PostgreSQL, one of the world’s largest and most powerful databases. Let’s delve deeper and see what we can accomplish!
Like I told in my quote, when you dive into database world, PostgreSQL always first selection for standard because this is one of the biggest and continuously growth database designed for multiple purposes. And you know, it contains a lot of stuff option for provisioning and operating high availability solution, we can choose
Patroni: A template for PostgreSQL High Availability with Etcd, Consul, ZooKeeper, or Kubernetes 🌟 (Recommended)
Pgpool: A middleware that works between PostgreSQL servers and a PostgreSQL database client
PAF (PostgreSQL Automatic Failover): High-Availibility for Postgres, based on Pacemaker and Corosync
However, when you try to relate about HA of PostgreSQL, you always hear about Patroni, Patroni and Patroni. when I try to choose the techstack for High Availability of PostgreSQL, there are a lot of articles, video tutorials emphasize the appearance of Patroni in special place conquered to success of any PostgreSQL DB with replicated conceptual.
Therefore, I’m truly curious go deeply, challenge and packaging the script to setup the HA Cluster for easier operating in near future, so why not and let’s take the walkthrough
Standalone to High-Availability with Patroni
There are a lot of articles and tutorial covered detail about this architecture, and I got to say it follow in different describing flow but same concept and standard architecture, you can double-check entire contents below
First of all, I want to shout out for all author of these articles, they already do a great contribution for entire community to figure out what actions we gonna do to setup, operate the High Availability with such detail tutorial, note-taken and moreover
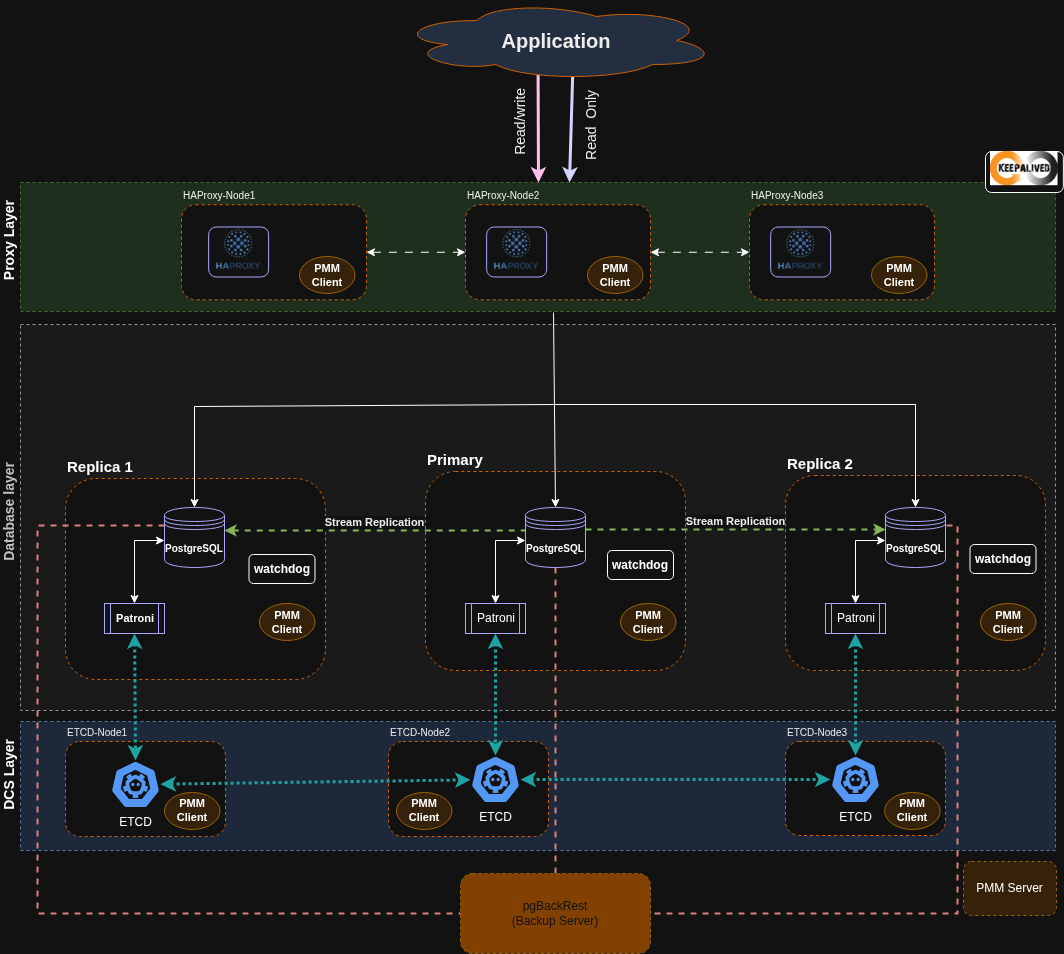
Not wait to long, we will go through each of step to operate HA PostgreSQL with Patroni, etcd, HAProxy, KeepAlive, …
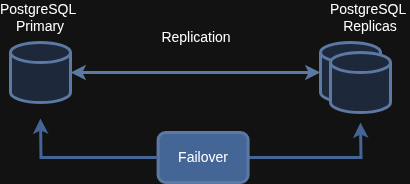
1. Operating the Replication
Source: Percona - PostgreSQL High Availability
Following the concept of Patroni, you can understand the HA Architecture, means convert your standalone to multiple replicate databases with the same data, but with more specific permission each of them.
Typically, you will have two node types
Primary Node (Crucial & Only)(Read & Write)
Secondary Node (Replicated & Multiple)(Read Only)
Warning
To ensure your High Availability (HA) architecture works as expected, you must follow these key configurations.
Deploy on Separate Hardware: You must deploy these instances on separate physical hardware and use different storage to prevent a single point of failure. This is a critical step for a resilient architecture.
Minimum Node Count: An HA PostgreSQL cluster should include at least two nodes (one primary and one replica). However, it is highly recommended that you set up a minimum of three nodes for any production-ready environment. A three-node cluster is essential for ensuring the integrity of the Etcd cluster’s Raft consensus, which guarantees reliable failover.
PostgreSQL support both logical and streaming replication, so to achieve high availability, Patroni will setup and use streaming replication to ensure the replication exactly data in these replica nodes, while reducing the delay between primary and replica node to prevent the loss
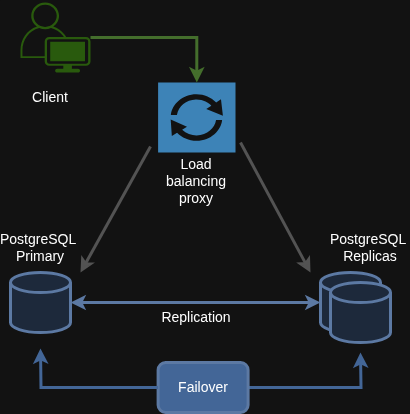
2. Switch Over and FailOver
Source: Percona - PostgreSQL High Availability
Switchover vs. Failover: The Backbone of HA
Switchover and Failover are the two techniques that have long formed the backbone of High Availability systems, and PostgreSQL is no exception.
Switchover
A Switchover is a planned, manual action that lets you transfer the primary role from one machine to another. You would use this for routine maintenance, such as patching the operating system, updating EOL components, or addressing networking latency. A good HA framework will help you execute this process smoothly with minimal latency and downtime.
Failover
A Failover is an automatic action designed for unexpected incidents. The system detects a problem—such as a node going down, becoming unresponsive, or encountering a software failure or power outage—and automatically activates the primary role transfer via a voting process. While a manual Failover is possible if the automated remediation fails, the goal is always to have it work on its own.
To build a truly efficient and reliable High Availability architecture, load balancers and proxies are essential. These components resolve the need for manual reconfiguration whenever a database endpoint fails, as a proxy can act as a single point of entry for your entire cluster.
With a proxy sitting in front of the database cluster, you can:
Send all write requests to the primary node.
Distribute all read requests to the replicas, which reduces the primary’s workload and improves overall performance.
Similar to your Patroni setup, you should also operate these proxies in a redundant manner. This means you are adding yet another layer of failover to your system, making it incredibly resilient. With this setup, clients can connect with zero reconfiguration, as the proxy automatically routes requests to the active endpoint and avoids sending requests to a node that is in recovery.
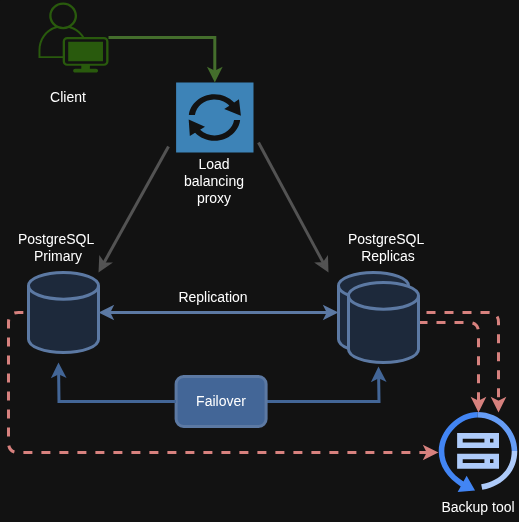
4. Backup Strategy (Out of Scope)
Source: Percona - PostgreSQL High Availability
Backup is one of the most essential jobs in any system. Even when you have High Availability, a backup can save your life. HA is designed for automatic failover, but it can’t protect you from every type of disaster.
A backup is your lifeline when:
Your data becomes corrupted.
Data is accidentally deleted.
Your system is hit by a malicious attack.
Therefore, you need a backup to create a point-in-time snapshot that you can use to restore your data whenever you need it.
How can these tech stacks work together ?
To setup the high availability of PostgreSQL, you will have multiple options, honestly, it’s kinda interesting, BTW you will become more frustration when decide what should following. Therefore, Like I related above, Patroni always become first option to tackle the High availability of PostgreSQL by the scalability and multiple benefits when you choose Patroni for production environment. Therefore, I decide to pick it up.
Patroni - Database Layer
Info
Patroni
Patroni is a template for high availability (HA) PostgreSQL solutions using Python. For maximum accessibility, Patroni supports a variety of distributed configuration stores like ZooKeeper, etcd, Consul or Kubernetes.
Some key benefits of Patroni for high-availability
Automated failover and promotion of a new primary
Prevention and protection from split-brain scenarios, existing two primary can cause duplicate data, data loss, …
Simplifying the management of PostgreSQL clusters
Self-healing via automatic restarts of failed PostgreSQL instances or reinitialization of broken replicas.
The ability to work and integrate with couple tools, platform to complete the architecture, such as etcd, HAProxy, …
There are more information about Patroni related by Percona, you can try to double check at Percona - Patroni
etcd - DCS Layer
Next, we talk about etcd - the distribution storage and how can it definition for multiple enormous system in the world, it always stand there for iconic solution of HighAvailability System, e.g: Kubernetes, CoreDNS, …
Info
etcd
etcd is a strongly consistent, distributed key-value store that provides a reliable way to store data that needs to be accessed by a distributed system or cluster of machines. It gracefully handles leader elections during network partitions and can tolerate machine failure, even in the leader node
etcd is structured on two type of node Primary (Leader) and Remain (Followers). It will store data in structure format and keep a copy of the same data to ensure redundancy and fault tolerance, it means when you write data into etcd, the change is sent to the leader and then replicates it to the other nodes in the cluster. This ensures that all nodes remain synchronized and maintain data consistency.
etcd work on Raft Consensus Algorithm, therefore it require redundant node for organizing the cluster and use election to transfer permission, it’s pretty same as Patroni
By the way, there are lot of stuff related etcd and story around this technology, so why not if we will discuss and learn it for another story. If you want to explore more, spend a little time to double-check at Percona - etcd
A free, very fast and reliable reverse-proxy offering high availability, load balancing, and proxying for TCP and HTTP-based applications. It is widely used to enhance the scalability, availability, and reliability of web applications by balancing client requests among backend servers.
In HA Patroni, HAProxy submit a crucial role in managing the High Avalability, in
Acting LoadBalancer and Proxy, distributing the connection across the cluster nodes
Transparent request to ready node, this will ensure the client connection always connect to the active primary node without needing to know the cluster’s internal state
HAProxy will monitor the health of PostgreSQL node via Patroni API and route traffic to Primary Node, if the failure appear, it will trigger the failover feature to vote a new primary note and HAProxy simple exchange the traffic to the new one with zero configuration. To distributing the requests, you can configure routing for write to primary node and read to secondary node
To prevent the single point of failure, HAProxy should remediation the patches via KeepAlived
Info
KeepAlived
A routing software written in C. The main goal of this project is to provide simple and robust facilities for loadbalancing and high-availability to Linux system and Linux based infrastructures
KeepAlived appear to manage the failover of HAProxy by moving into virtual IP when the primary one fail. No matter how many HAProxy nodes you have, only one of them can be a primary and have the MASTER state. All other nodes are BACKUP nodes. They monitor the MASTER state and take over when it is down.
All in one system
As you can see the architecture, it’s designed for matching together and I’m truly for taking the deep dive into this one.
First of all, let’s take about Database and DCS Layer
Patroni is a management tool that runs on each PostgreSQL instance. It handles the initialization and monitoring of the database, ensuring high availability. To maintain consistency across the cluster, PostgreSQL uses streaming replication, which, by default, is asynchronous. This means the primary node does not wait for a replica to acknowledge a new transaction before moving on.
Patroni relies on a Distributed Configuration Storage (DCS) layer to store the cluster’s state, enabling it to take automatic actions when needed. While other solutions like Zookeeper and Consul can be used, etcd is often recommended for its scalability, simplicity, consistency, and reliability.
Etcd is the backbone of almost every Patroni feature. It provides a robust consensus mechanism to ensure only one instance becomes the primary, which is crucial for preventing race conditions and data inconsistencies. When a cluster is started, the first Patroni instance to acquire a lock with a lease in etcd becomes the primary node. The remaining nodes will then join as replicas, waiting for the lock to be released if the primary fails.
By continuously storing the cluster’s state in etcd, Patroni ensures that all nodes are aware of the latest topology and status. For those interested in a deeper look, the Watchdog feature is a fascinating technology designed to prevent split-brain scenarios by automatically resetting a node that mistakenly attempts to become a primary.
Secondly, Load Balancing Layer
At this layer, we rely on HAProxy for load balancing and routing. The traffic is intelligently distributed, routing all write requests to the primary node while distributing read requests among the secondary nodes. This behavior is defined in the HAProxy configuration. Patroni provides a REST API that HAProxy queries to detect the primary node’s status.
To maintain high availability, redundancy must be ensured for the load balancer itself. This is where Keepalived comes in. Keepalived provides a Virtual IP (VIP) for HAProxy and continuously monitors its state. When the current active HAProxy node goes down, Keepalived automatically transfers the VIP to a remaining node and fails over the services there.
At the end, you can double-check the service layer for monitoring and backup. It will ensure your nodes continuous work with another layer to protect your service, prevent data loss when data corruption or any damage affect to the system.
Lab - Make it working
Setup environment for testing
Warning
For separating your host and your deployment, especially not cause any interruption. I really recommend acted these configuration and services in virtual machine or any cloud service
In my situation, I always prefer Vagrant for my experiment environment to provision couple of virtual machines, and take walkaround on them. If you want to learn and explore more about Vagrant, plugins or stories about this technologies, you can double-check a bit my old post
First of all, I will list a couple of things in Vagrant which you should configure
OS: Ubuntu 22.04 (Jammy) (Note: Recommended for compatible with PostgreSQL, and any databases)
Provider: VirtualBox
Authenticated Method: SSH Key
VM Specification: (2 CPU - 2GB RAM) x 3 (Note: For ensure the High-Availability of Patroni)
If you can see your host available to ensure those conditions, you can reach to next step for provisioning the PostgreSQL HA with Patroni
Now creating Vagrantfile and provide a couple information about box, network, hardware, ssh, … about your virtual machine, and so turn them on. But before, you run the Vagrantfile you should check the information below to understand a bit about networking
These configuration will take a big affect on your cluster to point the virtual machine can interact with each other via bridge interface. When you double-check two of articles above, there are some things you should be taken, such as
When use Ubuntu or Linux with VirtualBox, by default, virtual box will set host-only network in range 192.168.56.0/21, it means you can set ip address from 192.168.56.1 - 192.168.63.255 but remember default gateway and broadcast addresses
To setup these network, Vagrant allow you to use private_network to set host-only interface for communicating between virtual machine. In this experiment, I will choose three address 192.168.56.10, 192.168.56.11 and 192.168.56.12
You can put the Vagrant and go to provision your experiment environment
Vagrantfile
Vagrant.configure("2") do |config| # # Handle multiple machine in one block of Vagrantfile # # https://developer.hashicorp.com/vagrant/docs/multi-machine config.vm.define "harchidb-primary", primary: true do |config| config.vm.box = "ubuntu/jammy64" config.vm.hostname = "harchidb-primary" config.vm.communicator = "ssh" # Default enable 2222 for ssh communication (Add id: "ssh" to disable default) # https://realguess.net/2015/10/06/overriding-the-default-forwarded-ssh-port-in-vagrant/ config.vm.network "forwarded_port", guest: 22, host: 6996, protocol: "tcp", id: "ssh", host_ip: "127.0.0.1" # Add the bridge network for let two machine can communicate each others # With Linux, Private Network will set by default in range: 192.168.56.0/21 (192.168.56.1 - 192.168.63.255) # Read more the documentation at: https://www.virtualbox.org/manual/ch06.html#network_hostonly config.vm.network "private_network", ip: "192.168.56.10" config.vm.box_check_update = false config.ssh.username = ENV["SSH_USER"] config.ssh.private_key_path = ENV["SSH_PRIV_KEY_PATH"] config.ssh.port = 6996 config.ssh.guest_port = 22 # # Disable to generate a key pair inside .vargrant directory, use insecure_private_keys # # instead of using private_key # config.ssh.insert_key = false config.ssh.forward_agent = true config.vm.provider "virtualbox" do |config| config.name = "harchidb-primary" config.memory = 2048 config.cpus = 2 end end config.vm.define "harchidb-secondary", primary: true do |config| config.vm.box = "ubuntu/jammy64" config.vm.hostname = "harchidb-secondary" config.vm.communicator = "ssh" # Default enable 2222 for ssh communication (Add id: "ssh" to disable default) # https://realguess.net/2015/10/06/overriding-the-default-forwarded-ssh-port-in-vagrant/ config.vm.network "forwarded_port", guest: 22, host: 9669, protocol: "tcp", id: "ssh", host_ip: "127.0.0.1" # Add the bridge network for let two machine can communicate each others # With Linux, Private Network will set by default in range: 192.168.56.0/21 (192.168.56.1 - 192.168.63.255) # Read more the documentation at: https://www.virtualbox.org/manual/ch06.html#network_hostonly config.vm.network "private_network", ip: "192.168.56.11" config.vm.box_check_update = false config.ssh.username = ENV["SSH_USER"] config.ssh.private_key_path = ENV["SSH_PRIV_KEY_PATH"] config.ssh.port = 9669 config.ssh.guest_port = 22 # # Disable to generate a key pair inside .vargrant directory, use insecure_private_keys # # instead of using private_key # config.ssh.insert_key = false config.ssh.forward_agent = true config.vm.provider "virtualbox" do |config| config.name = "harchidb-secondary" config.memory = 2048 config.cpus = 2 end end config.vm.define "harchidb-thirdly", primary: true do |config| config.vm.box = "ubuntu/jammy64" config.vm.hostname = "harchidb-thirdly" config.vm.communicator = "ssh" # Default enable 2222 for ssh communication (Add id: "ssh" to disable default) # https://realguess.net/2015/10/06/overriding-the-default-forwarded-ssh-port-in-vagrant/ config.vm.network "forwarded_port", guest: 22, host: 16969, protocol: "tcp", id: "ssh", host_ip: "127.0.0.1" # Add the bridge network for let two machine can communicate each others # With Linux, Private Network will set by default in range: 192.168.56.0/21 (192.168.56.1 - 192.168.63.255) # Read more the documentation at: https://www.virtualbox.org/manual/ch06.html#network_hostonly config.vm.network "private_network", ip: "192.168.56.12" config.vm.box_check_update = false config.ssh.username = ENV["SSH_USER"] config.ssh.private_key_path = ENV["SSH_PRIV_KEY_PATH"] config.ssh.port = 16969 config.ssh.guest_port = 22 # # Disable to generate a key pair inside .vargrant directory, use insecure_private_keys # # instead of using private_key # config.ssh.insert_key = false config.ssh.forward_agent = true config.vm.provider "virtualbox" do |config| config.name = "harchidb-thirdly" config.memory = 2048 config.cpus = 2 end endend
Run the Vagrant with up command to turn on all of them
vagrant up
Afterward, you will get the experiment environment like this one
harchidb-primary - IP: 192.168.56.10 - SSH Port via NAT: 6996
harchidb-secondary - IP: 192.168.56.11 - SSH Port via NAT: 9669
harchidb-thirdly- IP: 192.168.56.12 - SSH Port via NAT: 16969
To make for simple connect to host via your own ssh-key, and it actually need for next step with Ansible and Autobase, you need to provision your private-key in these server. Read more articles below for information
I will add ssh-key via copy into the host, let’s create key
ssh-keygen -t rsa -b 2048
Now put the name for your key, I choose vmbox in my .ssh directory path, after that you will have vmbox and vmbox.pub as key-chain for ssh authentication
For my situation, for copying public key to the host, I will use scp because I set the authentication method is ssh for start, so you need provide the identity file in .vagrant folder to accessible via SSH Method 😢
# For harchidb-primaryscp -i .vagrant/machines/harchidb-primary/virtualbox/private_key -o IdentitiesOnly=yes ~/.ssh/vmbox.pub vagrant@192.168.56.10:/home/vagrant/.ssh/authorized_keys# For harchidb-secondaryscp -i .vagrant/machines/harchidb-secondary/virtualbox/private_key -o IdentitiesOnly=yes ~/.ssh/vmbox.pub vagrant@192.168.56.11:/home/vagrant/.ssh/authorized_keys# For harchidb-thirdlyscp -i .vagrant/machines/harchidb-thirdly/virtualbox/private_key -o IdentitiesOnly=yes ~/.ssh/vmbox.pub vagrant@192.168.56.12:/home/vagrant/.ssh/authorized_keys
Warning
On the situation, you have create a new virtual machine but your know_hosts have include the key from old configuration, you need to make sure to delete that. For e.g, use command
You will succeed for authorization into your vagrant virtual machine
Autobase with Ansible
Info
In the first version, I want to choose the hardway to provision the Patroni by your hand. But it’s plenty manual and sometimes you can encounter trouble when you miss some steps, and I don’t want it. Therefore, instead of, I find another solution and it works with great Ansible to executing the provision for HA PostgreSQL, it’s truly simple, production-ready and able to use as remotely.
But if you want to understand the sophisticated of setup, I really recommend you to read two articles
First of all, we talk about Autobase - the backbone of architecture, big shout out for them to create a great option for anyone to starting the setup high-availability for PostgreSQL.
Autobase becomes alternative to cloud-managed databases (DBaaS) such as Amazon RDS, Google Cloud SQL, Azure Database, and more. This one will enable you to create and manage PostgreSQL Clusters for
Ensure high-availability
Simplify the deployment process
Reduce the cost
Make database management accessible
Support multiple setups and techstack alternatives
Specially, You will surprise with autobase by the pretty friendly UI provided. The author package all of them into Docker, you can turn it up via couple of commands.
After run this docker, you can access to localhost and put the console-token and here what you got
The behind the scene is pretty complex ansible script, Autobase try to combine them into this UI and deliver for end-user the interfact to interact, monitor and tracking the state of Patroni Cluster before and after provisioning the HA PostgreSQL inside. Therefore, not waiting for we go to the setup with Autobase
Setup with Autobase by UI
After you prepare your host, I really recommend you run your autobase console one more time because for let your console can access to host, you need add more configuration into your docker command
Hit:1 http://deb.debian.org/debian bookworm InReleaseHit:2 http://deb.debian.org/debian bookworm-updates InReleaseHit:3 http://deb.debian.org/debian-security bookworm-security InReleaseHit:4 https://apt.postgresql.org/pub/repos/apt bookworm-pgdg InRelease Hit:5 https://packagecloud.io/timescale/timescaledb/debian bookworm InRelease Reading package lists... DoneBuilding dependency tree... DoneReading state information... Done1 package can be upgraded. Run 'apt list --upgradable' to see it.Reading package lists... DoneBuilding dependency tree... DoneReading state information... Doneiputils-ping is already the newest version (3:20221126-1+deb12u1).0 upgraded, 0 newly installed, 0 to remove and 1 not upgraded.PING 192.168.56.10 (192.168.56.10) 56(84) bytes of data.64 bytes from 192.168.56.10: icmp_seq=1 ttl=64 time=0.320 ms64 bytes from 192.168.56.10: icmp_seq=2 ttl=64 time=0.513 ms64 bytes from 192.168.56.10: icmp_seq=3 ttl=64 time=0.227 ms64 bytes from 192.168.56.10: icmp_seq=4 ttl=64 time=0.316 ms--- 192.168.56.10 ping statistics ---4 packets transmitted, 4 received, 0% packet loss, time 3085msrtt min/avg/max/mdev = 0.227/0.344/0.513/0.104 msPING 192.168.56.11 (192.168.56.11) 56(84) bytes of data.64 bytes from 192.168.56.11: icmp_seq=1 ttl=64 time=0.515 ms64 bytes from 192.168.56.11: icmp_seq=2 ttl=64 time=0.303 ms64 bytes from 192.168.56.11: icmp_seq=3 ttl=64 time=0.302 ms64 bytes from 192.168.56.11: icmp_seq=4 ttl=64 time=0.269 ms--- 192.168.56.11 ping statistics ---4 packets transmitted, 4 received, 0% packet loss, time 3069msrtt min/avg/max/mdev = 0.269/0.347/0.515/0.097 msPING 192.168.56.12 (192.168.56.12) 56(84) bytes of data.64 bytes from 192.168.56.12: icmp_seq=1 ttl=64 time=0.381 ms64 bytes from 192.168.56.12: icmp_seq=2 ttl=64 time=0.367 ms64 bytes from 192.168.56.12: icmp_seq=3 ttl=64 time=0.332 ms64 bytes from 192.168.56.12: icmp_seq=4 ttl=64 time=0.297 ms--- 192.168.56.12 ping statistics ---4 packets transmitted, 4 received, 0% packet loss, time 3069msrtt min/avg/max/mdev = 0.297/0.344/0.381/0.032 ms
Now your autobase-console be able to provision the HA Cluster, let try with UI first
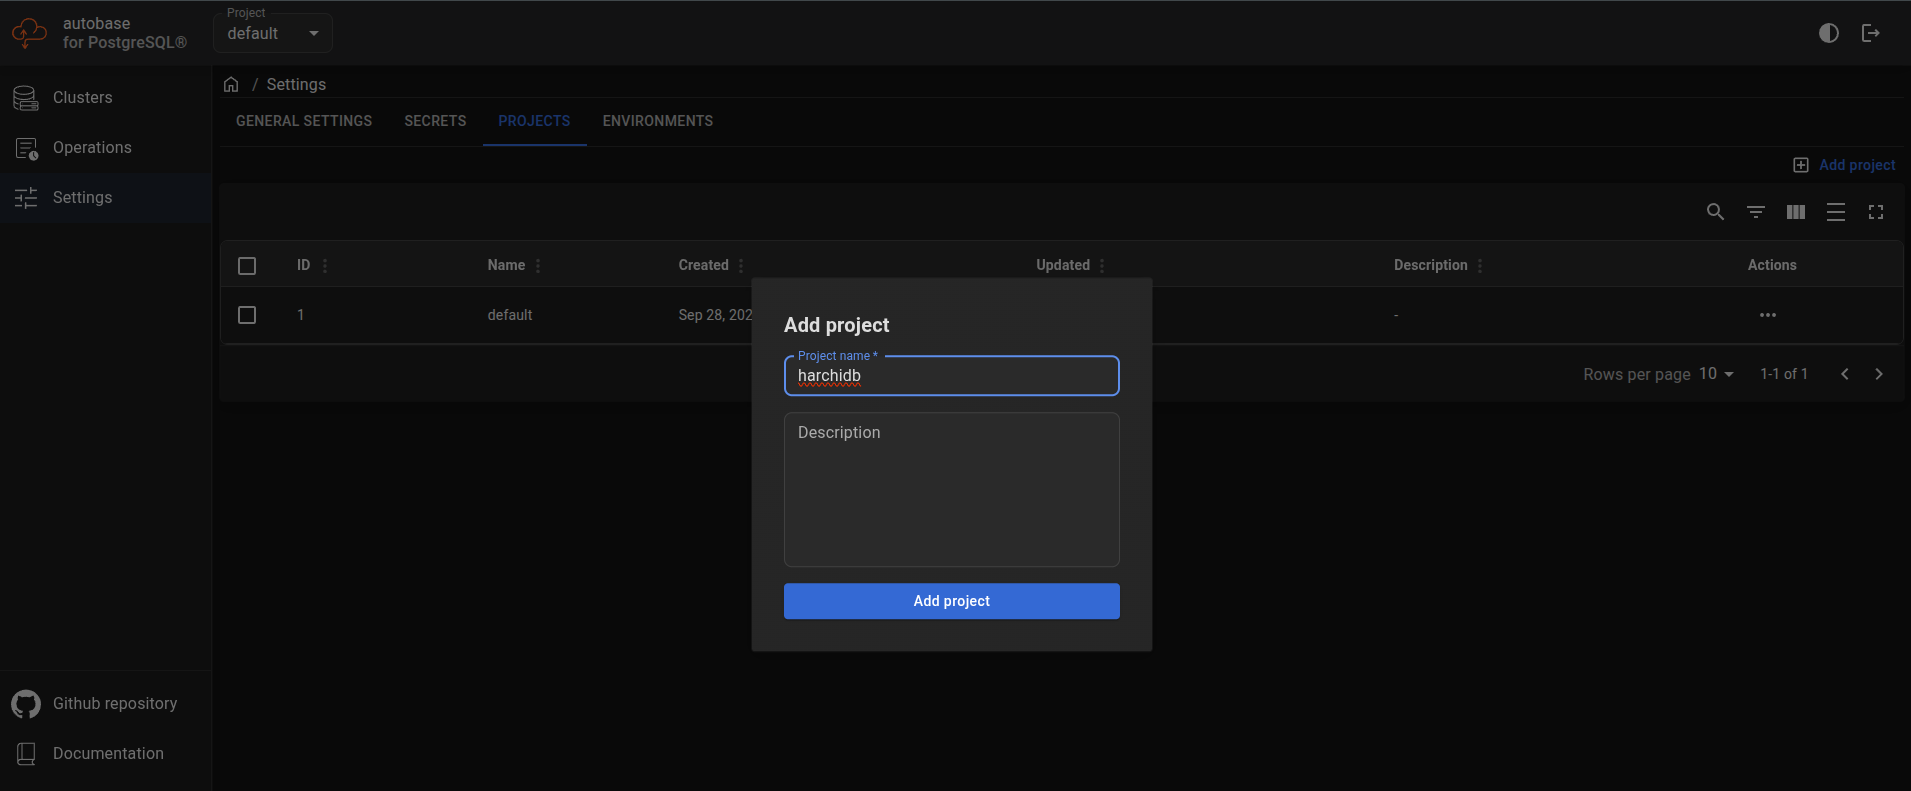
Access in UI again at http://localhost and create a new project for your own stuff
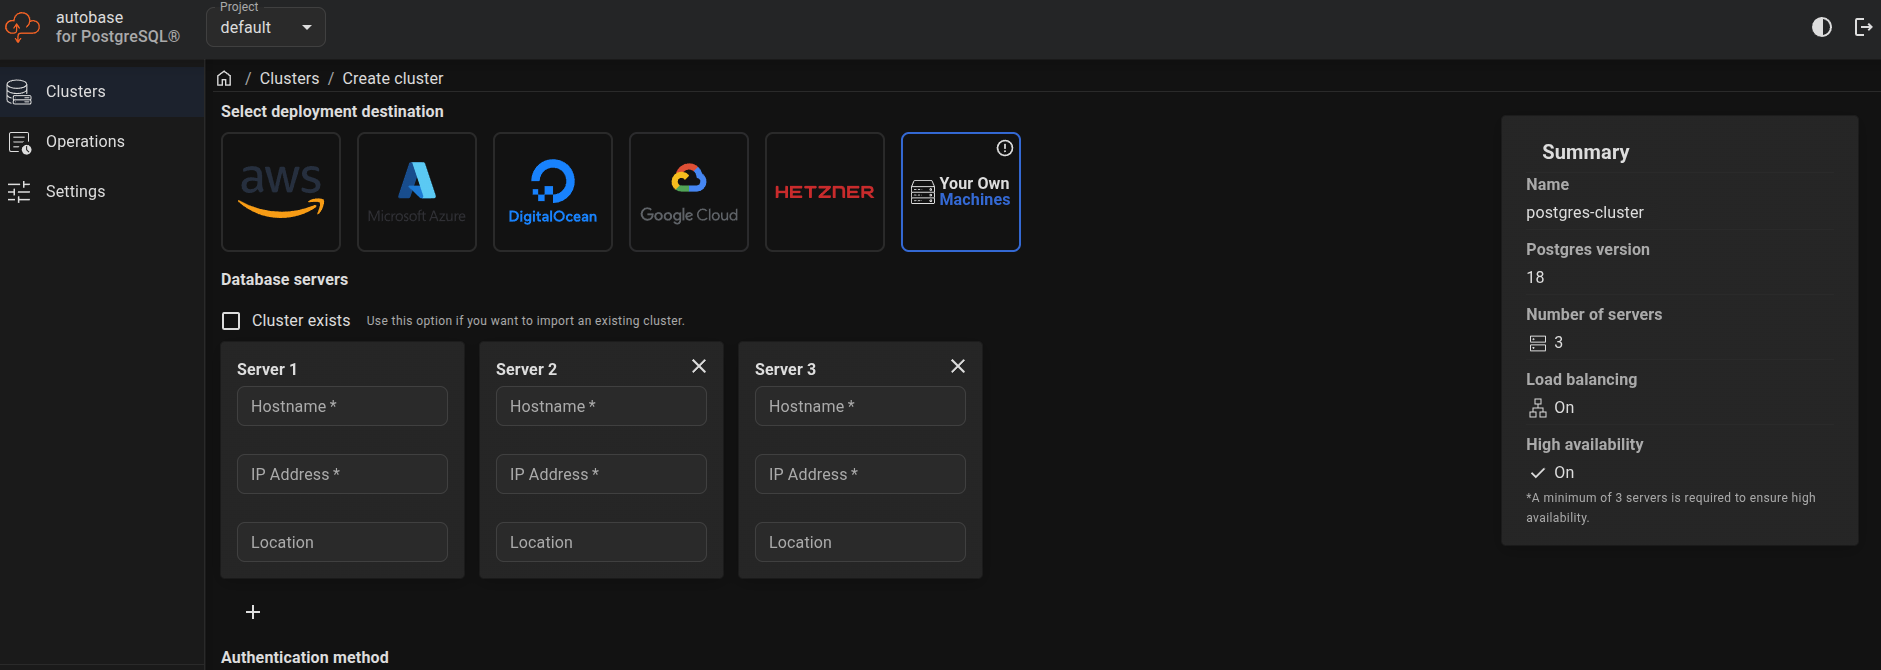
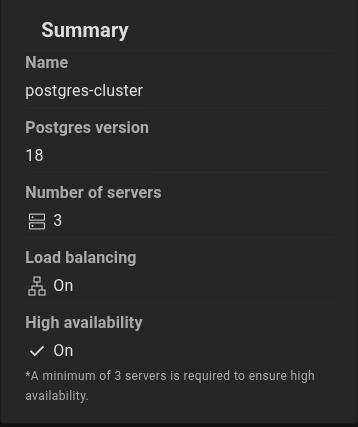
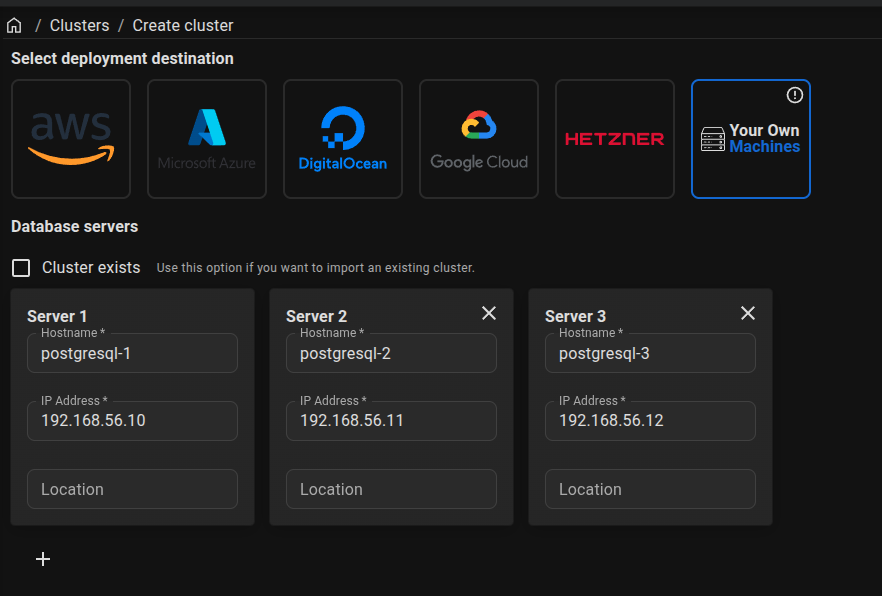
Now create a cluster with the configuration with configuration like this one
Now provide the couple of information of your virtual machines, like hostname, ip address, ssh-key and VIP address 192.168.56.69 😈
For preventing when you trigger the provision, you should pull the image autobase/automation:latest to your host
docker pull autobase/automation:latest
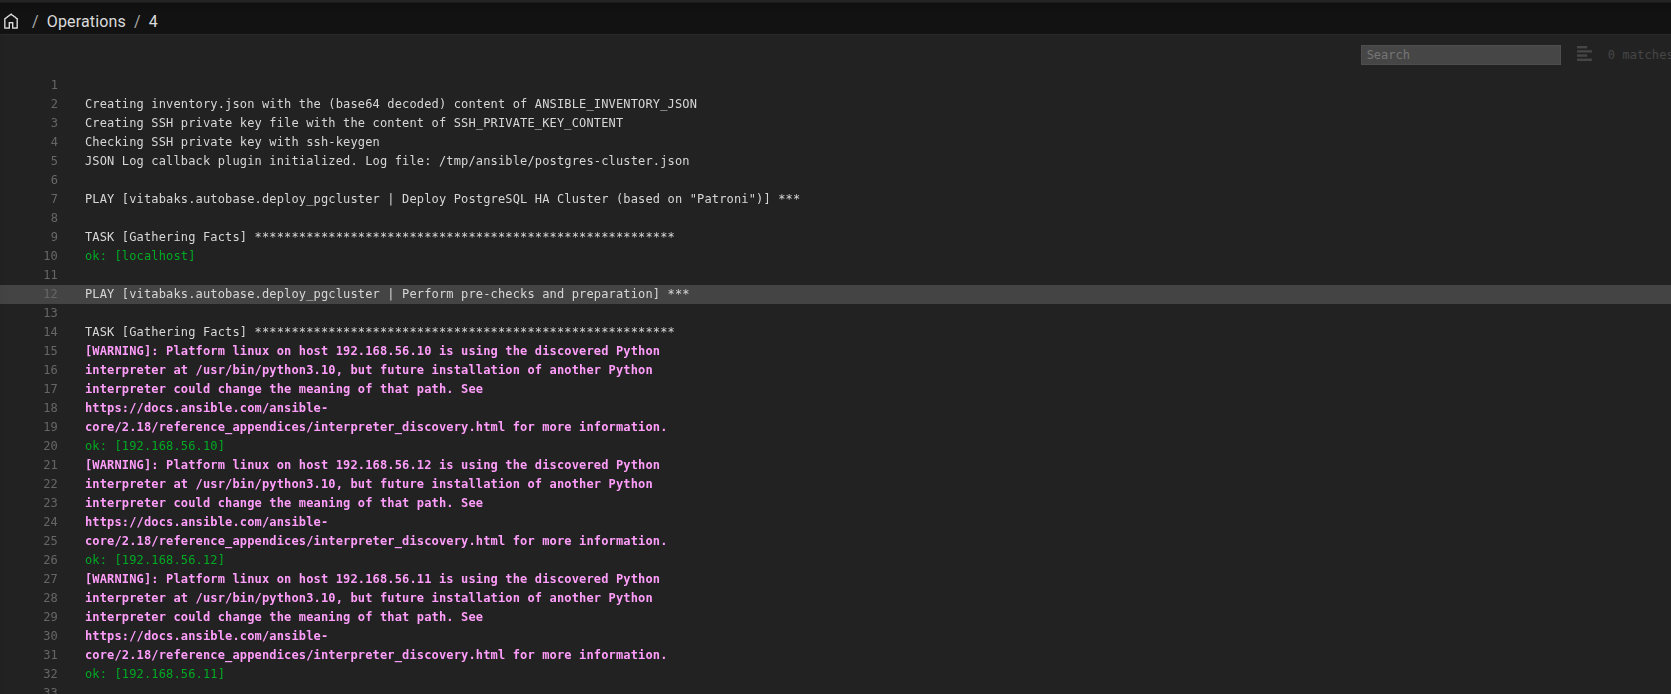
Now, you can trigger the provision and wait in couple minutes for completely entire progress. If you want to see the progress, you can double-check inside the operations of UI
Danger
Using the autobase UI presents a challenge when attempting to manage multiple Network Interface Controllers (NICs) on hosts provisioned via Vagrant.
This issue arises because when the Ansible script attempts to parse and use the target host information defined in the UI, it instead detects the host’s actual, and often conflicting, IP addresses. This frequently leads to a mismatch between the defined and detected IPs.
Ansible Detected IPs:10.0.2.15, 10.0.2.15, 192.168.56.12 (The 10.0.2.15 address is typically the non-routable default Vagrant NAT IP, which Ansible incorrectly selects for some hosts.)
This IP address mismatch subsequently causes an etcd cluster failure when the nodes attempt to join or communicate with one another using the incorrect address.
TASK [vitabaks.autobase.etcd : Generate etcd conf file] ************************changed: [192.168.56.10]changed: [192.168.56.12]changed: [192.168.56.11]TASK [vitabaks.autobase.etcd : Copy systemd service file] **********************changed: [192.168.56.10]changed: [192.168.56.12]changed: [192.168.56.11]TASK [vitabaks.autobase.etcd : Start etcd service and check cluster health] ****included: /root/.ansible/collections/ansible_collections/vitabaks/autobase/roles/etcd/tasks/start.yml for 192.168.56.10, 192.168.56.11, 192.168.56.12TASK [vitabaks.autobase.etcd : Enable and start etcd service] ******************fatal: [192.168.56.10]: FAILED! => {"changed": false, "msg": "Unable to start service etcd: Job for etcd.service failed because the control process exited with error code.\nSee \"systemctl status etcd.service\" and \"journalctl -xeu etcd.service\" for details.\n"}fatal: [192.168.56.11]: FAILED! => {"changed": false, "msg": "Unable to start service etcd: Job for etcd.service failed because the control process exited with error code.\nSee \"systemctl status etcd.service\" and \"journalctl -xeu etcd.service\" for details.\n"}fatal: [192.168.56.12]: FAILED! => {"changed": false, "msg": "Unable to start service etcd: Job for etcd.service failed because the control process exited with error code.\nSee \"systemctl status etcd.service\" and \"journalctl -xeu etcd.service\" for details.\n"}PLAY RECAP *********************************************************************192.168.56.10 : ok=63 changed=30 unreachable=0 failed=1 skipped=84 rescued=0 ignored=0192.168.56.11 : ok=42 changed=23 unreachable=0 failed=1 skipped=97 rescued=0 ignored=0192.168.56.12 : ok=42 changed=23 unreachable=0 failed=1 skipped=97 rescued=0 ignored=0localhost : ok=1 changed=0 unreachable=0 failed=0 skipped=253 rescued=0 ignored=0
Tip
The decision to switch to a script-based approach (such as direct Ansible execution leveraging inventories) is a practical choice because it offers direct and reliable control over host IP addresses. This method bypasses the network configuration ambiguity encountered when using the UI with certain virtualization platforms.
It’s important to clarify that this specific issue is primarily related to network resolution when using Vagrant, which can default to selecting non-routable NAT IPs (10.0.2.15).
The core Autobase tool remains effective and works correctly with other Private Network configurations, including hosts provisioned via VMware or QEMU. It is also an excellent tool for configuring machines already present on your network using its attractive UI. However, Vagrant can indeed be a difficult choice for multi-NIC environments due to its network handling defaults.
Setup with Autobase by script
By alternative the UI, we can approach autobase with script written in Ansible, you will have multiple options to choose or use any forks customize. But mainly, you will have two ways to adapt
Use directly the ansible-playbook of autobase. Read more solution at
Playaround with Ansible-Galaxy to pull autobase and work with it via inventories of us. I truly prefer this way, so we will deal with this solution. Read more solution at
Next define the the directory ansible in your host, for my specific, it will look like
./ansible├── inventories│ ├── group_vars│ │ └── all.yml # should be all for use group_vars of ansible│ └── hosts└── setup-patroni-postgres.yml3 directories, 3 files
First of all, you can double-check the example from official documentation which provide a great point for starting, about
Because you need to follow the structure of ansible to set variables for host, therefore you should keep your folder same as my mine. Check more about these configurations at
By default, if you setup the inventories base on the default, you will encounter the problems with vagrant with not provide single interface, and it will cause trouble when you start etcd and serve the certificates.
Tip
The issue you’ve identified stems from the etcd.conf.j2 template and how the etcd_bind_address variable is utilized within it.
Specifically, the core configuration variables for etcd, such such as ETCD_LISTEN_CLIENT_URLS, ETCD_LISTEN_PEER_URLS, and ETCD_INITIAL_CLUSTER, are correctly designed to reference the bind_address (as seen in the main.yml task).
However, the default template file is insufficiently explicit: it only provides descriptions and does not clearly show how these critical parameters are rendered using the etcd_bind_address variable.
Your solution to explicitly define and control the correct IP addresses via your Ansible hosts file is a necessary and effective workaround to ensure etcd binds to the routable IP rather than the incorrect default or detected NAT IP.
hosts
# This is an example inventory file for Ansible to deploy a PostgreSQL HA cluster.## postgresql_exists - Set to true if PostgreSQL is already installed and running on the server.# hostname - Hostname to set on this server (optional). If specified, the server will be renamed to this value.# new_node - Set to true to add this server as a new node to an existing cluster.# balancer_tags - Balancer tags for the /replica, /sync, /async Patroni endpoints, specified in "key=value" format, separated by commas.# patroni_tags - Patroni tags, specified in "key=value" format, separated by commas (e.g. "nosync=true,nofailover=true").# patroni_replicatefrom - The Patroni hostname this node should replicate from (for cascading replication).# bind_address - The IP address cluster services should bind to on this host. Defaults to the first available private IP address.# if dcs_exists: false and dcs_type: "etcd"[etcd_cluster] # recommendation: 3, or 5-7 nodes192.168.56.10 ansible_hostname=192.168.56.10 bind_address=192.168.56.10192.168.56.11 ansible_hostname=192.168.56.11 bind_address=192.168.56.11192.168.56.12 ansible_hostname=192.168.56.12 bind_address=192.168.56.12# if with_haproxy_load_balancing: true[balancers]192.168.56.10 ansible_hostname=192.168.56.10 bind_address=192.168.56.10192.168.56.11 ansible_hostname=192.168.56.11 bind_address=192.168.56.11192.168.56.12 ansible_hostname=192.168.56.12 bind_address=192.168.56.12# PostgreSQL nodes[master]192.168.56.10 hostname=postgresql-1 postgresql_exists=false bind_address=192.168.56.10[replica]192.168.56.11 hostname=postgresql-2 postgresql_exists=false bind_address=192.168.56.11192.168.56.12 hostname=postgresql-3 postgresql_exists=false bind_address=192.168.56.12[postgres_cluster:children]masterreplica# Connection settings[all:vars]ansible_connection='ssh'ansible_ssh_port='22'ansible_user='vagrant'#ansible_ssh_pass='secretpassword' # "sshpass" package is required for use "ansible_ssh_pass"ansible_ssh_private_key_file='~/.ssh/vmbox'#ansible_python_interpreter='/usr/bin/python3'
Info
Following this configuration will completely resolve problems when you work with Vagrant.
Next, you should go to modify a couple of settings in variables for compatible with your Patroni Cluster
Firstly, copying the default version to the ./inventories/group_vars/all.yaml file
Set the postgres username and password for root
patroni_superuser_username: "postgres"patroni_superuser_password: "postgres" # Please specify a password. If not defined, will be generated automatically during deployment.
Enable haproxy for load balancer layer
with_haproxy_load_balancing: true # or 'true' if you want to install and configure the HAProxy load balancershaproxy_listen_port: master: 5000 replicas: 5001 replicas_sync: 5002 replicas_async: 5003
Set the VIP (Virtual IP) and interface for vagrant host (NOTE: By default, the host-only interface will be enp0s8 if you provision Ubuntu 22.04 on Vagrant, but to ensure you need to ssh and double-check them with ip addr command)
cluster_vip: "192.168.56.69" # IP address for client access to the databases in the cluster (optional).vip_interface: "enp0s8" # interface name (e.g., "ens32").# Note: VIP-based solutions such as keepalived or vip-manager may not function correctly in cloud environments.
Disable pg_bouncer(Optional) (NOTE: you can enable if you want to use this feature)
pgbouncer_install: false # or 'false' if you do not want to install and configure the pgbouncer servicepgbouncer_processes: 1 # Number of pgbouncer processes to be used. Multiple processes use the so_reuseport option for better performance.pgbouncer_conf_dir: "/etc/pgbouncer"
Disable timescaledb and citus for reducing the error from them. Although it sets the false by default, but to ensure you should define them
When I use ansible at the latest version, when you run to task define timescaledb and citus, you will hit to the wall with error from the autobase definition. More about the issue at Ansible - Iterating over a simple list
You can double-check this configuration in your collection, or web version at GitHub - autobase/automation/roles/packages/tasks/extensions.yml and try disable the loop and instead pass the package into name parameter of ansible.builtin.package task. Here is what i editing
roles/packages/tasks/extensions.yml
# TimescaleDB (if 'enable_timescale' is 'true')- name: Install TimescaleDB package ansible.builtin.package: name: "{{ timescaledb_package }}" state: present # loop: "{{ timescaledb_package }}" # Cause error when define loop but the variable not return `list` but return `str` vars: timescaledb_package: >- [{% if pg_version | default(postgresql_version) | int >= 11 %} "timescaledb-2-postgresql-{{ pg_version | default(postgresql_version) }}" {% else %} "timescaledb-postgresql-{{ pg_version | default(postgresql_version) }}" {% endif %}]......# Citus (if 'enable_citus' is 'true')- name: Install Citus package ansible.builtin.package: name: "{{ citus_package }}" state: present # loop: "{{ citus_package }}" # Cause error when define loop but the variable not return `list` but return `str` vars: citus_package: >- [{% if ansible_os_family == 'Debian' and pg_version | default(postgresql_version) | int >= 15 %} "postgresql-{{ pg_version | default(postgresql_version) }}-citus-{{ citus_version | default('13.1') }}" {% elif ansible_os_family == 'Debian' and pg_version | default(postgresql_version) | int == 14 %} "postgresql-{{ pg_version | default(postgresql_version) }}-citus-12.1" {% elif ansible_os_family == 'Debian' and pg_version | default(postgresql_version) | int == 13 %} "postgresql-{{ pg_version | default(postgresql_version) }}-citus-11.3" {% elif ansible_os_family == 'Debian' and pg_version | default(postgresql_version) | int == 12 %} "postgresql-{{ pg_version | default(postgresql_version) }}-citus-10.2" {% elif ansible_os_family == 'Debian' and pg_version | default(postgresql_version) | int == 11 %} "postgresql-{{ pg_version | default(postgresql_version) }}-citus-10.0" {% else %} "citus_{{ pg_v
If any error cause in during the progress run deploy progress, you need to run tag=remove for uninstall each components in cluster to rerun again with no conflict. But you need to ensure what you gonna do, especially with production enviroment
Wait in the minutes to let it setup and take the result at the end.
Warning
The previous operation was interrupted and did not complete successfully, likely due to a transient network issue or other environmental factors. I am confident that the intended configuration is correct and should work.
If you encounter the same error or related problems in the future, please check my upcoming updates, as I plan to document a more robust solution based on my current work.
BONUS: After rerun in the different network with couple take note about structure project, disable error from the autobase collections and embrace wrong functionality, you will get the result deploy successfully at the end
There are couple things you can work around with Patroni and etcd, but you should take note these commands for workaround with this cluster and there are several check-list, below
This is couple of commands I usually to workaround with HA PostgreSQL Cluster
# Health check endpoint etcdsudo etcdctl \--endpoints=https://127.0.0.1:2379 \--cacert=/etc/etcd/tls/ca.crt \--cert=/etc/etcd/tls/server.crt \--key=/etc/etcd/tls/server.key \endpoint health# List all member in etcd clustersudo etcdctl \--endpoints=https://127.0.0.1:2379 \--cacert=/etc/etcd/tls/ca.crt \--cert=/etc/etcd/tls/server.crt \--key=/etc/etcd/tls/server.key \member list# Show list member with connect via private network, and output as tablesudo etcdctl \ --endpoints=https://192.168.56.10:2379,https://192.168.56.11:2379,https://192.168.56.12:2379 \--cacert=/etc/etcd/tls/ca.crt \--cert=/etc/etcd/tls/server.crt \--key=/etc/etcd/tls/server.key \ endpoint status --write-out=table
With patroni, almost workaround via patronictl, you need point to config file and use this one for queries cluster, state and anything action in Patroni cluster. Afterward, you can access any patroni configuration and information with config-file at /etc/patroni/patroni.yml
When you use patroni, you should upgrade parameter via patronictl instead manually upgrade. you can run them with command. I will talk more about this feature of next part, but you can imagine whole things in same place.
# List configuration of cluster sudo patronictl -c /etc/patroni/patroni.yml show-config# Edit the configuration of clustersudo patronictl -c /etc/patroni/patroni.yml edit-config
When you double-check the configuration, you will imagine the next way we can connect PostgreSQL via HAProxy through port 5000 and 5001. There are couple of things should be remembered when work with
To distribute the connection to PostgreSQL, you have multiple way to connect but simply, for
Read Write Request, you should connect to Port 5000
Read Only, you should connect to Port 5001
HAProxy will open at least 1000 connection when you connect via them
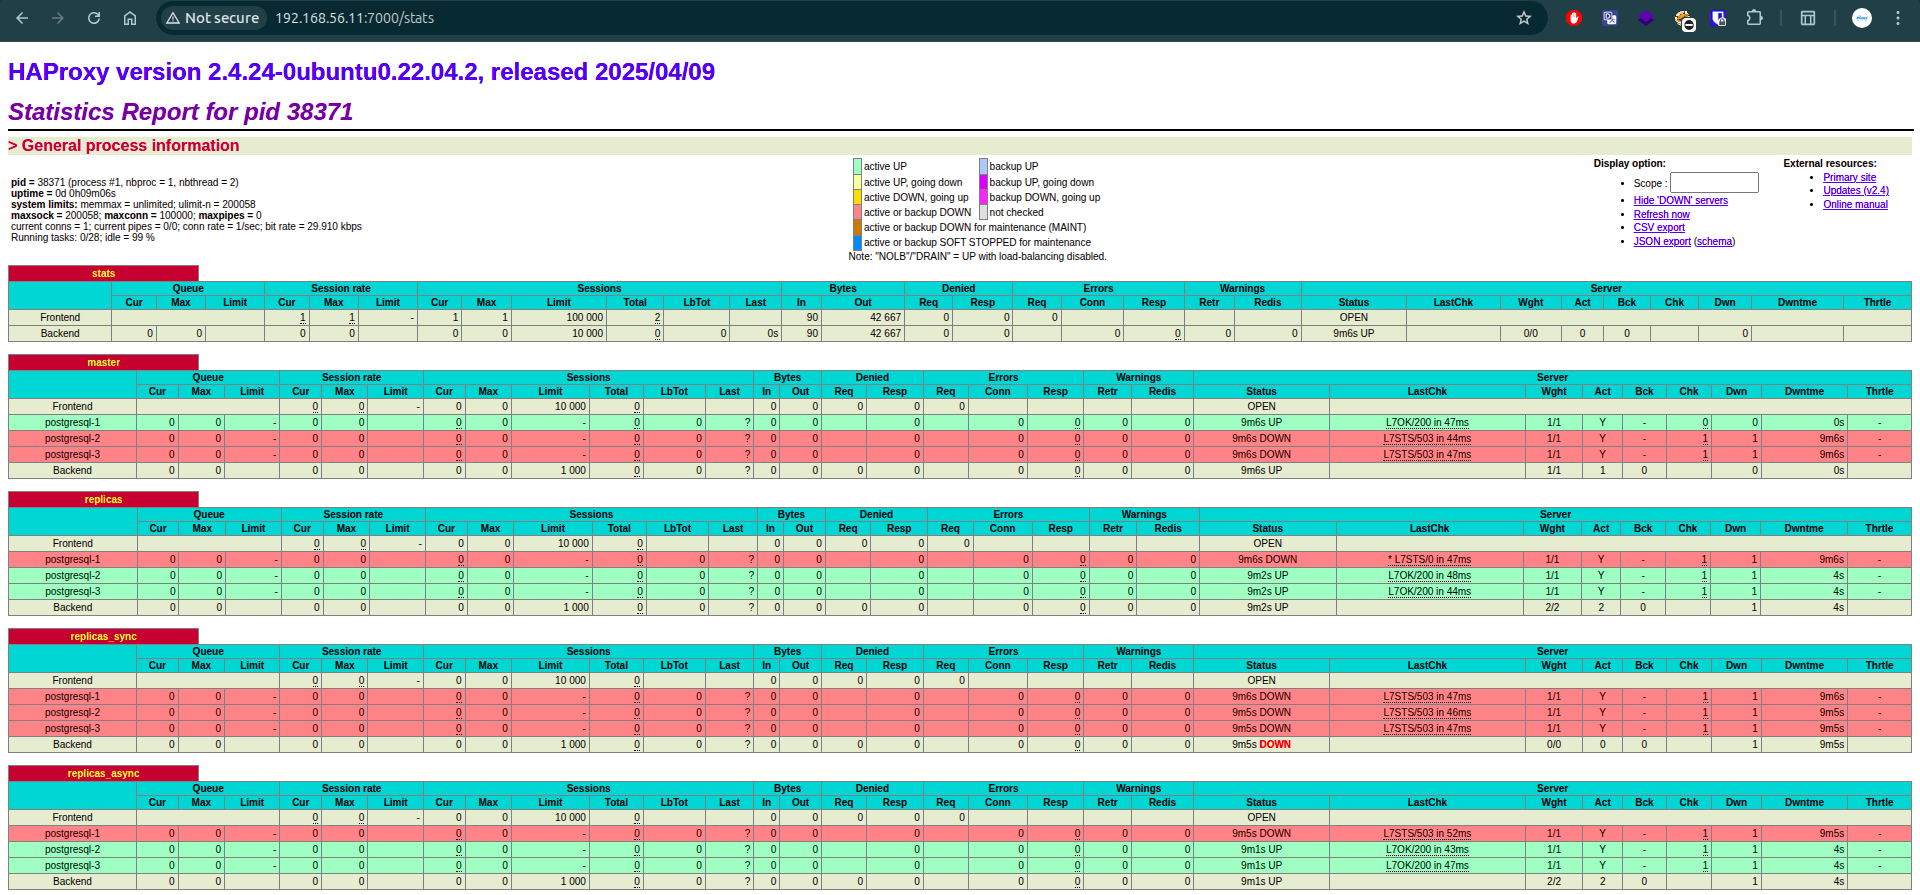
There are Port 7000 of HAProxy to let you see them via dashboard when it works and provide a good visualization for what endpoint or node able to readwrite or readonly
HAProxy Dashboard about Patroni Cluster State
For completely, before go to usage when you bootstrap successfully your Patroni cluster, you should change the configuration of etcd from state new to existing. This one can help you prevent error when your node reboot or rerun the etcd one more time
ETCD_INITIAL_CLUSTER_STATE="existing" # new
Usage
In my perspective, I usually use psql command to connect PostgreSQL Database and run query, so let try via VIP
You can test the read/write permission by permission of each type of PostgreSQL DB like this
Login to port 5000 via VIP and run
-- Create a table for Nintendo charactersCREATE TABLE nintendo_characters ( character_id SERIAL PRIMARY KEY, -- Unique identifier for each character name VARCHAR(50) NOT NULL, -- Name of the character game_series VARCHAR(50), -- Game series the character belongs to debut_year INT, -- Year the character debuted description TEXT, -- Brief description of the character is_playable BOOLEAN DEFAULT TRUE -- Whether the character is playable);-- Insert some example charactersINSERT INTO nintendo_characters (name, game_series, debut_year, description, is_playable)VALUES ('Mario', 'Super Mario', 1981, 'The iconic plumber and hero of the Mushroom Kingdom.', TRUE), ('Link', 'The Legend of Zelda', 1986, 'A courageous hero tasked with saving Hyrule.', TRUE);-- Select all rows to verify the table creation and data insertionSELECT * FROM nintendo_characters;
postgres=# -- Create a table for Nintendo charactersCREATE TABLE nintendo_characters ( character_id SERIAL PRIMARY KEY, -- Unique identifier for each character name VARCHAR(50) NOT NULL, -- Name of the character game_series VARCHAR(50), -- Game series the character belongs to debut_year INT, -- Year the character debuted description TEXT, -- Brief description of the character is_playable BOOLEAN DEFAULT TRUE -- Whether the character is playable);-- Insert some example charactersINSERT INTO nintendo_characters (name, game_series, debut_year, description, is_playable)VALUES ('Mario', 'Super Mario', 1981, 'The iconic plumber and hero of the Mushroom Kingdom.', TRUE), ('Link', 'The Legend of Zelda', 1986, 'A courageous hero tasked with saving Hyrule.', TRUE);-- Select all rows to verify the table creation and data insertionSELECT * FROM nintendo_characters;CREATE TABLEINSERT 0 2 character_id | name | game_series | debut_year | description | is_playable --------------+-------+---------------------+------------+------------------------------------------------------+------------- 1 | Mario | Super Mario | 1981 | The iconic plumber and hero of the Mushroom Kingdom. | t 2 | Link | The Legend of Zelda | 1986 | A courageous hero tasked with saving Hyrule. | t(2 rows)postgres=# \dt List of relations Schema | Name | Type | Owner--------+---------------------+-------+---------- public | nintendo_characters | table | postgres(1 row)
Next, you try to login for Port 5001 and try insert a little bit more
INSERT INTO nintendo_characters (name, game_series, debut_year, description, is_playable)VALUES ('Yoshi', 'Super Mario', 1990, 'A friendly green dinosaur and Marios trusted companion.', TRUE), ('Luigi', 'Super Mario', 1983, 'Marios younger brother and a skilled ghost hunter.', TRUE);
postgres=# INSERT INTO nintendo_characters (name, game_series, debut_year, description, is_playable)VALUES ('Yoshi', 'Super Mario', 1990, 'A friendly green dinosaur and Marios trusted companion.', TRUE), ('Luigi', 'Super Mario', 1983, 'Marios younger brother and a skilled ghost hunter.', TRUE);ERROR: cannot execute INSERT in a read-only transactionpostgres=# select * from nintendo_characters; character_id | name | game_series | debut_year | description | is_playable --------------+-------+---------------------+------------+------------------------------------------------------+------------- 1 | Mario | Super Mario | 1981 | The iconic plumber and hero of the Mushroom Kingdom. | t 2 | Link | The Legend of Zelda | 1986 | A courageous hero tasked with saving Hyrule. | t(2 rows)
Now you will encounter the error when you try write but it mean you only read on this endpoint at Port 5001, that’s completely work as expectation when we try separate the DB for RW or RO
Note
When you work via connection_string, that will on same page that psql but your postgresql now only approve SSL for connection, so by default it will use SSL to connect but if you try to disable that will lead to error for your connection
If you want to specific some parameters, please double-check your configuration carefully or read documentation for more information at 32.1. Database Connection Control Functions
pg_hba is a file configuration of client authentication, it means you should add more configuration to the database for make the PostgreSQL understand which PostgreSQL in cluster can be able to interacted with each others
Warning
When you already setup PostgreSQL via Patroni, you must you patronictl for edit the configuration of PostgreSQL for both pg_hba.conf and postgresql.conf
To run update pg_hba, you should connect to primary node and try edit with patronictl
# Show configurationpatronictl --config-file /etc/patroni/patroni.yml show-config
Edit and add more host into Patroni Cluster with another replicator user. For example, I will add other node 192.168.56.12 to Patroni, and the configuration should be liked this
Now, save and approve for edit configuration. For pg_hba, you can skip the reload configuration for your host, Patroni will take the responsibility and you won’t restart database.
Note
Please edit the configuration for another one in cluster, especially for both config.yaml and via patronictl
Update the PostgreSQL Configuration
There are few configuration related PostgreSQL parameters, so you need edit them via patronictl and follow the rule to reload the configuration because if you restart patroni service, it will cause failover in your host. For more information, please double-check at Patroni - Patroni configuration
The list parameter need to be aware
max_connections
max_prepared_transactions
max_locks_per_transaction
max_wal_senders
max_worker_processes
Warning
Changing these parameters require a PostgreSQL restart to take effect, and their shared memory structures cannot be smaller on the standby nodes than on the primary node.
Therefore, once upon again, please edit them via patronictl and don’t edit directly postgresql configuration at /var/lib/postgresql/$VERSION/main
However, as those settings manage shared memory, some extra care should be taken when restarting the nodes:
If you want to increase the value of any of those settings:
Restart all standbys first
Restart the primary after that
If you want to decrease the value of any of those settings:
Restart the primary first
Restart all standbys after that
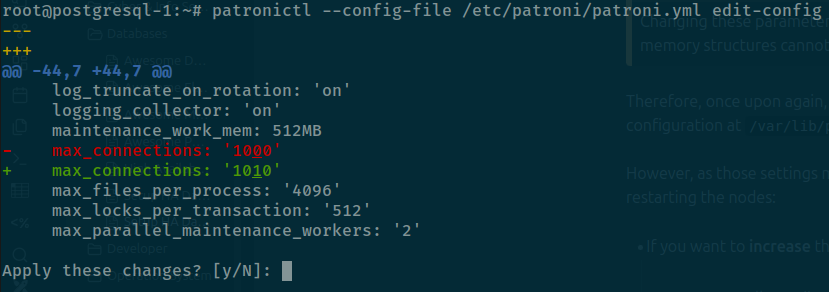
For example, you want to increase max_connection to higher value, by default it will set 1000 but you want to 1010, you can perform command edit-config
Now you need to modify max_connections: 1000⇒max_connections: 1010 and save with prompt yes to edit
Now check the patronictl with list command and you can see the change will set on pending
patronictl --config-file /etc/patroni/patroni.yml list
Now following the rule, you need restart the stand by first and after that you need to restart primary, with patronictl we have restart command to handle this action
Now double-check again and you can see your change successfully
Info
In the problems with patronictl, you can use directly command with curl to API of patroni at port 8008 of any member in cluster. Check more of them in Patroni - Patroni REST API
curl -X POST -k https://192.168.56.12:8008/restart
Conclusion
Success
This concludes the article. I recognize that this post contains a substantial amount of information to absorb. Implementing High Availability (HA) architecture—particularly for critical components like a database—is inherently complex in terms of operation, maintenance, and automation.
I plan to update this blog with new findings and information should I perform the provisioning process again or if any relevant changes occur. I hope this content was both educational and enjoyable. I highly recommend that you first follow the manual provisioning steps for the HA setup (as referenced by the attached links) before attempting to automate the process; this is crucial for understanding the underlying behavior.
Quote
It has been a while since I last wrote a technical article, especially one of this length. Thank you for taking the time to read my post to the very end. I appreciate your support, and my advice remains: take care, and always strive to move forward, especially in this emerging AI era. I hope you enjoyed the read, and I look forward to seeing you again! 🙌