
Quote
Yo, everyone! Long time no see. I’ve been quite busy with my job lately, and it took a while to get back here, but I’m happy to join you all again before the new year!
Today, I want to go directly into the deep dive I’ve been researching recently: Multi-Cluster Architecture. This is one of the biggest and most complex areas within the Kubernetes ecosystem, especially when it comes to serving a global audience. Get a seat and get ready—this is going to be an interesting session!
The Challenge need to face off
Question
As a business scales, its infrastructure becomes increasingly vulnerable to performance impact. To address this, organizations must find robust scaling solutions. Since on-premise environments present significant scaling challenges, the cloud has emerged as a crucial alternative. The ultimate goal is often to find the most effective way to combine these two types of systems: Private Cloud (On-Premise) and Public Cloud.
The process of scaling multi-cluster, multi-region Kubernetes environments using supplementary technology stacks is not new, yet it remains one of the biggest challenges for many teams today. This is because I firmly believe there is no single “best practice” that fits every situation; your work involves finding the most compatible solution for your specific system. Therefore, before reviewing my strategies, you should examine other stories surrounding this topic. I would like to acknowledge the following individuals for their useful case studies:
- Plural - Simplifying Kubernetes Multi-Region Management: Challenges & Solutions
- Youtube - Pods Everywhere! InterLink: A Virtual Kubelet Abstraction Streamlining HPC… - Diego Ciangottini
- AWS - Hybrid and Multi-Region Kubernetes Orchestration Using Kublr
- AWS - Running AWS Fargate with virtual-kubelet
- Blog - Scheduling simulations and ghosts in the cluster 🪄
- Medium - Multi-Cluster & Disaster Recovery: Building a Global Kubernetes Architecture That Never Sleeps
- Tigera - Secure and Scalable Kubernetes for Multi-Cluster Management
Honestly, this represents one of the toughest challenges I encounter as a DevOps Engineer: How to effectively scale infrastructure not only for CPU workloads but also for specialized GPU workloads to meet business needs. This involves ensuring that traffic is routed to the correct service in the Kubernetes cluster and establishing a robust DNS strategy.
Diving deeper into my situation brings up many related questions. Below, I outline the key challenges encountered when combining different architectural types:
1. Kubernetes Tech Stack and GPU Worker Management
The first challenge is determining the appropriate strategy for managing a multi-cluster environment with a global presence. This requires confirming whether the current technology stack will function as expected in the new hybrid environment. Adding GPU resources significantly increases complexity when selecting providers. The major questions revolve around GPU resource reservation, maximizing utilization, and managing the substantial cost of cloud GPUs.
Note
Given my constraints, the top choice for managing NVIDIA GPUs is HAMI (https://project-hami.io/). More details can be explored at HAMI for vGPU.
![]()
2. Serving and Inference Response
If you are working with a technology stack and are focused on efficient deployment, the next critical consideration is how to build an efficient inference pipeline. This requires minimizing latency and implementing sophisticated routing strategies to ensure the best model response times.
Several issues contribute to complexity, especially when leveraging standard Kubernetes concepts to define the architecture, such as disaster recovery, managing Endpoints and EndpointSlices, handling networking for storage platforms like Longhorn, and understanding how core components like kube-proxy and CoreDNS facilitate routing and resolve Internal DNS within the cluster. Frankly, this necessitates extensive research and planning.
These cases compel me to think critically and “outside the box.” Here is what I will be focusing on next:
- Ideally, I need only one endpoint for serving with multiple underlying replicas. This is better suited for scaling, especially when utilizing the Horizontal Pod Autoscaler (HPA). Furthermore, the Pod Topology Spread Constraints feature (https://kubernetes.io/docs/concepts/scheduling-eviction/topology-spread-constraints/) offers a more efficient way to prevent downtime. If I can seamlessly integrate remote nodes, allowing me to maintain a continuous deployment strategy and single serving endpoint, that would be ideal. In the opposite scenario, I would risk managing multiple endpoints instead of just one.
- If the service is running remotely, it must be able to return the result. The challenge then becomes how to reliably retrieve that response and return it to the client. The goal of scaling to another region is to achieve low latency, but without a control mechanism, I risk getting lost in a complex web of API domains. Given the characteristic of AI applications to return large data payloads, I need a controlled way to manage the data transfer overhead between these regions.
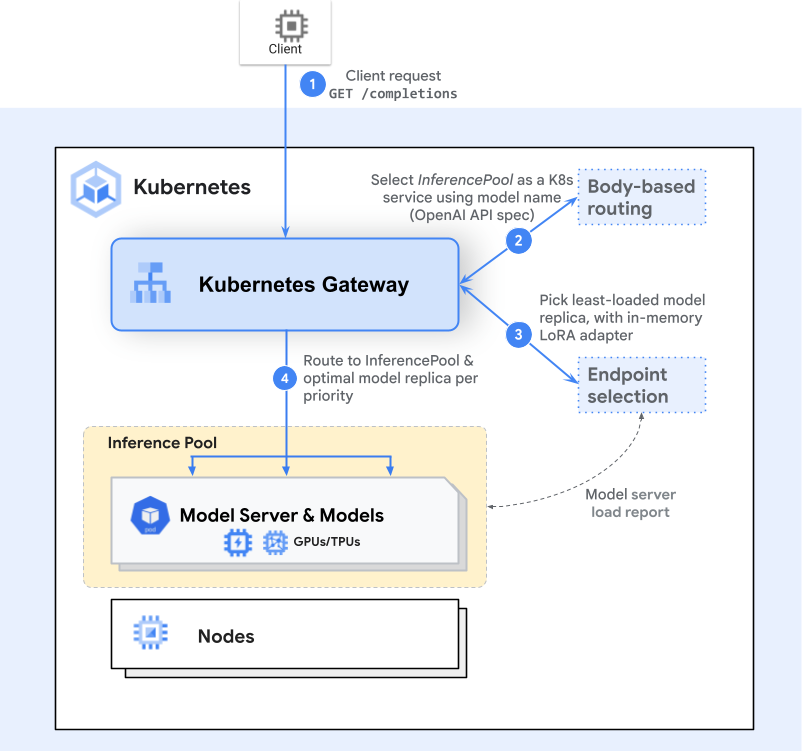
I am focused on exploring how to centralize the entire inference process into a single endpoint. The following list represents the initial options considered before selecting the final approach:
- API Gateway: Tools such as Kong Gateway or the native Kubernetes Gateway API.
- Inference Gateway: Specialized solutions like the gateway-api-inference-extension.
- Native Kubernetes: Utilizing Services without Selectors combined with custom Endpoints.
When implementing these methods, my core expectations are to:
- Establish a mapping or tunneling mechanism for efficient data transfer and communication between the hybrid cloud and on-premises environments.
- Define a robust routing module capable of intelligently redirecting requests to the correct region or service based on specific dependencies.
However, the architectural trade-off for this implementation is significant. This endeavor requires effectively refactoring the entire system, impacting how the application is exposed and how downstream services request and interact with the AI Service. I must find comprehensive solutions to address a multitude of critical, interrelated questions.
3. GitOps and CI/CD
Question
If you use GitOps as the standard for your cluster, you must consider for choosing some platforms, like Kubernete or different ecosystem that will keep your current deployment strategy.
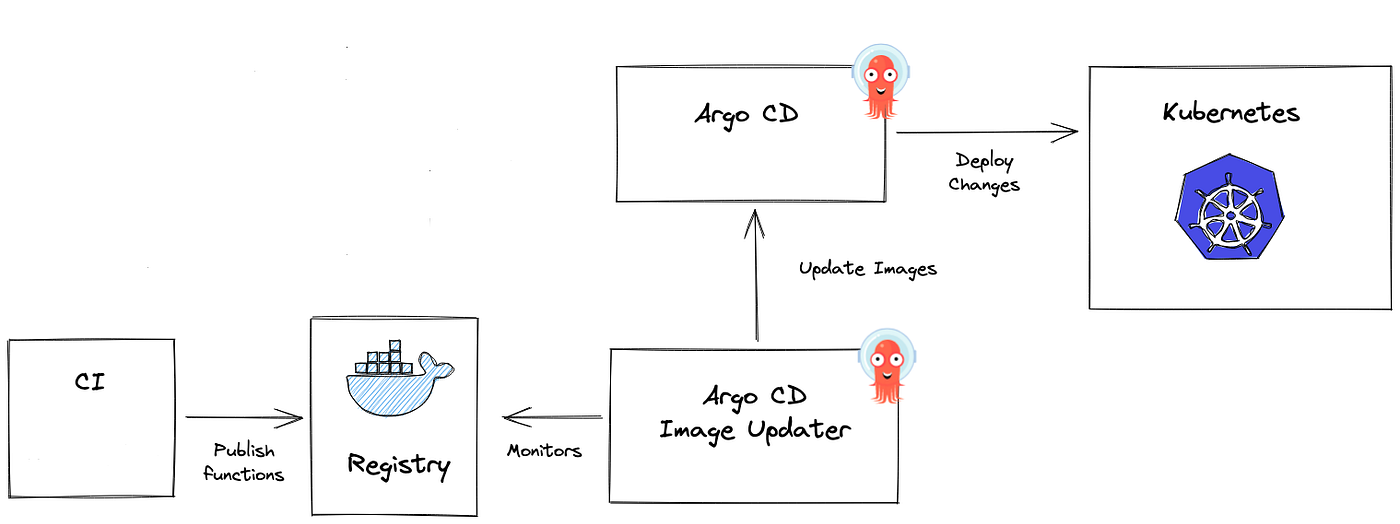
In my architecture, ArgoCD is an essential component used for platform governance and deployment, serving two primary roles:
- Application Management: To track and log application status and information directly within ArgoCD.
- Cluster Management: To enable true Multi-Cluster deployment and provide comprehensive tracking across all clusters.
The current challenge is ensuring consistency when adopting new deployment strategies. The existing structure must remain highly effective even with the introduction of newer technologies. Specifically, the major questions are: Is it possible to leverage Kubernetes-based techniques (managed by ArgoCD) to build and track deployments on environments like Container Instances or Serverless Solutions? If a change is necessary, which alternative options are the most feasible? Answering these questions will then lead directly to the next critical issue: Monitoring & Observability.
4. Monitoring & Observability
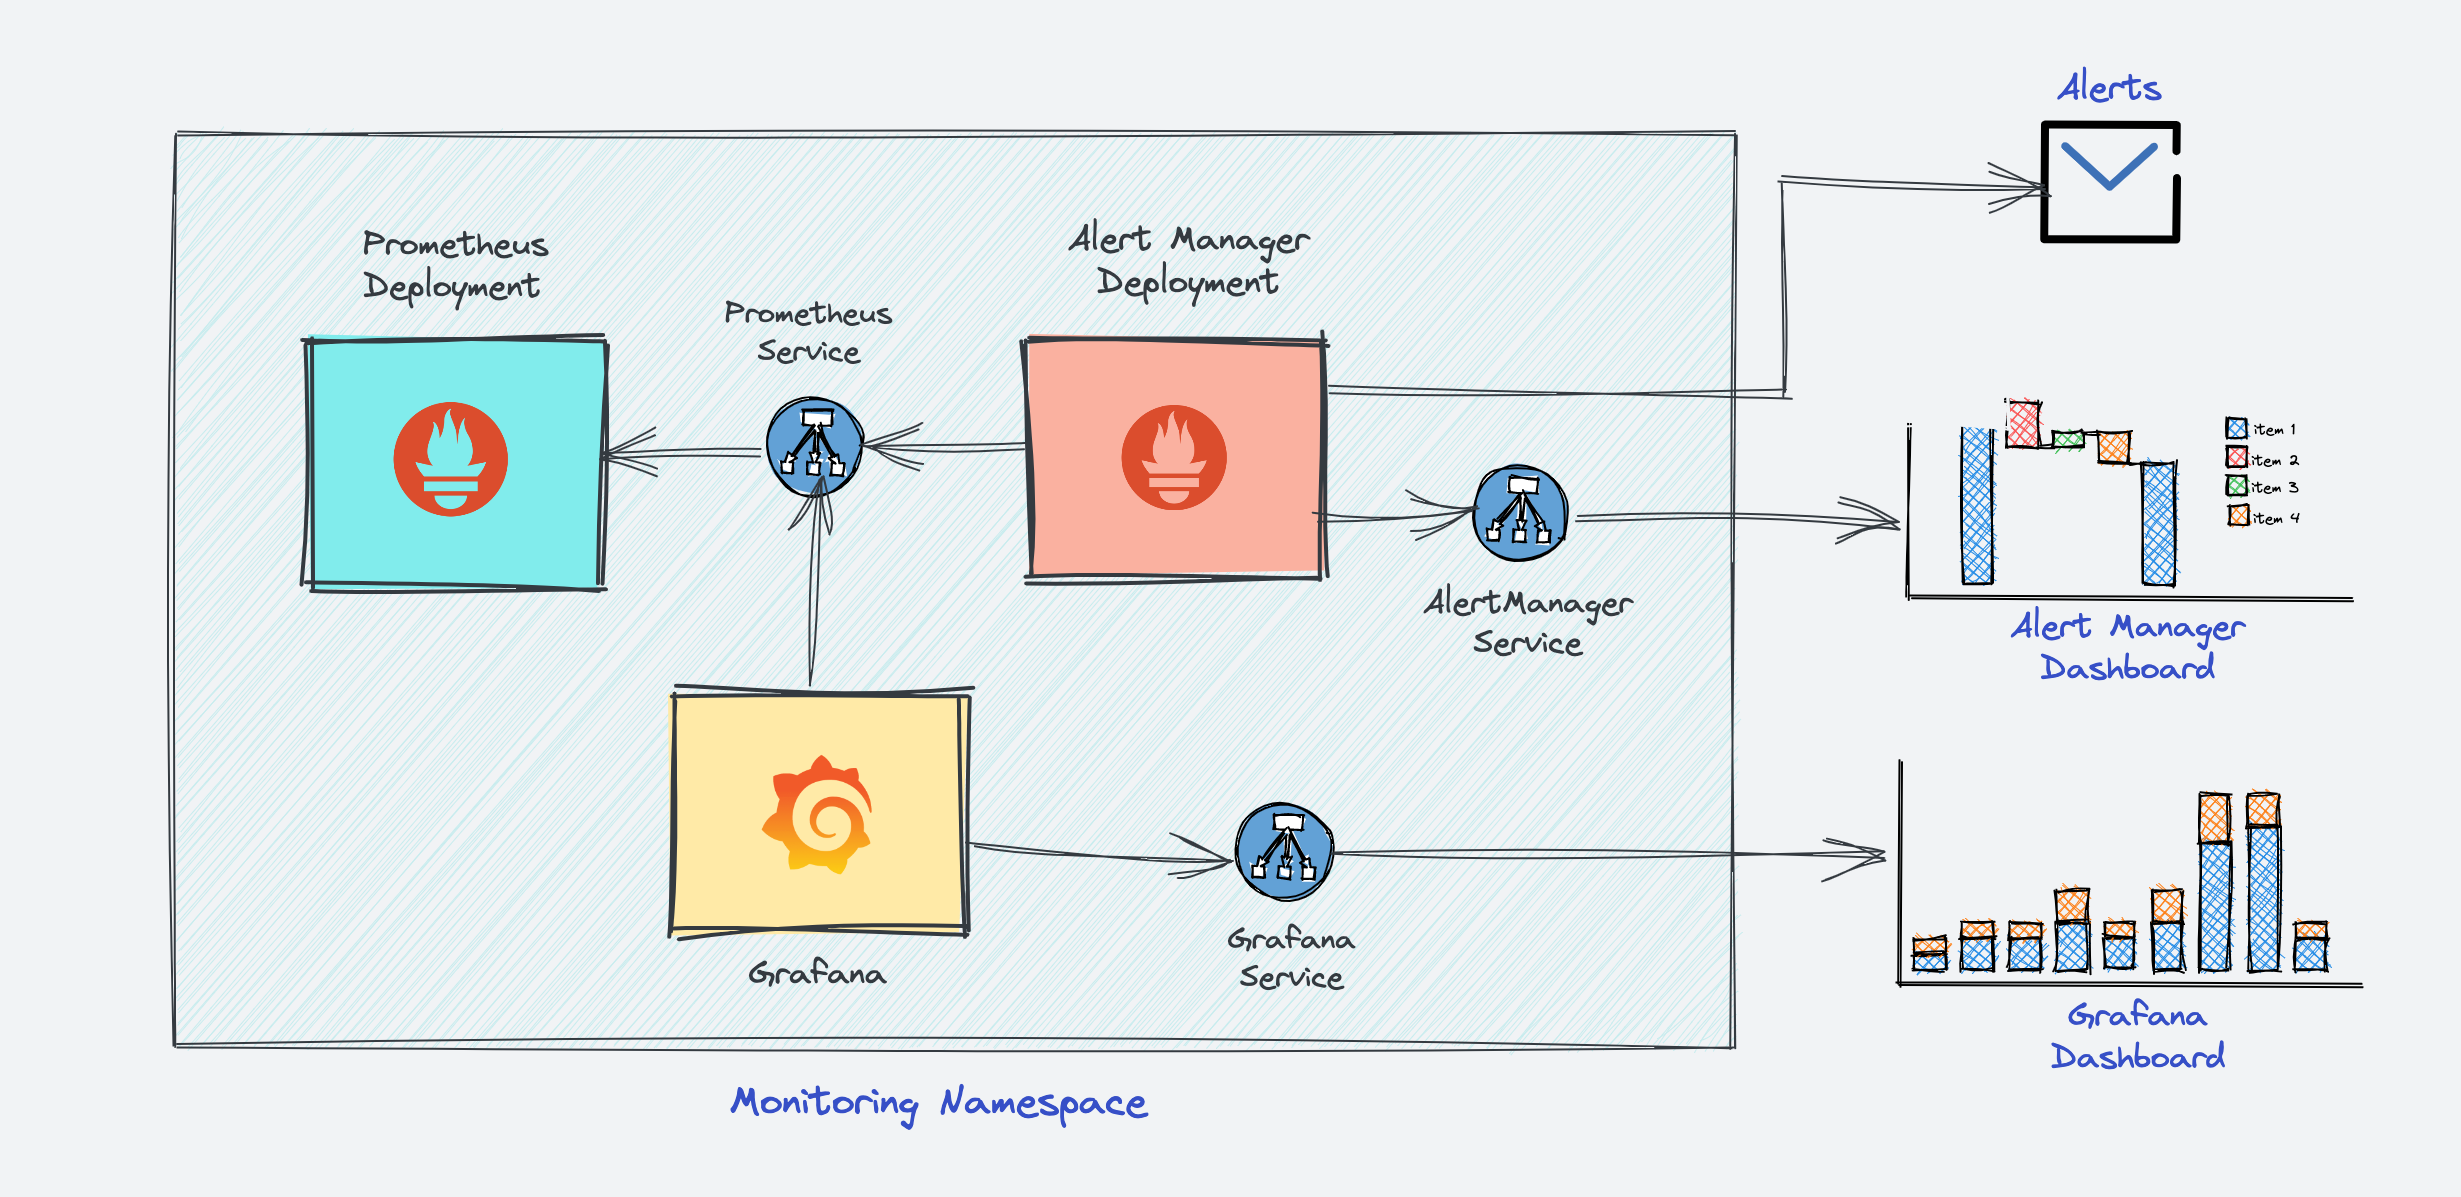
When considering Hybrid or Multi-Region environments, Monitoring and Observability becomes a significantly critical component. Its function is not merely to bridge the maintenance team with the cloud provider via metrics, logs, and traces, but also to ensure that the on-call and alerting service is always ready and provides precise, actionable information.
My current approach utilizes the standard tech stack: the Grafana Stack for metrics, alerting, and on-call, and ELK (Elasticsearch, Logstash, Kibana) for logging. Since this stack is deployed as a Kubernetes Service, it relies on native mechanisms like DaemonSets, Operators, or Custom Resource Definitions (CRDs) to operate and monitor a huge number of workloads and services.
The major question facing us is: “How can I effectively utilize the existing monitoring stack to observe a hybrid environment (combining private and public clouds)? Will this require me to replace existing components or introduce more complex architectural elements, such as the sidecar pattern, to achieve a functional and unified compromise in observability?”
Shiny Solution, but it’s tough !
These challenge above are what stuff I need to face off, it have some comfortable problem which able to change new techstack for getting approach. However, the most significant challenge is how to interact seamlessly with external providers without causing critical changes to our core deployment strategies, particularly concerning:
- GPU Reservation: Managing drivers, inference, secret mounting, and storage caching across regions.
- Microservice Interoperability in AI: Ensuring consistent DNS resolution and reliable boosting/step-function execution.
But luckily, I found, not thought about two potential path able to following, but it’s tough also
-
Custom Resource Definition (CRD) Approach: This allows me to define custom business logic and strategies using the sophisticated Kubernetes API. (🔴 Difficulty: Insane, Time Estimated: Several Months)
- Frameworks: Operator SDK or kubebuilder
- Article: Youtube - Unlocking the Power of Kubernetes: Create your own Resources with CRDs
-
Virtual Kubelet Approach: This is an open-source Kubernetes Kubelet implementation that masquerades as a standard Kubelet. It enables Kubernetes nodes to be backed by Virtual Kubelet providers, such as serverless cloud container platforms. (🔴 Difficulty: Insane, Time Estimated: Several Months)
- Documentation: https://virtual-kubelet.io/docs/
- Article: AWS - Running AWS Fargate with virtual-kubelet
Strategy 01: CRD (Custom Resource Definition) - HTTP Tunneling
Note
For this situation, I think that will tough option, because you won’t have lot of permissions to take the effective into edge environment, such as Kubernetes or Container, you just have only way to structure application in remote environment by entirely the manual setup or binary compiling (Back to 2010s 😄)
The goal is to centralize service scaling and traffic entry to a single endpoint (e.g., *.example.net on the edge machine) via a custom service endpoint mechanism.
| Strategy | Analysis & Limitation | Recommendation |
|---|---|---|
| 1. SSH Tunnel | Not viable for highly scalable AI traffic. Lacks native Kubernetes service operators, limits traffic to Layer 4 (TCP), and cannot perform advanced HTTP routing or health checks required for inference. 🚨 | ❗Avoid |
| 2. External Service & Endpoint | Viable through Kubernetes Service without selectors, using custom EndpointSlice or Endpoints objects to point to remote IPs. However, latency and guaranteed health/performance are not ensured across hybrid boundaries. 🔦 | ⚠️ Possible, but high risk for latency-sensitive AI. |
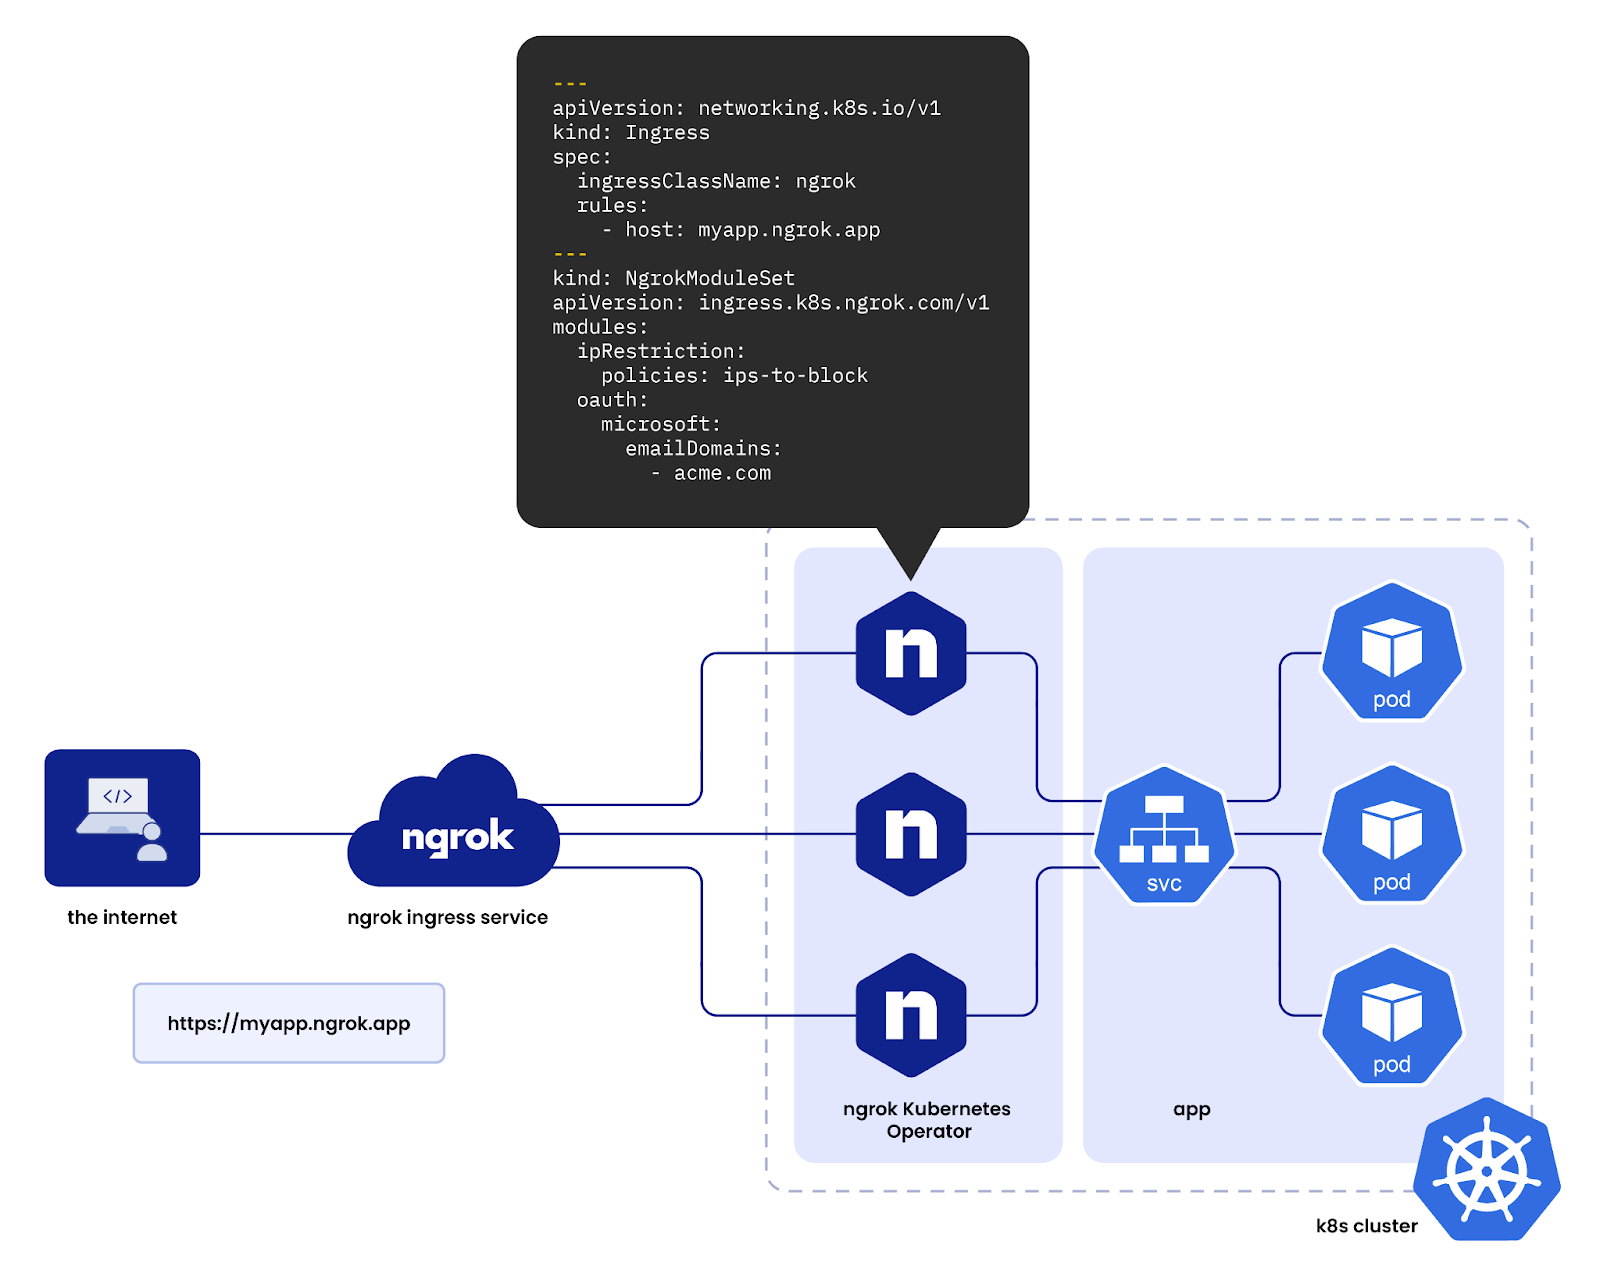
| 3. HTTP Tunneling | The most robust solution for hybrid centralization. Tools like Cloudflare Tunnel, Inlets, or ngrok create a persistent, secure tunnel from the remote/on-prem service back to a centralized edge ingress. This provides: - Single Entry Point: All *.example.net traffic is managed centrally.- Enhanced Routing: Allows for intelligent routing and load balancing based on health/region. | ✅ Recommended |
You will have couple of opensource able to raise these workflow, but if you need to ensure them into workflow, it’s gonna wild because their missions are totally difference, so why I need to build CRD for keep my strategies. But I will list down some options, and you can able to workaround for experiment purpose
SSH Tunnel
- Kty: The terminal for Kubernetes. kty is the easiest way to access resources such as pods on your cluster - all without
kubectl - Mirrord: Run your microservice locally with seamless access to everything in the cloud—speeding up development, improving code quality, and reducing cloud costs.
HTTP Tunnel
- inlets-operator: Get public TCP LoadBalancers for local Kubernetes clusters
- ngrok-operator: Leverage ngrok for your ingress in your Kubernetes cluster
- cloudflare-operator: A Kubernetes Operator to create and manage Cloudflare Tunnels and DNS records for (HTTP/TCP/UDP) Service Resources
You can able to join several discussion in Reddit and read couple of articles to more adoption in this way
- Microsoft - How Bridge to Kubernetes works
- Reddit - Are there any good off the shelf ssh tunnels for the cluster to talk to my machine?
- InterLink - Tunneled deployment
But really challenge about how can I deal with Bare Metal Distribution Challenge (Non-Container), e.g: HPC or VM with not able to install any container runtime
As the require for a solution to distribute and run the AI service (the self-contained FastAPI/RayService application) on bare metal/MIG servers (farm servers) without installing Kubernetes, a container runtime (Docker/Containerd), or sophisticated CI/CD tools due to environmental constraints (temporary nodes, no install permissions). So why I think about the Agentless SSH-Driven for Orchestration
Since all container-based solutions are blocked, the only viable method is to deploy the application as a native OS process orchestrated directly from the main repository of project.
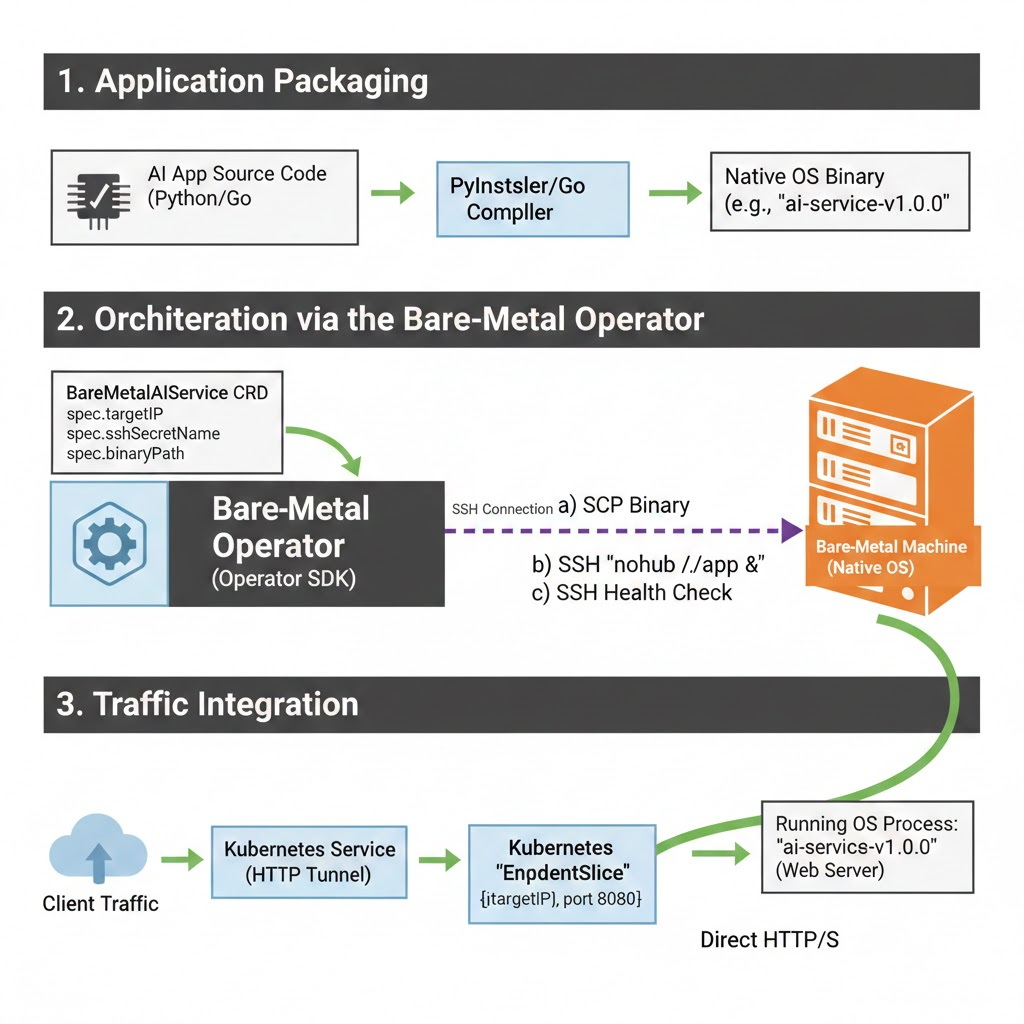
- Application Packaging: The AI application must be compiled or packaged as a self-contained native binary (e.g., via PyInstaller/Nuitka) that includes all necessary dependencies (including a web server) and can run without a separate container runtime.
- CRD & SSH Operator: Build a highly specialized Kubernetes Operator (using Operator SDK or Kubebuilder) to manage a new Custom Resource (e.g.,
BareMetalAIService). - Deployment Flow:
- The Operator reads the
BareMetalAIServiceCRD, which specifies the target bare-metal machine IP and SSH Secret. - Via SSH, the Operator performs SCP to push the self-contained application binary.
- Via SSH, the Operator executes a command (
nohup ./app-binary &) to run the application as a resilient OS background process.
- The Operator reads the
- Traffic Integration:
- When the Operator confirms the remote application is running (via SSH health checks or querying an internal status endpoint), it dynamically updates a Kubernetes
EndpointSliceobject. - This
EndpointSlicepoints the centralized HTTP Tunnel Service to the IP and port of the application running directly on the bare-metal machine.
- When the Operator confirms the remote application is running (via SSH health checks or querying an internal status endpoint), it dynamically updates a Kubernetes
But there are several trade-offs and you are willing to handle it
| Factor | Consequence |
|---|---|
| Refactoring Burden | Requires massive refactoring to create the self-contained binary and the custom SSH Operator. |
| Latency/Throughput | High risk of increased AI throughput latency due to the network gap and the overhead of data transfer (especially for large AI responses). |
| System Complexity | Introduces an entirely custom, non-standard SSH-based deployment layer that requires continuous maintenance. |
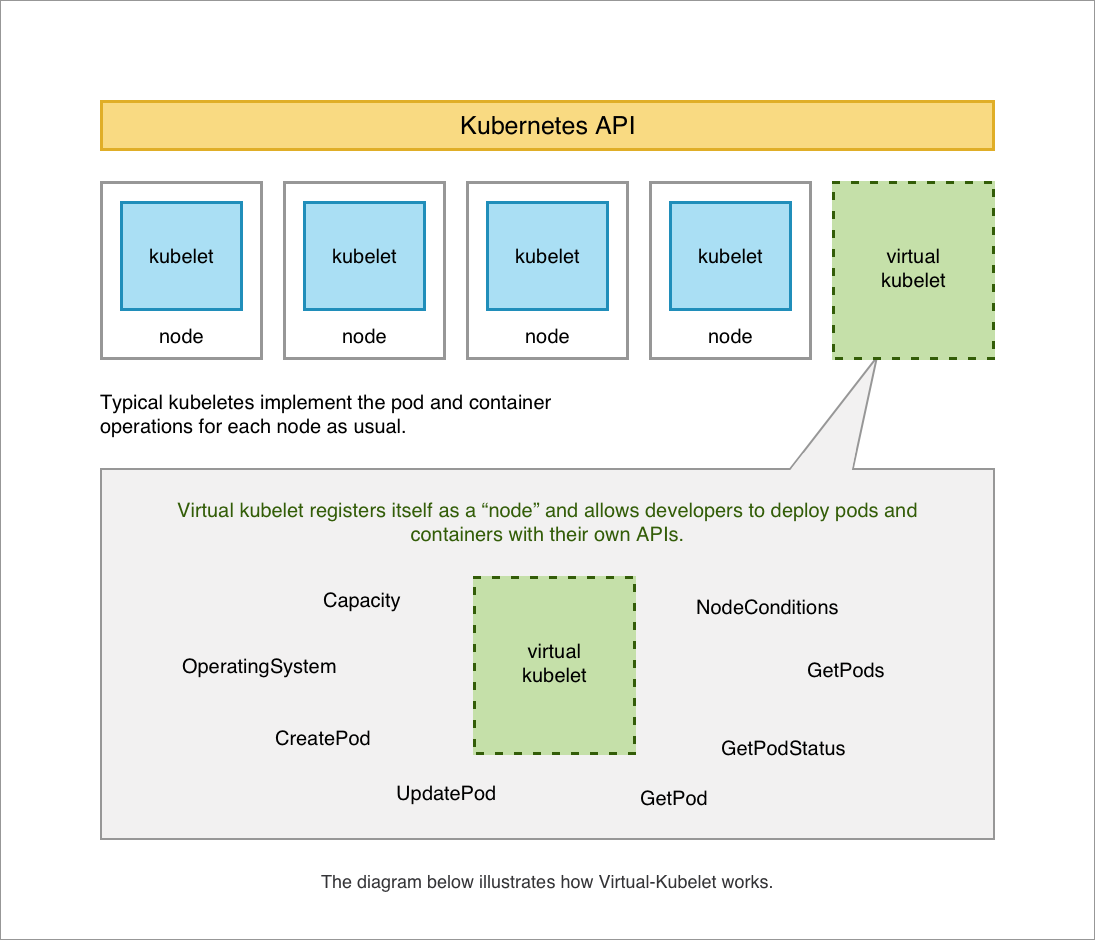
Strategy 02: Virtual Kubelet
Info
The Virtual Kubelet approach effectively decouples your Kubernetes control plane from the remote computational resources. It registers a “virtual node” in your cluster, allowing the native Kubernetes Scheduler to place Pods onto it. The Virtual Kubelet instance then translates those standard Pod creation requests into API calls specific to the remote cloud provider (or your custom bare-metal farm). This standardizes your deployment workflow.
If you delve deeper into Virtual Kubelet Providers and want to build the own version, they require the vendor provide the following functionality to be considered a fully compliant integration:
- Provide the back-end plumbing necessary to support the lifecycle management of Pods, containers, and supporting resources in the context of Kubernetes.
- Conform to the current API provided by Virtual Kubelet.
- Restrict all access to the Kubernetes API Server and provide a well-defined callback mechanism for retrieving data like Secrets or ConfigMaps.
The Virtual Kubelet binary acts as the agent for the remote node and you will have two ways for setup this for your cluster
| Method | Description |
|---|---|
| External CLI Tool | The virtual-kubelet CLI tool can run external to the cluster, defined with the --provider and a --nodename flag (e.g., virtual-kubelet --provider my-ai-farm --nodename farm-node-01). |
| In-Cluster Deployment (Recommended) | For a robust GitOps solution, deploy the Virtual Kubelet using Helm, which manages its lifecycle as a standard deployment/daemonset within the Current Cluster. |
The Azure ACI example illustrates the in-cluster deployment method:
# 1. Add the Virtual Kubelet Helm repository
helm repo add virtual-kubelet [https://raw.githubusercontent.com/virtual-kubelet/virtual-kubelet/master/charts](https://raw.githubusercontent.com/virtual-kubelet/virtual-kubelet/master/charts)
# 2. Install the Virtual Kubelet for the Azure provider
helm install virtual-kubelet-azure virtual-kubelet/virtual-kubelet \
  --namespace virtual-kubelet \
  --set provider=azure
# 3. Verify the new node appears
kubectl get nodes --namespace virtual-kubelet --watch
Warning
The production usage of Virtual Kubelet is not as widespread as native Kubernetes. It requires significant consideration to ensure stability and service reliability.
However, the key trade-off is that adopting this strategy allows you to:
- Adapt Full Kubernetes Deployment Strategies: You can use native tools like HPA, Jobs, and CronJobs to orchestrate across the hybrid boundary.
- Optimize Communication: You insert a specific layer (the Provider) for interacting with your custom infrastructure (GPU/bare-metal), allowing you to build in logic for resource scraping, logging, and metrics collection for better Monitoring & Observability.
The Truth Solution, stable but expensive

With these experiment above, I got many problem when I try to deal with them because of non production are available and the resources spend for it, that become insane with estimated time. So why I change the plan and choose the easier way but more expensive with these new architectures and tools below
Multi-Cluster Kubernetes Architecture
Before I choose this option, I have a great chance to get approach with several articles and it give me more chance to think that can be happen, and with recently project will allow to scale following that way, such as
- Apptio - Kubernetes Multi-Cloud
- Plural - Kubernetes Multi-Cluster: A Practical Guide
- Tigera - What Is Multi-Cluster Kubernetes?
- GroundCover - Multi-cluster Kubernetes: Benefits, Challenges and Tools
- CNCF - Simplifying multi-clusters in Kubernetes
- Medium - GitOps at Scale: Mastering Multi-Cluster Management and Advanced Patterns
- Medium - Multi-Cluster & Disaster Recovery: Building a Global Kubernetes Architecture That Never Sleeps
- Medium - Kubernetes multi-cluster implementation in under 10 minutes
This journey has provided me with incredible experience, and I have secured support from my business to conduct external experiments with several Cloud Providers and their Managed Kubernetes Services. I can confirm there are many effective ways to ensure GPU deployment, even if the strategies differ significantly from on-premise systems like RKE2 and K3s, which handle highly specific use cases.
The Multi-Cluster architecture allows you to logically organize your workloads across several server groups, facilitating traffic balancing with a single Load Balancer and providing other benefits. When setting up multi-cluster environments, two common deployment approaches are used:
- Replicated Architecture: The entire application stack is deployed across multiple Kubernetes clusters, ensuring high availability and redundancy for your application in every cluster it resides in.
- Split-by-Service Architecture: Different parts of the application are deployed into separate Kubernetes clusters. Instead of running the entire replicated application, each cluster is responsible for running specific services and components.
For Cluster Management, you also have two common ways to approach this architecture:
- Kubernetes-Centric: This approach focuses on using Kubernetes-native tools and APIs to manage and operate the multiple clusters. This method is often seen with ArgoCD acting in the role of the control plane for GitOps.
- Network-Centric: This approach emphasizes the networking layer, connecting multiple clusters at the network level. You typically see this implemented with Mesh Systems (e.g., Cilium, Istio) to provide secure and reliable communication between services across different clusters.
Quote
It’s a great opportunity to find the version and approach compatible with your specific system. As I mentioned at the beginning, there is no single “best definition” for solving multi-region problems, so your mission is to find the right strategy and become proficient with it.
While Multi-Cluster architecture offers significant benefits, it also introduces substantial operational challenges that require careful consideration. Therefore, I have decided to manage the multi-cluster environment using the Replicated Architecture approach, which helps tackle and prevent the following issues:
- Single Point of Failure (SPOF): This architecture minimizes downtime by ensuring the application can quickly switch to a new environment. This is especially crucial for AI workloads, where I plan to implement a backup cluster to ensure an Active-Active setup regardless of where inference traffic originates.
- Isolating the Tech Stack: The unique nature of Kubernetes AI workloads lies in their GPU Deployment strategies. This approach simplifies dealing with various Cloud Providers, as I can leverage their managed Kubernetes services (where the control plane is managed by the provider) and focus my efforts solely on the worker nodes.
- Load Balancing: The primary indicator for choosing this approach is the ability to achieve smart routing and efficiently balance demand during traffic spikes.
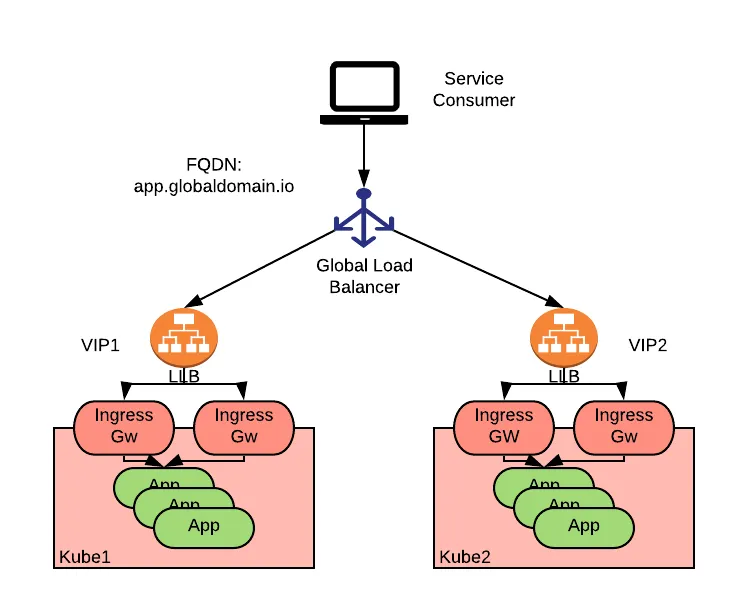
However, making this architecture functional requires robust traffic routing strategies, which is a complex topic in itself. For my specific needs, Global Load Balancing (GLB) and sophisticated DNS Management offer the most promising solutions.
GLB and DNS Load Balancing
Honestly, when I researched strategies for global traffic routing, I imagined numerous scenarios, ranging from the basic to the highly complex. Many ideas emerged before Global Load Balancing (GLB) became the most potential option. The articles I found provided me with the necessary foundation and insight into GLB.
- Blog - k8gb: The Best Open Source GSLB Solution for Cloud Native
- Medium - Smarter Traffic, Better Performance: A Hands-On Journey with AWS Route 53 Routing Policies
- AWS - Implementing multi-Region failover for Amazon API Gateway
- Alibaba - Optimize Global Application Performance with Intelligent DNS and GTM Integration
- AWS - AWS Global Accelerator Custom Routing with Amazon Elastic Kubernetes Service
- Wallarm - DNS Load Balancing and Failover
- RedHat - Global Load Balancer Approaches
- LoadBalancer - The ultimate guide to Global Server Load Balancing (GSLB): Benefits, uses, and configurations
- Youtube - Ensuring high availability with global load balancing in Kubernetes - Matthias Hauber
- CNCF - Exploring multi-cluster fault tolerance with k8gb
- Bizfly - Global Server Load Balancing (GSLB) là gì? Khái niệm và cách hoạt động
- CloudFlare - What is global server load balancing (GSLB)?
- Blog - GSLB for Kubernetes using NSX-ALB
Delving into these topics has significantly broadened my knowledge and helped me identify viable options for managing enormous traffic and workloads, a methodology I previously lacked experience in researching. With the GLB approach, I expect to achieve the following clarified benefits:
- Smart Routing: Traffic will be routed to the nearest available server from the user’s request origin, based on GeoRouting.
- Health Check: The ability to define and utilize application health-check paths to verify the state of a target cluster before traffic is routed to it.
- Failover: Automatic redirection of the routing path to an available option when the primary destination experiences an outage.
- Routing Algorithms: Flexibility in changing routing policies based on defined criteria, such as
nearest,weight-ratio,round-robin, and others.
For these reasons, I have decided to make GLB a crucial part of the stack for solving multi-region problems, particularly for scaling purposes. However, selecting the specific type of GLB introduces another set of questions, and there are several options I need to consider, such as:
For Cloud
- AWS: AWS Route53, AWS Global Accelarator
- Azure: Azure DNS, Azure Traffic Manager
- Google: Cloud DNS, Cloud Load Balancing
- Alibaba: Alibaba Cloud DNS, Alibaba GTM
For OpenSource
- GSLB: Polaris GSLB
- DNS: Bind9, Power DNS
For Kubernetes and Native Cloud
- DNS: ExternalDNS, bindy
- GSLB: K8gb
In my position, I have the opportunity to work extensively with the Cloud, meaning I will not implement DNS solutions myself but will instead leverage Cloud Providers to build the entire strategy for managing global traffic. Alibaba Cloud is one of the providers I have had the chance to work with, and I will share more details about this experiment in the next section.
In conclusion, modern Networking has become incredibly complex. Routing traffic is no longer a simple, single-path problem. Systems require scale, and that necessitates a DNS layer capable of adapting to changes with zero downtime and supporting smooth scaling. For this reason, I am truly grateful for understanding and learning how to utilize these technologies natively.
The Journey of System Scaling

Note
Following this introduction, I will provide a detailed account of the entire process involved in building my Multi-Cluster Kubernetes environment. I also intend to share my personal insights, notes on hard-to-solve issues, and other relevant information. First and foremost, I want to emphasize that this implementation is an experiment and may not be universally applicable; therefore, quick adaptation and finding compatible solutions for your specific use case are essential. Now, let’s delve into the details.
Multi-Cluster Get Ready
Before going to step, with Multi-Cluster setup, I have two options for experimenting and with two different techstack for GPU Setup, they are VNG Cloud (Vietnamese) and Alibaba Cloud (China). So why I choose to different because I want to see what type of GPU Deployment offering, what failover and happen when GLB can able to change the backend behind the scene, that can proven more about this concept working, or not.
For VNG Cloud
- Managed Kubernetes : VNG Kubernetes Service (VKS)
- Networking: VPC, EIP, ALB and GLB
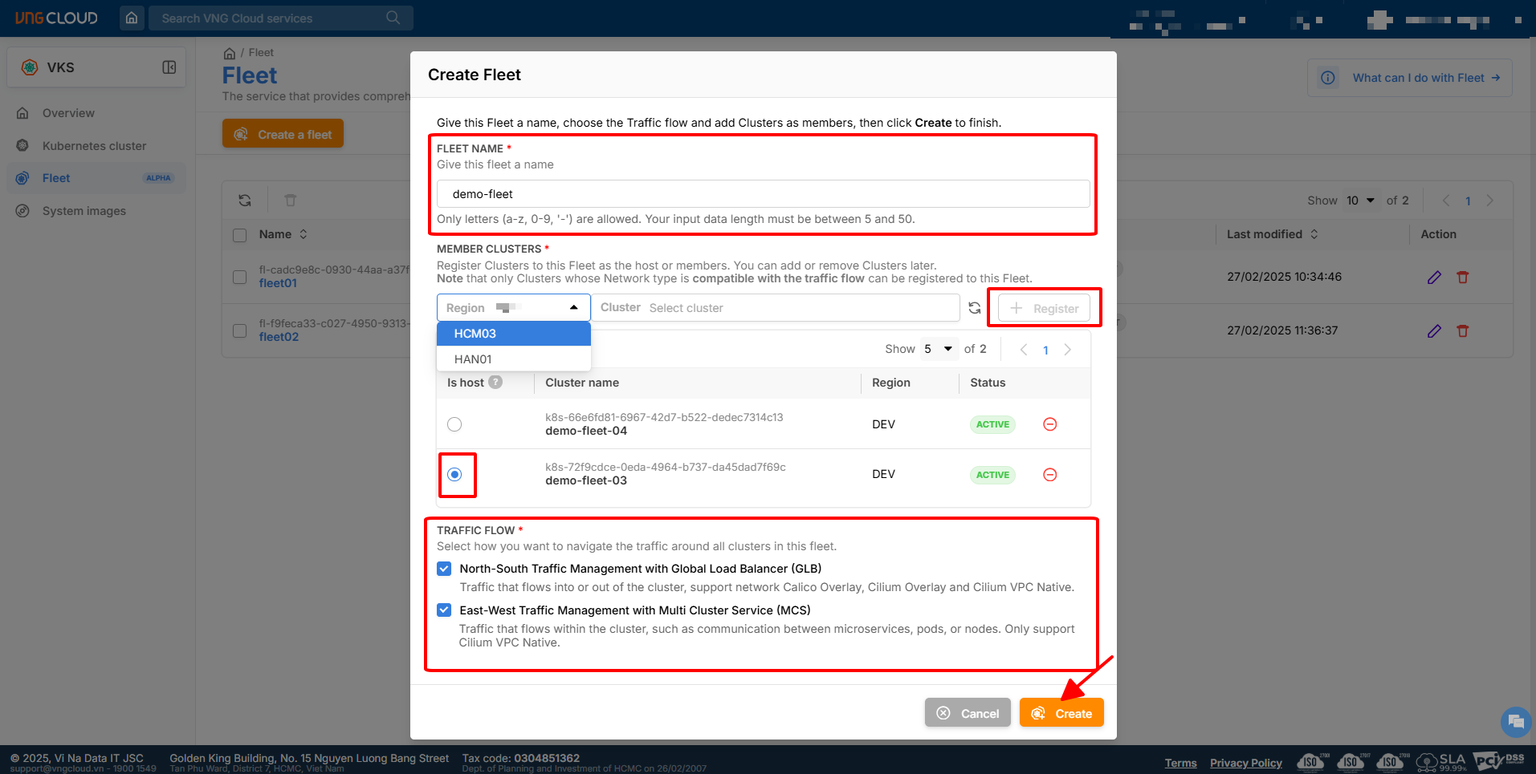
- Kubernetes Advantaged: VKS Fleet Management - Native Multi-Cluster of VNG Cloud
- Kubernetes Components:
- GPU Management: GPU Opeartor and HAMi
- Storage Management: LongHorn
- Networking: Cilium, CoreDNS and Kube Proxy
- Ingress: Nginx Ingress
- CRD: VNG Cloud Load Balancer Controller ⇒
oci://vcr.vngcloud.vn/81-vks-public/vks-helm-charts/vngcloud-load-balancer-controller(NOTE: You can usehelm pullto overview the fully helm-chart or any CRD viewer to double-check the CRD, e.g: doc.crds.dev) or explore more at VKS Helm Chart - GitOps: ArgoCD
- Monitoring & Observability: EFK, Grafana & Prometheus
For Alibaba Cloud
- Managed Kubernetes: Alibaba Container Service for Kubernetes (ACK)
- Networking: VPC, EIP, NAT Gateway, SLB, Cloud DNS and GTM
- Kubernetes Components
- GPU Management: CGPU Sharing, Cloud-Native AI Suite
- Storage Management: LongHorn, Alibaba CSI Plugin
- Networking: Terway, CoreDNS and Kube Proxy
- Ingress: ALB Ingress
- CRD: ALB Ingress Controller
- GitOps: ArgoCD
- Monitoring & Observability: EFK, Grafana & Prometheus
When I try to workaround with these Cloud, it gives me different experience, but for summary I can review
- Alibaba: Focus on the detail definition with ACK (Monitoring, Ingress, Disk, Kubernetes Version, Plugin and Extension), more one option to choose ⇒ Complex but managed entirely
- VNG: Focus on the clean and directly configuration with VKS ⇒ Simple but manual setup stuff by yourself
Therefore, I will try go detail a bit for specific cloud for let you know what I handle in my POC for multi-cluster experiment
Alibaba Cloud
Following the official documentation, you will have fully experience for choosing what option available for your demand. Explore more about these stuff at
- Alibaba - Container Service for Kubernetes
- Alibaba - What is ACK?
- Alibaba - Billing of ACK managed clusters and dedicated clusters
- Alibaba - ACK Managed Cluster Terminology
Base on my demand, I want to choose the type of Cluster managed the control-plane for me and let’s me fully focus on worker, and with their requirement, I choose to use ACK Managed Cluster for potential option and with Cloud Native AI Suite Requirements, that make I also consider to choose Pro Version for following with concept of Cloud
To choose what type machine you want for GPU Scheduling and Deployment, you can explore them at Overview of heterogeneous computing clusters - Container Service for Kubernetes - Alibaba Cloud Documentation Center with support several types of NVIDIA Card

I have try on the instance gen ecs.gn8is.4xlarge that have spec 16 vCPU 128 GiB Memory with 1x Nvidia L20. I have spec of instance, including
- CPU: Intel(R) Xeon(R) Gold 6462C with 16vCPU
- Memory: 128GB
- GPU: Nvidia L20 with 48GB vRAM
With the pricing around 50$/days and 1500$/month and you will get the coupon if you have collap with vendors with great pricing aroud 20%-30% cut off.
For fully experience, I will recommend you to delve into the official installation for more information, including
- Created ACK Managed Cluster (Control Plane) ⇒ Quickly create an ACK managed cluster
- Create Node Pool (Worker) ⇒ Create and manage node pools
With my experience, you will have to setup couple steps and grant permission to fully adoption
-
Provision ACK Pro Managed Cluster (Control Plane)
- General Configuration: Name, Region, Kubernetes version (1.34.1-aliyun.1) and Update information
- Network Configuration: VPC, Zone, Security Group, EIP for KubeAPI, Network Plug-in (CNI, ENI) and CIDR
-
Provisioning ACK Node Pools
- Enable Node Pool (Required)
- Setup Node Pool configuration: Name, Runtime and Auto Managed opts for your ACK (Patching CVE, repair application)
- Choose your Instance and Image: Billing, Instance, Security Hardening, OS and Logon Type
- Choose your storage: System Disk and Data Disk
- Number of instance for your worker pools
-
Provisioning Kubernetes Components
- Setup Ingress Type, e.g: ALB, APIG and Nginx
- Volume Plugin
- Container Monitoring
- Advanced Options, e.g: ACK core, Applications CRDs, Monitoring & Observability, Storage, Networking, Security and Others (GPU, HPA, VPA, OPA, …)
-
Confirm and Grant the Required Permission
Success
After you provide and confirm the information, you need wait a bit for provisioning new cluster
After provisioning, you can get and double-check your cluster first with profile inside the Tab Cluster Information > Connection Information with 2 opts, including
- Temporary: Get the
kubeconfigduring short term, around couple of hours to several days - Long-Term: Get the
kubeconfigwith the long-term connection, with great for join your cluster with ArgoCD and multiple stuff related Cluster Management
After grep the kubeconfig, you can directly interact with cluster via LEN or kubectl, for example
export KUBECONFIG="~/.kube/l20-alibaba.yaml"
kubectl get pods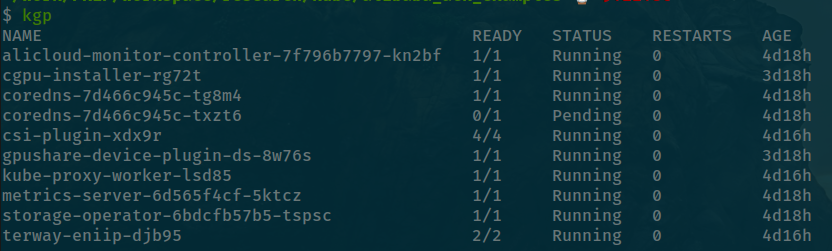
By default, you will have couple of stuff in kube-system namespace
- CoreDNS ⇒ Service Discovery
- CSI Plugin ⇒ Alibaba Cloud Storage
- Terway ⇒ CNI
- Metrics Server ⇒ Monitoring & Observability
Note
As you can see, I have
gpu-shareandcgpuinstallation after these components above, because Alibaba require you enable Cloud-Native AI Suite before they will kick off your cluster to serving GPU Application. With that point will create the different with Cluster in environment where you need to manual to handle it stuff by yourself withGPU Operator,HAMior another solutions by yourself. Instead off, Alibaba Cloud will automatically setup these workload to control GPU Natively for your demanding when feature enabled. Explore more at Enable scheduling features - Container Service for Kubernetes - Alibaba Cloud Documentation Center
Base on what documentation reference, you will have several options to choose for clarify what GPU deployment strategy in your ACK. You can able to enable one of them with node-label and therefore, you can read more them below
| Type | Describing |
|---|---|
ack.node.gpu.schedule: default | Performance-critical tasks that require exclusive access to an entire GPU, such as model training and high-performance computing (HPC). |
ack.node.gpu.schedule: cgpu | Shared computing power with isolated GPU memory, based on Alibaba Cloud’s cGPU sharing technology. |
ack.node.gpu.schedule: share | Shared computing power and GPU memory with no isolation. |
By demanding of mine, I will use the concept cgpu which pretty fit for my deployment and also operated same as On-Prem System with HAMi Stack. Therefore leverage implemented by this Alibaba, It give me change to use it natively with this Cloud. This is one of big point to turn Alibaba different for GPU Deployment recently compared with AWS, Azure or On-Prem which almost support GPU Operator only (MIG, Time Slicing and MPS) before better optional vGPU and also GPUDirect RDMA and GPUDirect Storage appearing
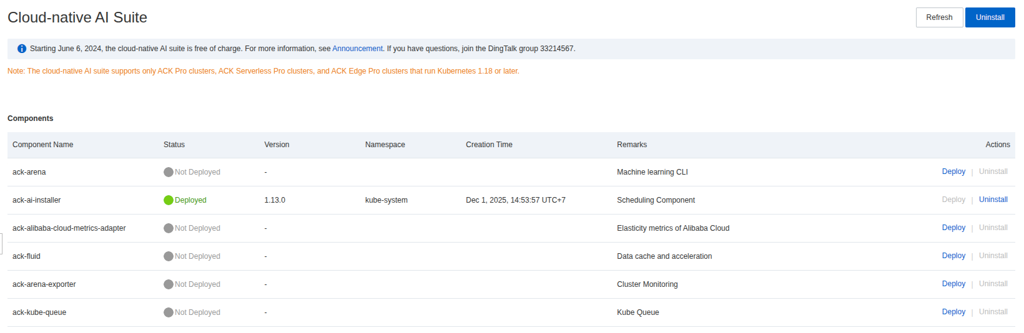
First of all, you need to enable and grant permission to allow your ACK can use the feature at Tab Applications > Cloud-Native AI Suite > Enabled
After that you will have dashboard like this one and you can enable the feature ack-ai-installer to let your cluster enable the GPU Scheduling Feature
Next, we will need to exchange label of node-pools for exchange that from default to cGPU opt at Nodes > Node > More > Labels
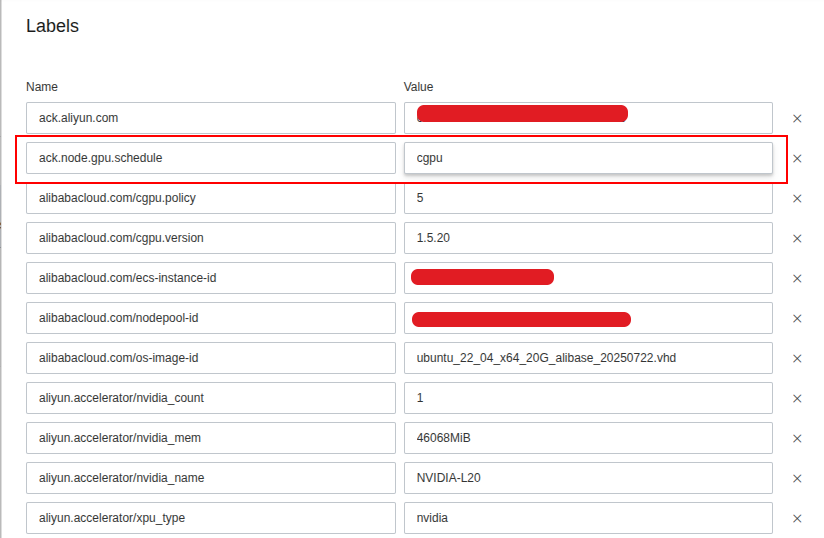
After saving, you can query directly in your cluster with get node command
kubectl get nodes --show-labels | grep -e "ack.node.gpu.schedule=cgpu"Now you can wait for a bit before pod component with cgpu feature running
kubectl get pods --show-labels | grep -e "app=ack-ai-installer"For testing, your application work with GPU of Alibaba, you can try and double-check via several example, such as
- Examples of using GPU sharing to share GPUs
- GPU Sharing with Pod
apiVersion: v1
kind: Pod
metadata:
  name: gpu-pod
spec:
  containers:
    - name: ubuntu-container
      image: ubuntu:18.04
      command: ["bash", "-c", "sleep 86400"]
      resources:
        limits:
          aliyun.com/gpu-mem: 8 # GPU memory requirement (GBi)
$ kubectl exec --tty --stdin gpu-pod -- nvidia-smi
Fri Dec 5 03:15:08 2025
+---------------------------------------------------------------------------------------+
| NVIDIA-SMI 535.161.07 Driver Version: 535.161.07 CUDA Version: 12.2 |
|-----------------------------------------+----------------------+----------------------+
| GPU Name Persistence-M | Bus-Id Disp.A | Volatile Uncorr. ECC |
| Fan Temp Perf Pwr:Usage/Cap | Memory-Usage | GPU-Util Compute M. |
| | | MIG M. |
|=========================================+======================+======================|
| 0 NVIDIA L20 On | 00000000:00:03.0 Off | 0 |
| N/A 36C P0 75W / 350W | 0MiB / 8376MiB | 0% Default |
| | | N/A |
+-----------------------------------------+----------------------+----------------------+
+---------------------------------------------------------------------------------------+
| Processes: |
| GPU GI CI PID Type Process name GPU Memory |
| ID ID Usage |
|=======================================================================================|
+---------------------------------------------------------------------------------------+Success
As you can see, the big GPU already split and isolate into small piece with 8GB vRAM as same as the expectation of us
- Deployment for inference with the selection models, Kokoro-FastAPI
apiVersion: apps/v1
kind: Deployment
metadata:
  labels:
    app: kokoro-fastapi
  name: kokoro-fastapi
spec:
  replicas: 1
  selector:
    matchLabels:
      app: kokoro-fastapi
  strategy: {}
  template:
    metadata:
      labels:
        app: kokoro-fastapi
    spec:
      containers:
      - image: ghcr.io/remsky/kokoro-fastapi-gpu:v0.2.4
        name: kokoro-fastapi-gpu
        resources:
          requests:
            cpu: 100m
            memory: 1Gi
          limits:
            # Give it 3 vRAM GPU and 5GB Memory
            aliyun.com/gpu-mem: 3 # Each vGPU contains 10240m device memory (Optional,Integer)
            memory: 5Gi
$ kubectl exec --tty --stdin deployments/kokoro-fastapi -c kokoro-fastapi-gpu -- nvidia-smi
Fri Dec 5 03:20:12 2025
+---------------------------------------------------------------------------------------+
| NVIDIA-SMI 535.161.07 Driver Version: 535.161.07 CUDA Version: 12.8 |
|-----------------------------------------+----------------------+----------------------+
| GPU Name Persistence-M | Bus-Id Disp.A | Volatile Uncorr. ECC |
| Fan Temp Perf Pwr:Usage/Cap | Memory-Usage | GPU-Util Compute M. |
| | | MIG M. |
|=========================================+======================+======================|
| 0 NVIDIA L20 On | 00000000:00:03.0 Off | 0 |
| N/A 36C P0 75W / 350W | 996MiB / 3141MiB | 0% Default |
| | | N/A |
+-----------------------------------------+----------------------+----------------------+
+---------------------------------------------------------------------------------------+
| Processes: |
| GPU GI CI PID Type Process name GPU Memory |
| ID ID Usage |
|=======================================================================================|
+---------------------------------------------------------------------------------------+After that, you can try to inference them via GUI but first create service to expose your application as ClusterIP type and port-forward this service to try request from your localhost:8880/web
Success
Now we can see the L20 can able to inference the application same as expectation with Pytorch Model deploying via FastAPI
As I related above, I prefer to use fully and natively service provided for Kubernetes by that Cloud, and honestly Alibaba doesn’t make me disappointed with ALB Ingress of them which create for cut off lot of painful and focus on the expose your application with sophisticated rule. Therefore, I will recommend to apply the structure already definition by Aliababa with Ingress, and ALB Ingress of Alibaba is pretty good options with characteristic
- Elastic Auto Scaling
- Advanced Protocol Support (QUIC, gRPC)
- Content-Based Advanced Routing
- Security Integration (WAF, DDoS and TLS)
- Cloud Native Applications
- Elastic and Flexible Billing
You can see the image below to imagine what you need to implementation for routing traffic, it’s nearest zero configuration because Alibaba support us handle whole of them as CRD
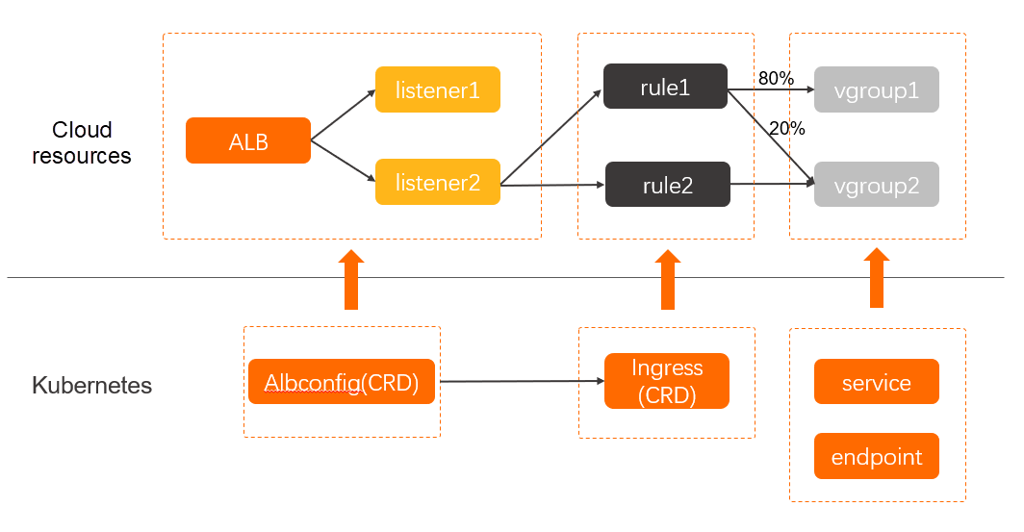
Note
You mission in this situation is creating ingress and service to routing traffic inbound from external into cluster, with more definition, you can use several annotations to configuration for letting you able to implement advantaged ingress strategies. Read more at ALB Ingress user guide
Now we can use service expose from previous GPU Application with ingress definition below
kubectl create ingress kokoro-fastapi \
--rule=kokoro.ai.example.com/\*=kokoro-fastapi:8880 --class alb \
--dry-run=client --namespace=default --output yaml | kubectl apply -f -
Now you will got the ingress on for expose your application via ALB, you can try to testing with Host header to directly resolve your application from your ALB IP or CNAME before we add another layer for DNS Resolving
$ curl -H "Host: kokoro.ai.example.com" -i \
alb-xxxxxxxxxxxxx.cn-hongkong.alb.aliyuncsslbintl.com/health

HTTP/1.1 200 OK
Date: Fri, 05 Dec 2025 04:16:02 GMT
Content-Type: application/json
Content-Length: 20
Connection: keep-alive

{"status":"healthy"}%
VNG Cloud
So how about VNG Cloud with VKS, it’s pretty good ways and cheap than Alibaba optional with 100% percent so if you want to try and workaround the Kubernetes in SEA Location, I will recommend you to choose VNG. Let’s see what it got for Managed Kubernetes Platform, but first you will need these official documentation to know more about
Through this documentation, you can see with VNG Cloud will provide two type of VKS Cluster with mainly focus for
- Public Cluster: Managing and workaround with VKS via Public Load Balancer, it will keep your Kubernetes connect from remote and convenient for adapting the out stand management, such as ArgoCD for MultiCluster
- Private Cluster: Managing and workaround with VKS via Private Load Balancer, it fits for situation to ensure security, zero-trust privacy and limited access
For detail comparison, I think you should take a look about Comparison between using Public Cluster and Private Cluster
With my circumstance, I prefer to use ArgoCD to manage multi-cluster and also the VKS not exceptional for that why I choose Public Cluster for kicking off this experiment.
Currently, VNG Support several GPU Type for GPU workload in Kubernetes, (e.g: A40, RTX2080Ti, RTX4090, RTX5090) and they are pretty good options for multi-tasking from training, inference and data processing with high workload. Please double-check the marketing page and contact with sale for more information at VNG - GPU Cloud
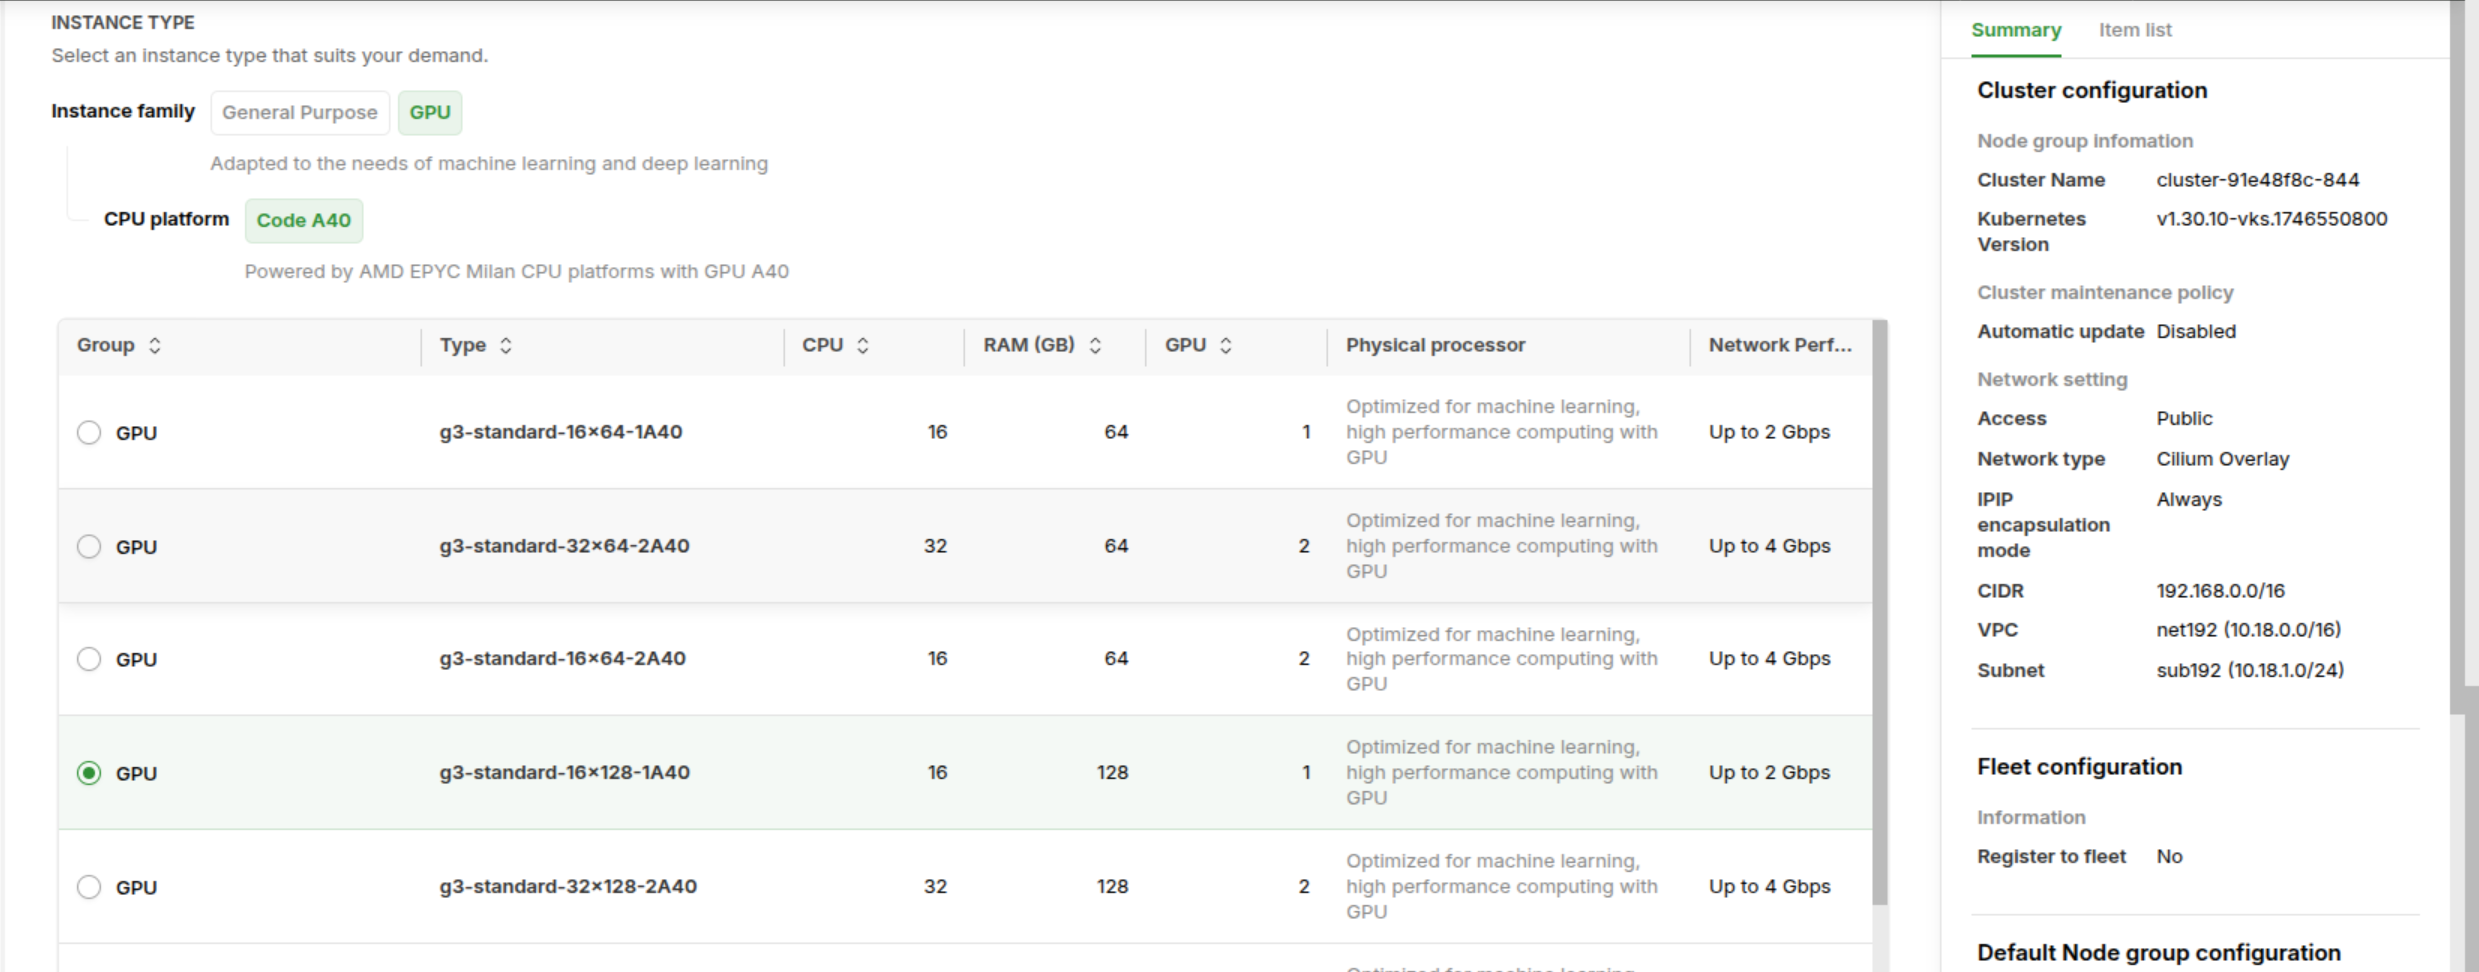
I have chance to use A40 and RTX2080Ti, it brings back a good quality, high-performance and probably stable and with my perspective, I prefer to use A40 with gen g3-standard-16x128-1A40 for VKS Deployment with spec below
- CPU: 16vCPU
- Memory: 128 GB RAM
- GPU: Nvidia A40 - 48GB vRAM
For furthermore implementation and initialize, I also share you about the fully documentation for setup completely VKS in VNG Cloud
- First of all, you can go to VKS Portal and choose what region you want to deploy to create new VKS in that location. You are required to active
VKSbefore able to use, so that why you need click to Active button - Next, Create a Cluster with several configuration to setup, e.g: VPC, Storage, VKS Version, …
Note
Honestly to say, VKS provider great UI/UX for setting VKS Configuration with only one portal and this provide smoothly configuration before making decision for building or not
- Choose the additional option to installing for your VKS, e.g: BlockStore CSI, vLB, GPU Operator. For this option, I need to install entirely by myself, and I will share with you for this part

- Confirm your configuration of VKS in Tab Right Monitor before click Create Kubernetes Cluster to create a new one. Wait for a bit (VKS will set on Creating State) before becoming Ready for using in portal
Success
Now, you are able to use VKS in VNG Cloud with several feature need to implementation also, but first the Kubernetes is available that proven good signal
After deploying, you can use command below to check the component default creating in kube-system namespace
kubectl get pods -n kube-systemFor GPU Deployment, VNG Cloud provides specific documentation here: VNG - Working with NVIDIA GPU Node Group.
Using my preferred technology stack, I will guide you through installing both the GPU Operator and HAMi in this Kubernetes Cluster. (Note: I will not provide a detailed version comparison, as previously done in the article Use both NVIDIA Operator and HAMI).
By delving deeply into the GPU Operator, I discovered it creates and modifies several configurations for containerd, introducing multiple runtimes like nvidia, nvidia-cdi, nvidia-legacy, runc, and others. This is why I believe it fits perfectly with HAMi: VKS uses this containerd instance to run containers on the cluster, and HAMi is designed to integrate with it. You can find more information about configuring containerd for HAMi here: Configure containerd.
Leveraging GPU Operator, it build the completely environment for HAMi able to run in that case, even if you don’t have permission access into worker machine. First of all, let’s add GPU Operator repo and install the favorite version of mine v25.10.0
# Add Helm repo for GPU Operator
helm repo add nvidia https://helm.ngc.nvidia.com/nvidia \
    && helm repo update

# Install GPU Operator
helm install --wait --generate-name \
    -n gpu-operator --create-namespace \
    nvidia/gpu-operator \
    --version=v25.10.0 --set "cdi.enabled=false"
You will have fully deployment with only one nvidia runtime be created by operator. You can double-check with command
kubectl get runtimeclasses.node.k8s.ioNext, you need to deploy HAMi, but also need to refine a bit in values.yaml file, and also add node-label for your GPU instance with gpu=on. So here what you need change in HAMi latest version v2.7.0
- Annotation for distinguishing with GPU Operator:
resourceName: "nvidia.com/gpu"⇒resourceName: "hami.nvidia.com/gpu"and also variables relatednvidia. Check more at GitHub - Change the parameter
runtimeClassNamefrom""tonvidia. Check more at GitHub
Now you can apply the HAMi helm-chart by adding repository and get ready to deployment
# Add Helm repo for HAMi
helm repo add hami https://project-hami.github.io/HAMi/

# Install HAMi
helm install hami hami/hami -f values.yaml --version=2.7.1 -n gpu-operator --wait
If you want to find more information, you can explore about couple of page about HAMi
After completing all these processes, you will be able to create a new resource layer, vgpu, based on the device-plugin mechanism provided by HAMi. This mechanism allows you to create virtual reservations for workloads, enabling HAMi to interact with the underlying GPU layer and establish an efficient utilization strategy for Kubernetes resource reservation.
Same as Alibaba Approach, I will try to reproduce GPU workload with supporting of HAMi base on different manifest
apiVersion: apps/v1
kind: Deployment
metadata:
  labels:
    app: kokoro-fastapi
  name: kokoro-fastapi
spec:
  replicas: 1
  selector:
    matchLabels:
      app: kokoro-fastapi
  strategy: {}
  template:
    metadata:
      labels:
        app: kokoro-fastapi
      # Set the PodAnnotation for specific GPU Type, e.g: A40
      annotations:
        nvidia.com/use-gputype: "A40"
    spec:
      # Setup with HAMI Scheduler
      schedulerName: "hami-scheduler"
      # Use the nvidia runtime
      runtimeClassName: "nvidia"
      containers:
      - image: ghcr.io/remsky/kokoro-fastapi-gpu:v0.2.4
        name: kokoro-fastapi-gpu
        resources:
          requests:
            cpu: 100m
            memory: 1Gi
          limits:
            # Give it 1 GPU with 5GB vRAM
            hami.nvidia.com/gpu: 1 # requesting 1 vGPUs
            hami.nvidia.com/gpumem: 5000 # Each vGPU contains 49152m device memory (Optional,Integer)
            memory: 5Gi
kubectl exec --tty --stdin deployments/kokoro-fastapi \
-c kokoro-fastapi-gpu -- nvidia-smi
Mon Dec 8 03:09:55 2025
+-----------------------------------------------------------------------------------------+
| NVIDIA-SMI 580.95.05 Driver Version: 580.95.05 CUDA Version: 13.0 |
+-----------------------------------------+------------------------+----------------------+
| GPU Name Persistence-M | Bus-Id Disp.A | Volatile Uncorr. ECC |
| Fan Temp Perf Pwr:Usage/Cap | Memory-Usage | GPU-Util Compute M. |
| | | MIG M. |
|=========================================+========================+======================|
| 0 NVIDIA A40 On | 00000000:00:06.0 Off | 0 |
| 0% 48C P0 112W / 300W | 911MiB / 5000MiB | 0% Default |
| | | N/A |
+-----------------------------------------+------------------------+----------------------+
+-----------------------------------------------------------------------------------------+
| Processes: |
| GPU GI CI PID Type Process name GPU Memory |
| ID ID Usage |
|=========================================================================================|
| 0 N/A N/A 115 C /app/.venv/bin/python3 964MiB |
+-----------------------------------------------------------------------------------------+When application already work, you can also check via port-fowarding of expose service to validate them in WebUI of Kokoro-TTS at localhost:8880/web
kubectl expose deployment/kokoro-fastapi --port 8880 --target-port 8880
kubectl port-forward service/kokoro-fastapi 8880:8880
Next stuff, I want to implementation and use the Application Load Balancer (ALB) of VNG to expose my application, and also create inbound endpoint. But first, VKS requires some CRDs to create vLB (Load Balancer of VNG) in Kubernetes Native, you can use helm-chart already reference above vngcloud-load-balancer-controller to install that controller into VKS Cluster. Read more at
- VNG - Ingress for an Application Load Balancer: User Guide for installing Ingress with ALB
- VNG - Configure for an Application Load Balancer: Annotation for more advantage configuration
But with default values of controller will lead you to issue because it exist more stuff need to be modified comparison with default, e.g: vserverURL, clusterID (not relation) and clientID and clientSecret (obligatory). So here fully command to help you successfully deploy this controller
helm install vngcloud-load-balancer-controller oci://vcr.vngcloud.vn/81-vks-public/vks-helm-charts/vngcloud-load-balancer-controller \
  --namespace kube-system \
  --set mysecret.global.clientID= __________________ \
  --set mysecret.global.clientSecret= __________________ \
  --set mysecret.cluster.clusterID= ____________________ \
  --set mysecret.cluster.vserverURL= https://<region>.api.vngcloud.vn/vserver
For more information, you can use pull and template command to see detail inside this component when it operates
helm template vngcloud-load-balancer-controller oci://vcr.vngcloud.vn/81-vks-public/vks-helm-charts/vngcloud-load-balancer-controller \
  --namespace kube-system \
  --set mysecret.global.clientID= __________________ \
  --set mysecret.global.clientSecret= __________________ \
  --set mysecret.cluster.clusterID= ____________________ \
  --set mysecret.cluster.vserverURL= https://<region>.api.vngcloud.vn/vserver \
  --debug > install.yaml
If you feel pleasure with install.yaml, you can directly apply the configuration with command apply and your controller will appear in kube-system namespace
Next, I prefer to operate additional nginx-ingress as ingress class for deploy in VKS, so that why I will deploy nginx-ingress-controller with mode LoadBalancer and let’s it request the ALB from controller and attach it into this nginx-ingress, and after that you will able to assign ingress with nginx class to let nginx-controller routing your traffic to specific backend
# Add Helm repo
helm repo add ingress-nginx https://kubernetes.github.io/ingress-nginx && \
helm repo update

# Installation
helm upgrade --install nginx-ingress ingress-nginx/ingress-nginx \
  --repo https://kubernetes.github.io/ingress-nginx \
  --namespace kube-system --set "controller.publishService.enabled=true"
Now create the ingress to expose kokoro-fastapi with ALB
kubectl create ingress kokoro-fastapi \
--rule=kokoro.example.com/\*=kokoro-fastapi:8880 --class nginx \
--dry-run=client --output yaml | kubectl apply -f -
For testing, you can combine with curl with header Host: ALB IP
curl -H 'Host: kokoro.example.com' http://<ALB>/health

{"status":"healthy"}
GLB and DNS Get Ready
After successfully defining and confirming the status of all your multi-clusters, the next crucial step is integrating Global Load Balancer (GLB) and DNS. This integration must not only handle the resolution of a single IP address for Kubernetes but also manage the setup for a Pool of Active IP addresses across all activated clusters.
Fortunately, I’ve had the opportunity to conduct this experiment with several cloud providers. However, since one of them (VNG Cloud) is not currently stable enough for a production environment, I have chosen to demonstrate my strategy using Alibaba Cloud services.
Quote
For DNS Management and GTM Routing, with my perspective, Alibaba provide great options for us to leverage their DNS system to build and management fully domain of services
DNS Management
Alibaba Cloud DNS will allow you to route your domain from wherever you buy it to Alibaba by exchanging NS Record. In some situations, if you don’t want to route the root domain and only route wildcard subdomain, Alibaba allow you to handle that stuff with same as behavior like AWS Route53. Explore more about at Create SSL Cert with ACM and Route53 for AWS Services > Practice with AWS
But first, you need to double-check how can you create DNS Zone via these official documentations at
- Alibaba - What is Public Zone
- Alibaba - Smoothly migrate domain name resolution to Alibaba Cloud DNS
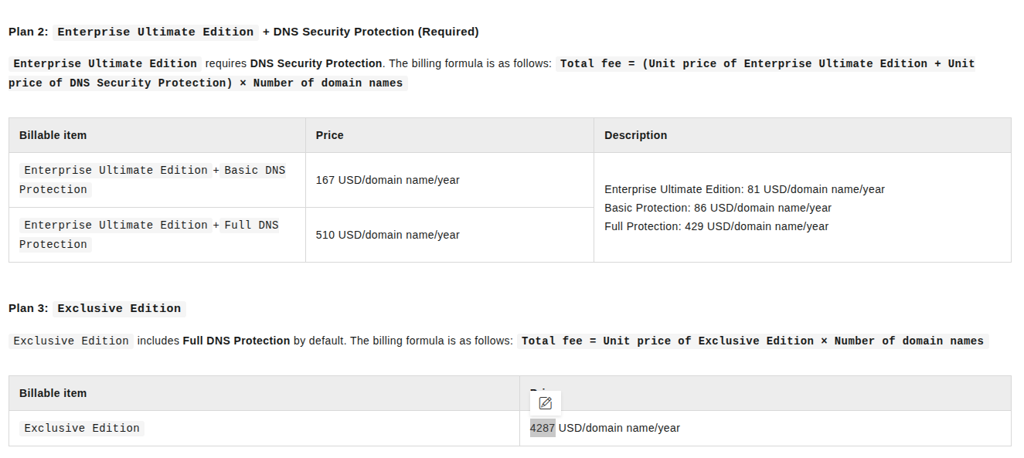
With new policy of Alibaba, this provider will require you to purchase the instance if you are enterprise for managing domain you want to manage by them. There are two opts
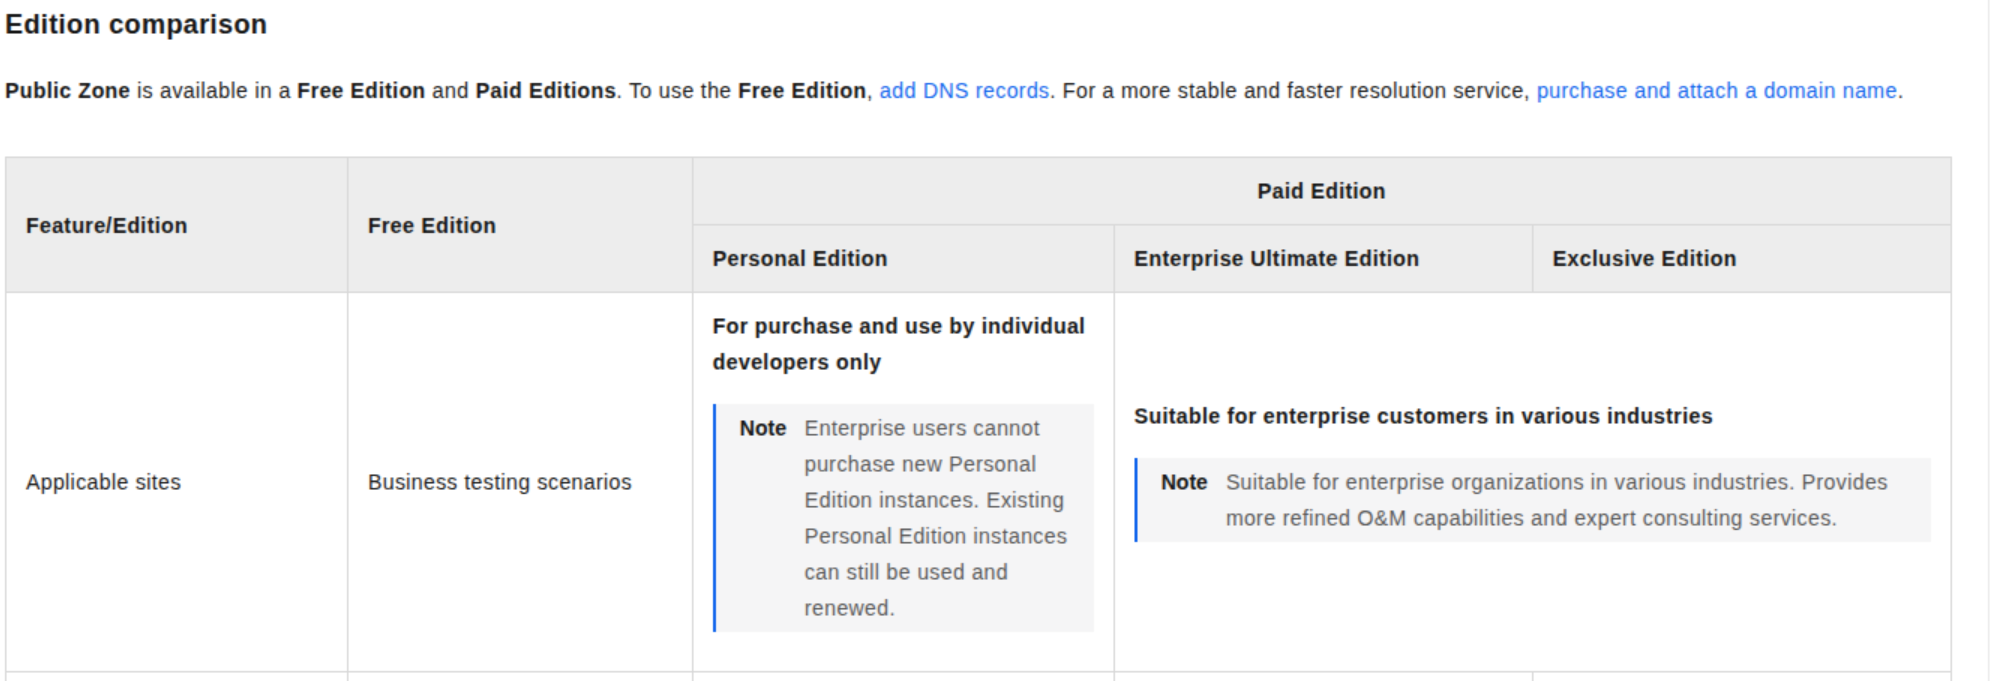
- Personal Edition (Only for Individual Account)
- Enterprise Ultimate Edition - 167 - 510$/domain/year
- Exclusive Edition - 4287$/domain/year
Info
If you want to see more about the feature available of enterprise version compare with personal or exclusive, you can double-check more at Edition comparison
Warning
Because this one is typically reservation instance, it means you need to aware about time expiration and try to renew if you don’t want the system corruption
After purchasing the instance, you will available to add your domain to zone and even if it’s subdomain, your actions are adding couple of settings for Alibaba able to control your domain, including
- TXT Record: Appearing in page when add the subdomain
- NS Record: Appearing in page of Public Zone of subdomain

Now you can able to setup your DNS directly into your Alibaba, for example, I will map
- A Record to list of IP of ALB to resolve the application behind (For GTM Purpose)
- Or you can choose CNAME Record for instead (For normal purpose)
Warning
You can only choose map your define subdomain for only type A or CNAME but not able to configure both of them
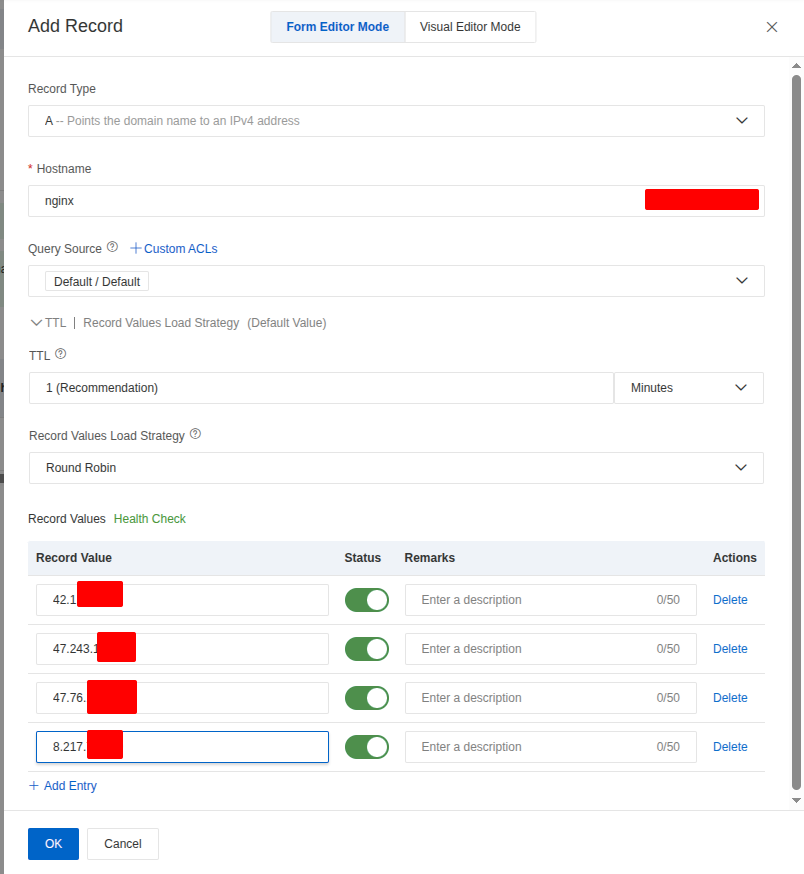
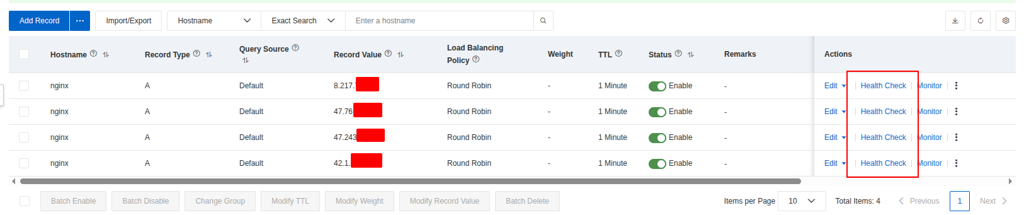
To testing, I will try to hosting NGINX Service in each cluster in pools and use this DNS for routing traffic base on policy Round Robin to each of them (NOTE: By default, Almost DNS routing strategies for same endpoint will adapt Round Robin, if you want to advantage you need to consider for Global Load Balancer or Enterprise Optional DNS to tackle this problem)
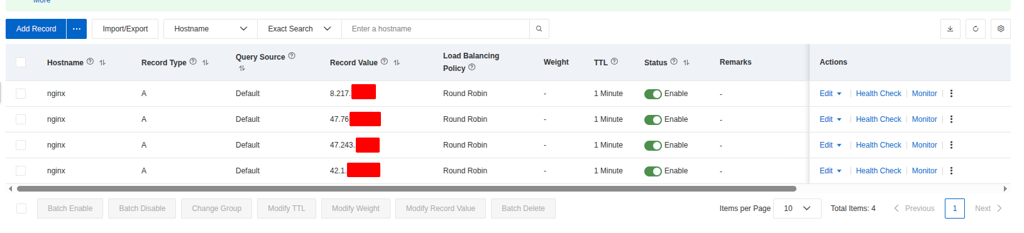
Now add new record, e.g: nginx.ai.xxx.xxx to Public Zone with record type A for both AIP of cluster-01 (VNG) and cluster-02 (Alibaba). Because ALP of Alibaba organize base on multi-zone so that why it has more than one EIP, you can go to SLB Portal to grab them, or use dig command to find that one
dig +short @8.8.8.8 A <ALB-domain> Put these IP to publish record, set TTL and several options for domain and Click OK. Read more about this at Add DNS records for a website
Now you able to view the created record in dashboard, and it take few secs for DNS knowing your host with Query Source of Alibaba

The process doesn’t stop there. Alibaba Cloud DNS enables you to create intelligent DNS resolution using its Query Source feature. This means that for every record you create, you can adjust the DNS Server settings to quickly resolve your domain to the appropriate IP address based on the query origin—a truly great feature for performance. For more information, you can refer to the official documentation: Use Alibaba Cloud DNS to implement intelligent DNS resolution.
The GTM and Health Check for Global Routing
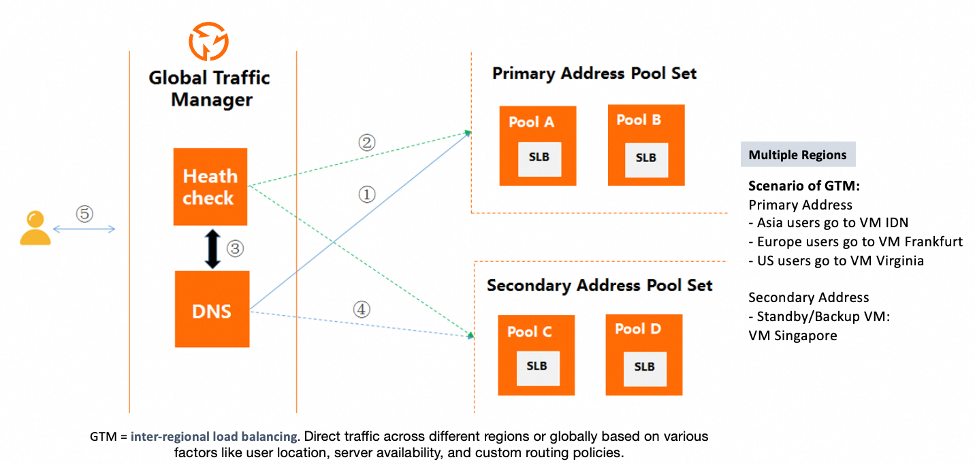
With Cloud DNS, you gain full control over your domain with features that boost performance and create intelligent resolution. However, if you require more advanced DNS features, such as sophisticated Failover or adaptive routing, the Global Traffic Manager (GTM) is one of the best options offered by Alibaba Cloud to tackle these problems. GTM is, in essence, the platform’s dedicated Global Load Balancer (GLB). For alternative or complementary options, you can also explore the Global Accelerator service. The following articles provide comprehensive details on these solutions:
- Alibaba - How to implement failover in Alibaba Cloud DNS
- Alibaba - Implement intelligent DNS resolution with Alibaba Cloud DNS and Global Accelerator
- Alibaba - How to use GTM for multi-active load balancing and disaster recovery
- Alibaba- Implement region-based intelligent resolution with GTM
- Alibaba - Public Cloud DNS Best Practices
- Alibaba - GTM Best Practice
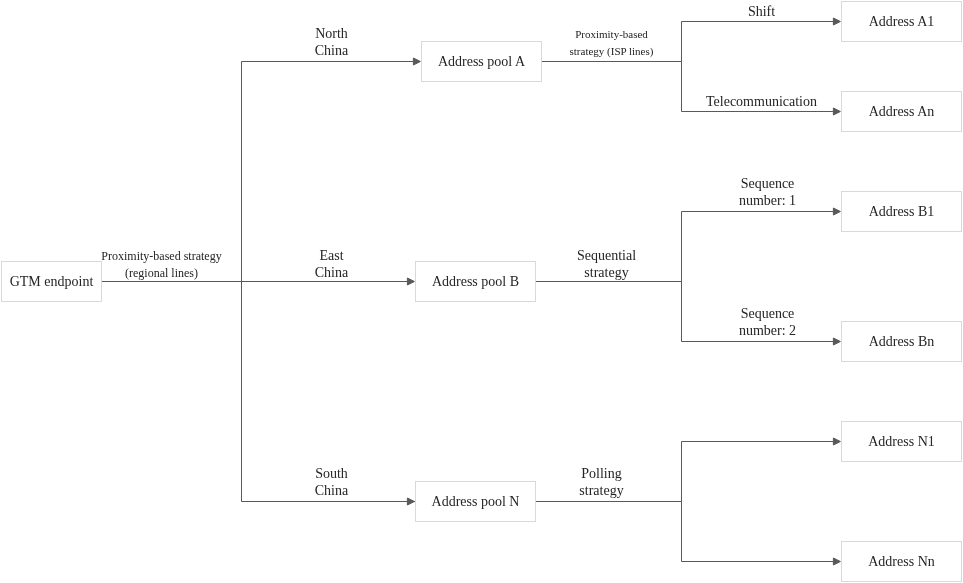
With GTM, you gain powerful features that allow you to define your own failover and routing strategies, including:
- GTM endpoint: the domain name through which GTM provides services
- Address pool: A feature of GTM that is used to manage application service addresses, which can be IP addresses or domain names
- Address: the endpoint of an application and also the response that is returned by GTM after the resolution and decision-making processes
- Load balancing policy: a dynamic resource scheduling mechanism that selects an appropriate address pool for an endpoint and an appropriate address within the address pool based on specific algorithms and policies
- Health check template: Health check feature performs real-time probes on the addresses in an address pool to evaluate the operational status and availability of application services. Supporting several protocol, e.g: Ping, TCP, or HTTP/HTTPS
You will have two ways to define GTM for your domain, such as
- You can use DNS Public Zone with Health Check ⇒ Alibaba will automatically create GTM pattern for your DNS Record with Ping Protocol
- Define by yourself GTM for DNS Record via GTM in Alibaba Record (Recommend). Read detail in GTM Getting Started
Question
Let’s break down couple of steps to define completely GTM Traffic Flow for situations, Implementation region-based intelligent resolution with GTM and also failover
For define GTM, you can choose Create Access Domain > Custom Scenario

Alibaba will provide you great UI/UX and visualization full workflow as diagram below, so I want define two traffic workflow including VN and Domestic Server for separate traffic between two cluster depend on region request
Warning
Remembering Disable state of GTM before becoming available, because it can cause downtime for your application if anything doesn’t healthy.
First of all, you will define access domain with A Record to setup the same DNS for multiple hosts
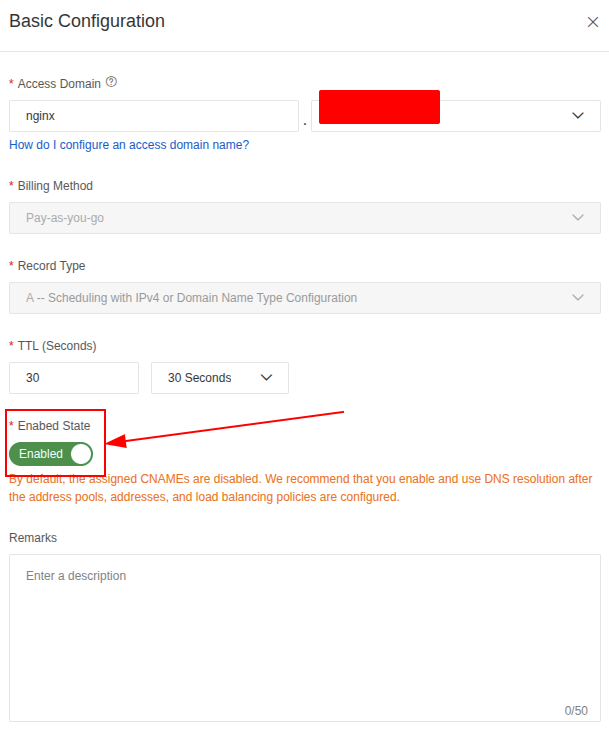
Note
For billing, Alibaba will suggest two options, include Pay As You Go and Subscription, with the price you need to be conclude for each domain created, so you need to carefully to apply full GTM strategies for entire service in your Kubernetes. Explore more at GTM Billing
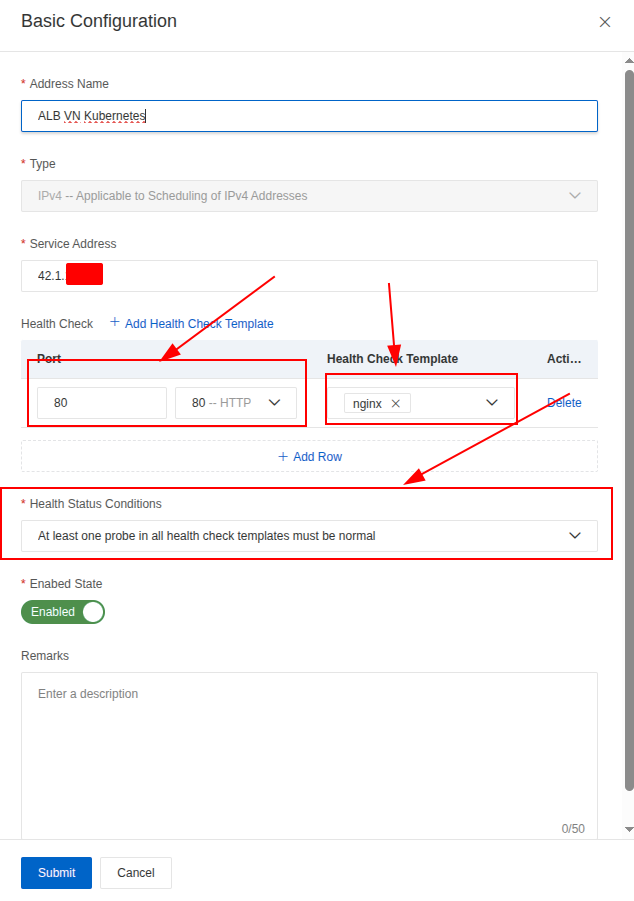
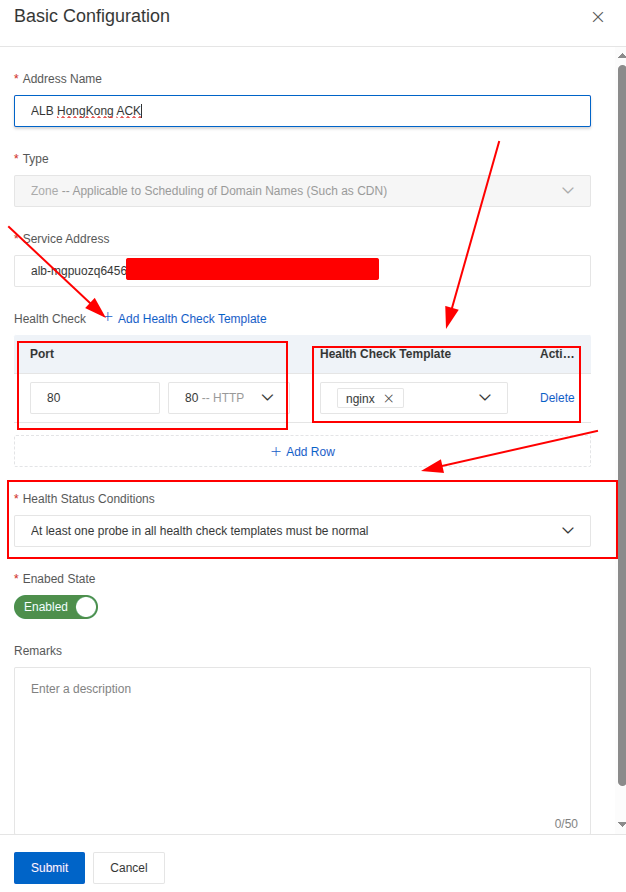
Next, you can define address pools and it conressponds 2 pools for dedicated 2 different ALB, with different Type
- For HK (Oversea Server), you can use Type Zone, which allow to setup CNAME Record and it will be available for ALB Domain of Alibaba, e.g:
alb-xxx.xxx.xxx - For VN (Domestic Server), you can use same way but Type IPv4 for using the ALB as raw IP Address, e.g:
42.1.x.x
Lastly, you need to define Address where your ALB stay for but first you need to define your health-check template to assign for last step (Important)
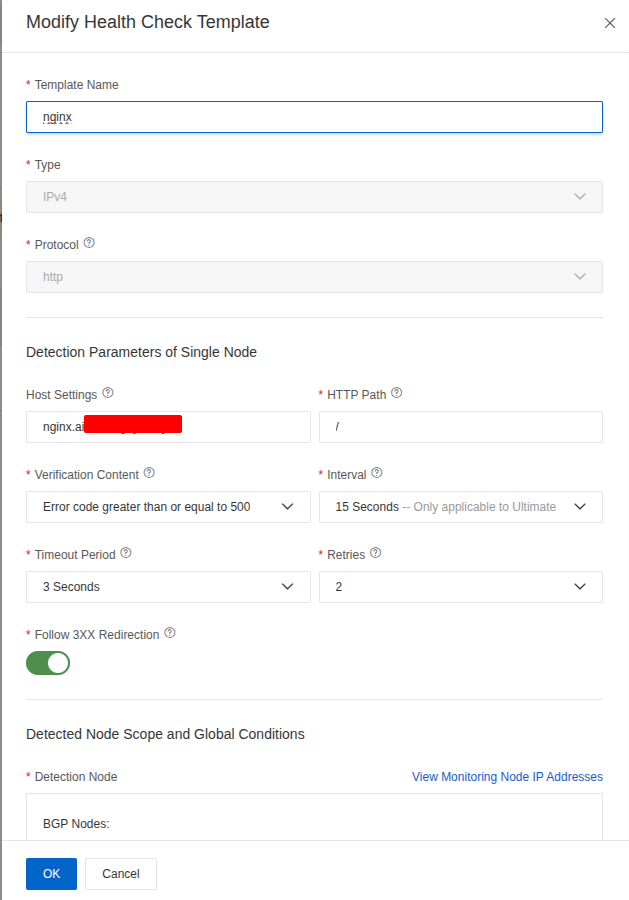
I must relate this crucial point regarding Host Settings (via the Host: xxx header). This setting is an extremely important record that informs the GTM about which service is behind your IPv4 or Application Load Balancer (ALB) Domain, especially when traffic is ultimately handled by a Kubernetes Ingress.
Initially, I overlooked this detail and attempted to differentiate applications inside the Kubernetes cluster by using two types of Ingress configurations:
- Wildcard Domain (Exact): This was intended to expose only the health-check path, allowing direct checkups via the ALB IP or Domain without requiring an additional header.
- Specific Domain (Prefix): This was intended to provide full, domain-based control for services serving production traffic via the Ingress controller.
I struggled with the core question of how to distinguish my applications behind the ALB (which is attached to the GLB) for health-check purposes. Thanks to a colleague and articles like the following, I discovered the solution was to configure it via the Host header: AWS Blog - Exposing Kubernetes Applications, Part 2: AWS Load Balancer Controller.
Note
If you already buy the ultimate instance of DNS, you can set the interval for running health-check for 15 secs, but for standard version the interval must be 1 minutes or over. Therefore, you need to become wise to deal with this configuration, and it can bring you better experience or terrible. Let’s talk more in the improvement part
Aftet that, you can turn back Address Configuration again and setup your address with IPv4 or ALB Domain, and remembering for set the health-check template with monitoring port
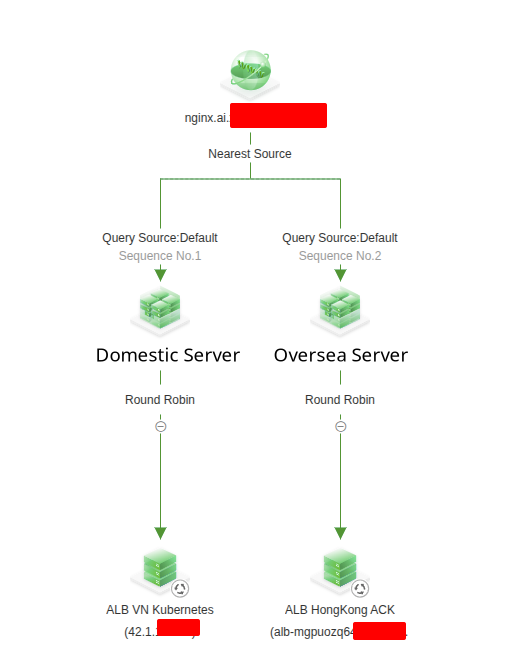
We are now fully prepared to build the Global Traffic Manager (GTM) Flow to ensure High Availability (HA) and Failover. At this stage, we can define the specific, compatible routing algorithm for each step and proceed to test the resulting configuration.
The defined routing strategy is as follows:
- Address Domain ⇒ Address Pools: Nearest Source (This leverages Intelligent DNS to direct the user to the geographically closest cluster pool.)
- Address Pools ⇒ Address: Round Robin (This is applied within the selected cluster pool to ensure balance across the available endpoints/servers.)
Note
More sophisticated strategies, such as dynamically balancing the workload when the system becomes overloaded, will be considered for a future feature. Currently, I have not identified any viable options that allow for monitoring metrics and automatically updating the routing weight-ratio based on those metrics.
Failover and Recovery Testing and Time Consuming

I have written a small script to automatically health-check, track failover, recovery, and measure the downtime required before services become available again, allowing me to observe the performance of the Global Traffic Manager (GTM).
Please review the following scenarios that reflect the testing progression:
- State 1: Initial Baseline - Both domains/endpoints are available and healthy.
- State 2: Failover Test (Intelligent DNS Target) - Manually cause downtime for the server currently being resolved by the intelligent DNS configuration.
- State 3: Double Failure - Cause downtime for the remaining available server/endpoint.
- State 4: Recovery Check (Non-Intelligent Target) - Bring the second server back online.
- State 5: Full Recovery Check - Bring the server targeted by intelligent DNS back online, checking for a return to the stable, preferred state.
The script’s output log and the configuration requests are provided below:
# --- Configuration ---
# The URL of the service endpoint to check
ENDPOINT_URL = "http://nginx.ai.example.com/"
# Expected successful HTTP status code (e.g., 200 OK)
EXPECTED_STATUS = 200
# Expected failover status code to start downtime count
FAILOVER_STATUS = 503
# Interval between checks in seconds
CHECK_INTERVAL_SECONDS = 1
# NOTE: Set CHECK_INTERVAL_SECONDS to a low value (e.g., 1s) for accurate downtime measurement.
# Number of retries before concluding the service is DOWN (unused for failover timing but kept for general failure tracking)
MAX_RETRIES = 2
# Timeout for the HTTP request in seconds
REQUEST_TIMEOUT_SECONDS = 2
# Number of times the script will check the service before exiting and writing the summary
TOTAL_CHECKS_TO_RUN = 180 # Set to run for 180 seconds (180 checks * 1s interval)
Here is the result what I got for this experiment
==================== FAILOVER DOWNTIME SUMMARY ====================
Run Start Time: 2025-12-05 15:53:27
Endpoint URL: http://nginx.ai.example.com/
Initial IP Resolved: 42.1.xxx.xxx
------------------------------------------------------------
Total Checks Performed: 180
Successful Checks (Status 200): 55
Average Successful Latency: 244.49 ms
------------------------------------------------------------
Total Failover Events (200->503->200): 2
Average Failover Downtime: 71.691 seconds
All Recorded Downtime Events (s):
  - Event 1: 79.678s
  - Event 2: 63.704s
============================================================
My overall conclusions from testing the GTM implementation are as follows:
- Failover and Recovery Performance: The failover process was slow and lacked smoothness when transitioning between an unavailable region and a recovered one. In particular, the recovery state showed very poor performance, with only approximately 30% of requests succeeding. This indicates a significant issue that needs a specific plan for enhancement.
- Workflow Validation: Despite the performance issues, the overall workflow operated as expected. The system correctly managed failover and attempted to balance traffic, even with only one Kubernetes cluster (represented by different endpoints) behind the GTM.
- Latency Observation: I am generally satisfied with the latency response introduced by the GTM. It did not introduce a significantly large load differential on the Nginx server response, though the response time was slightly elevated. I will explore ways to mitigate this minor increase in latency.
For Future Implementation and Enhancement

Boosting the efficiency of FailOver and Latency of GTM (GLB)
Having conducted thorough research, including reviewing useful articles and solutions like the ones linked below, I have gained insight into the areas that require immediate attention:
- Azure - Architecture best practices for Azure Traffic Manager
- Alibaba - Optimize Global Application Performance with Intelligent DNS and GTM Integration
While the resources are few, they provide critical focal points for analyzing and fixing my slow failover and recovery issue. I need to consider several potential layers in my setup:
-
Kubernetes/Application Load Balancer (ALB) Layer: This involves the internal Kubernetes network behavior and health signaling. Key areas to inspect include:
- Tuning the application’s
Readiness Probeconfiguration. - How quickly
EndpointandEndpoint Sliceupdates propagate. - Adjusting
terminationGracePeriodSecondsto ensure clean, fast service shutdown.
- Tuning the application’s
-
Global Traffic Manager (GTM) Layer: The focus here is on the manager’s operational configuration. Key areas to inspect include:
- Reviewing the primary routing policy.
- Optimizing the health-check template settings (e.g., check intervals and failure thresholds).
-
DNS Layer: This layer is critical for how quickly clients observe changes. Key areas to inspect include:
- Focusing on optimizing the Time-To-Live (TTL) configuration to meet the desired recovery expectation.
- Investigating the impact of client-side caching on resolution times.
Optimize Kubernetes & ALB Shutdown (The Internal Layer)
| Component | Setting/Action | Recommended Value | Rationale |
|---|---|---|---|
| Kubernetes Pod | terminationGracePeriodSeconds | 5 - 10 seconds | The default is . This is the time Kubernetes waits after sending a SIGTERM before force-killing the Pod (SIGKILL). Lowering this speeds up the Pod’s removal. |
| Application | SIGTERM Handling | Implement a graceful shutdown that immediately fails the readiness check upon receiving SIGTERM. | This is critical. It instantly tells the ALB/Ingress Controller that the target is unavailable, before the Pod fully dies. |
| ALB Target Group | Unhealthy Threshold/Interval | Low Interval (e.g., 5 seconds), Low Unhealthy Threshold (e.g., 2). | The ALB must detect the Pod’s failure (via the failed readiness probe) and remove the IP from its target group list as quickly as possible. |
Optimize Alibaba GTM & DNS TTL (The External Layer)
-
Aggressively Low DNS TTL:
- Set the Global TTL Period in your GTM settings to the lowest feasible value, ideally seconds or, if your GTM version allows, seconds.
- Rationale: This is the maximum time a client will continue trying the old (failed) IP after GTM has updated the DNS record.
-
Tuned Health Checks:
- Set the Health Check Interval to the minimum supported by your GTM edition (e.g., 15 seconds).
- Set the Unhealthy Threshold to a low value, such as 2 or 3 consecutive failures.
- Calculation: With a 15 seconds interval and an unhealthy threshold of 2, the GTM will detect the failure in approximately 30 seconds.
Note
To effectively test and choose the best configuration, you should combine the GTM setup with the Query Source feature of Alibaba Cloud DNS to ensure intelligent DNS resolution. After reconfiguring the settings discussed (Kubernetes Probes, GTM thresholds, and DNS TTL), you must continue to actively monitor the entire system to verify the readiness and performance of the GTM solution.
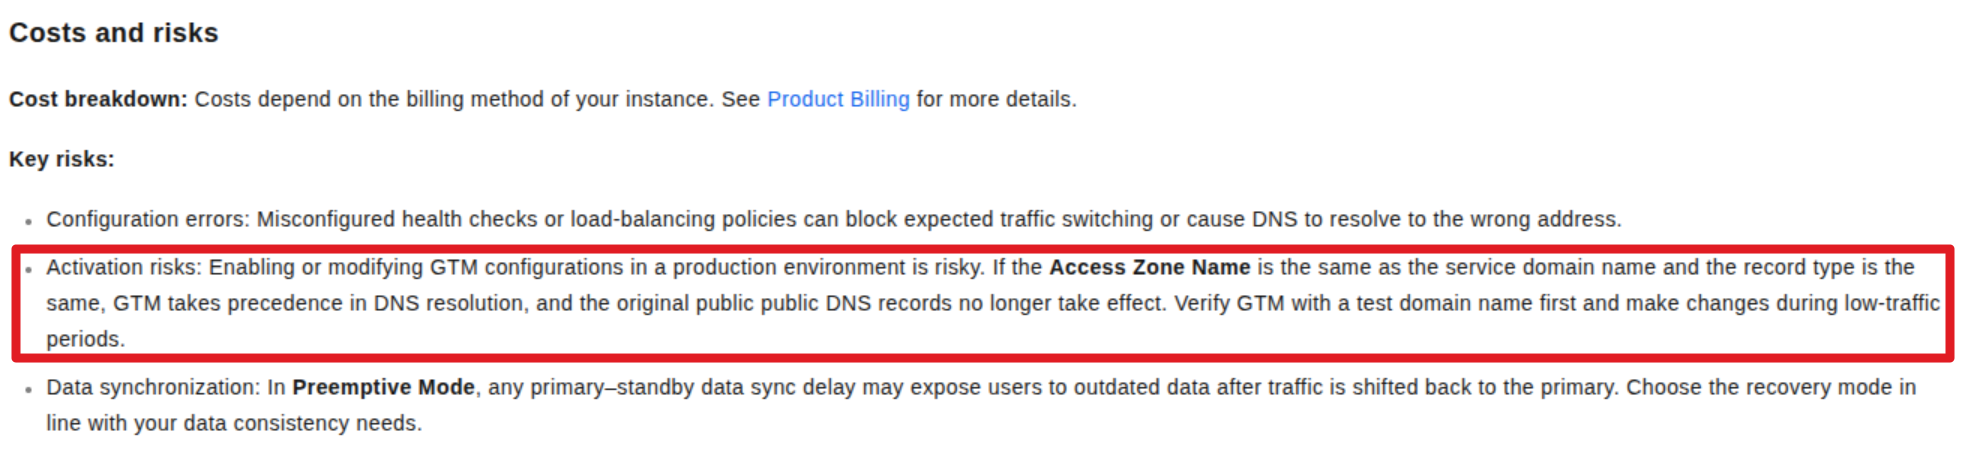
Dynamically configure DNS with ExternalDNS
![]()
To quickly create and manage DNS records from within a Kubernetes Cluster, I always look for open-source solutions or Custom Resource Definitions (CRDs) like ExternalDNS to automate configuration with providers such as Alibaba Cloud DNS or CloudFlare.
First, here are the reference articles that were highly inspirational for this implementation:
- Medium - External DNS in Kubernetes: A Complete Guide for Platform Engineers
- Alibaba - ACK Managed Cluster - Use ExternalDNS
- External DNS - Documentation
Following these guides, particularly Alibaba Cloud’s official documentation for implementing ExternalDNS on ACK (Managed Kubernetes), is straightforward. However, for clusters not managed by Alibaba (like a self-managed or a third-party cloud cluster), an alternative plan for authentication is required, specifically how to leverage Alibaba Cloud’s RAM Account permissions.
To tackle this, I looked into open-source tools provided by Alibaba for container services that run natively on Kubernetes, such as the ack-ram-tool. However, for an external Kubernetes cluster to authenticate securely using RAM permissions and successfully utilize ExternalDNS to configure service endpoints, I need to rebuild and define a new authentication strategy. If you have time, you can take the look these issues and PR of contributor for externalDNS with Alibaba Cloud to make this implementation come true
- GitHub - RRSA (RamRoleforServiceAccount) support for Alibaba Cloud
- GitHub - ExternalDNS - feat(alibabacloud): support RRSA and IMDSv2
- Alibaba - Use RRSA to authorize different pods to access different cloud services
The articles and repositories regarding Pod authentication across various Cloud Providers provide significant value, especially if you want to delve deeper into the underlying Kubernetes mechanisms rather than relying on high-level Cloud Platform abstractions.
- Medium - Simplify AWS IRSA for Self-Hosted Kubernetes with IRSA Manager
- ExternalDNS - Setting up ExternalDNS for Services on AWS
- EKS Workshop - ExternalDNS with EKS
Conclusion

Success
That covers everything I wanted to share on this topic. The experience, especially the time spent researching all of this, has been truly memorable for me this year.
I sincerely hope you’ve all collected some valuable knowledge or that a new idea has sparked for you through this blog. I look forward to seeing how these concepts influence your work in the near future.
Quote
This marks the end of my technology articles for the year! As the holidays are starting next week, I want to wish you all a fantastic time with your family. I hope you get enough time to recharge your energy for the next year of hard work. Come back with great energy!
I am deeply grateful and honored to share my knowledge, contribute to the community, and expand my network. Your engagement proves that my work has value, and I promise to bring even more efficient and impactful content in the future. You all are my greatest motivation to keep moving forward and contributing.
Good luck for next year, sending my love to all of you. I wish you to stay safe, happy, and keep moving forward. Cheers 🍻! Merry Christmas and Happy New Year! See you for the next release!