Hello! It’s been a while, a month since my last break, and nearly half a year since this blog was moved to the archives. I’ve taken some free time this weekend to revive it with fresh content for the Kubewekend Stories series. I’ve been running plenty of experiments over the past month, and I’m excited to finally share these articles. Let’s dive into this week’s Kubewekend to explore the best strategies for ingressing your applications into a cluster!
Kubewekend Before and Now
If you remember about Kubewekend in nearest time about we handle extra part about to setup RKE2 for Kubernetes instead Kind, you can double-check again in Kubewekend Session Extra 2: Rebuild Cluster with RKE2 or K3S. As I’ve mentioned in these articles, I chose RKE2 for our production environment due to considerations like Container Storage Interface (CSI) and High Availability (HA), which kind doesn’t fully address in that context.
However, despite those challenges, I still believe kind remains the best option for practicing in a local Kubernetes environment. Today, we’re revisiting kind with Cilium to explore how this platform, leveraging eBPF and Network Security CNI, that can enhance our applications. Explore again about Cilium, Hubble and eBPF Technologies via Kubewekend Session 4: Learn about ebpf with hubble and cilium
After a few months, I’ve dived into several blogs about Cilium and its comparison with traditional models like Kube-Proxy. These resources explain how eBPF is transforming networking in Kubernetes and what trade-offs we make when adopting Cilium. There are a new versions of Cilium are constantly introducing exciting functionalities and there’s a lot happening with eBPF and Cilium is pushing the boundaries.
You can find more great information by reading the articles or visiting the LinkedIn and blog posts linked below.
Comparing with previous blog from a year ago, I believe Cilium is evolving to become the new methodology for who love and want to adopt eBPF and network enhancement around this technology, and once again I think Cilium can do lots of stuff to control your network in Kubernetes with great ecosystem, such as
Let’s explore more about Cilium Utilities and Learn how can Kubernetes expose your application and serving traffic in your application. From this one, you can change any technologies or CRDs about Load Balancer, Ingress Controller or API Gateway to make your Kubernetes become more efficiency and more persona
How does Kubernetes serve the traffic ?
Basic Networking in Kubernetes
When you work with Kubernetes, the network topic always stay on the top priority because it’s hard to understand and stick with lots of definition which appear only by Kubernetes. To get more information before diving into my sharing, you can double-check these concepts at Kubernetes - Services, Load Balancing, and Networking
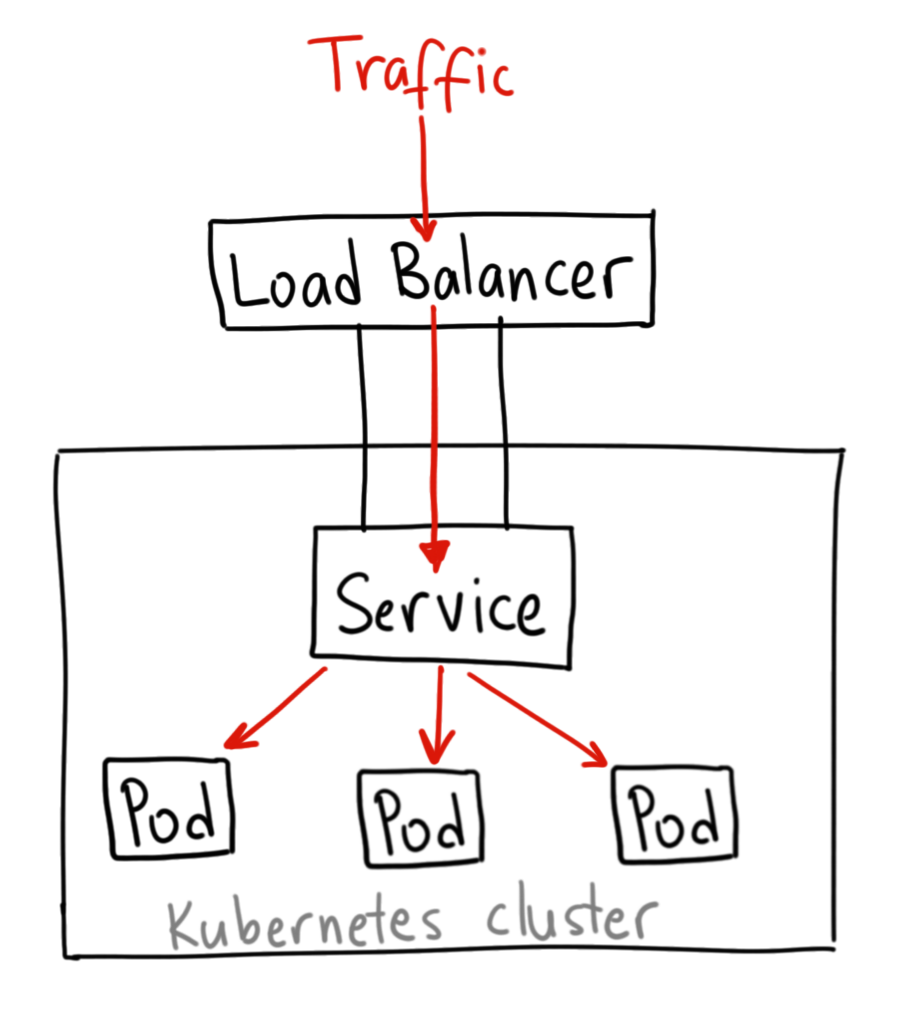
Let’s take a short walkthrough from initialize of networking to completely serving before detailing it, but simply, these step will begin
Starting with the foundation of the cluster, the CNI (Container Network Interface) plays a critical role by assigning IP addresses to Pods, which is the starting point of Kubernetes networking. This cluster-wide IP address allows Pods to communicate with one another—whether on the same node or across different nodes—directly, without the need for proxies or NAT.
Building upon Pod networking, the Service API provides a stable IP address to represent a set of underlying Pods. This is supported by EndpointSlices objects, which track the network endpoints of the Pods backing that specific service.
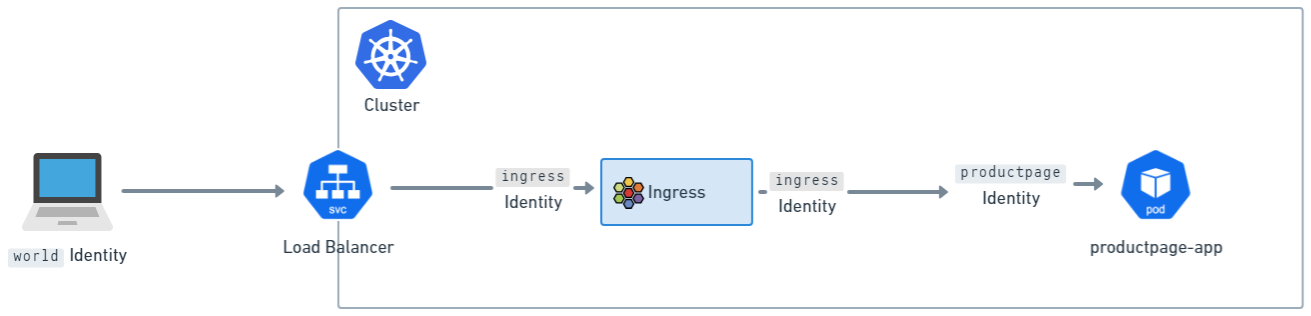
To make these Services accessible to clients outside the cluster, Kubernetes utilizes Ingress and the Gateway API.
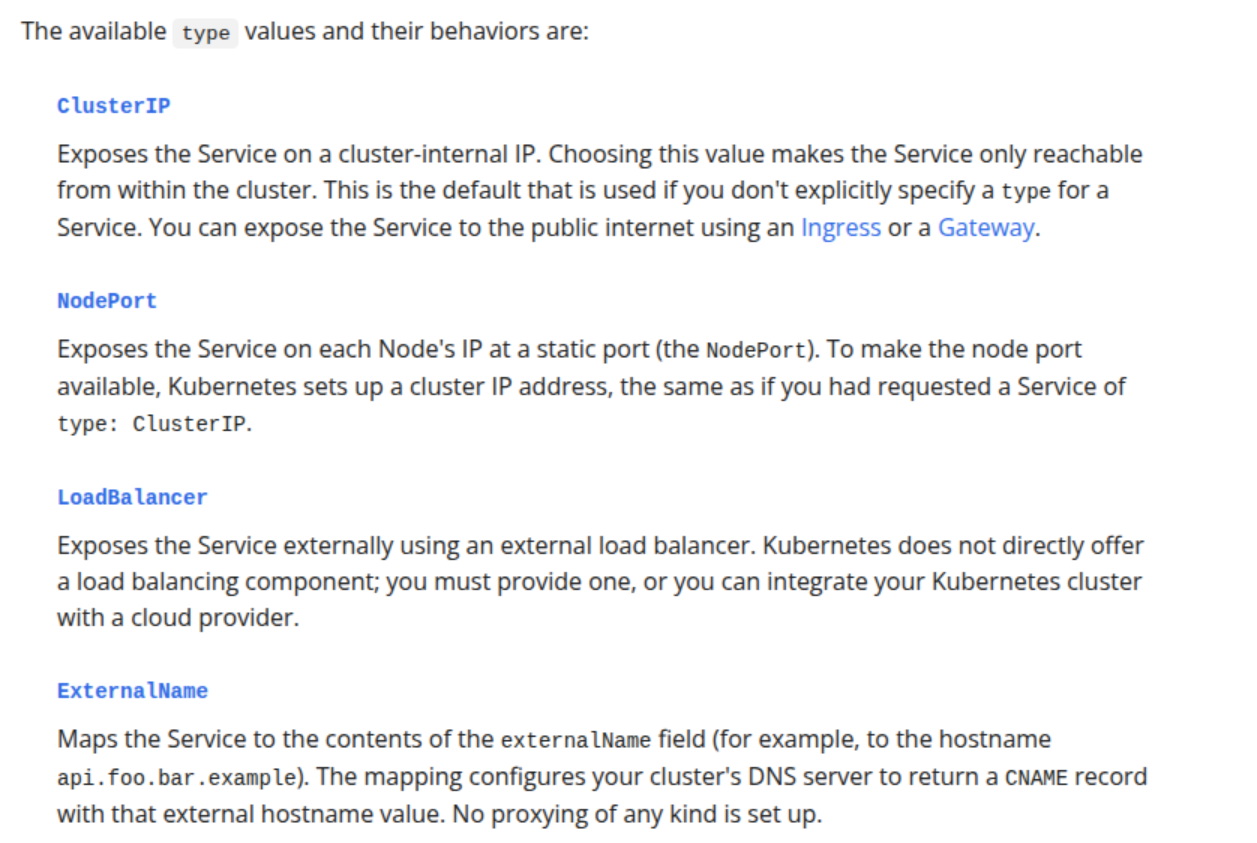
To advertise these services externally, you often deploy a Service of type: LoadBalancer, which acts as a bridge between the Kubernetes cluster and your host network. While Cloud providers handle this automatically, implementing Load Balancers in On-Premises environments presents unique challenges; this blog will explore effective strategies to tackle those problems.
To enhance both accessibility and security, NetworkPolicy is a built-in resource used to control traffic between Pods or between Pods and the outside world. Currently, solutions like Cilium are emerging as top-tier choices for this layer. We will dive deeper into Network Policies and Kubernetes security in a dedicated future post.
Kubernetes create the own way to make it becomes unique in network concept, and they implement them to API and let’s community choose what they want for their Kubernetes cluster. But like I told, the basic network options always stay in standard for modern nowadays, so you must know about Container Networking Interface (CNI) and Network Policy, Kubernetes Proxy
With Cilium, you will have the stack to ensure to cover whole network concepts of Kubernetes, the next gen already adopt by multiple team around the world. Let’s explore next in
In Kubewekend with Cilium
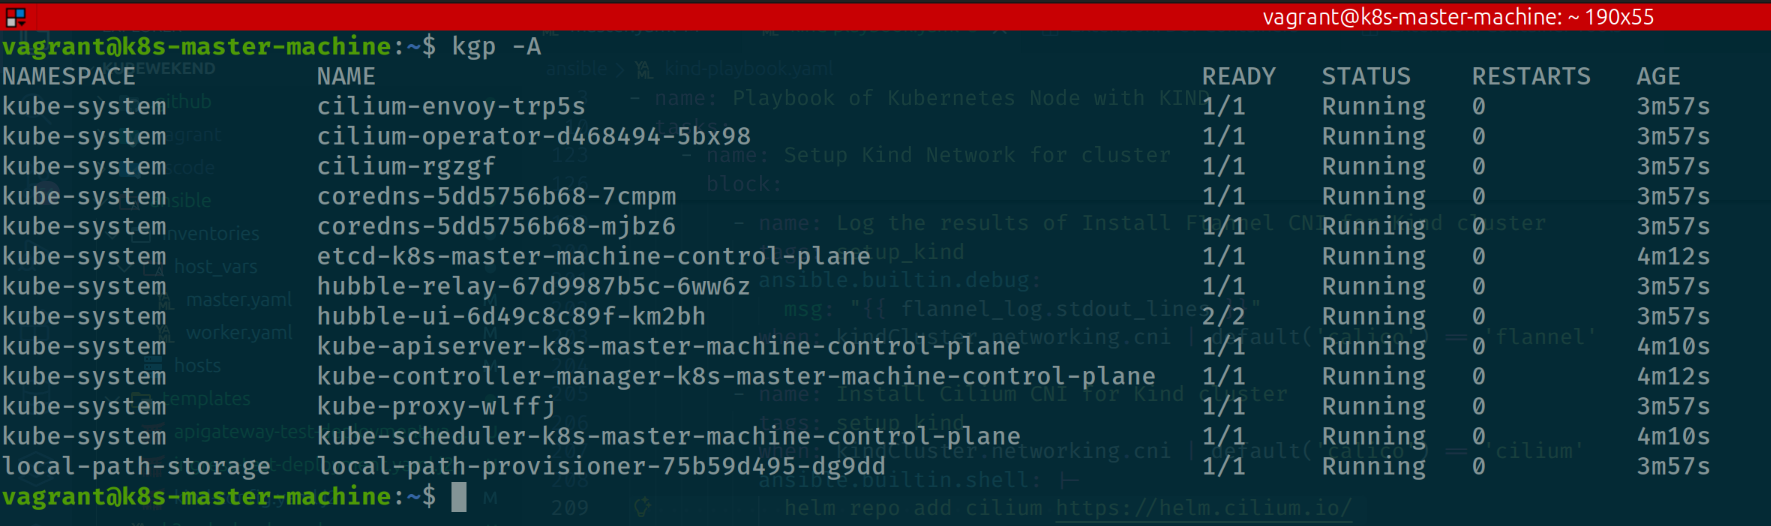
With old version, we are use cilium CLI to setup the cilium controller and also hubble in our cluster. But if you want do more great things with brand new feature, I would recommend you to use Helm Chart for Cilium Deployment. With the refine of Kubewekend Source Code, I will help you easier apply helm in Kind Cluster, but at first you need to know what step behind.
When I turn on the Kubewekend Cluster with Cilium, that will help your cluster work perfectly via helm command below
Let’s take a look about Cilium Components when we deploy this stack in Kubewekend
Cilium Envoy: Envoy will setup as daemonset workload and become host proxy for enforcing HTTP and other L7 policies as specified in network policies for the cluster.
Cilium Operator: Operator will work as controller to orchestration the CRDs provided by Cilium, which help you define a lots of stuff with Cilium Features.
Cilium: The daemonset pods work as CNI in Kubewekend Cluster
Hubble Relay and Hubble UI: The tools let us discover and monitor network follow inside cluster, and visualization them as dashboard with friendly UI
By default, you will encounter the several problem when create the Service as Load Balancer because Kind doesn’t integrate actual Load Balancer between Kubernetes with your host, so why you operate any Ingress Controller with Service Load Balancer, that will stuck in Pending State.
For example I try to operate Nginx Ingress and you will see your Nginx Controller Service still pending before LoadBalancer initialize
Otherwise, you will have multiple options about Gateway and Ingress to expose your Services in Kubernetes. Please spent time to double-check couple of options below
As you can see, the great issue is appearing and that made us to must find the solution if you want to expose your application. Luckily, LoadBalancer is one of the interesting things introduced much in Kubernetes, and here what stuff we can tackle to solved our problems, with couple of solutions below
Using VIP (Virtual IP) in Kind Network with Kube-vip or MetalLB
Using Cloud Provider of Kind, the solution recommend by Kind at Kind - LoadBalancer. To reduce the complex, I already try to build them into docker-container and easier to distribute them with tag xeusnguyen/cloud-provider-kind:latest
There are more several stuff to deal with Load Balancer optional, so if you want to explore more about Kubernetes with this technology. Please double-check these articles
This article focuses specifically on Cilium, detailing how to leverage it alongside Nginx Ingress to route external traffic into the cluster. After evaluating various architectural patterns, I have opted for Node IPAM LB. This feature provides Service Load Balancing using the Node’s own IP addresses, a concept similar to the ServiceLB (KlipperLB) implementation found in K3s.
This approach significantly reduces complexity for those who prefer not to manage L2 or BGP configurations. It is particularly effective for environments like Kind, where multiple networking layers can become difficult to manage. Node IPAM LB is the most streamlined option: it honors .spec.ipFamilies (choosing between IPv4 and IPv6) and prioritizes ExternalIP addresses, falling back to InternalIP addresses otherwise.
There are several critical considerations when adopting Node IPAM LB for your cluster:
Traffic Policy: Setting .spec.externalTrafficPolicy to Cluster or Local determines candidate selection. Cluster considers all nodes as candidates, while Local focuses on nodes hosting the specific Pods defined by the Service’s EndpointSlices.
Cilium Constraints: When using Cilium Ingress or the Gateway API, you cannot set .spec.externalTrafficPolicy to Local because it utilizes dummy endpoints for the Service LoadBalancer. This is specific to the Cilium implementation; for consistent behavior, it is recommended to set this value to Cluster.
Node Selection: Node IPAM LB honors the label node.kubernetes.io/exclude-from-external-load-balancers and the ToBeDeletedByClusterAutoscaler taint to prevent specific nodes from being used as load-balancing candidates.
Node Filtering: To explicitly restrict which nodes listen for incoming traffic, you can add the io.cilium.nodeipam/match-node-labels annotation to your Service.
To change and make it available for NodeIPAM, you must upgrade helm one more time and add couple of parameters
Now let’s double-check again with ingress-nginx and service with LoadBalancer
As you can see, the NodeIP Address assigned into controller, and make it’s able to work as Kubernetes for ingress
Why does it have that IP ?
Because your kubewekend is operating with kind cluster and use kind network managed by Docker, and it will attach with IP in that container network range. For my situation, Docker setup the kind network with CIDR 172.18.0.0/16 so why you see it have IP 172.18.0.2, and you can double-check with command
docker network inspect kind
So what next ? We will take walkthrough to implement new deployment and expose them with nginx ingress to serving external traffic
Deployment and expose the application with Ingress
With NodeIPAM, your actual IP of node already assign into control-plane and loadbalancer, so it simply understand your kubewekend container can able to access via port 80/443. That’s why you can expose port 80/443 in the configuration of Kind when you run the bootstrap cluster, Read more at Kind - Extra Ports Mapping
But in the situation, you already bootstrap cluster and operate cilium that’s pretty hard to re-run concept again because we can’t expose port again when container is running in Docker, instead we recreate again. So that’s not pretty good deal, but we can try with another way below, but first let’s run couple way to check your ingress worked, and ready to expose your application
First, let’s run curl command to port of your kubewekend cluster at 80/443, and also to port when your ingress run as node-port. By default, nginx-ingress will define default backend at /healthz route to let you can do health-check
# For http (Work with LoadBalancer)curl -i http://<IP-LB>/healthz# For https (Work with LoadBalancer)curl -i -k https://<IP-LB>/healthz# For situation only node-port workingcurl -i http://<HostIP>:<PortMapping>/healthz
Next, let’s operate nginx deployment and try to expose with nginx ingressclass to see what it work. You can save as file or run it with cat <<EOF command by kubectl apply -f
Now in default namespace, your application will create with nginx container and also expose the new service and domain for your application with nginx IngressClass.
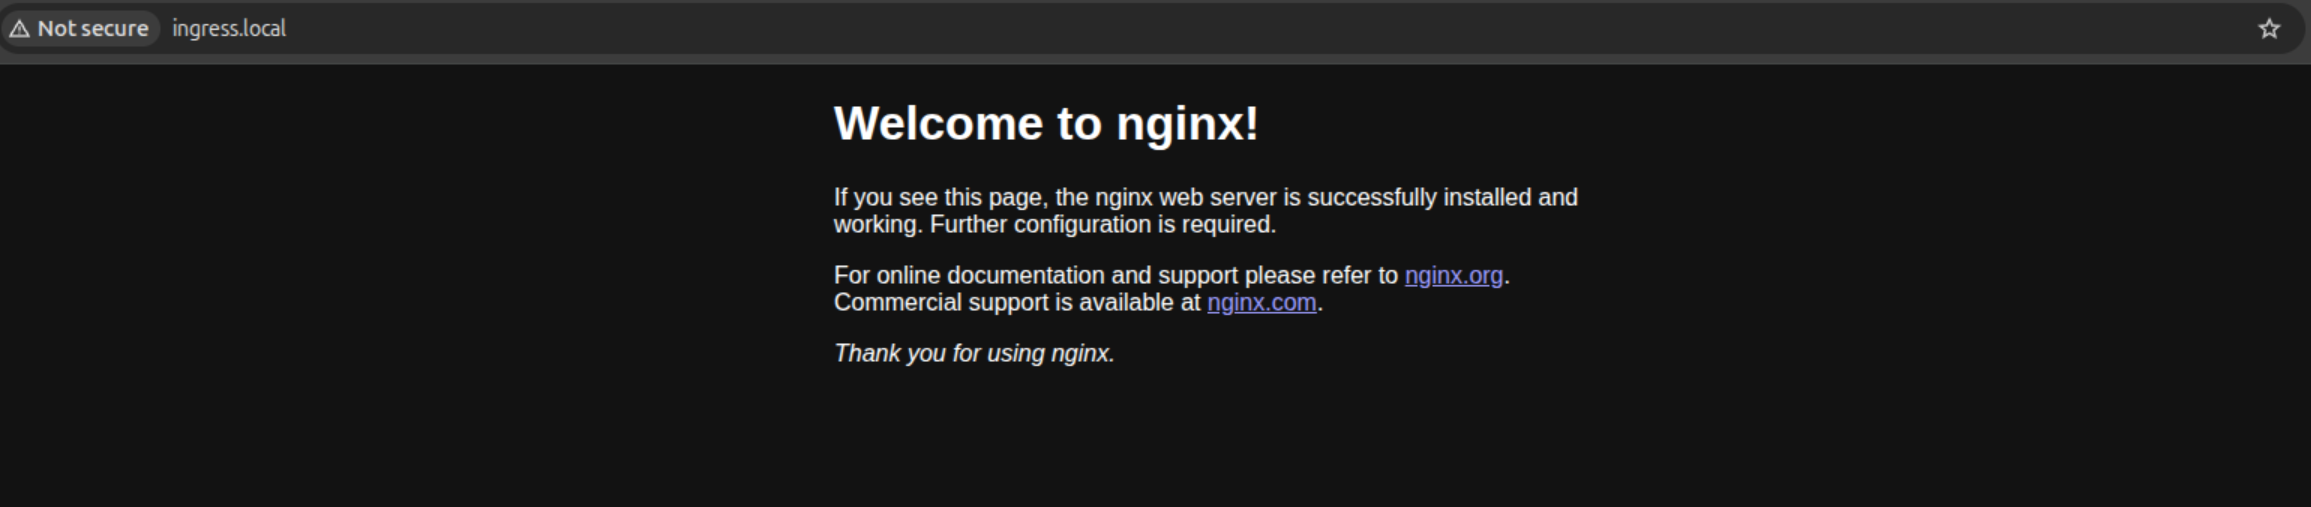
You can double-check again with curl command. Because you setup the host, to let ingress-nginx know what service to routing, you must specific host header
curl -i -H 'Host: ingress.local' http://<LB-IP>
Alright, that’s seem pretty good for us, and we are also set up what we need to implementation the brand new application with expose them via Kubernetes concept by Service and Ingress. To make it become more accessible, especially via browser and don’t need recreate kubewekend, I think about tunnel, proxy or socket strategy to map Host IP, it means IP of host used to run kubewekend to container where kubewekend work
After get involve couple of technologies, I think socat is pretty good option to handle mapping IP to IP with TCP forwarder. This option become more trust after review couple articles
The best option for handle in this case is creating service systemd, that take the responsibility to forward from port 80/443 of host to port 80/443 of container. Here is definition
[Unit]Description=Socat Network Forwarding Service port 80After=network.target[Service]Type=simpleUser=rootExecStart=/usr/bin/socat TCP-LISTEN:80,bind=<HOST-IP>,fork TCP:<IP-LB>:80Restart=on-failureRestartSec=10[Install]WantedBy=multi-user.target
[Unit]Description=Socat Network Forwarding Service port 443After=network.target[Service]Type=simpleUser=rootExecStart=/usr/bin/socat TCP-LISTEN:443,bind=<HOST-IP>,fork TCP:<IP-LB>:443Restart=on-failureRestartSec=10[Install]WantedBy=multi-user.target
Now enable and start these services
sudo systemctl daemon-reloadsudo systemctl enable socat-netforward-port-80.servicesudo systemctl enable socat-netforward-port-443.servicesudo systemctl start socat-netforward-port-80.servicesudo systemctl start socat-netforward-port-443.servicesudo systemctl restart socat-netforward-port-80.service || echo "socat-netforward-port-80 service will be restarted after 10 seconds"sudo systemctl restart socat-netforward-port-443.service || echo "socat-netforward-port-443 service will be restarted after 10 seconds"sudo systemctl status socat-netforward-port-80.servicesudo systemctl status socat-netforward-port-443.service
Alright, let’s try again with the request to host instead via External Load Balancer
curl -i -H 'Host: ingress.local' http://<HOST-IP>
vagrant@k8s-master-machine:~$ curl -i -H 'Host: ingress.local' http://192.168.56.99HTTP/1.1 200 OKDate: Mon, 02 Feb 2026 04:21:17 GMTContent-Type: text/htmlContent-Length: 615Connection: keep-aliveLast-Modified: Tue, 09 Dec 2025 18:28:10 GMTETag: "69386a3a-267"Accept-Ranges: bytes<!DOCTYPE html><html><head><title>Welcome to nginx!</title><style>html { color-scheme: light dark; }body { width: 35em; margin: 0 auto;font-family: Tahoma, Verdana, Arial, sans-serif; }</style></head><body><h1>Welcome to nginx!</h1><p>If you see this page, the nginx web server is successfully installed andworking. Further configuration is required.</p><p>For online documentation and support please refer to<a href="http://nginx.org/">nginx.org</a>.<br/>Commercial support is available at<a href="http://nginx.com/">nginx.com</a>.</p><p><em>Thank you for using nginx.</em></p></body></html>
If you want to expose via browser, let’s define inside /etc/hosts
sudo nano /etc hosts> 192.168.56.99 ingress.local
Breaking News
In March 2026, ingress-nginx is becoming archive with not upgrading anymore, if you want to take the advantage futures of Kubernetes networking, you should consider to migrate into Gateway or using instead by other implementations, like Cilium, Traefik or Kong. Read more at
The implementation of Cilium Ingress and the Gateway API reflects its unique architectural position as a CNI-integrated solution. Unlike traditional controllers that run as standalone deployments, Cilium embeds these capabilities directly into its networking stack, providing a unified management experience.
Unified Network Stack: Because Ingress and Gateway API are part of the Cilium CNI, they eliminate the need for separate controllers (like ingress-nginx). You can expose your services via a LoadBalancer, NodePort, or even directly on the Host Network. This consolidation reduces operational complexity by providing a single, comprehensive stack for all Kubernetes networking requirements.
eBPF and Transparent Proxying: When traffic reaches a service port, Cilium utilizes eBPF to intercept packets and transparently forward them to a per-node Envoy instance using the TPROXY kernel facility. This mechanism ensures high performance and enables the CiliumNetworkPolicy engine to enforce security rules on both incoming and outgoing ingress traffic. The Envoy component on each node is specially optimized to interact with the eBPF engine for rapid policy lookups.
Source IP Visibility: To maintain visibility into the original client, Cilium leverages Envoy to append the trusted client address to the X-Envoy-External-Address header. This is critical for applications that require accurate logging or IP-based access controls.
Advanced Features and Annotations: Cilium supports modern requirements like TLS Passthrough and standard Ingress Path Types. It also offers a variety of supported annotations, allowing for a transition from ingress-nginx that feels familiar yet operates with a more sophisticated eBPF-driven backend.
Info
Host Networking Mode: Since version 1.16, Cilium supports Host Networking mode for Ingress and Gateway API. This allows the Ingress Controller to be exposed directly on the host’s network interfaces, which is particularly useful in environments where a standard LoadBalancer service is not available.
Let’s jump on the feature Ingress, and see what we got with this ingressclass instead of nginx. For setup cilium-ingress, your kubernetes need to meet the requirement, including
Cilium must be configured with NodePort enabled, using nodePort.enabled=true or by enabling the kube-proxy replacement with kubeProxyReplacement=true
Cilium must be configured with the L7 proxy enabled using l7Proxy=true (default)
Kubernetes cluster need to support Service of LoadBalancer Type
After reviewing the helm-chart of Cilium, you can use this command below to open ingress controller
Cilium support 2 type of ingress loadbalancer mode, include shared and dedicated. Each of type have own benefit, for shared, we can reuse only one loadbalancer for every expose with ingress resources, instead dedicated will create a dedicated loadbalancer for the ingress. It means you will have a lot of loadbalancer
After deploy the feature ingress, you can double-check again with new ingressclass created and also service as Load Balancer Type
kubectl get pods -n kube-systemkubectl get service -n kube-systemkubectl get ingressclass
Let’s edit the example in previous and see what we got when calling via cilium-ingress instead nginx-ingress
kubectl edit -n default ingress test-ingress
Let’s do curl command again and see what we got, but first let off ingress-nginx in previous because it will cause the confuse with same load-balancer address with NodeIPAM. After that, you can try to reload again Operator and CNI to adapt with this ingress one more time
curl -i -H 'Host: ingress.local' http://<HOST-IP>
vagrant@k8s-master-machine:~$ curl -i -H 'Host: ingress.local' http://172.18.0.2HTTP/1.1 200 OKserver: envoydate: Mon, 02 Feb 2026 07:41:33 GMTcontent-type: text/htmlcontent-length: 615last-modified: Tue, 09 Dec 2025 18:28:10 GMTetag: "69386a3a-267"accept-ranges: bytesx-envoy-upstream-service-time: 0<!DOCTYPE html><html><head><title>Welcome to nginx!</title><style>html { color-scheme: light dark; }body { width: 35em; margin: 0 auto;font-family: Tahoma, Verdana, Arial, sans-serif; }</style></head><body><h1>Welcome to nginx!</h1><p>If you see this page, the nginx web server is successfully installed andworking. Further configuration is required.</p><p>For online documentation and support please refer to<a href="http://nginx.org/">nginx.org</a>.<br/>Commercial support is available at<a href="http://nginx.com/">nginx.com</a>.</p><p><em>Thank you for using nginx.</em></p></body></html>
Conclusion
Success
For the first post of this year, I am shifting my focus toward “slow technology”—taking the time to deep-dive into the core concepts I want to highlight during our kubewekend sessions. This post, originally from my archives, is an essential resource for those looking to delve into Kubernetes as a beginner. It is designed to help you build a solid foundation for your practice. I hope this article clarifies the complexities of Kubernetes networking and demonstrates exactly how Pods are exposed and advertised to external traffic within a cluster.
Quote
Happy New Year, everyone! I hope this post kicks off a year filled with exciting challenges and growth. I plan to dedicate more time to refining kubewekend, making it a platform where learning Kubernetes is accessible and intuitive. My goal is to help you integrate the technologies you love and build them into a robust platform that supports the future of your career. Let’s see what we can achieve together! If you enjoy the content, please consider dropping a star to follow the activity on GitHub - Kubewekend. Take care, and I’ll see you in the next kubewekend drop!


 Otherwise, you will have multiple options about Gateway and Ingress to expose your Services in Kubernetes. Please spent time to double-check couple of options below