Surprise! One More for the Year 🎁
Hi everyone! It is a great opportunity to be back with one more technical deep dive before the new year arrives. I know I mentioned in my last post that I was wrapping things up, but I managed to finish my experiments with ExternalDNS and couldn’t wait to share the results with you.
So, take a seat and let’s see what we’ve got. Welcome back for one last session before the holiday season truly begins!
ExternalDNS and what do you waiting for?
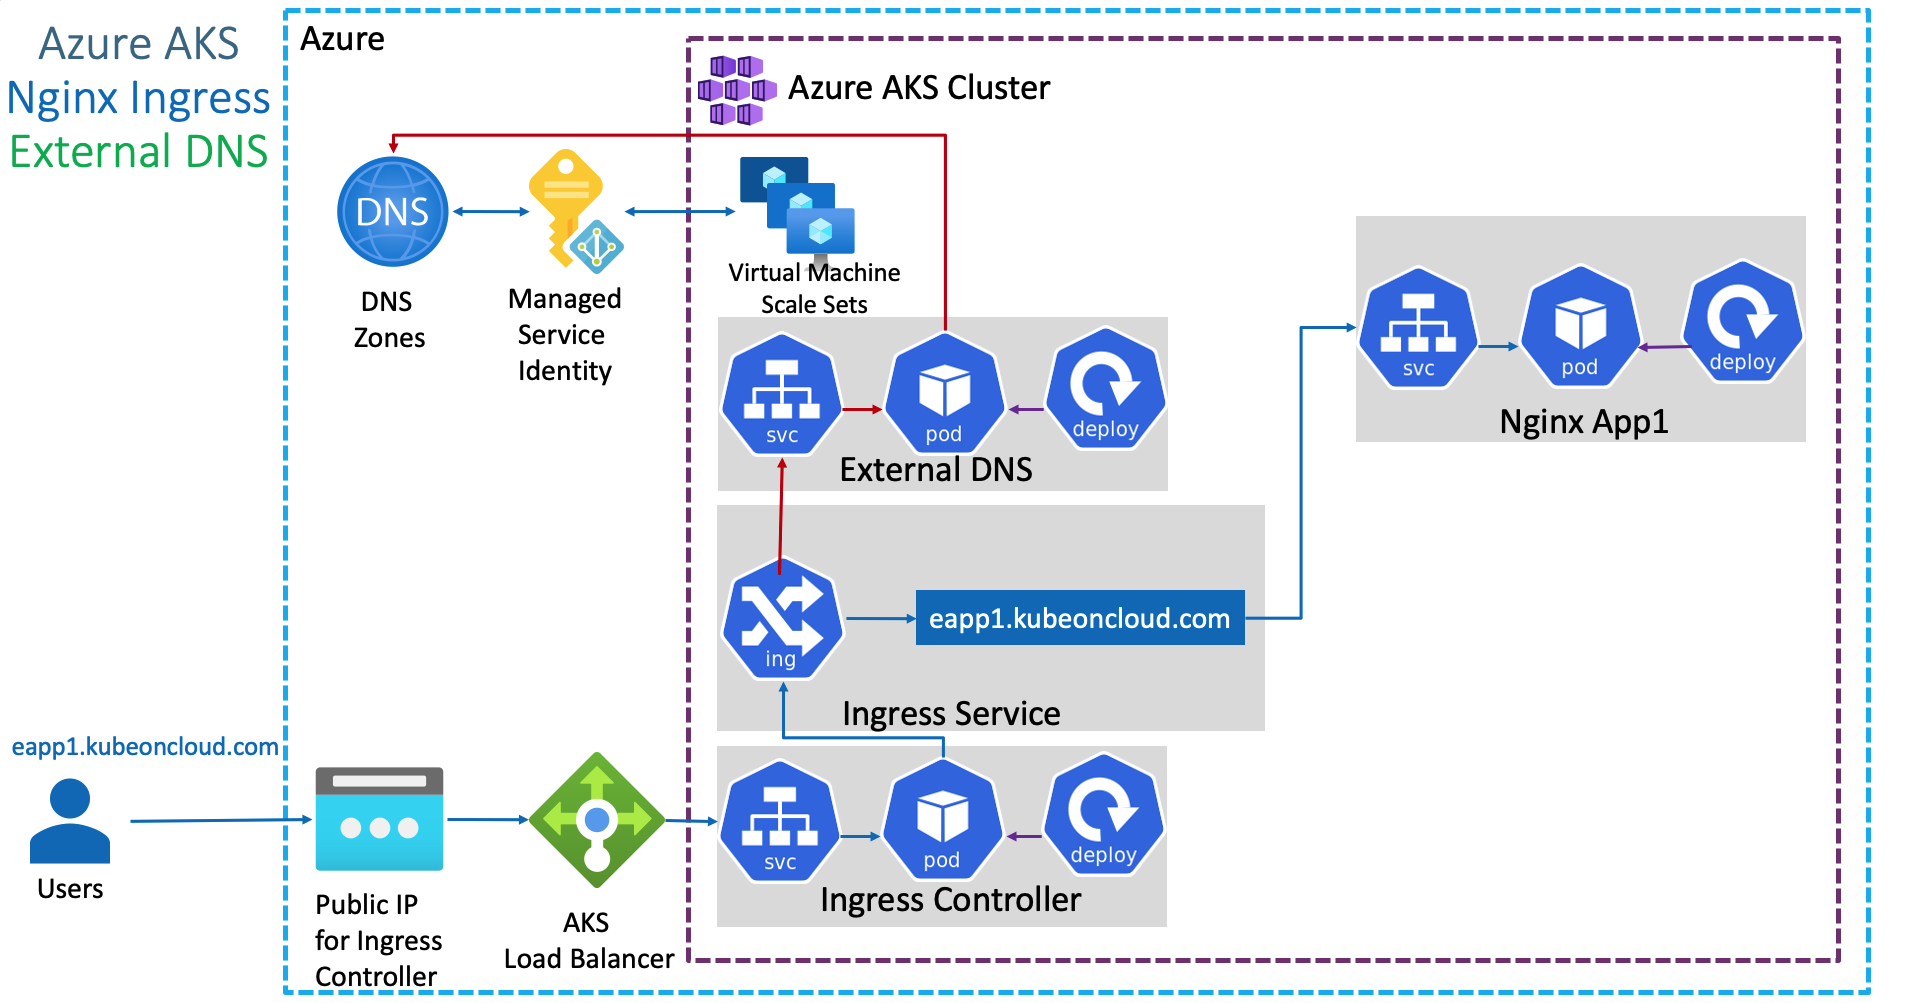
![]()
Following my previous article, The Story of Mine about Multi-Region Architecture which explored scaling services and optimizing user experience via low-latency strategies, Global Server Load Balancing (GSLB), and Multi-Cluster patterns, I am now shifting my focus to ExternalDNS.
In practice, I encountered significant authentication and integration challenges when attempting to sync Alibaba Cloud DNS with non-native Kubernetes distributions, such as RKE2 and K3s, via ExternalDNS. However, I successfully implemented a robust workaround using AWS Route53. Route53 proved highly compatible and widely supported for this target architecture. ExternalDNS serves as a force multiplier here, providing the seamless automation necessary to enhance the cloud-native maturity of any system.
Over the past year, as I delved deeper into the Kubernetes ecosystem, I developed a strong preference for building cloud-native solutions where tools operate as integrated components. This approach significantly reduces the friction of cross-stack compatibility. ExternalDNS, in particular, stands out; it is a powerful controller that automates DNS record management—the backbone of infrastructure—allowing engineering teams to offload substantial operational overhead.
Before diving into the core implementation, I would like to share a brief overview of current technological trends and my perspective on the specific challenges this solution is designed to resolve.
What is ExternalDNS?
Definition
ExternalDNS is a tools cloud-native to synchronizes exposed Kubernetes Service and Ingress with DNS Providers
ExternalDNS is an essential tool for teams that need to manage Kubernetes environments but lack direct, manual permissions to create and manage DNS records. It was specifically designed to alleviate this operational friction, offering native support for a wide range of providers, including Google Cloud DNS, AWS Route 53, Azure DNS, Cloudflare and moreover.
According to the FAQ and the Initial Design documentation, ExternalDNS was inspired by and built upon the foundations of several pioneering projects, including:
- Kops’ DNS Controller
- Zalando’s Mate
- Molecule Software’s route53-kubernetes
Today, ExternalDNS has become the industry standard for bridging the gap between Kubernetes and DNS management. Its growing popularity makes it the preferred choice for orchestrating DNS in Multi-Cluster architectures, enabling the centralization of record management into a single, unified workflow.
The objective of ExternalDNS is straightforward: it operates as a controller (Deployment) within the Kubernetes cluster and automates DNS record creation based on specific triggers:
- Parsing the
spec.rules.hostfield in an Ingress object. - Parsing the
spec.tls.hostsfield in an Ingress object. - Detecting the
external-dns.alpha.kubernetes.io/hostnameannotation on an Ingress object. - Detecting the
external-dns.alpha.kubernetes.io/hostnameannotation on atype: LoadBalancerService object.
By monitoring these two core Kubernetes resource types (Services and Ingresses), ExternalDNS automatically synchronizes DNS records and exposes applications. This creates a seamless developer experience where deploying an Ingress or Service automatically results in a live, reachable DNS endpoint on providers like AWS Route 53 or Google Cloud DNS.
Addressing the critical concern of “Does it mess up my DNS records?”, ExternalDNS implements a robust ownership mechanism to safeguard existing infrastructure. It ensures that it only modifies or deletes records it explicitly manages, leaving unmanaged records untouched. Currently, ExternalDNS supports the following registry methods for tracking record ownership:
- TXT Records: This is the default approach. Each DNS record created by ExternalDNS is accompanied by a shadow TXT record containing a unique identifier (ID). This metadata indicates that the record is managed by ExternalDNS and is safe to update or delete.
- DynamoDB: For AWS users, ExternalDNS allows storing ownership metadata in a DynamoDB table rather than cluttering the hosted zone with TXT records.
noopRegistry: This option passes metadata directly to the provider. However, for most providers, this means metadata is not persisted, effectively disabling ownership tracking.- AWS Service Discovery: Metadata is stored within AWS Cloud Map (Service Discovery). This registry is exclusive to the
aws-sdprovider.
The Expectation of Mine
The idea for this approach solidified when I was looking for a way to prove that DNS records could be managed externally without compromising security or architectural integrity. ExternalDNS stood out as the only solution that offered both stability and broad industry recognition. For my requirements, ExternalDNS is a mission-critical component; it enables me to architect a DNS layer that handles intelligent failover and multi-cluster routing with absolutely zero manual configuration.
I have extensively researched and referenced the following materials, which confirm that ExternalDNS is the right choice for high-availability and disaster recovery scenarios:
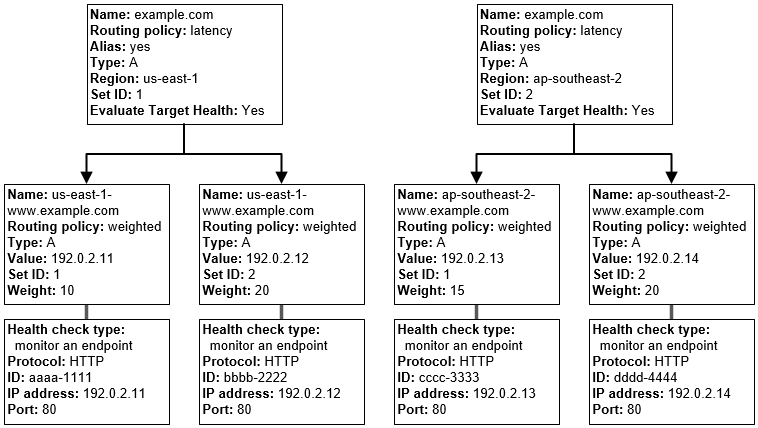
- Automated Lifecycle Management: The ability to sync the Kubernetes API state with public DNS providers ensures that the DNS records are always a “source of truth” for the current infrastructure.
- Multi-Cluster Centralization: It allows for a unified DNS management strategy where multiple clusters can report to a single hosted zone while maintaining record isolation via ownership IDs.
- Operational Efficiency: By offloading DNS updates to a controller, engineering teams can focus on application logic rather than manual infrastructure tickets.
These resources gave me the confidence that ExternalDNS can scale alongside a complex Multi-Region architecture while ensuring seamless service discovery for every new endpoint.
- Dev.to - Automated DNS Record Management for Kubernetes Resources using external-dns and AWS Route53
- Dev.to - Securing external-dns: Encrypting TXT Registry Records
- AWS - How to Set Up ExternalDNS with Amazon EKS: Automating DNS Management for Kubernetes Services and Ingresses
- AWS - Unified Service Discovery with Amazon ECS and Kubernetes
- Infralovers - Amazon EKS with ALB and External DNS for Route 53
- EKS Workshop - ExternalDNS
- ExternalDNS - AWS
- Youtube - External DNS for Kubernetes
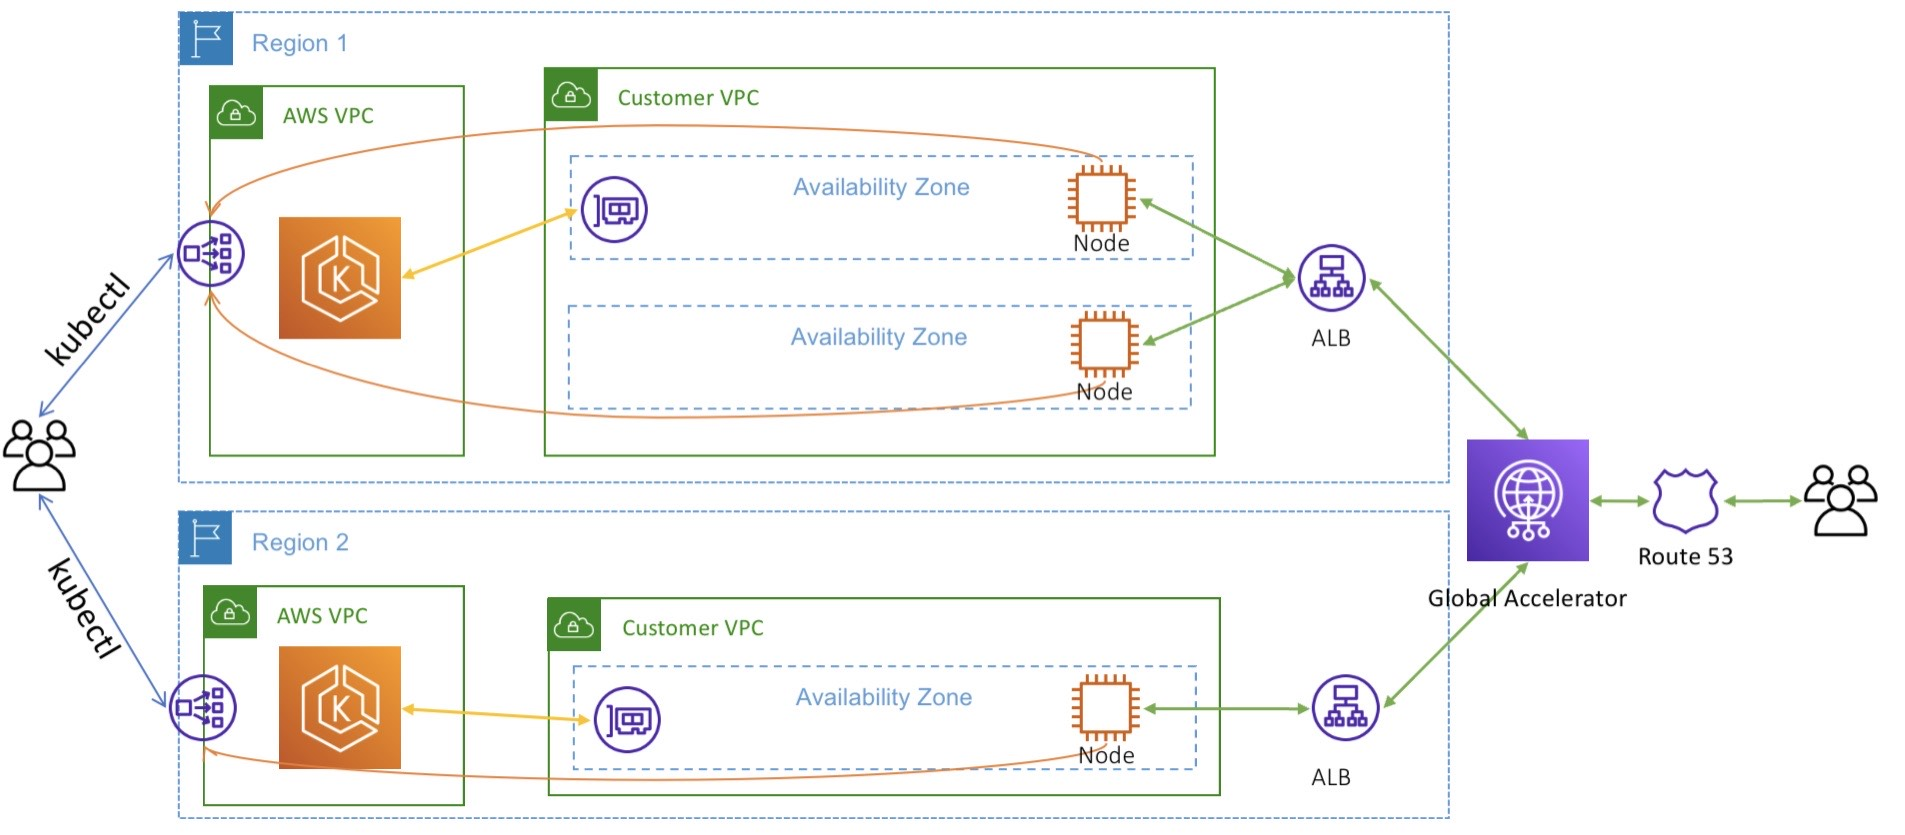
AWS Route 53 stands out as one of the most mature environments for ExternalDNS integration. It serves as a foundational choice for building a centralized DNS management layer, specifically because ExternalDNS was architected with native support for this platform.
Choosing AWS Route 53 as the central “source of truth” allows for a unified management strategy across both EKS (Amazon Elastic Kubernetes Service) and Non-EKS clusters (such as RKE2, K3s, or on-premises deployments). This centralized approach provides several architectural advantages:
- Cross-Cluster Centralization: You can manage records for multiple clusters from a single AWS account, significantly simplifying governance.
- Native Integration: ExternalDNS leverages AWS IAM roles (via IRSA for EKS or static credentials for non-EKS) to securely automate record lifecycle management.
- Hybrid Cloud Ready: By using Route 53, you bridge the gap between cloud-native workloads and legacy infrastructure, ensuring consistent name resolution across the entire organization.
- Intelligent Routing: It allows you to leverage Route 53’s advanced features, such as latency-based routing or health-check-driven failover, directly through Kubernetes annotations.
By implementing this, the DNS layer effectively becomes a “self-healing” component of your infrastructure. Whether a service is joining a cluster in us-east-1 or a private data center, ExternalDNS ensures it is discoverable with zero manual intervention.
Get Ready for Lab Time
Alright not waiting to long, I think we can start the POC to validate what I describe above with the AWS Route53 and multi-cluster. But first of all, I want to show what spec I got, including
- RKE2: Run
nginxapplication with content RKE2 and expose them vianginx-ingress - K3s: Run
nginxapplication with content K3s and expose them viatraefik-ingress - 2x Publish IP: These one will different address but resolve same domain to let Route53 distribute traffic to them via ALB following
Round Robinalgorithm
Preparation Experiment Environment
To testing for fair result, I will positive prepare two different content of each cluster to see the weight before we change the routing strategies to ensure low-latency with geo-location routing
I wil choose nginx for easier customize and easier to deploy that with static content, here what I prepare and apply for each cluster
To change content, I prefer to use configmap to modify the default output of nginx deployment
apiVersion: v1
kind: ConfigMap
metadata:
  name: nginx-content
  namespace: default
data:
  index.html: |
    <html>
    <head><title>Cluster Discovery</title></head>
    <body>
      <h1>Hello from the Cluster!</h1>
      <p>This application is currently running on: <b>RKE2 Cluster</b></p>
    </body>
</html>apiVersion: apps/v1
kind: Deployment
metadata:
name: nginx-distro-check
labels:
app: nginx
spec:
replicas: 1
selector:
matchLabels:
app: nginx
template:
metadata:
labels:
app: nginx
spec:
containers:
- name: nginx
image: nginx:latest
ports:
- containerPort: 80
volumeMounts:
- name: html-volume
mountPath: /usr/share/nginx/html/index.html
subPath: index.html
volumes:
- name: html-volume
configMap:
name: nginx-contentNote
You can do the same stuff with other cluster, exchange content and we can calculate the weight when DNS routing traffic to specific target.
You can apply these manifest to build the experiment application before we setup the ExternalDNS controller
kubectl apply -f configmap.yaml
kubectl apply -f deployment.yaml
kubectl expose deployment nginx-distro-check --port 80 --target-port 80
Statistic Credential for Authentication Route53
When working with AWS, you must always ensure that your IAM entity has the appropriate permissions. Amazon Route 53 is no exception; you require a policy that grants access to Route 53 and permits the modification of records within the service. You can refer to the following documentation to define the necessary permissions for this POC:
- ExternalDNS - AWS IAM Policy
- ExternalDNS - AWS IAM Permissions with ABAC
- ExternalDNS - AWS Further Improvements
For demonstration purposes and ease of use in a playground environment, I will create and apply the basic policy defined by ExternalDNS. This policy provides sufficient privileges to list, read, and modify records in any hosted zone within AWS Route 53.
Warning
For enhanced security in production, you should implement the principle of least privilege by restricting permissions to specific Route 53 Hosted Zones used by your Kubernetes cluster.
{
  "Version": "2012-10-17",
  "Statement": [
    {
      "Effect": "Allow",
      "Action": [
        "route53:ChangeResourceRecordSets",
        "route53:ListResourceRecordSets",
        "route53:ListTagsForResources"
      ],
      "Resource": [
        "arn:aws:route53:::hostedzone/*"
      ]
    },
    {
      "Effect": "Allow",
      "Action": [
        "route53:ListHostedZones"
      ],
      "Resource": [
        "*"
      ]
    }
  ]
}
Because this policy doesn’t exist, so you need to create it by yourself and assume them for any user which typically spent for ExternalDNS Service. For example, I will create this policy with name ExternalDNSUpdater and assume them for user externaldns-user

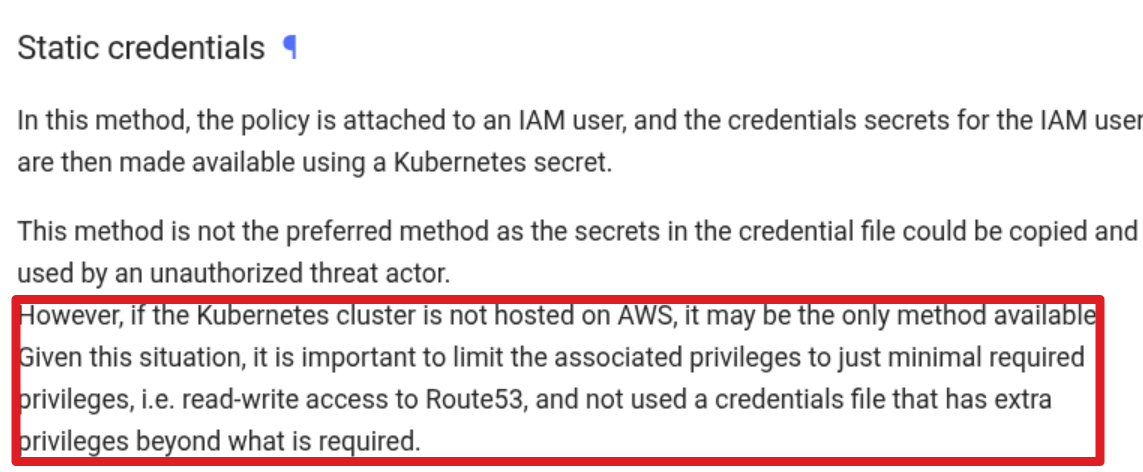
For the non EKS cluster, you are not available to use techniques related with service account to assume this policies so why I assume it via additional user and create static credential with AWS_KEY provided. But for more secure and if you use the EKS for main Kubernetes Cluster, you can follow these instruction to build the efficiency module
- ExternalDNS - Node IAM Role
- ExternalDNS - IAM Roles for Service Accounts 🌟 (More Secure - Recommended)
But for my case-study, I will use to use ExternalDNS - Static Credentials to mount this credential into non’t EKS cluster and it will allow for ExternalDNS pod to remote modify the record via this credentials. You can easily get one for yourself at Security credentials tab for each user in AWS Account
When you create and grab your key in AWS Console, you will have one time to save this access key, so create a file and save them with format
[default]
aws_access_key_id=AWS_ACCESS_KEY_ID
aws_secret_access_key=AWS_SECRET_ACCESS_KEY
Now create the secrets in location where you want to deploy ExternalDNS, I prefer to use it with external-dns for distinguish with it other, so here what action to perform
kubectl create namespace external-dns
kubectl create secret generic external-dns \
	--namespace external-dns --from-file /path/to/credentials/file
Success
Alright, you are already doing whole stuff for prepare to start ExternalDNS deployment with pre-define IAM Authentication via Static Credentials
Deploy ExternalDNS and Validate
For deploying ExternalDNS in target-cluster, you will several ways to handle this stuff, but following documentation, you can deploy it via Helm - ExternalDNS and it’s official way to create the ExternalDNS easily but if you want to deloy via manifest
But I will recommend to use helm with official value definition, first of all, you need to read the default values.yaml before setup the aws provider version
provider:
  name: aws
env:
  # Set default external region (even if global), but for prevent error
  - name: AWS_DEFAULT_REGION
    value: us-east-1
  - name: AWS_SHARED_CREDENTIALS_FILE
    value: /etc/aws/credentials/poc_credentials # the key credentials already define with key `poc_credentials`
extraVolumes:
  - name: aws-credentials
    secret:
      secretName: external-dns
extraVolumeMounts:
  - name: aws-credentials
    mountPath: /etc/aws/credentials
    readOnly: true
Now apply the helm deployed with the specific customize values.yaml with command
# Add helm repo
helm repo add external-dns https://kubernetes-sigs.github.io/external-dns/ && helm repo update

# Install external-dns with values.yaml
helm upgrade --install external-dns external-dns/external-dns --values values.yaml --namespace external-dns
Alright, when you validate the pod running with log show your the domain host_zone, that is good signal for ExternalDNS to work with your domain in Route53. Now, you can validate by create routing the traffic to your application via Ingress
kubectl create ingress nginx-distro-check \
--rule=externaldns-nginx.yourroute53.com/\*=nginx-distro-check:80 --class nginx \
--dry-run=client --namespace=default --output yaml | kubectl apply -f -;
Now you can double-check the log of external-dns and you can see that will announce your record is created in Route53
 Now try to request into the application via DNS already define, and the result is failure because ExternalDNS will map the Local IP address for your A record, it means you can access externally. Therefore, I try to modify it to Public IP and this case study will be work at all
curl externaldns-nginx.yourdomain.route53

<html>
<head><title>Cluster Discovery</title></head>
<body>
  <h1>Hello from the Cluster!</h1>
  <p>This application is currently running on: <b>RKE2 Cluster</b></p>
</body>
</html
Note
The challenge still here with private IP and I need to manual change it’s via Route53 portal, but it’s also proven the record able to create via ExternalDNS for your cluster
Advantaged configuration with ExternalDNS
To resolve these issues and optimize your setup, ExternalDNS provides a wide array of configuration options via annotations. These allow you to tailor DNS management to specific use cases—such as handling multiple DNS providers or improving synchronization efficiency. I have curated several resources that break down these advanced configurations in detail. Some of these community guides offer a more practical and accessible approach compared to the official documentation
- ExternalDNS - Available Annotations: The comprehensive list of supported annotations for various providers.
- DevOpsCube - ExternalDNS Step-by-Step Guide: A practical breakdown of IAM roles and multi-provider setups.
- Avesha Docs - Advanced Annotation Examples: Detailed examples for TTL, target overrides, and weighted records. 🌟 (Recommended)
These are couple of annotations that impact a lot for your configuration
external-dns.alpha.kubernetes.io/acces:privateorpublic⇒ The option lets you define what type of address should be set when your cluster have bothprivateanpublicfor Service and Ingressexternal-dns.alpha.kubernetes.io/hostname: The option lets you define the hostname for your service or ingress, especially it can propose for Single or Multiple domains and it will separate by comma,in multiple domains. You can use this for define host instead of specific insidespec.rules.hostof ingress for example, but usually use it with service in mode Load Balancer
apiVersion: v1
kind: Service
metadata:
  annotations:
external-dns.alpha.kubernetes.io/hostname: sub.domain.tld,sub2.domain.tld,sub3.domain.tldexternal-dns.alpha.kubernetes.io/target: This option lets you define the target of your domain assignment, it will truly important in the situation if you want to specific multiple IP Addresses, or CNAME record for domain resolution. In the situation, the list have more than one record, you can use comma,to separate between of them
apiVersion: networking.k8s.io/v1
kind: Ingress
metadata:
  annotations:
    external-dns.alpha.kubernetes.io/hostname: sub.domain.tld
external-dns.alpha.kubernetes.io/target: 12.34.56.78,90.12.34.56external-dns.alpha.kubernetes.io/ttl: This options let you define TTL (Time To Live) value for your DNS record, it’s typically important for you to define the strategies failover and support the routing for upgrading the IP address behind the DNS. The value is setting in seconds (s)
apiVersion: v1
kind: Service
metadata:
  annotations:
    external-dns.alpha.kubernetes.io/hostname: sub.domain.tld
    external-dns.alpha.kubernetes.io/ttl: "60"
Info
With these options, I can refine my old configuration to new one which clarify the expectation for define Public IP and CNAME type for DNS Record.
apiVersion: networking.k8s.io/v1
kind: Ingress
metadata:
  name: nginx-distro-check
  annotations:
    external-dns.alpha.kubernetes.io/target: test.anotherdomain.com # CNAME Record, A or AAAA are available
    external-dns.alpha.kubernetes.io/ttl: "60"
    external-dns.alpha.kubernetes.io/access: public
spec:
  ingressClassName: nginx
  rules:
  - host: externaldns-nginx.yourroute53.com
    http:
      paths:
      - backend:
          service:
            name: nginx-distro-check
            port:
              number: 80
        path: /
        pathType: Prefix
status:
  loadBalancer: {}
Not only stop by simple configuration, AWS Route53 and ExternalDNS allow you to do more complicate configuration for your requirement, such as Weight, Routing Policies or Health Check. You can double-check these documentation for more evidence
Note
For setting any routing policies, you need to define the annotation
external-dns.alpha.kubernetes.io/set-identifierwith unique identity for distinguishing between your policies from multi-cluster
Warning
Remembering, you will have permission to choose only one of these policies to setup for your domain
Warning
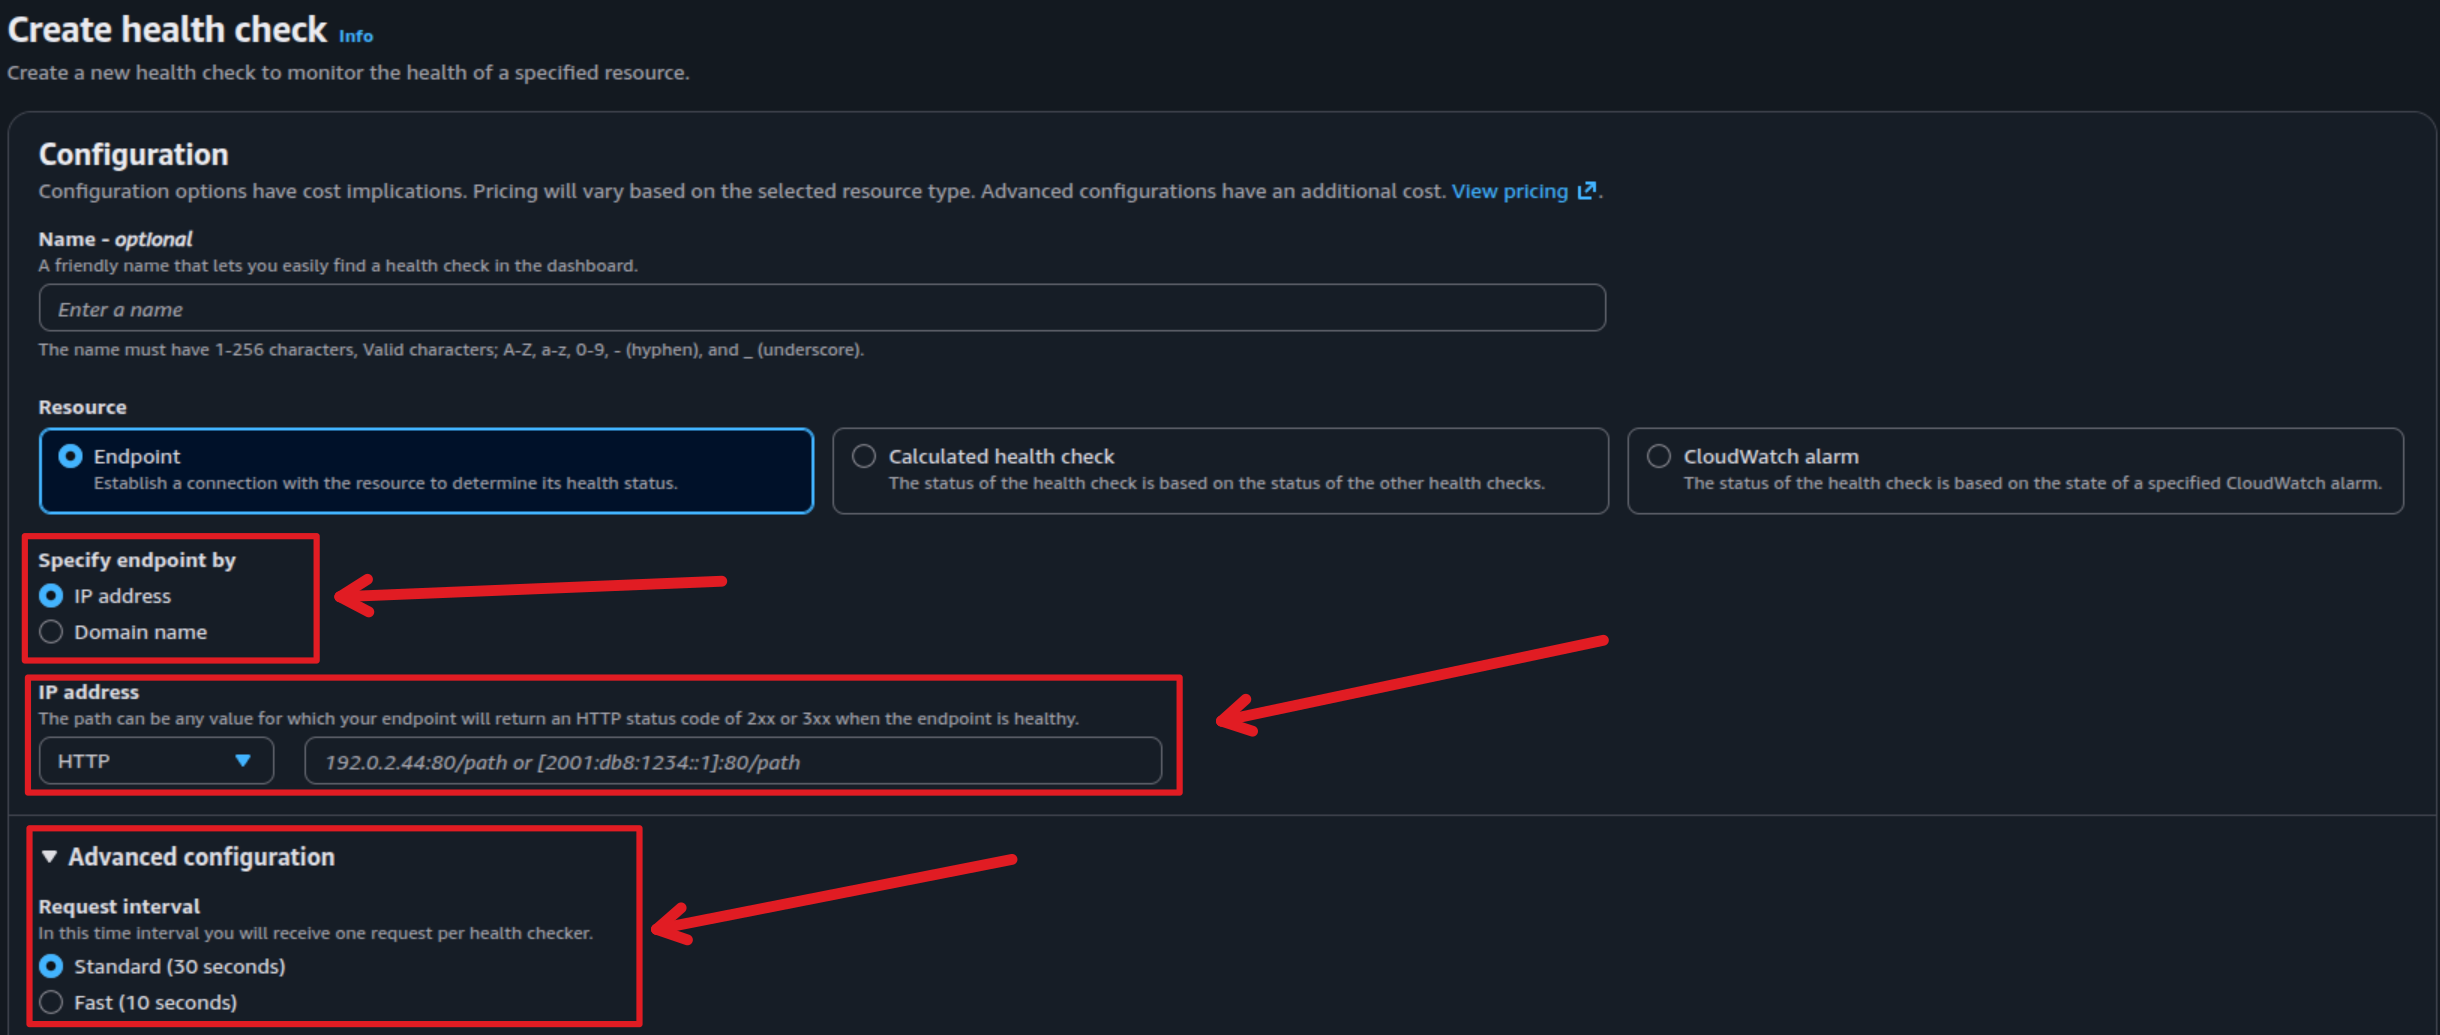
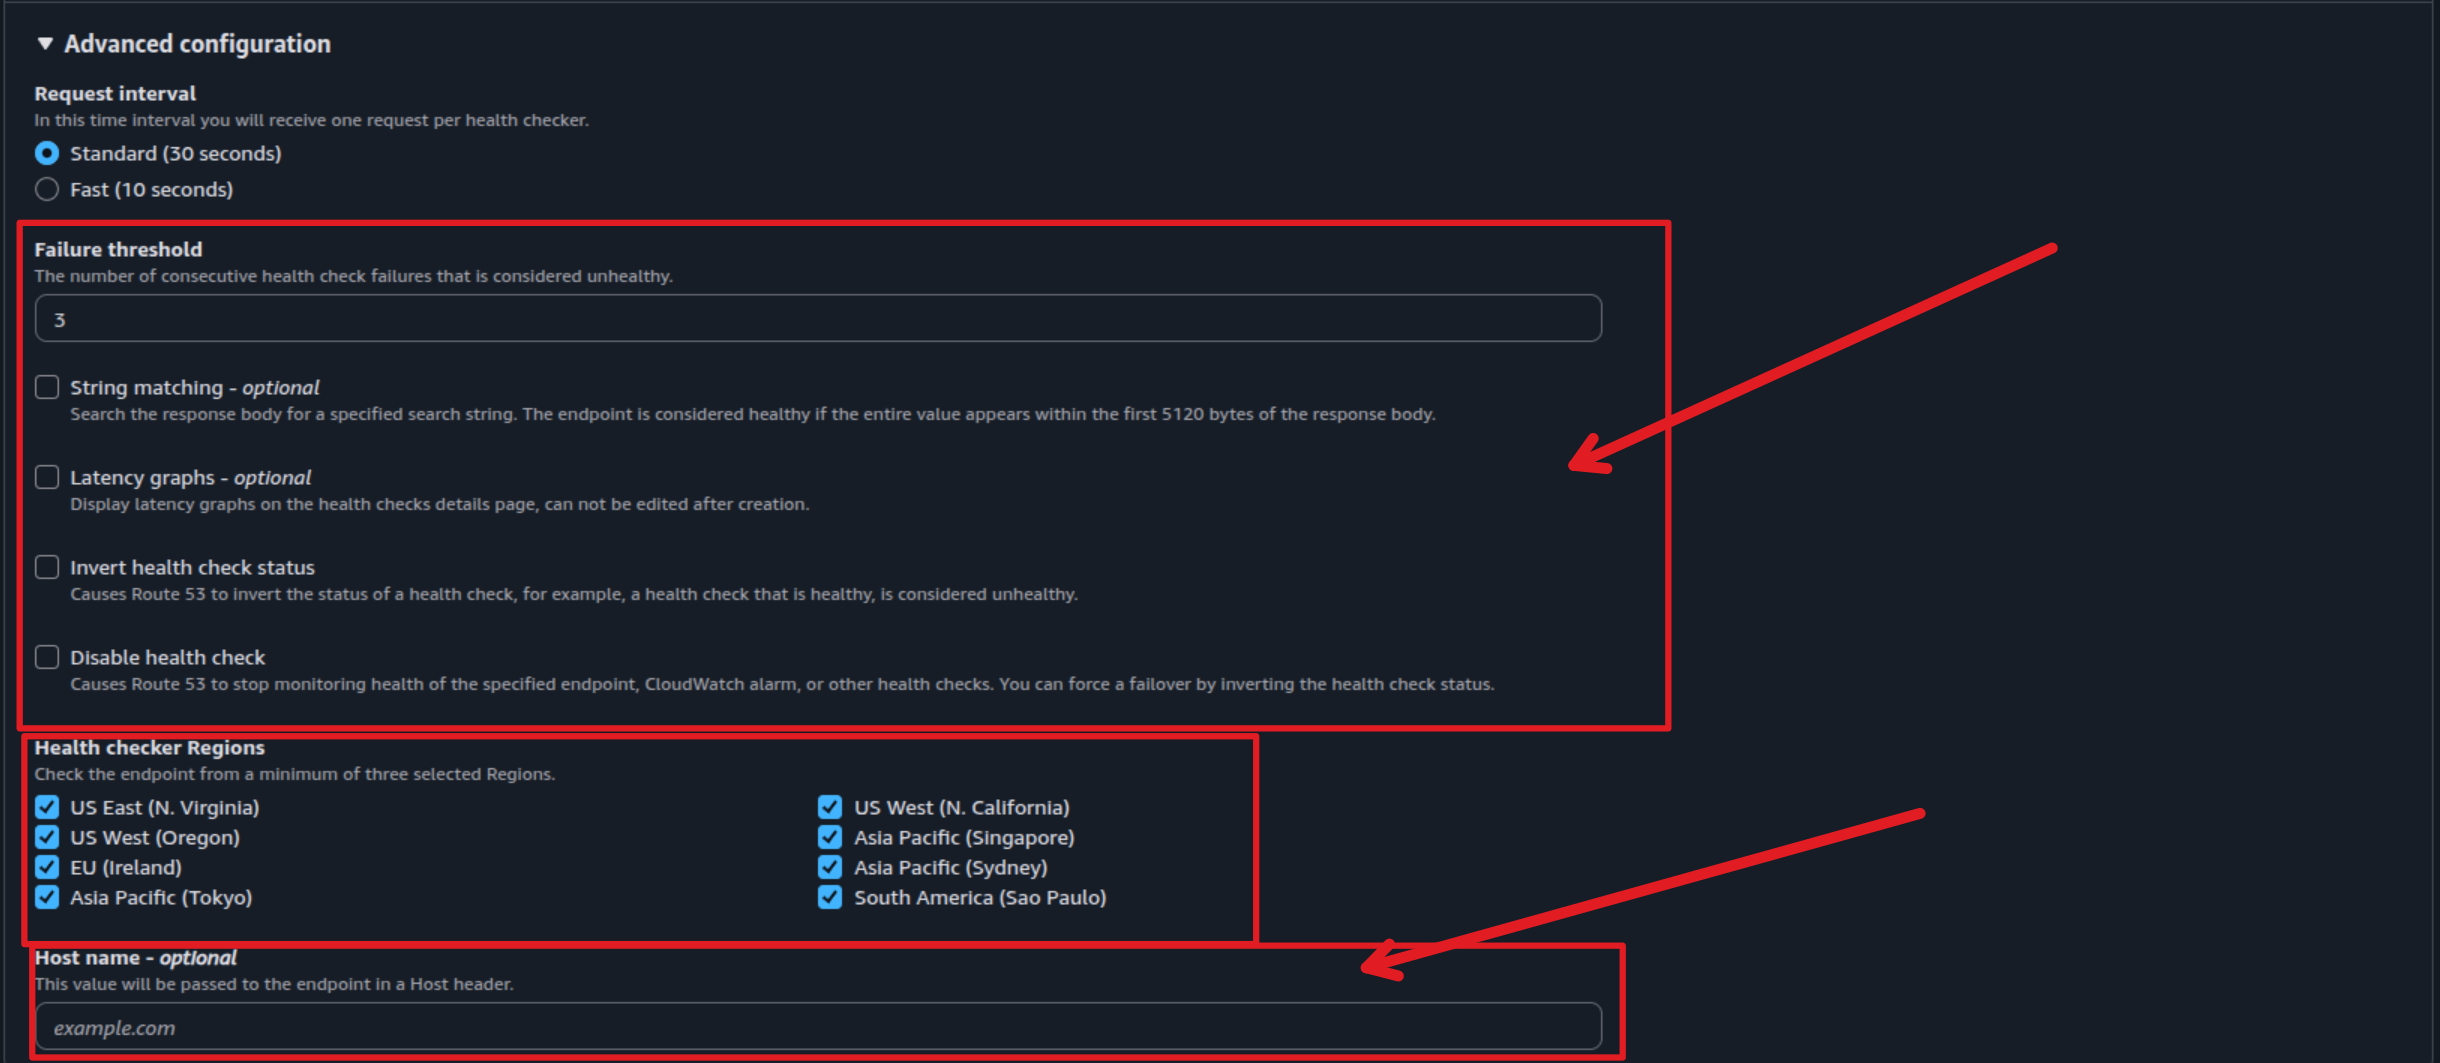
For Health Check Template, ExternalDNS doesn’t support you to create them, but you allow to setup the exists template via
health-check-idwith annotationexternal-dns.alpha.kubernetes.io/aws-health-check-id: <health-check-id>
Currently, Route53 support several options routing for defining your strategies traffic
- Simple (Default): Use the standard DNS Functionality
- Weighted: Use to set the portion of traffic send to each resources
- Geolocation: Use to route traffic to your resources based on the geographic location of your users
- Latency: Use to route traffic to your resources in the AWS Region that provides the lowest latency. It must be in AWS Regions
- IP-based: Use to route traffic to resources based on their IP Addresses that you know
- Failover: Use to route traffic to a resource when the resource is healthy or to a different resource when the first resource is unhealthy.
- Multivalue answer: Use to configure Route53 to return multiple value such as IP addresses for your web servers, in response to DNS queries.
- Geoproximity: Use to configure Route53 route traffic to your resources based on the geographic location of your users and your resources
Let’s walkthrough detail for several configurations base on the strategies support by ExternalDNS
For Blue/Green or A/B Testing Strategy
Note
You can use Weighted Records with annotation
external-dns.alpha.kubernetes.io/aws-weightfor setting the portion
Cluster A Manifest
metadata:
  annotations:
    external-dns.alpha.kubernetes.io/hostname: app.example.com
    external-dns.alpha.kubernetes.io/set-identifier: cluster-a-record
    external-dns.alpha.kubernetes.io/aws-weight: "80"
Cluster B Manifest
metadata:
  annotations:
    external-dns.alpha.kubernetes.io/hostname: app.example.com
    external-dns.alpha.kubernetes.io/set-identifier: cluster-b-record
    external-dns.alpha.kubernetes.io/aws-weight: "20"
For Latency-Based Routing (Multi-Region) Strategy
Note
You can use Latency-based routing with annotation
external-dns.alpha.kubernetes.io/aws-regionwith different identities for multiple-regions. This option will support AWS Regions, e.g:us-east-1,ap-southeast-1,ap-east-1, and moreover. Check more at AWS - AWS Regions
Cluster A Manifest
metadata:
  annotations:
    external-dns.alpha.kubernetes.io/hostname: global-app.example.com
    external-dns.alpha.kubernetes.io/set-identifier: us-east-endpoint
    external-dns.alpha.kubernetes.io/aws-region: us-east-1
Cluster B Manifest
metadata:
  annotations:
    external-dns.alpha.kubernetes.io/hostname: global-app.example.com
    external-dns.alpha.kubernetes.io/set-identifier: ap-southeast-endpoint
    external-dns.alpha.kubernetes.io/aws-region: ap-southeast-1
For Failover Routing Strategy
Note
You can use FailOver Routing with annotation
external-dns.alpha.kubernetes.io/aws-failoverto define which one is primary and secondary for failover strategies
Cluster A Manifest (Primary)
metadata:
  annotations:
    external-dns.alpha.kubernetes.io/hostname: blog.example.com
    external-dns.alpha.kubernetes.io/set-identifier: primary-site
    external-dns.alpha.kubernetes.io/aws-failover: PRIMARY
Cluster B Manifest (Secondary)
metadata:
  annotations:
    external-dns.alpha.kubernetes.io/hostname: blog.example.com
    external-dns.alpha.kubernetes.io/set-identifier: secondary-site
    external-dns.alpha.kubernetes.io/aws-failover: SECONDARY
For Geolocation Routing Strategy
Note
You can use Geolocation-based routing with several annotation to specific what location you want to routing for base on Geographic, including
external-dns.alpha.kubernetes.io/aws-geolocation-continent-code: A two-letter continent code. See more at AWS - GetGeoLocation. Eithercontinentorcountrymust be specifiedexternal-dns.alpha.kubernetes.io/aws-geolocation-country-code: A two-character country code or*to indicate a default resource record set.external-dns.alpha.kubernetes.io/aws-geolocation-country-code: (Optional) A subdivision code for a country.
For Geoproximity Routing Strategy
Note
You can use Geoproximity routing with several annotations define the detail geography for your request, including
external-dns.alpha.kubernetes.io/aws-geoproximity-region: A AWS region where the resource is present.external-dns.alpha.kubernetes.io/aws-geoproximity-local-zone-group: A AWS local zone group where the resource is present. See more at AWS - Available Local Zonesexternal-dns.alpha.kubernetes.io/aws-geoproximity-coordinates: Specifylatitudeandlongitudefor routing traffic to non-AWS resources.external-dns.alpha.kubernetes.io/aws-geoproximity-bias: Route more traffic or less traffic to the resource by specifying a value ranges between -90 to 90. See more at AWS - Geoproximity Routing
Otherwise, you will have option to choose with Multi-value answer Strategy with annotation external-dns.alpha.kubernetes.io/aws-multi-value-answer
The Experiment Multi-Cluster with ExternalDNS

I will need extra time to set up an additional Kubernetes cluster (using K3s for a multi-cluster environment) to properly conduct this experiment. Since there is limited documentation online regarding a standardized approach for this strategy, I must manually test and identify the challenges and solutions involved in managing ExternalDNS within a Multi-Cluster Architecture.
The primary challenges to address in this POC include:
- Record Ownership: Preventing multiple ExternalDNS instances from conflicting while managing the same Hosted Zone.
txt-owner-idStrategy: Assigning a unique owner ID to each cluster to clearly distinguish which cluster manages a specific DNS record.- Cross-Cluster Shared Records: Addressing scenarios where multiple clusters must contribute to a single record, such as for Weighted Round-Robin (WRR) or Failover routing policies.
Multi-Cluster Configuration
To operate ExternalDNS following concept multi-cluster, you need to prevent the conflict about Ownership of record. It’s truly important for my expectation when adapt the single endpoint for same services but deploy as replicated in multi-cluster. If you don’t have plan for tackling, the ExternalDNS will automatically update your record as infinite loop.
As you remembering, ExternalDNS support us the registry for ownership record, via txt, dynamodb, aws-sd or noop option, and this parameter is exactly what you need to define for distinguish your ExternalDNS Deployment in different cluster. By default, txt registry will be choose, but their identity is not setup and it will set for default because value is Null, Read more at GitHub - ExternalDNS Values.yaml. Therefore, you need to change these record to define what ExternalDNS
Warning
You need only choose one of
txtPrefixortxtSuffixfor definition
txtOwnerId: Specify an identifier for this instance of ExternalDNS when using a registry other thannooptxtPrefix: Specify a prefix for the domain names of TXT records created for thetxtregistry. Mutually exclusive withtxtSuffixtxtSuffix: Specify a suffix for the domain names of TXT records created for thetxtregistry. Mutually exclusive withtxtPrefix
With these configuration, you will allow to distinguish the same DNS Record with different txt ownership, and to handle this stuff, you can able to add more configuration to values.yaml file of each cluster and redeploy ExternalDNS again
provider:
  name: aws
env:
  # Set default external region (even if global), but for prevent error
  - name: AWS_DEFAULT_REGION
    value: us-east-1
  - name: AWS_SHARED_CREDENTIALS_FILE
    value: /etc/aws/credentials/poc_credentials # the key credentials already define with key `poc_credentials`
extraVolumes:
  - name: aws-credentials
    secret:
      secretName: external-dns
extraVolumeMounts:
  - name: aws-credentials
    mountPath: /etc/aws/credentials
    readOnly: true
txtOwnerId: "k3s-cluster" # Change for RKE2
txtPrefix: "k3s" # Change for RKE2
helm upgrade --install external-dns external-dns/external-dns --values values.yaml --namespace external-dnsNote
Your ExternalDNS will work again each cluster and now you are available to define the new record. Because your permission doesn’t allow DELETE action in host-zone, so that why you need delete your old record created by ExternalDNS in the previous step
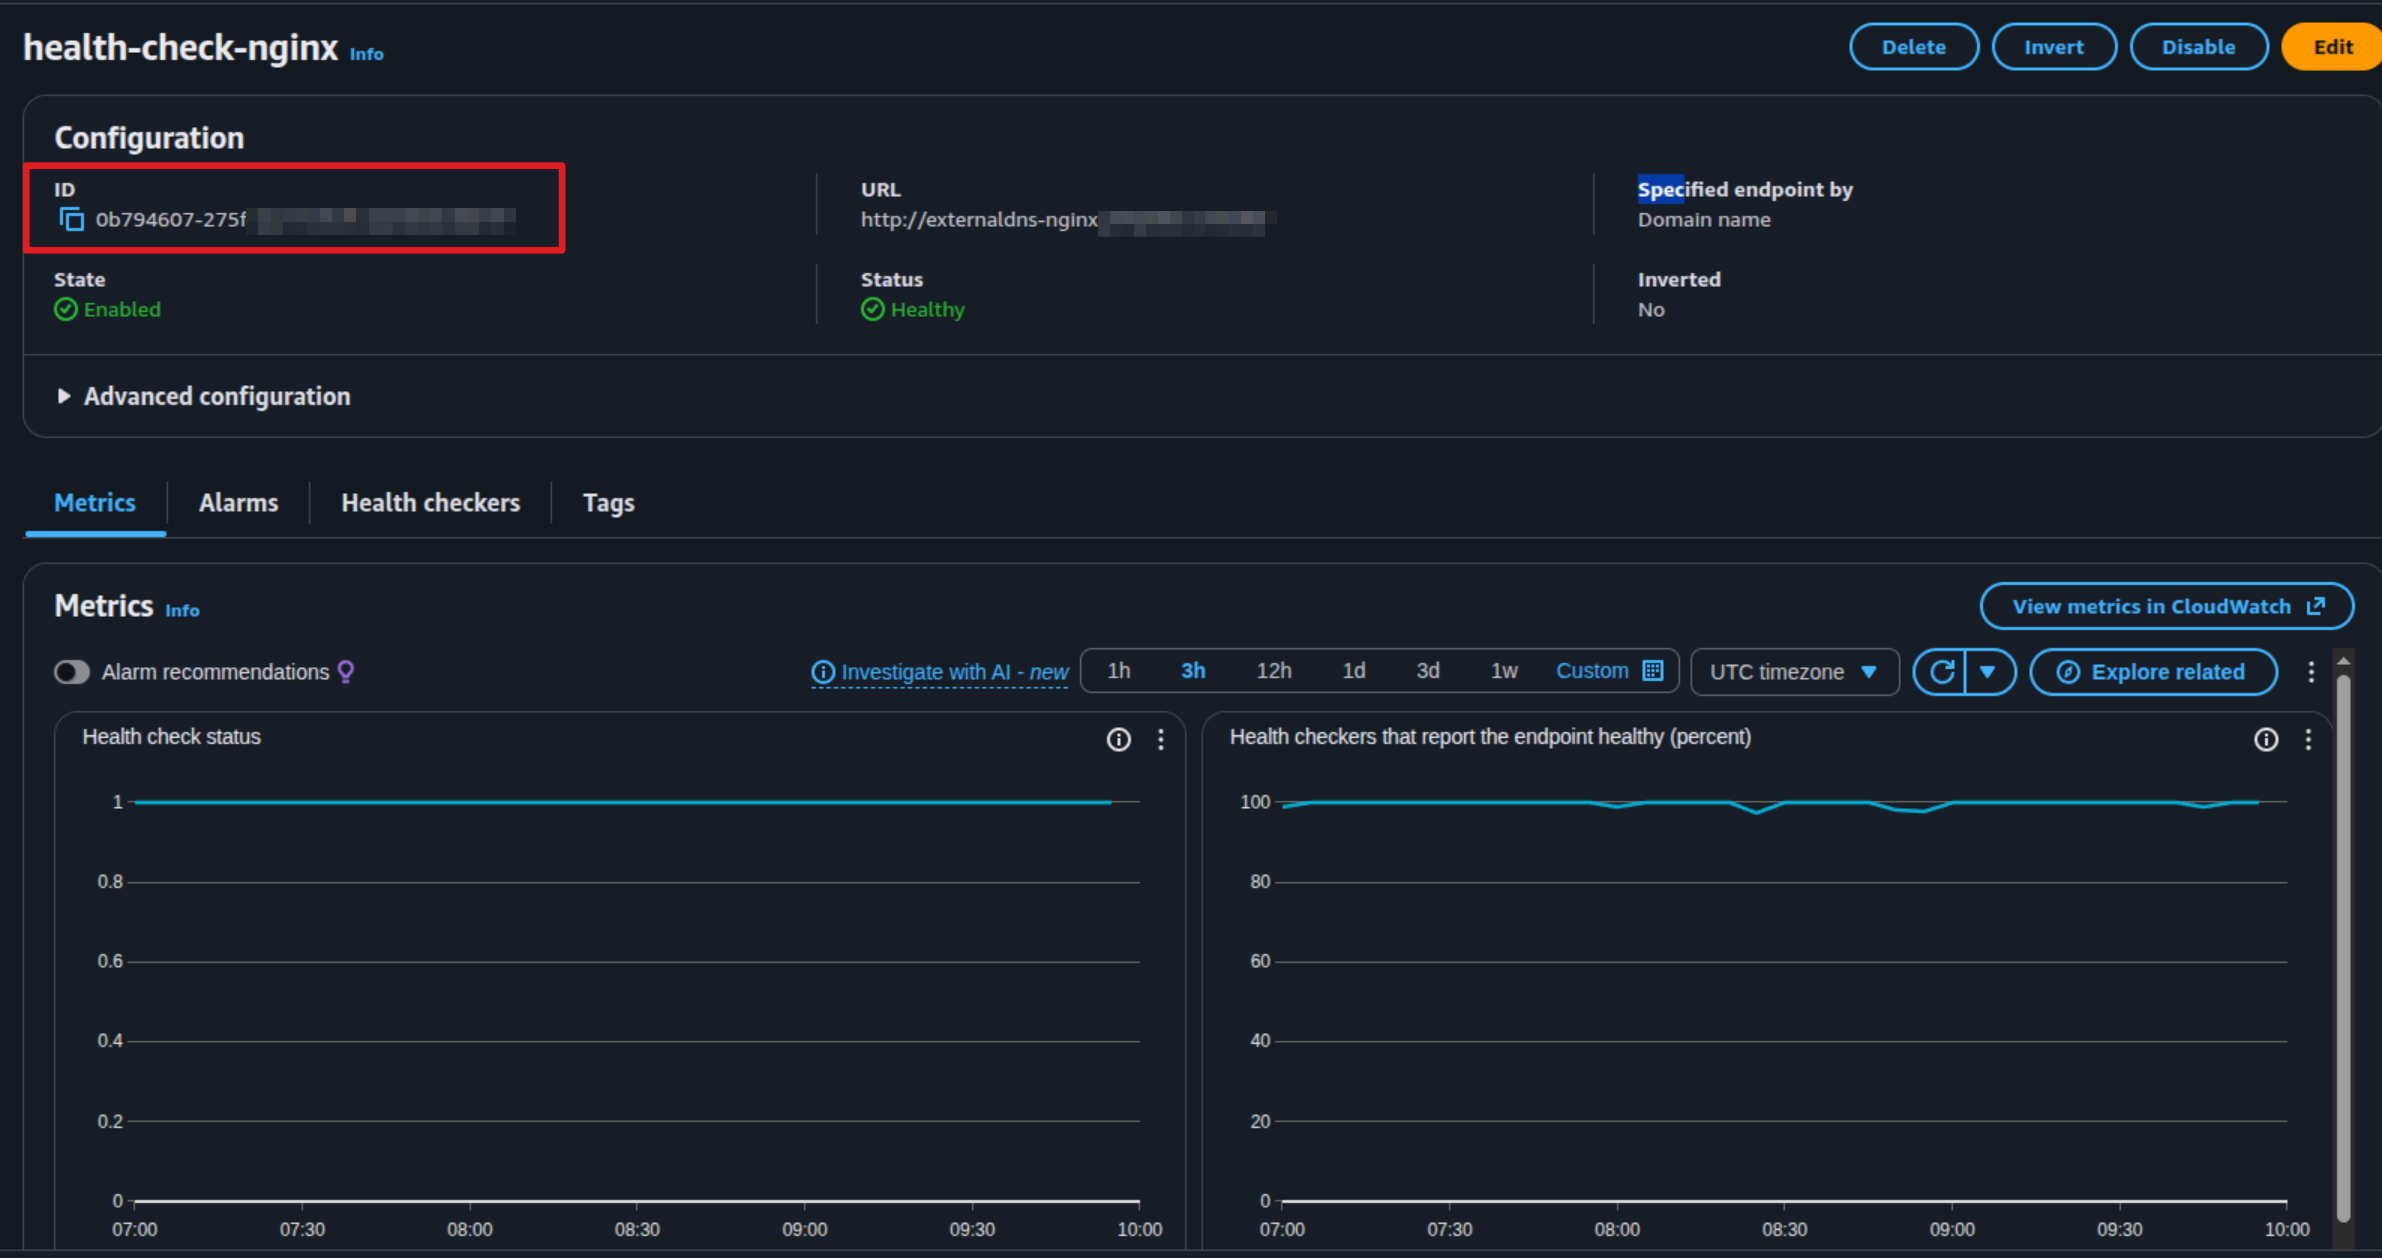
Alright ! After that, you need to create health-check template in Route53 to define the health-check functionality for your application
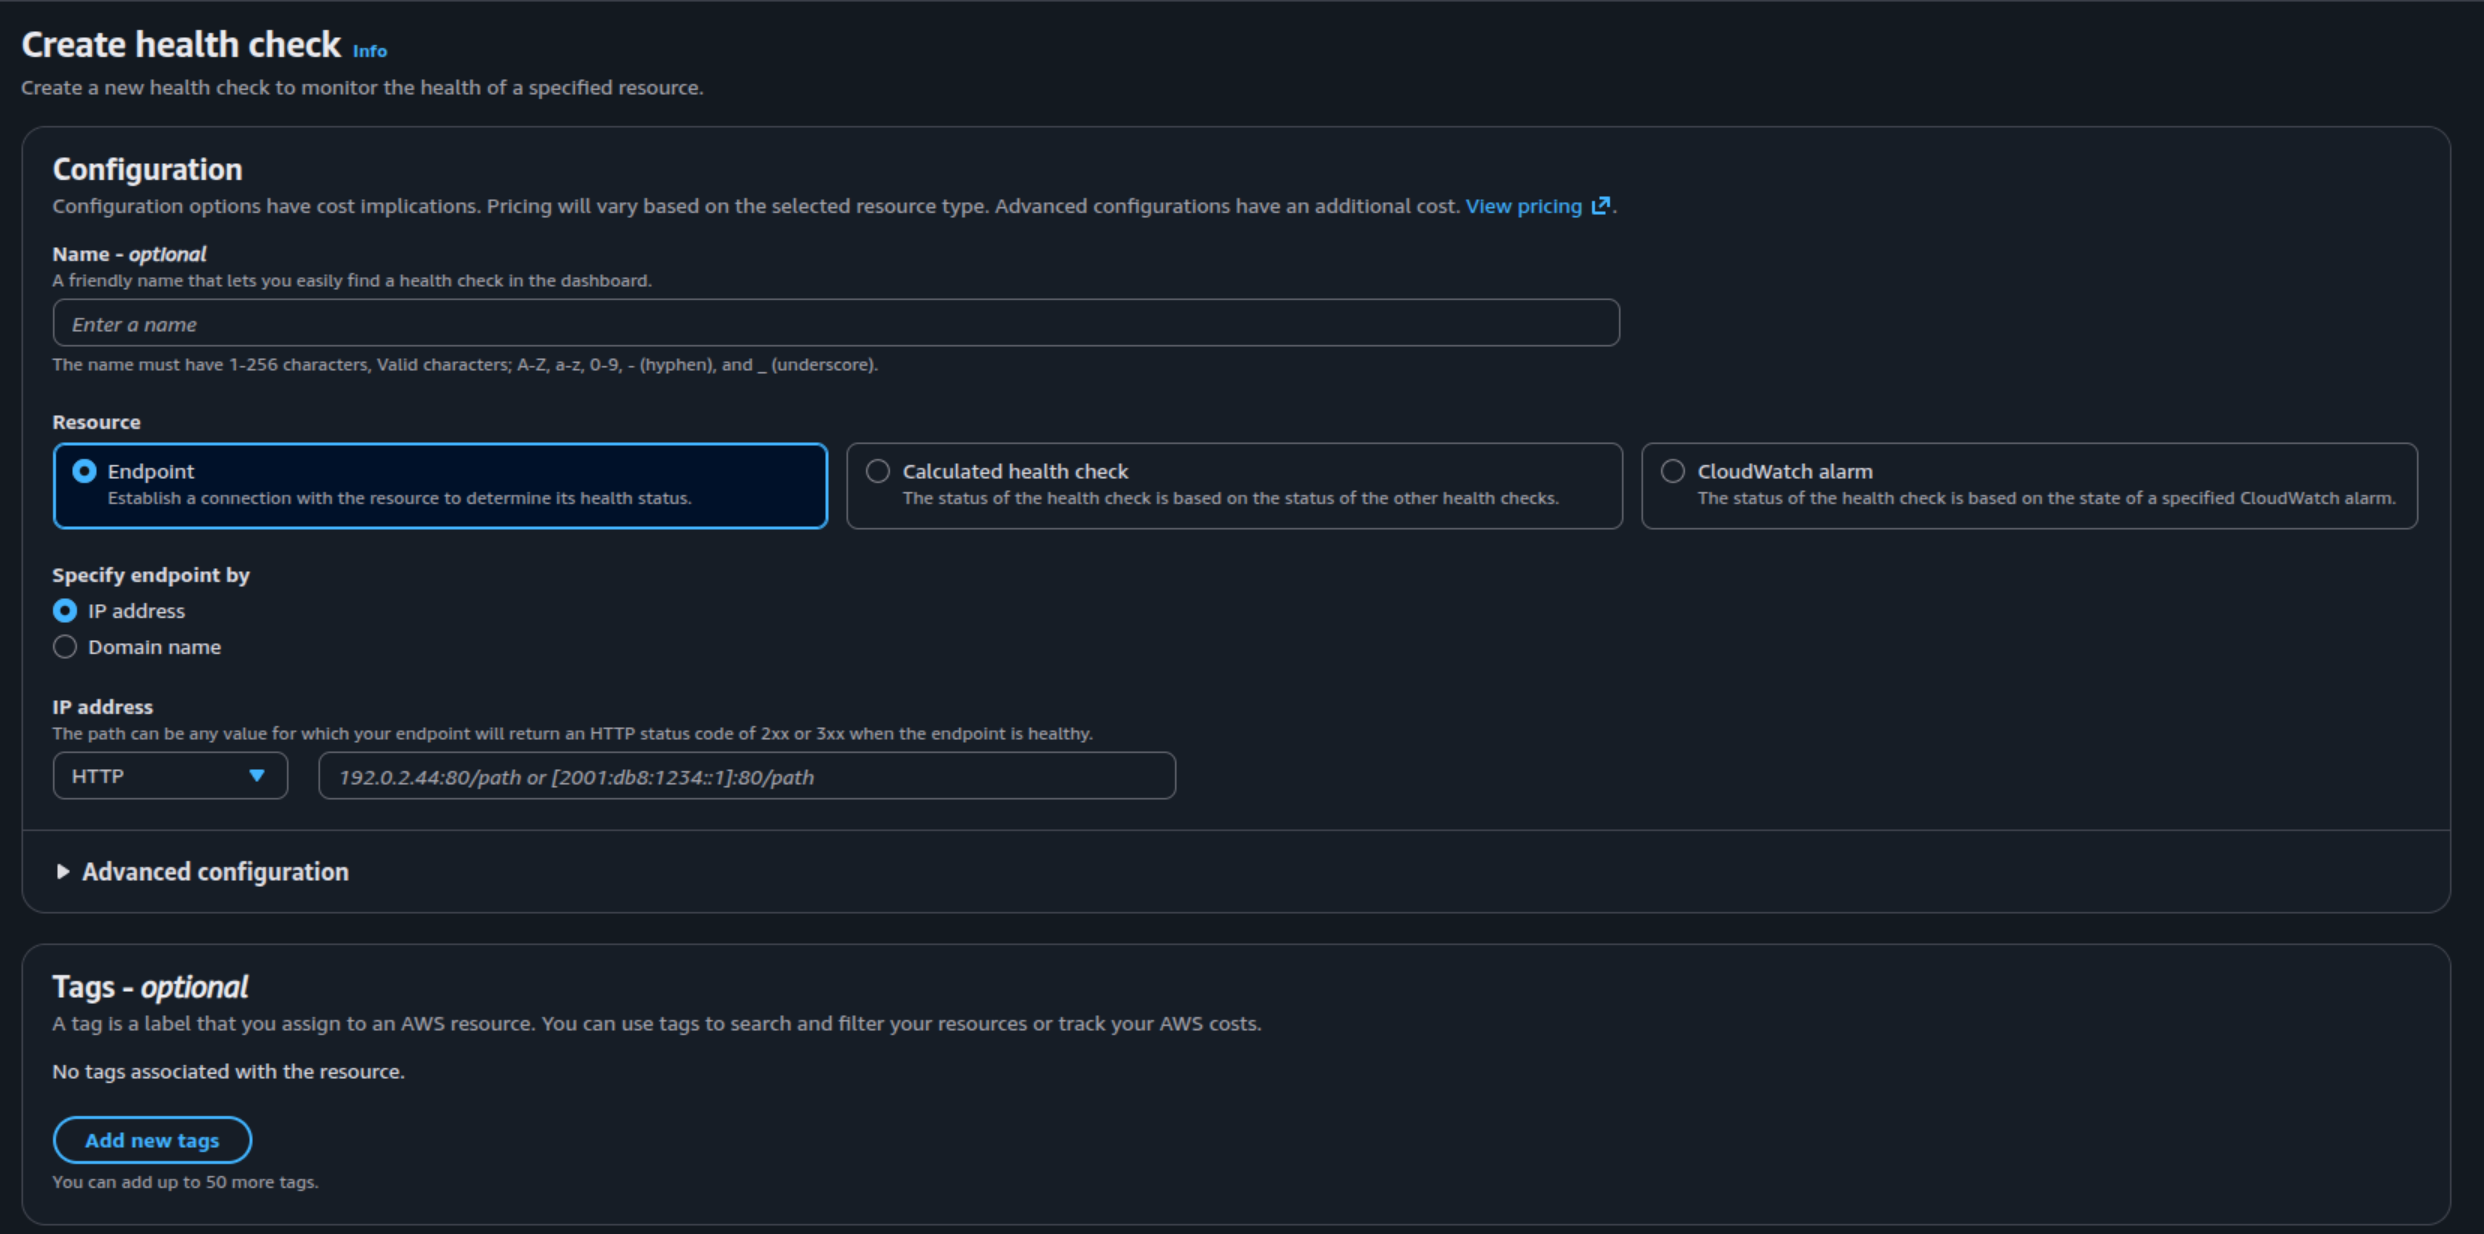
After you define the template, you can get the health-check-id to submit into ExternalDNS annotations
Now turn back to your terminal, and modify ingress.yaml file which you already define in previous
Warning
Because of RRSET policy, AWS or any DNS Management won’t allow you to create same record with different type CNAME and A for example. Here why you need to change your target to all CNAME or A instead of using different, and therefore I decide to move to IPv4 (A Type)
To adapt the intelligent DNS resolution with Route53, I prefer to choose Latency-Based Routing with annotation aws-region with define two main location for RKE2 and K3s cluster with spec
- RKE2: Setup with region HongKong ⇒
ap-east-1 - K3s: Setup with region Singapore ⇒
ap-southeast-1
Cluster RKE2 Manifest
apiVersion: networking.k8s.io/v1
kind: Ingress
metadata:
  name: nginx-distro-check
  annotations:
    external-dns.alpha.kubernetes.io/target: 203.171.xx.xx
    external-dns.alpha.kubernetes.io/ttl: "60"
    external-dns.alpha.kubernetes.io/access: public
    external-dns.alpha.kubernetes.io/set-identifier: glb-externaldns-rke2-latency
    external-dns.alpha.kubernetes.io/aws-region: ap-east-1
    external-dns.alpha.kubernetes.io/aws-health-check-id: 0b794607-275f-xxxx-xxxx
spec:
  ingressClassName: nginx
  rules:
  - host: externaldns-nginx.yourroute53.com
    http:
      paths:
      - backend:
          service:
            name: nginx-distro-check
            port:
              number: 80
        path: /
        pathType: Prefix
status:
  loadBalancer: {}
Cluster K3s Manifest
apiVersion: networking.k8s.io/v1
kind: Ingress
metadata:
  name: nginx-distro-check
  annotations:
    external-dns.alpha.kubernetes.io/target: 5.223.xx.xx
    external-dns.alpha.kubernetes.io/ttl: "60"
    external-dns.alpha.kubernetes.io/access: public
    external-dns.alpha.kubernetes.io/set-identifier: glb-externaldns-k3s-latency
    external-dns.alpha.kubernetes.io/aws-region: ap-southeast-1
    external-dns.alpha.kubernetes.io/aws-health-check-id: 0b794607-275f-xxxx-xxxx
    traefik.ingress.kubernetes.io/router.entrypoints: web
spec:
  ingressClassName: traefik
  rules:
  - host: externaldns-nginx.yourroute53.com
    http:
      paths:
      - backend:
          service:
            name: nginx-distro-check
            port:
              number: 80
        path: /
        pathType: Prefix
status:
  loadBalancer: {}
Applying these manifests, it will create record in Route53 and allow the two instance ExternalDNS can create record with different owner

To testing the correct routing, you can try to connect each cluster and run curl and dig command to the target
# Show the Target IP when your host resolve the DNS
dig @8.8.8.8 +short A externaldns-nginx.yourroute53.com

# Show the content of cluster base on your host resolve the DNS
curl http://externaldns-nginx.yourroute53.com
Failover and Latency Reducing
For applying failover and latency with Route53, it’s kinda complex because it doesn’t have great visualization like Alibaba Cloud DNS, and also you need to consider to build the combination them with ExternalDNS. Because you can’t create both strategies FailOver and Latency Based Routing with Route53, and if you can, you will manage complexity routing strategies, and this thing wasn’t my expectation
Before go to directly with ExternalDNS solution, I recommend you double-check these contents to imagine what next action you need to handle for combine these routing algorithms
- AWS - Types of Amazon Route 53 health checks
- AWS - How Amazon Route 53 determines whether a health check is healthy
- AWS - Creating, updating, and deleting health checks
- AWS - Configuring DNS failover
Warning
If you read these documentation,
health-checkis one the important stuff for your failover strategies, but you need to confirm that work before enable them to prevent the corruption for association DNS record

With the previous health-check-template, you will encounter problems because your health-check target is domain, it means that will follow the Route53 Latency Base Routing and some zone will hit to 503 error, and some zone will normal and here is the point which I don’t like as well.
Therefore, same as Alibaba Cloud DNS, you can define IP record instead Domain record for health-check and it will fit with Kubernetes DNS resolved by Ingress Controller. You can define Host: ingress-host-name Header with the record as IPv4 and IPv6, it’s legit useful and now you can able to create health-check for service inside the specific cluster
Note
Remembering the value you are setup that effect directly to the DNS Resolution and health-check your application

With combination, I don’t want create any complex so I will use individual and find what strategies suitable for my situation, so I choose
- Failover Routing
- Latency Based Routing
I have write couple of small script to help-you check the the target resolution of each strategy routing and also provide a evidence to see failover ⇒ recovery ⇒ downtime ⇒ recovery ⇒ normal base on the pre-define test-case in Alibaba Cloud DNS
- State 1: Initial Baseline - Both domains/endpoints are available and healthy.
- State 2: Failover Test (Intelligent DNS Target) - Manually cause downtime for the server currently being resolved by the intelligent DNS configuration.
- State 3: Double Failure - Cause downtime for the remaining available server/endpoint.
- State 4: Recovery Check (Non-Intelligent Target) - Bring the second server back online.
- State 5: Full Recovery Check - Bring the server targeted by intelligent DNS back online, checking for a return to the stable, preferred state.
Script for testing Latency and Target
#!/bin/bash

# Configuration
URL_HOST=$1
ITERATIONS=${2:-10}
DNS_SERVER=$3
LOG_FILE="cluster_efficiency.log"

if [ -z "$URL_HOST" ]; then
    echo "Usage: $0 <target-url> [requests] [dns-server-ip]"
    echo "Example: $0 https://myapp.example.com 20 8.8.8.8"
    exit 1
fi

# Extract domain for dig (removes http/https and paths)
DOMAIN=$(echo "$URL_HOST" | sed -e 's|^[^/]*//||' -e 's|/.*$||')

echo "=== Multi-Cluster Routing Test: $(date) ===" > "$LOG_FILE"
echo "Target: $URL_HOST | Domain: $DOMAIN" >> "$LOG_FILE"
[[ -n "$DNS_SERVER" ]] && echo "Testing against DNS: $DNS_SERVER" >> "$LOG_FILE"
echo "---------------------------------------------------------" >> "$LOG_FILE"

echo "Testing $ITERATIONS requests. Results saving to $LOG_FILE..."

for ((i=1; i<=ITERATIONS; i++)); do
    echo "--- REQUEST #$i ---" >> "$LOG_FILE"

    # 1. LOG DIG OUTPUT
    echo "[DNS RESOLUTION]" >> "$LOG_FILE"
    if [ -n "$DNS_SERVER" ]; then
        DIG_OUT=$(dig "@$DNS_SERVER" "$DOMAIN" +noall +answer +stats)
        TARGET_IP=$(echo "$DIG_OUT" | grep -E 'IN[[:space:]]+A' | awk '{print $NF}' | head -n1)
    else
        DIG_OUT=$(dig "$DOMAIN" +noall +answer +stats)
        TARGET_IP=$(echo "$DIG_OUT" | grep -E 'IN[[:space:]]+A' | awk '{print $NF}' | head -n1)
    fi
    echo "$DIG_OUT" >> "$LOG_FILE"

    # 2. LOG SERVER RESPONSE
    echo -e "\n[SERVER RESPONSE]" >> "$LOG_FILE"
    if [ -n "$TARGET_IP" ]; then
        # Force curl to use the IP we just resolved to simulate a fresh DNS hit
        RESPONSE=$(curl -sL --resolve "$DOMAIN:80:$TARGET_IP" --resolve "$DOMAIN:443:$TARGET_IP" "$URL_HOST")
        echo "Connected to: $TARGET_IP" >> "$LOG_FILE"
    else
        RESPONSE=$(curl -sL "$URL_HOST")
        echo "Warning: DNS Resolution failed, using system default." >> "$LOG_FILE"
    fi
    echo "$RESPONSE" >> "$LOG_FILE"
    echo -e "\n" >> "$LOG_FILE"

    printf "."
done

# --- SUMMARY ANALYSIS ---
echo -e "\n\n--- Traffic Distribution Summary ---"
RKE2_COUNT=$(grep -ic "rke2" "$LOG_FILE")
K3S_COUNT=$(grep -ic "k3s" "$LOG_FILE")
TOTAL=$((RKE2_COUNT + K3S_COUNT))

if [ $TOTAL -gt 0 ]; then
    echo "RKE2 (Cluster A): $RKE2_COUNT ($(( RKE2_COUNT * 100 / TOTAL ))%)"
    echo "K3s  (Cluster B): $K3S_COUNT ($(( K3S_COUNT * 100 / TOTAL ))%)"
else
    echo "No 'rke2' or 'k3s' strings found in responses. Check log for details."
fi
echo "---------------------------------------------------------"
#!/bin/bash

# Configuration
URL_HOST=$1
ITERATIONS=${2:-10}
DNS_SERVER=$3
LOG_FILE="cluster_efficiency.log"

if ! command -v bc &> /dev/null; then
    echo "Error: 'bc' is required. Install via 'sudo apt install bc'."
    exit 1
fi

if [ -z "$URL_HOST" ]; then
    echo "Usage: $0 <target-url> [requests] [dns-server-ip]"
    exit 1
fi

DOMAIN=$(echo "$URL_HOST" | sed -e 's|^[^/]*//||' -e 's|/.*$||')

# Counters and Accumulators
TOTAL_DNS_TIME=0
TOTAL_HTTP_TIME=0
RKE2_COUNT=0
K3S_COUNT=0

echo "=== Multi-Cluster Routing Test: $(date) ===" > "$LOG_FILE"
echo "Target: $URL_HOST" >> "$LOG_FILE"
echo "---------------------------------------------------------" >> "$LOG_FILE"

echo "Testing $ITERATIONS requests. Results saving to $LOG_FILE..."

for ((i=1; i<=ITERATIONS; i++)); do
    # 1. DNS RESOLUTION
    if [ -n "$DNS_SERVER" ]; then
        DIG_OUT=$(dig "@$DNS_SERVER" "$DOMAIN" +noall +answer +stats)
    else
        DIG_OUT=$(dig "$DOMAIN" +noall +answer +stats)
    fi

    DNS_TIME=$(echo "$DIG_OUT" | grep "Query time" | awk '{print $4}')
    TARGET_IP=$(echo "$DIG_OUT" | grep -E 'IN[[:space:]]+A' | awk '{print $NF}' | head -n1)
    TOTAL_DNS_TIME=$((TOTAL_DNS_TIME + DNS_TIME))

    # 2. HTTP REQUEST (Capturing Full Body)
    # We save the full body to a temporary file to ensure we don't lose data
    TEMP_BODY=$(mktemp)
    if [ -n "$TARGET_IP" ]; then
        HTTP_TIME_SEC=$(curl -sL -w "%{time_total}" --resolve "$DOMAIN:80:$TARGET_IP" --resolve "$DOMAIN:443:$TARGET_IP" "$URL_HOST" -o "$TEMP_BODY")
    else
        HTTP_TIME_SEC=$(curl -sL -w "%{time_total}" "$URL_HOST" -o "$TEMP_BODY")
    fi

    HTTP_TIME_MS=$(echo "$HTTP_TIME_SEC * 1000" | bc)
    TOTAL_HTTP_TIME=$(echo "$TOTAL_HTTP_TIME + $HTTP_TIME_MS" | bc)

    # 3. CLUSTER DETECTION (Look for markers in the full body)
    RESPONSE_BODY=$(cat "$TEMP_BODY")
    IDENTIFIED_CLUSTER="Unknown"

    if echo "$RESPONSE_BODY" | grep -qi "rke2"; then
        IDENTIFIED_CLUSTER="RKE2"
        ((RKE2_COUNT++))
    elif echo "$RESPONSE_BODY" | grep -qi "k3s"; then
        IDENTIFIED_CLUSTER="K3s"
        ((K3S_COUNT++))
    fi

    # 4. LOGGING PER REQUEST
    {
        echo "--- REQUEST #$i ---"
        echo "Timestamp: $(date '+%Y-%m-%d %H:%M:%S')"
        echo "DNS Time: ${DNS_TIME}ms | IP: $TARGET_IP"
        echo "HTTP Time: ${HTTP_TIME_MS}ms | Cluster: $IDENTIFIED_CLUSTER"
        echo "Full Body:"
        echo "$RESPONSE_BODY"
        echo -e "---------------------------------------------------------\n"
    } >> "$LOG_FILE"

    rm "$TEMP_BODY"
    printf "Request %d: DNS %sms | HTTP %sms | Cluster: %s\n" "$i" "$DNS_TIME" "$HTTP_TIME_MS" "$IDENTIFIED_CLUSTER"
done

# --- FINAL SUMMARY ---
AVG_DNS=$(echo "scale=2; $TOTAL_DNS_TIME / $ITERATIONS" | bc)
AVG_HTTP=$(echo "scale=2; $TOTAL_HTTP_TIME / $ITERATIONS" | bc)
TOTAL_DETECTED=$((RKE2_COUNT + K3S_COUNT))

echo -e "\n================= PERFORMANCE SUMMARY ================="
echo "Total Iterations: $ITERATIONS"
echo "Avg DNS Resolution: ${AVG_DNS} ms"
echo "Avg HTTP Response:   ${AVG_HTTP} ms"
echo "-------------------------------------------------------"
echo "Traffic Distribution:"
if [ $TOTAL_DETECTED -gt 0 ]; then
    echo "  - RKE2: $RKE2_COUNT ($(( RKE2_COUNT * 100 / ITERATIONS ))%)"
    echo "  - K3s : $K3S_COUNT ($(( K3S_COUNT * 100 / ITERATIONS ))%)"
else
    echo "  - No cluster markers found in the response bodies."
fi
echo "======================================================="
Script for testing failover and successful rate
import requests
import time
import datetime
import sys
import socket
import argparse
from urllib.parse import urlparse
from io import StringIO
import contextlib

# --- Function Definitions ---

def resolve_ip(url):
    """Extracts the hostname from the URL and resolves its primary IP address."""
    try:
        hostname = urlparse(url).netloc.split(':')[0]
        ip_address = socket.gethostbyname(hostname)
        return hostname, ip_address
    except socket.gaierror:
        return None, "DNS Resolution Failed"
    except Exception as e:
        return None, f"Error resolving IP: {e}"

def check_service_status(url, timeout):
    """Attempts to connect to the given URL and returns status code and latency."""
    try:
        start_time = time.time()
        response = requests.get(url, timeout=timeout)
        latency_ms = (time.time() - start_time) * 1000
        return response.status_code, latency_ms
    except requests.exceptions.RequestException:
        return 0, -1

@contextlib.contextmanager
def captured_output():
    """Context manager to capture stdout and restore it when done."""
    new_out, old_out = StringIO(), sys.stdout
    try:
        sys.stdout = new_out
        yield sys.stdout
    finally:
        sys.stdout = old_out

def run_health_check_process(args):
    """
    Runs the monitoring loop using arguments passed via CLI.
    """
    # State Variables
    service_state = "UP"
    failover_start_time = None
    failover_downtimes = []
    success_count = 0
    total_latency_ms = 0

    print(f"✅ Starting Failover Downtime Check for: {args.url}")
    print(f"   Downtime trigger: **{args.fail_code}** | Recovery trigger: **{args.up_code}**")
    print(f"   Interval: {args.interval}s | Total Checks: {args.checks}")
    print("-" * 100)

    print(f"{'Timestamp':<23} | {'Status':<15} | {'Latency':<10} | {'Resolved IP':<15} | Downtime")
    print("-" * 100)

    _, ip_at_start = resolve_ip(args.url)

    for check_number in range(1, args.checks + 1):
        timestamp = datetime.datetime.now().strftime("%Y-%m-%d %H:%M:%S")
        current_time = time.time()
        downtime_log = ""

        hostname, ip_address = resolve_ip(args.url)
        status_code, latency_ms = check_service_status(args.url, args.timeout)

        # --- FAILOVER LOGIC ---
        if status_code == args.fail_code and service_state == "UP":
            service_state = "FAILOVER_IN_PROGRESS"
            failover_start_time = current_time
            conclusion = f"🟠 **FAILOVER**"
            downtime_log = f"Downtime START. IP: {ip_address}"

        elif status_code == args.up_code and service_state == "FAILOVER_IN_PROGRESS":
            service_state = "UP"
            downtime_duration = current_time - failover_start_time
            failover_downtimes.append(downtime_duration)
            conclusion = f"🟢 **RECOVERY**"
            downtime_log = f"Downtime END. Duration: {downtime_duration:.3f}s"

        elif status_code == args.fail_code and service_state == "FAILOVER_IN_PROGRESS":
            conclusion = f"🟠 **FAILOVER**"

        elif status_code == args.up_code:
            conclusion = f"🟢 **UP**"
            success_count += 1
            total_latency_ms += latency_ms

        else:
            if status_code == 0:
                conclusion = f"🔴 **DOWN/ERR**"
            elif status_code == -1:
                conclusion = f"🔴 **DNS ERR**"
            else:
                conclusion = f"🟠 **WARNING({status_code})**"

        print(f"{timestamp:<23} | {conclusion:<15} | {f'{latency_ms:.2f} ms':<10} | {ip_address:<15} | {downtime_log}")

        if check_number < args.checks:
            time.sleep(args.interval)

    average_latency = total_latency_ms / success_count if success_count > 0 else 0

    return {
        "start_time": datetime.datetime.now().strftime("%Y-%m-%d %H:%M:%S"),
        "endpoint_url": args.url,
        "initial_ip_resolved": ip_at_start,
        "total_checks_performed": args.checks,
        "successful_checks": success_count,
        "average_successful_latency_ms": average_latency,
        "total_failover_events": len(failover_downtimes),
        "failover_downtimes_sec": failover_downtimes,
    }

def write_summary_file(filename, log_content, summary_data, up_code):
    """Writes the entire log content and the summary to the output file."""

    final_summary = f"\n\n{'='*20} FAILOVER DOWNTIME SUMMARY {'='*20}\n"
    final_summary += f"Run Start Time: {summary_data['start_time']}\n"
    final_summary += f"Endpoint URL: {summary_data['endpoint_url']}\n"
    final_summary += f"Initial IP Resolved: {summary_data['initial_ip_resolved']}\n"
    final_summary += "-" * 60 + "\n"
    final_summary += f"Total Checks Performed: {summary_data['total_checks_performed']}\n"
    final_summary += f"Successful Checks (Status {up_code}): {summary_data['successful_checks']}\n"
    final_summary += f"Average Successful Latency: {summary_data['average_successful_latency_ms']:.2f} ms\n"
    final_summary += "-" * 60 + "\n"
    final_summary += f"Total Failover Events: {summary_data['total_failover_events']}\n"

    if summary_data['total_failover_events'] > 0:
        downtimes = summary_data['failover_downtimes_sec']
        avg_downtime = sum(downtimes) / len(downtimes)
        final_summary += f"Average Failover Downtime: {avg_downtime:.3f} seconds\n"
        for i, dt in enumerate(downtimes):
            final_summary += f"  - Event {i+1}: {dt:.3f}s\n"

    final_summary += "="*60 + "\n\nFull Log:\n"

    try:
        with open(filename, "w") as f:
            f.write(final_summary)
            f.write(log_content)
        print(f"\n✅ Process Complete. Results written to: **{filename}**")
    except IOError as e:
        print(f"\n❌ **ERROR:** Could not write file. {e}")

# --- Main CLI Entry Point ---
if __name__ == "__main__":
    parser = argparse.ArgumentParser(description="Monitor service failover and downtime durations.")

    # Positional Argument (Required)
    parser.add_argument("url", help="The URL of the service to monitor (e.g., http://example.com)")

    # Optional Arguments with Defaults
    parser.add_argument("-i", "--interval", type=float, default=0.5, help="Seconds between checks (default: 0.5)")
    parser.add_argument("-c", "--checks", type=int, default=150, help="Total number of checks to run (default: 150)")
    parser.add_argument("-o", "--output", default="failover_summary.log", help="Output log filename")
    parser.add_argument("--up-code", type=int, default=200, help="HTTP code representing 'UP' (default: 200)")
    parser.add_argument("--fail-code", type=int, default=503, help="HTTP code that triggers downtime count (default: 503)")
    parser.add_argument("--timeout", type=int, default=3, help="Request timeout in seconds (default: 3)")

    args = parser.parse_args()

    with captured_output() as buffer:
        try:
            summary = run_health_check_process(args)
        except KeyboardInterrupt:
            print("\nStopped by user.")
            sys.exit(0)

    log_output = buffer.getvalue()
    write_summary_file(args.output, log_output, summary, args.up_code)
Note
As I related, the IAM was created not able to delete any record, so you need to manual delete exist record because ExternalDNS will prevent to change the new strategies for exist record.
INSIGHT: FailOver Routing (Active-Passive Architecture)
AWS Route 53 efficiently manages traffic between Primary and Secondary resources in an Active-Passive architecture. Key technical observations include:
- Primary-Only Routing: Traffic is strictly directed to the Primary instance. This behavior remains consistent regardless of the DNS resolver being used (e.g., Google DNS
8.8.8.8or Cloudflare1.1.1.1), as the resolver simply fetches the authoritative record designated by the policy. - Health Check Dependency: Failover is triggered only when the Primary resource is marked as Unhealthy via a Route 53 Health Check. Upon failure detection, Route 53 automatically updates the DNS response to point toward the Secondary (standby) instance.
- Architectural Constraint: While this strategy is excellent for high availability and disaster recovery, it does not support “intelligent” routing. Since traffic is forced to the Primary by design, the system cannot optimize for performance or proximity during normal operation.
**INSIGHT: Latency-Based Routing (Active-Active Architecture) 🌟 (Recommended)
AWS Route 53 performs exceptionally well at managing traffic across multiple AWS Regions (e.g., Hong Kong ap-east-1 and Singapore ap-southeast-1). Here are the key insights from this strategy:
- Latency-Optimized Steering: Route 53 directs requests to the region providing the lowest network latency. While minor network fluctuations (100–200ms) may occur based on ISP routing, the service consistently ensures users connect to the most performant cluster relative to their location.
- Resolver Accuracy and Testing: Testing with specific DNS resolvers (e.g., Google
8.8.8.8or Cloudflare1.1.1.1) viadigandcurlconfirms that Route 53 accurately returns the expected regional endpoints. For instance, when using a VPN to simulate an American source, Route 53 correctly identifies the lowest-latency path—routing to Hong Kong if it offers superior performance compared to other global nodes. - Hybrid Intelligence & High Availability: This strategy satisfies both “intelligent routing” and “failover” requirements. It leverages DNS-level metrics to optimize user experience while providing automated failover if a regional cluster becomes unavailable.
- Kubernetes Integration: This workflow is easily automated using ExternalDNS, which synchronizes Kubernetes Ingress or Service resources with Route 53 records, simplifying multi-region management.
- Advanced Precision: To achieve even higher accuracy in DNS resolution, you may consider Geolocation or Geoproximity routing. These policies provide more granular control over traffic distribution based on the physical location of the user, which can often yield more predictable results than latency alone.
Result Latency and Targeting Testing
On K3s Server
# Testing with non't setup DNS Resolved (127.0.0.1:53)
./testing-glb-target-refine.sh externaldns-nginx.yourroute53.com 20
Testing 20 requests. Results saving to cluster_efficiency.log...
Request 1: DNS 196ms | HTTP 133.199000ms | Cluster: RKE2
Request 2: DNS 1ms | HTTP 125.921000ms | Cluster: RKE2
Request 3: DNS 1ms | HTTP 115.818000ms | Cluster: RKE2
Request 4: DNS 0ms | HTTP 116.072000ms | Cluster: RKE2
Request 5: DNS 0ms | HTTP 129.238000ms | Cluster: RKE2
Request 6: DNS 0ms | HTTP 114.375000ms | Cluster: RKE2
Request 7: DNS 1ms | HTTP 114.054000ms | Cluster: RKE2
Request 8: DNS 1ms | HTTP 117.414000ms | Cluster: RKE2
Request 9: DNS 0ms | HTTP 114.940000ms | Cluster: RKE2
Request 10: DNS 0ms | HTTP 126.832000ms | Cluster: RKE2
Request 11: DNS 0ms | HTTP 127.225000ms | Cluster: RKE2
Request 12: DNS 0ms | HTTP 119.652000ms | Cluster: RKE2
Request 13: DNS 0ms | HTTP 117.816000ms | Cluster: RKE2
Request 14: DNS 1ms | HTTP 114.571000ms | Cluster: RKE2
Request 15: DNS 0ms | HTTP 127.732000ms | Cluster: RKE2
Request 16: DNS 1ms | HTTP 117.765000ms | Cluster: RKE2
Request 17: DNS 0ms | HTTP 114.861000ms | Cluster: RKE2
Request 18: DNS 0ms | HTTP 116.035000ms | Cluster: RKE2
Request 19: DNS 1ms | HTTP 118.035000ms | Cluster: RKE2
Request 20: DNS 0ms | HTTP 115.018000ms | Cluster: RKE2

================= PERFORMANCE SUMMARY =================
Total Iterations: 20
Avg DNS Resolution: 10.15 ms
Avg HTTP Response:   119.82 ms
-------------------------------------------------------
Traffic Distribution:
  - RKE2: 20 (100%)
  - K3s : 0 (0%)
=======================================================

# Testing with setup DNS Resolved (8.8.8.8:53)
./testing-glb-target-refine.sh externaldns-nginx.yourroute53.com 20 8.8.8.8
Testing 20 requests. Results saving to cluster_efficiency.log...
Request 1: DNS 10ms | HTTP 1.923000ms | Cluster: K3s
Request 2: DNS 8ms | HTTP 2.037000ms | Cluster: K3s
Request 3: DNS 7ms | HTTP 1.320000ms | Cluster: K3s
Request 4: DNS 13ms | HTTP 1.058000ms | Cluster: K3s
Request 5: DNS 7ms | HTTP 1.042000ms | Cluster: K3s
Request 6: DNS 7ms | HTTP .993000ms | Cluster: K3s
Request 7: DNS 2ms | HTTP 2.402000ms | Cluster: K3s
Request 8: DNS 13ms | HTTP .903000ms | Cluster: K3s
Request 9: DNS 59ms | HTTP 1.713000ms | Cluster: K3s
Request 10: DNS 3ms | HTTP 1.093000ms | Cluster: K3s
Request 11: DNS 2ms | HTTP 1.116000ms | Cluster: K3s
Request 12: DNS 14ms | HTTP 1.155000ms | Cluster: K3s
Request 13: DNS 2ms | HTTP .983000ms | Cluster: K3s
Request 14: DNS 3ms | HTTP 1.067000ms | Cluster: K3s
Request 15: DNS 2ms | HTTP 1.187000ms | Cluster: K3s
Request 16: DNS 2ms | HTTP .907000ms | Cluster: K3s
Request 17: DNS 2ms | HTTP .969000ms | Cluster: K3s
Request 18: DNS 9ms | HTTP 1.009000ms | Cluster: K3s
Request 19: DNS 2ms | HTTP 1.011000ms | Cluster: K3s
Request 20: DNS 2ms | HTTP .951000ms | Cluster: K3s

================= PERFORMANCE SUMMARY =================
Total Iterations: 20
Avg DNS Resolution: 8.45 ms
Avg HTTP Response:   1.24 ms
-------------------------------------------------------
Traffic Distribution:
  - RKE2: 0 (0%)
  - K3s : 20 (100%)
=======================================================
Out of Server
# Testing with non't setup DNS Resolved (127.0.0.1:53)
./testing-glb-target-refine.sh externaldns-nginx.yourroute53.com 20
Testing 20 requests. Results saving to cluster_efficiency.log...
Request 1: DNS 345ms | HTTP 75.597000ms | Cluster: RKE2
Request 2: DNS 0ms | HTTP 155.296000ms | Cluster: RKE2
Request 3: DNS 0ms | HTTP 147.799000ms | Cluster: RKE2
Request 4: DNS 0ms | HTTP 158.722000ms | Cluster: RKE2
Request 5: DNS 0ms | HTTP 153.367000ms | Cluster: RKE2
Request 6: DNS 0ms | HTTP 90.236000ms | Cluster: RKE2
Request 7: DNS 0ms | HTTP 55.238000ms | Cluster: RKE2
Request 8: DNS 0ms | HTTP 215.486000ms | Cluster: RKE2
Request 9: DNS 0ms | HTTP 255.261000ms | Cluster: RKE2
Request 10: DNS 0ms | HTTP 183.795000ms | Cluster: RKE2
Request 11: DNS 0ms | HTTP 126.558000ms | Cluster: RKE2
Request 12: DNS 0ms | HTTP 151.385000ms | Cluster: RKE2
Request 13: DNS 0ms | HTTP 256.725000ms | Cluster: RKE2
Request 14: DNS 0ms | HTTP 152.590000ms | Cluster: RKE2
Request 15: DNS 0ms | HTTP 148.759000ms | Cluster: RKE2
Request 16: DNS 0ms | HTTP 159.916000ms | Cluster: RKE2
Request 17: DNS 0ms | HTTP 254.522000ms | Cluster: RKE2
Request 18: DNS 0ms | HTTP 154.938000ms | Cluster: RKE2
Request 19: DNS 0ms | HTTP 76.316000ms | Cluster: RKE2
Request 20: DNS 0ms | HTTP 156.849000ms | Cluster: RKE2

================= PERFORMANCE SUMMARY =================
Total Iterations: 20
Avg DNS Resolution: 17.25 ms
Avg HTTP Response:   156.46 ms
-------------------------------------------------------
Traffic Distribution:
  - RKE2: 20 (100%)
  - K3s : 0 (0%)
=======================================================

# Testing with setup DNS Resolved (8.8.8.8:53)
./testing-glb-target-refine.sh externaldns-nginx.yourroute53.com 20 8.8.8.8
Testing 20 requests. Results saving to cluster_efficiency.log...
Request 1: DNS 120ms | HTTP 164.963000ms | Cluster: RKE2
Request 2: DNS 61ms | HTTP 180.645000ms | Cluster: RKE2
Request 3: DNS 75ms | HTTP 97.155000ms | Cluster: RKE2
Request 4: DNS 60ms | HTTP 32.411000ms | Cluster: RKE2
Request 5: DNS 115ms | HTTP 97.499000ms | Cluster: RKE2
Request 6: DNS 55ms | HTTP 176.205000ms | Cluster: RKE2
Request 7: DNS 178ms | HTTP 179.325000ms | Cluster: RKE2
Request 8: DNS 172ms | HTTP 182.365000ms | Cluster: RKE2
Request 9: DNS 25ms | HTTP 29.024000ms | Cluster: RKE2
Request 10: DNS 33ms | HTTP 35.612000ms | Cluster: RKE2
Request 11: DNS 50ms | HTTP 28.684000ms | Cluster: RKE2
Request 12: DNS 25ms | HTTP 104.481000ms | Cluster: RKE2
Request 13: DNS 48ms | HTTP 175.252000ms | Cluster: RKE2
Request 14: DNS 177ms | HTTP 177.777000ms | Cluster: RKE2
Request 15: DNS 177ms | HTTP 33.153000ms | Cluster: RKE2
Request 16: DNS 119ms | HTTP 29.989000ms | Cluster: RKE2
Request 17: DNS 25ms | HTTP 174.120000ms | Cluster: RKE2
Request 18: DNS 178ms | HTTP 32.807000ms | Cluster: RKE2
Request 19: DNS 115ms | HTTP 75.680000ms | Cluster: RKE2
Request 20: DNS 178ms | HTTP 178.753000ms | Cluster: RKE2

================= PERFORMANCE SUMMARY =================
Total Iterations: 20
Avg DNS Resolution: 99.30 ms
Avg HTTP Response:   109.29 ms
-------------------------------------------------------
Traffic Distribution:
  - RKE2: 20 (100%)
  - K3s : 0 (0%)
=======================================================
Failover Testing
The configuration is set when execute the experiment
✅ Starting Failover Downtime Check for: http://externaldns-nginx.yourroute53.com
   Downtime trigger: **503** | Recovery trigger: **200**
   Interval: 0.5s | Total Checks: 200
The result got it after the testing
==================== FAILOVER DOWNTIME SUMMARY ====================
Run Start Time: 2025-12-23 16:45:47 (Actual: 2025-12-23 16:43:06)
Endpoint URL: http://externaldns-nginx.yourroute53.com
Initial IP Resolved: 203.171.30.152
------------------------------------------------------------
Total Checks Performed: 200
Successful Checks (Status 200): 88
Average Successful Latency: 424.73 ms
------------------------------------------------------------
Total Failover Events: 2
Average Failover Downtime: 38.889 seconds
  - Event 1: 59.358s
  - Event 2: 18.420s
============================================================
The Conclusion of Experiment
When I try to perform and take the experiment with ExternalDNS and also with Route53, I have few insight for this oscassion, especially with impressive with Latency Based Routing Strategy of Route53
- Result of Latency and Target Routing are truly impressive with high accuracy and when I set the additional DNS for domain resolved, it’s response with high-perform with latency not over
10ms, what the performance. But I believe when you operate this strategy in real traffic, it will encounter a lot of troubles, but generally it gave me the better result than I expect, compared with Alibaba Cloud DNS on the previous session with 1+ point more for Route53 - Result of Failover and Downtime chaos are also great for few points, I see with these routing strategies, it can occur the failover implementation, but Route53 prefer the failover routing than ever, but well it come with high-impact value. The downtime change unavailable to available can approve, but it can do better with what I said, e.g: Optimize TTL, Optimize Heath-check and mask downtime for service in Kubernetes, but not to say I have more work to enhance when get ready with these routing strategy, but some how it’s having great point for considering.
- I know in the last, AWS is expensive and everyone know it, with these health-check template and small request time for health-check, it will cost us a bit for around
3$but honestly if you approve with this point, I think your server will have great ressilence to handoff and ensure the high-availability of system. If I have more options to choose, I think AWS Global Accelerator that been promised to brink back more efficiency for problem multi-cluster in AWS Cloud. Explore more at AWS - Operating a multi-regional stateless application using Amazon EKS
Conclusion

Success
That wraps up this post! I know I still owe you a deep dive into the most critical part—how the full stack handles ExternalDNS with Route53 in a multi-cluster environment. I want to ensure the compatibility and reliability are 100% before sharing, so stay tuned for a major update on that experiment soon!
Quote
This really is the final technical post of the year! As the holidays approach, I hope all your deployments run smoothly and perfectly. I am so incredibly grateful for your support throughout this journey.
I’ll be taking a well-deserved break and working on a “Year in Review” recap. I look forward to seeing you all again in early 2026! It’s been a great year—now go enjoy time with your family and have a fantastic holiday. Merry Christmas and a Happy New Year! See you all soon! 🍻